Search the Community
Showing results for tags 'bike'.
-
Does anyone have a good set of eyebrows from a 2 gen they would like to sell? I would like to add them to the front of my sidecar to match the bike.
-
 Well folks, I have been having some weird issues with my 2001 RSV and I am not really sure if they are in fact issues or related so here we go... Summary of 'symptoms': 1) Engine cut out (like someone hit the cut off switch; engine died only, no stumbling/starving for fuel, no interruption on the radio) when shifting from first to second and from second to first 2) Engine sometimes cranks for a long time before starting (happens hot or cold) More detailed explanations of each: (1) It was a slightly cooler morning (30s-40s ish) but not any cooler than it had been in prior weeks, and I did what I ALWAYS do before leaving for work. Come out to the garage, load my crap in the trunk, turn the fuel on, start the bike (no choke necessary - my garage stays reasonably warm), back out of the garage, give the bike 10-20 seconds, tweak the throttle to check for proper warm-up time, all is good so I take off. While driving up the road, no more than a few hundred yards from my house (somewhere between 20 and 30 mph) I go to shift into second, as soon as I push the shift lever the motor dies. It was a near instant cut out - ie no starving for fuel, no stumbling, no chugging etc. The first thing I check is the engine cut off switch (sometimes I bump it with my thumb), then the side stand, all is good so I pop the clutch and it starts right back up. I immediately u-turn and roll back home (I live downhill from where I was), pull in the drive way and inspect stuff. I turn the key off and back on to check for the fuel pump noise (which was present and clicking like it should). I checked the side-stand switch, clutch safety switch, etc etc and all seemed fine. Decided to give it another go, bike started right up and I rode to work with no problems. This happed 2-3 weeks ago. I had assumed that I had maybe not let the bike warm up enough, tweaked the throttle while shifting and maybe it cut out. This morning, I rode in (temperature ~70) and stopped at the bank. The bike is plenty warm at this point. Pulling out of the bank, all goes fine until I start to slow down for a stop sign, again a few hundred yards from the bank, go to down shift into first and the engine dies. Just like before, all of the electronics stayed on without interruption (radio played continuously, etc etc) and it was like I had hit the engine shut off switch but I did not. I do not recall hitting any big bumps or whatever either, it was a smooth patch of road. I do not recall this morning if I tapped the starter to restart the bike or just popped the clutch; either way it started right back up and it ran fine the rest of the way back to work. When I left my house, I know for sure the fuel pump did its clickity thing because I heard it. As a result of issue (2) I have been making a point of shutting the petcock off 2-4 miles from my house so that I can verify the pump operational everytime I start my bike. The fact that this engine cut out when shifting has happened twice now has be beginning to think that maybe it is a real issue or at least something to investigate. (2) Issue number two that may or may not be related is the occasional really long cranking time required to start my bike on occasion. I first noticed it last Thursday (8 days ago) I was about 200 miles into a ride and it started to get dark, I pulled over to the shoulder to change out my sunglasses for my clear safety glasses. All was running well until I went to start my bike. I hit the starter button and the bike cranked but did not start right away like it usually does. I cranked it in a few bursts of about 3-5 seconds each then shut off the ignition, turned the petcock to off and let the bike sit for a minute or so (thinking maybe it was flooded). After letting it sit for 1-2 minutes I turned the key back to the on position, hit the starter and it fired right up. Turned the gas back to the ON position then took off. The bike ran fine for the rest of the evening. Friday morning, it was around 40 with rediculously high humidity (70+%) and the dew was really thick. [i was parked at a hotel as I was traveling for work]. I went out loaded up for the day and went to start the bike and it behaved similarly, it took several rounds of cranking before it eventually started (I turned the gas OFF over night and made sure to pull the choke all of the way out and turn the gas ON before trying to start it). After some cranking, similar to the previous day's behavior, it started right up and ran fine for my ride into where I was working that day and then back to the hotel again, that evening. The next day started off the same, weather wise, and the bike started without hesitation in the morning. I left work around noon and stopped by the local motorsickle dealership to paroose a bit before heading back home and when I went to restart my bike (after chatting with someone who was looking at a purdy RSTD adn telling him how reliable these bikes are ) I had a repeat of these symptoms - long cranking time before actually starting). The bike ran fine all ~300 miles back home so . I was careful to not stop on the side of the road and I stopped for fuel every 100 miles just in case it was bad gas or something. Since then this long cranking symptom has been present a few times and it seems to occur at inconsistent intervals (sometimes when the bike is warm and sometimes when it is cold). I drained my float bowles and the first round of fuel that came out looked awfully clear and smelled very weakly of gasoline. I left one of the float drain screws open and flowing into a glass jar while allowing the fuel pump to cycle and it pumped out just fine. After that first round the fuel came out looking like I expect good fuel to look and smell. For kicks, I did mix some fresh fuel with a few OZ of sea foam and pumped it straight into the carbs and let it sit that way overnight, re-drained in the morning then put fresh fuel in the tank and rode for a little bit. Again, driving/riding wise the engine seems to run fine. I have had a couple of these long crank times since I did the carb bowl drain, but it has only been maybe 2 or 3 times since last Saturday (my bike is my primary mode of transportation and it has been started several times within the last week). I feel like this could be a weak, intermittant or failing fuel pump but am not really sure what else it could be. My next course of action will be to change the fuel filter (current one has less than 10k miles on it, but if I did get a bit of bad fuel somewhere, I know it can clog in a hurry) and go ahead and put in new spark plugs (I am approaching 8k miles on the current set of plugs). I checked the header pipes during warm up and after riding for a while (IR thermometer) and all four are within 10 or so degrees of each other. I have been paying extra close attention to the fuel pump 'clickage' [suspecting a weak or intermittent fuel pump] and am strongly considering just replacing the dumb thing so I don't get stranded somewhere... I am at a loss for what else could be causing these symptoms and if these are even related to each other so I am all ears for suggestions of things to check, inspect, pay attention to or whatever. Thanks a lot! As usual, I am coming up to a departure date for a ~1-2 week ~6k mile ride and crap starts going wrong... yea me. :sign09:
 -
My Neutral light doesn't come on and as such I cannot let my bike idle while on the kickstand. This is even IF it is in neutral. Where do I look first?
-
 Can't get the rear drive oil filler plug out on my red bike. It seems stuck fast. I have tried some heat and currently have some kroil soaking on top of it. Its dark now, so I'll leave it soak till tomorrow. I am afraid of deforming the hex of the plug if I put on too much force. I havent tried the drain plug bolt yet but everything is very dry on this bike so I'll bet it will be a problem too. Suggestions? Thanks, Brian H.
 -
Not too long before installing the HID on the bike, my radio had been acting up.. I had thought it was a bad connection on one of the cable plugs etc but the other day, the whole thing went up and died.. Turn the ignition on, press the audio or CB button on the handle bar controller and nothing.. the controller doesn't light up, no juice or crackle or nuttin coming through the speakers. I checks all the cables, wires, ground and so on etc etc.. nothing.. I pulled the radio from my buddy's bike as we were installing his HID and yup, his radio works.. ARGH... logic says, my radio is dead. oh no.. It sounded bad for weeks prior and it finally gave up the ghost the other day.. BLECH... can't even play MP3s as everything goes through that box.. Does any one know what the YELLOW cable does? So, here's the question.. Its a 2006 Midnight Venture. Its a US bike here in Canada. I have no warranty here in Canada but I can get warranty work done in the USA if I am down there and can find a sympathetic dealer to help.. Is the radio a warranty item? If so, then I might be in luck as I'm going on my long road trip through the USA next month and could find a dealer in Maine to do a swap.. only takes 12 minutes to swap it out.. OR... find someone who could help me by doing a swap? if NOT a warranty item, then where best to find a replacement radio? I'm guessing that the previous two owners had done such a bad wiring job under the hood before I bought the bike, I had so many problems with the steering locks cutting everything that it weakened everything and poof... it gave up the ghost. Hoping for some help.. Hard to ride in comfort and fun without the tunes.. =)
-
Last evening I fired up the bike - generally takes a bit to warm up and smooth out. I twist the throttle and it acts like it isn't getting fuel and the tach goes to 0. Let off and it goes back up again. Darn bike acts like it runs on 2 cylinders. Turned around to bring it home. then it starts running just fine - open it up and it takes off like Boomer leaving his woman. Any ideas about what happened?
-
.thumb.jpg.4e1b3809c4633f365ba67afc212f21df.jpg) I've posted about this before, and there is even a tech article I wrote under Engine and Drivetrain on how to do it. But I continue to be amazed by how screwed up and WAY OFF the factory settings every RSV seems to be! So I just gotta keep proselytizing about it . . . At Don's maintenance day I just reset the floats on three more RSVs, and out of the 12 carbs, only ONE (one carb, not one bike) was even remotely close to the factory spec! And that was the first carb from ANY of the RSVs I have done that wasn't set unbelievably high. Too-high float levels cause rich mixtures and excessive fuel use at speed. Up to now I have only been able to report on the 10% improvement in fuel economy I got from my own bike by properly setting the fuel level. Others for whom I have done the work all said it seemed better, but they didn't go to the trouble of having detailed before and after comparisons. Well, now I have another. Four of us on RSVs rode together from Texas up to Don's in Ohio, about 1,250 miles. I paid attention to how much gas each of us took at each gas stop. Since we were all riding in the same conditions and the same speeds on the same roads, it was an ideal way to get some side-by-side comparisons. I generally took less gas at every stop, and Ponch took the most - every time. And the difference was quite significant. I never tried to calculate the MPG for each bike, but I know he was buying a lot more gas over and over again for 1,200 miles. So that is the "before" state. On Friday morning while I had nothing else to do, Ponch and I pulled his carbs and reset the float levels to the specs from the Yamaha shop manual. The only other change we did was to put in new plugs while we had things apart. To be completely open here, there was some evidence that Ponch's RF plug was not fireing as well as the others. After maintenance day, Ponch and I rode together on the way back to Texas. This was another fantastic oportunity for us to get a real life side-by-side comparison of two RSVs under identical conditions for many, many tanks of gas, and now with Ponch's bike having the floats properly set. Guess what? Ponch and I took virtually the exact same gas at every single gas stop, no matter if we had been doing 50 in the twisties or 80 on the superslab. That is a HUGE change from what he was getting on the ride up just two days before. Actually, I tell a little bit of a lie - while we weren't trying to compare exact fill levels by looking inside the tanks, Ponch generally took just a tad less than I did at most stops - probably just 0.1 gallons on a 5 gallon fill. So Ponch's bike went from being the worst of four in MPG (by a long shot), to actually being the best. We have no way of being certain how much credit the new plugs get for this, but I'm betting the float levels were the biggest piece. OK, I'll stop for now. But if you haven't had the float levels checked on your RSV, your really should think about it. Even if it is brand new. By all means, do not assume the factory got them even close to the right level!! Ride safe, Goose
I've posted about this before, and there is even a tech article I wrote under Engine and Drivetrain on how to do it. But I continue to be amazed by how screwed up and WAY OFF the factory settings every RSV seems to be! So I just gotta keep proselytizing about it . . . At Don's maintenance day I just reset the floats on three more RSVs, and out of the 12 carbs, only ONE (one carb, not one bike) was even remotely close to the factory spec! And that was the first carb from ANY of the RSVs I have done that wasn't set unbelievably high. Too-high float levels cause rich mixtures and excessive fuel use at speed. Up to now I have only been able to report on the 10% improvement in fuel economy I got from my own bike by properly setting the fuel level. Others for whom I have done the work all said it seemed better, but they didn't go to the trouble of having detailed before and after comparisons. Well, now I have another. Four of us on RSVs rode together from Texas up to Don's in Ohio, about 1,250 miles. I paid attention to how much gas each of us took at each gas stop. Since we were all riding in the same conditions and the same speeds on the same roads, it was an ideal way to get some side-by-side comparisons. I generally took less gas at every stop, and Ponch took the most - every time. And the difference was quite significant. I never tried to calculate the MPG for each bike, but I know he was buying a lot more gas over and over again for 1,200 miles. So that is the "before" state. On Friday morning while I had nothing else to do, Ponch and I pulled his carbs and reset the float levels to the specs from the Yamaha shop manual. The only other change we did was to put in new plugs while we had things apart. To be completely open here, there was some evidence that Ponch's RF plug was not fireing as well as the others. After maintenance day, Ponch and I rode together on the way back to Texas. This was another fantastic oportunity for us to get a real life side-by-side comparison of two RSVs under identical conditions for many, many tanks of gas, and now with Ponch's bike having the floats properly set. Guess what? Ponch and I took virtually the exact same gas at every single gas stop, no matter if we had been doing 50 in the twisties or 80 on the superslab. That is a HUGE change from what he was getting on the ride up just two days before. Actually, I tell a little bit of a lie - while we weren't trying to compare exact fill levels by looking inside the tanks, Ponch generally took just a tad less than I did at most stops - probably just 0.1 gallons on a 5 gallon fill. So Ponch's bike went from being the worst of four in MPG (by a long shot), to actually being the best. We have no way of being certain how much credit the new plugs get for this, but I'm betting the float levels were the biggest piece. OK, I'll stop for now. But if you haven't had the float levels checked on your RSV, your really should think about it. Even if it is brand new. By all means, do not assume the factory got them even close to the right level!! Ride safe, Goose -
 Hi All, I have been lurking for a while and posted a few things, mostly trying to get some more knowledge before tearing into my bike getting it ready for Spring. Great site and lots of information here! Here is the story, My wife and I started riding 2 years ago and just fell in love with it. We have a great group of friends and family who we get to ride with and it has been a new and awesome experience for us. We started on a 1982 Honda Silverwing Interstate with 7,000 original miles on it. We put 10K miles on it over the last 2 summers and it was a great starter bike for us. I sold is on E-Bay and it now has a nice new warm home in Florida. I have been looking at Royal Stars for about a year and decided that is what will be our next bike,.. Well I found this 1997 Yamaha Royal Star Tour Classic with 32K miles on it: http://i1306.photobucket.com/albums/s564/Darrin-GT/1997%20Yamaha%20Royal%20Star%20Makeover/1996YamahaRoyalStar001_zps4b5dccf3.jpg http://i1306.photobucket.com/albums/s564/Darrin-GT/1997%20Yamaha%20Royal%20Star%20Makeover/1996YamahaRoyalStar002_zps5db08446.jpg http://i1306.photobucket.com/albums/s564/Darrin-GT/1997%20Yamaha%20Royal%20Star%20Makeover/1996YamahaRoyalStar003_zps3b34d541.jpg http://inlinethumb01.webshots.com/33920/2141459730101950171S600x600Q85.jpg http://inlinethumb63.webshots.com/47038/2219161110101950171S600x600Q85.jpg It was at the Auto Auction (I own a car lot) late last fall. I was high bidder on it for 2K and bought it for $2,220.00 and rode it 60 Miles back to my shop the same day. It was too great of a deal to pass up! My wife and I are very excited about it! I put a new rear tire and rear brakes on it last fall, was able to put about 200 miles on it before snow flew and it has been sitting ever in my shop since. Few other things that I have done to it was buy a stock windshield, rear floor boards, front lowers, and a luggage rack. Since I got it from the auction I have no idea where it is as far as maintenance is concerned So now it is time to start working on it. Here are the plans: Do all of the basics Full Fluid: Change, Oil, Rear Drive, Front Forks, Tune Up, Plugs, Clean the K&N's Sync the Carbs Adjust the Valves. For Modifications: Install Fairing with full gauges: volt, Temp, Oil, and tac 6x9 Speakers Small Amp for a MP3 Player, dont want a big car radio. Tall Riders Back Rest Luggage rack Few more saftey chrome items. The plan is to start working on it in the next few days and have it all done before spring. Here are some pics of it so far: Fairing test fit: http://i1306.photobucket.com/albums/s564/Darrin-GT/1997%20Yamaha%20Royal%20Star%20Makeover/1997RoyalStarTourDeluxmakeover002_zps08625be4.jpg Side Shot tank, seats, side motor covers removed: http://i1306.photobucket.com/albums/s564/Darrin-GT/1997%20Yamaha%20Royal%20Star%20Makeover/1997RoyalStarTourDeluxmakeover003_zps8573ebce.jpg http://inlinethumb44.webshots.com/45931/2789621260101950171S600x600Q85.jpg Didnt know the bike has K&N Filters! http://i1306.photobucket.com/albums/s564/Darrin-GT/1997%20Yamaha%20Royal%20Star%20Makeover/1997RoyalStarTourDeluxmakeover004_zps10513349.jpg http://inlinethumb52.webshots.com/45235/2789763760101950171S600x600Q85.jpg Shot of the rear quad pipes: Think they are Barons Nasty Boys http://i1306.photobucket.com/albums/s564/Darrin-GT/1997%20Yamaha%20Royal%20Star%20Makeover/1997RoyalStarTourDeluxmakeover005_zpsfd156eb7.jpg http://inlinethumb12.webshots.com/3275/2607327560101950171S600x600Q85.jpg Yamaha's Comfort Cruise Seats made by Corbin, and Tank: http://i1306.photobucket.com/albums/s564/Darrin-GT/1997%20Yamaha%20Royal%20Star%20Makeover/1997RoyalStarTourDeluxmakeover006_zpsdbda4006.jpg http://inlinethumb53.webshots.com/46708/2694000440101950171S600x600Q85.jpg Side Motor Covers to be blasted and re painted: http://i1306.photobucket.com/albums/s564/Darrin-GT/1997%20Yamaha%20Royal%20Star%20Makeover/1997RoyalStarTourDeluxmakeover007_zps1f362dd9.jpg http://inlinethumb51.webshots.com/48050/2556630150101950171S600x600Q85.jpg Fairing Backside: http://i1306.photobucket.com/albums/s564/Darrin-GT/1997%20Yamaha%20Royal%20Star%20Makeover/1997RoyalStarTourDeluxmakeover008_zps678f716f.jpg http://inlinethumb40.webshots.com/359/2310931100101950171S600x600Q85.jpg Rear seat and windshield: http://i1306.photobucket.com/albums/s564/Darrin-GT/1997%20Yamaha%20Royal%20Star%20Makeover/1997RoyalStarTourDeluxmakeover009_zps49835fea.jpg http://inlinethumb59.webshots.com/13306/2960733780101950171S600x600Q85.jpg Oil leak on the right side: http://i1306.photobucket.com/albums/s564/Darrin-GT/1997%20Yamaha%20Royal%20Star%20Makeover/1997RoyalStarTourDeluxmakeover011_zpsfb610ef2.jpg http://inlinethumb01.webshots.com/26176/2902507960101950171S600x600Q85.jpg Left shot of bike: http://i1306.photobucket.com/albums/s564/Darrin-GT/1997%20Yamaha%20Royal%20Star%20Makeover/1997RoyalStarTourDeluxmakeover012_zps33e48000.jpg http://inlinethumb45.webshots.com/46700/2436787720101950171S600x600Q85.jpg So I will keep everything in this post as progress slowly moves forward. I am sure that I will be needing some advice as I get into this project. We plan on keeping this bike for some time so if you have any suggestions or advice I would be happy to hear it! Thanks! Darrin
 -
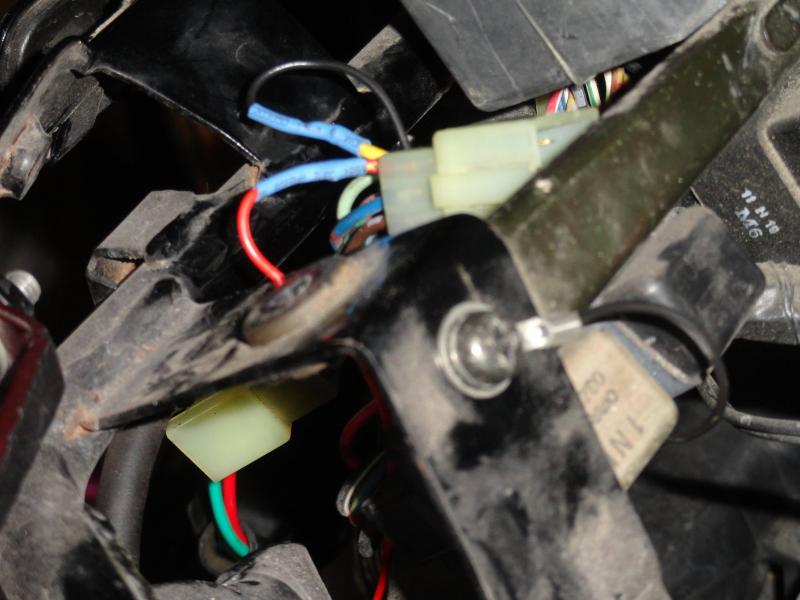
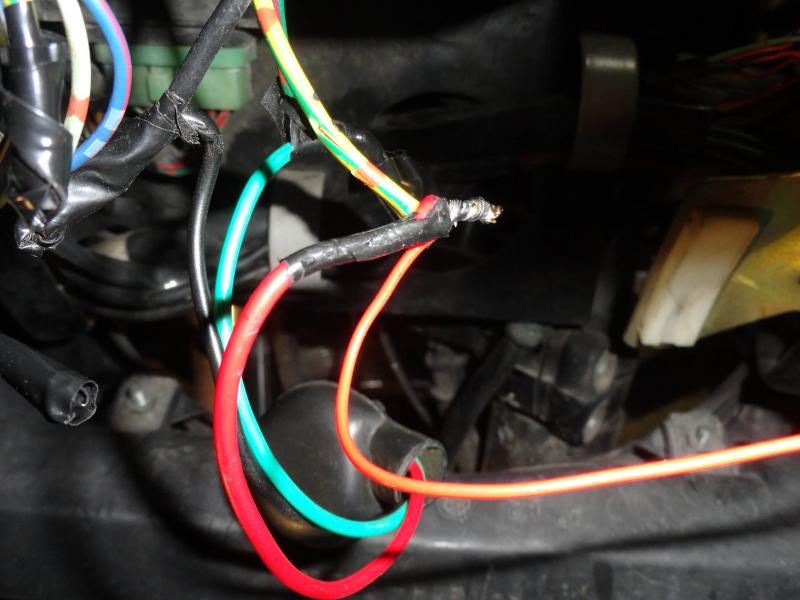
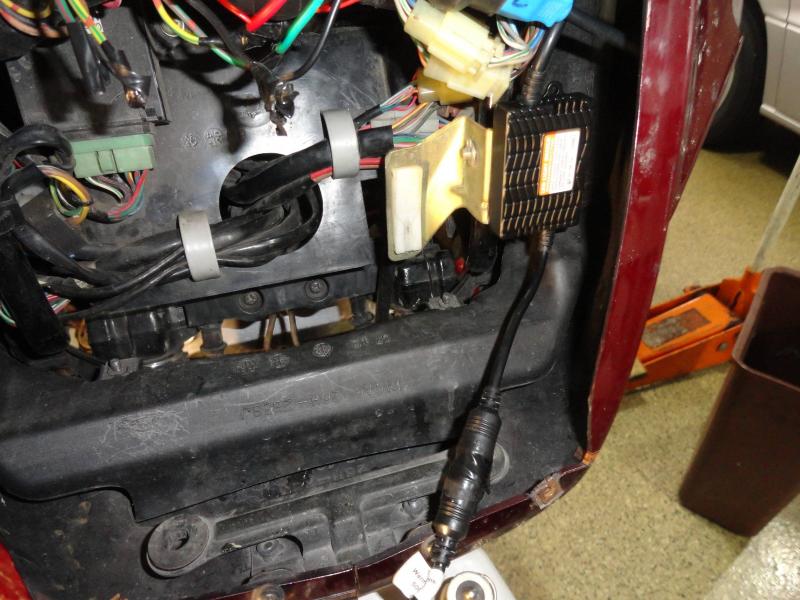
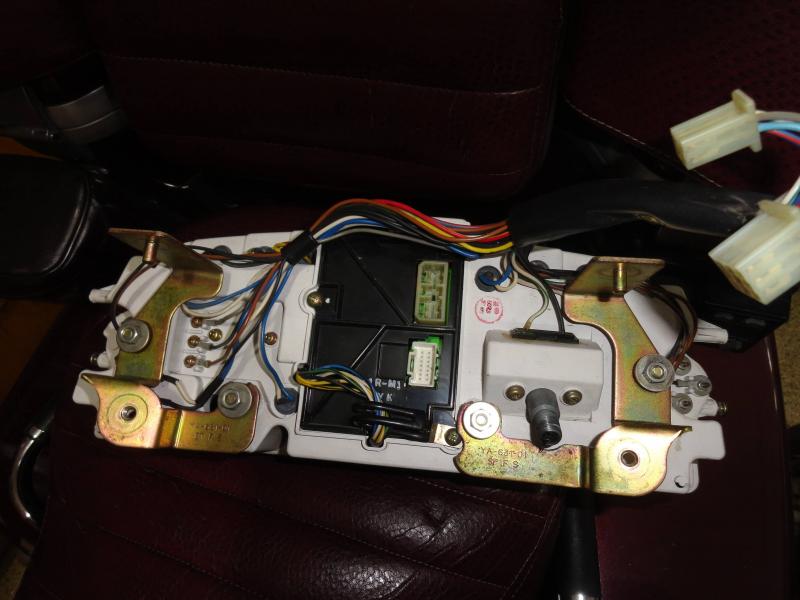
 I just bought the SpeedMetal 2200/2400 Lumen LED headlight conversion kit from CycleGear for $60. I don't know he long they'll have this sale, but they have it every so often. I wondered about the light pattern, so I removed the headlight from my bike and took it down to my workshop. I used a big wooden 'C' clamp to position it in a repeatable position. Before I took the Sylvania Silver Star bulb out of the headlight, I applied 13 volts to it and observed the light pattern on the basement wall. I marked the top of the main part of the light beam with a marker, and then repeated this with the high beam. I also marked the workbench where the 'C' clamp was so that I could put it back in the same position. I switched to the LED lamp and powered it up. There appeared to be very little difference in the beam shape or position, but of course the light beam was much brighter. The light beam on low was just a tiny bit higher, and the high beam was more than a bit higher. It looked great. I connected it to the bike, and I had the headlight alarm in the CMS on, and I couldn't switch between high and low beam. Dingy recently showed a picture of the CMS printed circuit board and also where to jumper to eliminate the alarm. http://www.venturerider.org/forum/first-generation-venture-tech-talk/92274-jumper-cmu-leds-bulbs-prevent-warning-light-coming.html Of course, the instrument panel has to be removed from the bike first. It's not a bad job, just take the windshield off and take the screws out for the front turn signals and let them hang by the wires. Look inside the turn signals mounting at the openings to the sides of the instrument panel. On each side you will see 2 phillips screws that hold the instrument panel cover to the instrument panel. Take the 2 that prevent the cover from sliding upward completely out, and loosen the 2 screws that prevent the cover from sliding toward the rear of the bike. Then just slide the cover toward the rear of the bike. To remove the instrument panel, using a 1/4” ratchet, long extension, universal joint, and 10mm socket, reach upward from the headlight opening and remove the 2 bolts from the bottom of the instrument panel. DO NOT REMOVE THE NUTS---they just hold the brackets to the instrument panel. Also when I had the bolts out of the threads, but still in the hole, I reached in from the top with a magnet tool and prevented the bolts and washers from falling when I pulled the socket off the bolt. Looking through the headlight opening, towards the left side of the bike (look right into the opening) you will find 2 connectors for the instrument panel---disconnect them. Disconnect the speedometer cable, and then pick up the instrument panel slightly to slide the top pins out of the grommets, and move the panel towards the rear of the bike slightly. Reach in and disconnect the 2 connectors on the back of the CMS (BTW, CMS=Computer Monitor System). Now remove the instrument panel. Place a soft cloth on the work bench and set the panel down face down. Take the screws out that mount the CMS, and remove the CMS. Take it out as 1 piece, there is no need to slide it apart yet. Lift the side that has the wire bracket under a screw first, and then when it's clear of the hole, slide it towards where the wire bracket was mounted. You'll see that the other side has a clear plastic piece on it that allows the panel bulb to illuminate the CMS. Separate the CMS but be careful. One board has a connector that can be pulled to separate that board. However 2 boards have a ribbon cable that you can't easily remove, so don't stress this area too much. The CMS light monitors have a magnetic proximity switch wrapped with a coil of wire. The lamp current flows through the coil, and creates a magnetic field, that closes the proximity switches. You need to solder a small piece of wire across the proximity switches for high and low beam headlights. Dingy has arrows pointing to the correct places to put the jumpers. Then re-assemble the CMS and re-install it in the instrument panel. (see picture of the back of instrument panel) (See picture #1) You can see the RLU (Reserve Lighting Unit) at the top of the picture. Follow the wiring out of it to the connector. On the motorcycle side of the connector, cut and tape the G/R, Y/G, and the light green wires (the light green isn't shown in the picture). Now, you'll be able to switch between high and low beam, and the HEADLIGHT white lamp on the instrument panel won't come on, but the blue high-beam light on the instrument panel won't work. To get that working, on the motorcycle side of the instrument panel connector, cut the Y and the R/Y wires leaving about 2” of them still on the connector. Tape the 2 wires not in the connector (that you just cut). Using two 12” lengths of 16-20 gauge connect them to the Y and the R/Y wires from the connector. I soldered mine and used shrink tubing to insulate them, but you could use butt connectors. (picture #2) Connect the Yellow wire to ground. I used a terminal and put it under the screw in the picture (picture #3). Shorten the wire before putting the terminal on it. Connect the R/Y wire to the headlight high beam lead (Y/R). On my bike, I've replaced the headlight socket, so I had soldered and taped connections to the new socket. I just untaped mine, wrapped the R/Y around the previous connection, soldered it and then taped it again. If you still have the original headlight socket, use a pocket knife and strip a short length of the Y/R wire, wrap the R/Y wire around the bare wire, solder it and tape it. (picture #4) This completes the necessary wiring changes and your LED headlight should work on both high and low beams, and you should have no alarms. Also, your blue high beam light should work. Now you need to mount the LED light control module. In picture #4 you can see where I mounted mine. Then when I was installing the headlight into the bike, I saw that the control module was hitting the side of the headlight. I ended up using a heat gun to get the double sided adhesive pad to release and then I moved the control unit about 1/4” more to the left side of the bike. The connector between the LED bulb and the control panel has a lock nut, but on mine the lock nut wouldn't stay tight. To cure this, I wrapped the connector with electrical tape to prevent the nut from loosening. Now it's time to install the headlight. Position the original headlight and the LED to control module wiring so that they won't get pinched by the headlight and the height adjusting mechanism. Last night I rode the bike for a bit to 'test' the headlight---Low beam was a lot brighter than the OEM bulb, and the pattern seemed a bit wider. Nobody flashed their lights at me though. It's not a road burner. However when I rode along side of a car with halogen headlights, his beams looked like they were made by candles. The high beam wasn't that much better than the low beam. The high beam pattern seems to be pretty high.
-
Hi everyone, Firstly just a short introduction, I live in the UK just purchased a 1990 Venture Royale XVZ1300, Cali import. Been riding 21 years, always been on sprts bikes but decided that I need to act more responsibly now I'm over 40 ha ha. Love the bike, fantastic fun to ride and so comfy.. however I have a problem. I had to buy a new battery, got the right one in the end 12v 20ah, then discovered that the reg/rec wasn't working, so at great expense ( VAT, and customs !!) , purchased a replacement one from the US. Fitted it to the bike, the problem is that when the bike is revved at 2000 rpm, with a tester on the battery terminals it is only showing 12.16 to 12.19v . There is power coming from the reg when the plug is tested, and it rises and falls when revved, there is also power coming from the stator... I always thought that when revved it should show around 14v ?. The battery never drops below 12v even when idling and the lights are on, brake operated etc etc. Is it different for the Venture Royale, or is there another problem somewhere else, and if so ...... any ideas ????? :icon_smile_question Thanks... and hello again
-
Found this post over on the Delphi Goldwing II forum. Have not tried it, cannot vouch for it, just thought I would pass it along. Not sure I have a need for it here in Florida, but may do it just to check it out one day. Cross posted from GL1800Riders.com GL1800 Remote Starter Feature Being that it’s too cold to ride, I figured I’d take the Wing in for a checkup. While it was in the service department, I had a rare opportunity to hang out with the mechanic as he did the requested service and he shared with me a feature of the Wing that I never knew was there. He said he’s seen it on the ‘net but I never have so I thought I’d post it for those of you that don’t already know about it. The 1800 has a remote start feature that utilizes the remote key fob. Once it is programmed it works really well. Nice for those of us in the colder climates, the bike will be warmed up when I get to it. I won’t have to sit there and warm it up so it doesn’t stumble as I pull away. The mechanic said that Honda was planning on having it as a feature but with everyone being so lawsuit happy they backed away from having it in case a sensor switch went bad or something and allowed the bike to start in gear. (damned lawyers ruin everything) So, instead it is an “unsupported feature”. There is no warranty coverage on this feature, officially it doesn’t exist. Sort of like the opening ceremony option. Anyway, he did mine for me but I wrote down the program sequence to pass along. Here it is…. With the key in the LOCKED position and the trunk open, press the CALL button on the remote. When the horn sounds press UNLOCK.. Immediately press CALL again. When the horn sounds hit UNLOCK. Hit CALL one more time and as soon as the horn sounds, latch (close) the trunk and within 3 seconds turn the key to the ON position. When correctly completed, the CALL button becomes the REMOTE START button. Resetting the ECU or disconnecting the battery resets the CALL button to its previous function and the process will need to be repeated to make it work again. The bike must be on the center stand in neutral and the fork must be locked for this feature to work. Once the bike is running, you must insert your key and turn the ignition switch to ON before you take the bike off the center stand or it will immediately kill. Works great! Try it, you’ll like it.
-
Fall is upon us, and with it getting darker earlier and with our white tail friends getting ready to run amok, I added a few very inexpensive safety items that I picked up at Wally World today. The LED lights are mounted on both right and left side saddle bag rails and can be solid or blinking for additional visibility from the sides at night. They take 2 AAA batteries each and will run for 400- 500 hours continuous before needing new batts. They cost $8.95 each. I took the bike out for a quick ride tonight, and man can you be seen! The chrome deer whistle is mounted under the right side bag to catch the max amount of wind, and is barely visible, and is also removable by sliding it off the stick-on holder. They came 2 to a package for $7.95, so I mounted the other one under the right side foot pad on the wife's Harley. For that price, I'll probably get two more for the left side of each bike. Can't be too careful this time of year.
-
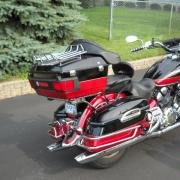
I was wondering if anyone here has these on their bike. They are Saddle Bag Trim Rails: http://www.starmotorcycles.com/assets/accessories/500/STR-1D672-50-00-500.jpg They fit the 2nd Gen Ventures and the '05 - '09 RSTD. I can't say that I've ever seen a bike (pictures or in person) that have them installed. I wonder if it's because of the price (list is $177.99), or if it's because to install them you have to drill into your saddlebag lids. My local Yammy dealer went to the creditors a few months ago and I picked these up at the creditor's auction yesterday for $28. There was lots of other stuff there, unfortunately not much for the Royal Stars. I did bid on a few other items but they went for more than I wanted to pay. I guess I'm looking to find out if I should install these, or if there have been issues with them. Thanks, Glenn
-
need to know more about lowering kit for my '04 RSV. Short legs are making things difficult with the little woman sitting behind me. She sits so high, its difficult to keep bike upright when we come to a stop. Would lowering the rear help? Where do I buy the Baron's kit, how much, how dificult to install etc.? Thanks
-
 Hello all, I have made a few posts and as a few who have read them might know I am new to the venture following. I am strongly mechanically inclined and am attempting a budget rebuild of a 1985 Venture royal from bare frame up. I am asking in this thread all of you for any suggestions, opinions, and or thoughts of what you might change or upgrade on your first generation ventures if you have the opportunity to do it your way. Having never rode one before I am not able to judge this myself so I ask those that know these bike better than I. My bike is torn down and I have cleaned it up and fresh paint and now starting the rebuild. I am painting the bike synergy green from the 2010 camaro ss and blacking out what I can but trying to allow it to be still tasteful. I have taken the advice of a well respected member and am upgrading my transmission to the second generation gear and fork set as well as using a vmax final drive to give me the gear range I desire. I am on a budget and will be using what is good and rebuilding or replacing what needs work but am not afraid to spend where needed. I am open to all suggestions whether a large job or not, and I will be really paying attention to items that are repeatedly mentioned. Everything from cosmetic to fit and function will be considered. Please have at it and do not hold back, basically a resurrected gen 1 built venturerider.org style. Thanks to all who contribute and I will collect pics during the process and post them in a thread at a later date.
 -
 My 87VR always had carburation problems ever since I acquired her used at 40k miles. The last mechanic that worked on it before I gave up on other techs, and took over the full responsibility of being the only one to work on it told me that the intakes that were on the bike when i got it were the wrong intake manifolds. He said the ones on the bike were vmax manifolds that had a crossover port that the 87 xvz1300 did not have. He explained that the extra ports were sucking air that affected the air intake with the gas mixture to intake port causing the gas/air mixture feed to the spark plugs to be wrong. The end result was that the fuel burn was rich and the bike didn't idle properly and the fuel burn in the cylinder was not efficient causing poor ignition at the spark plug. It sounded reasonable to me so i gave him the OK to order the right intake manifolds. It ran a little better for a while but the same poor performance quickly returned. Then the bike died altogether. Note: The next few paragraphs are background describing my mental reference at the time If you not interested in my thought process and want to skip to the point scroll down to the paragraph heading "The Point". It was at that point that I started believing that i was the proud owner of a dinosaur too old for reliable professional service and abandoned by Yamaha since a lot of the parts i needed were no longer available. And the parts that were available were so cost prohibitive that I couldn't justify the expenditure needed to keep her alive. I was almost ready to part her out. In fact the Yamaha dealers wouldn't even talk to me about working on it since it was more than ten years old. Evidently Yamaha in their marketing strategy has decided to only stand behind their product for no longer than ten years. As much as that pisses me off I guess I can understand that they have to cater to the new money and twenty year old + bikes are past history, from their corporate point of view. But as a builder and contractor that has made my living built on my reputation of providing quality work and a man of character that stands behind his product, engineering, service and workmanship no matter how longs it been, I felt deserted and violated. So anyway I had a decision to make. Do I give up on her, Part her out and and commit her usable organs to Ebay. Or do I stand by the old girl and fight for her life even though she was on Life support and could possible already be dead. I started looking at new Goldwings, BMW 1200's, Victory Visions. The ride on the Goldwings somehow felt like a park bench, the BMW's had a nice ride but the saddle didn't fit my crouch, the vision took my breath the first time I saw it. As I was considering it as a option the reoccurring thought that popped into my mind was about if George Jetson rode a motorcycle it would be the Victory Vision. I was weighing out my options when I investigated ebay for the first time as marketing research to test the market for used 87 Venture Royal parts. My plan at that time was to generate the down payment on a new bike by parting out my 87VR. To my amazement I found out that ebay offered what Yamaha no longer did and what I needed could be won realitively cheaply on the internet ebay auction. The first Auction I won on ebay was a set of Carbs from Sean Hess (Hessforless ebay seller & member of VentureRiders.org) which I was sure was the root of my bike problems. During that transaction I talked to Sean on the phone and he told me about Venturerider.org God Bless you Sean. Well I BELIEVE THAT LIFE IS ABOUT TRIAL AND ERROR. Thomas Eidison was once asked about his failures in testing 300 and something different materials to use as the filament for the light bulb before he discovered that carbon tungsten worked. His response was, "None of those test were failures, in fact I succeed in all of those test by discovering what did not work". Dragonslayer philosopy: Failures are learning experiences you can profit by. Am I rambling? The carbs didn't fix the problem so I timidly entered a tech thread that seemed to be related to the problems that I was experiencing and asked for help as a newby to VR.org. GeorgeS (my VR.org hero) responded offering his assistance. Typical of what I have since discovered is the nature of this club and it's members he selflessly committed his considerable time addressing and walking me through troubleshooting and fixing my bike. God Bless you GeorgeS, God Bless you VR.org each of you one and all. With his help and others we breathed new life into her. With all of that said I'll get to the point. She ran better than she ever did. Well enough for me to feel good enough about her to break her down for a new paint job and going over which I completed just in time to make the Clay18 Bike presentation. Which was the first time I had met any of ya'll in person. Muffinman stepped up at that event to offer to sync my carbs in the parking lot. An offer I deeply appreciated and humbly accepted. Even though I felt that I had managed to get the sync fairly close judging by her improved performance. I was floored to discover from muffinmans carb sync that the intakes were still sucking outside air and as Muffinman explained it, meant that the current efficiency was equivalent of operating on 2 1/2 carbs instead of four. Evidently I still had some work to do. I limped thru last summer diagnosing low compression problems on one cylinder, chasing Ohm demons through the electrical and electronic systems then finally starter clutch failure on top of the never resolved carb problems. So I committed to another ground up going over including a new to me, used 9000mile 1990 model engine. During that process i won a ebay auction for a November 1986 issue of Cycle Magazine which evaluated the 1987xvz1300 Venture Royal with technical changes from 1986 to 1987. The Point One of the technical points the article mentioned was larger carb bores from the 34 mm mikunis to 35 mm mikunis in 1987. And I quote, "These measurements come from the carb's mouths- at the venturis, the jump is even bigger: 30.3mm in 85, 31.6mm in 86. To even out the mixture, both pilot and main jets grow larger this year yet fuel consumption remains remarkably close to the numbers from our last test unit." When I first read that information it didn't mean anything to me. During the history of my ownership and the foregoing background dialog I have ended up with three different sets of intake manifolds. All of which look exactly the same visually. But on the work bench they got mixed up. Then as I was preping carbs to mount on new motor I noticed that some seemed to fit tighter on carb mouths than others.:lightbulb:I Got out the ruler and guess what? There is a measurable difference in the opening (Where carb throat inserts in intake boot.) size between the three different sets of Intake manifolds/boots. is it possible that my problem all along was that the intake manifolds were not the same year as the carbs therefore the clamps did not fully constrict the boots around the carb throats and therefore not completely sealing or preventing air being sucked through that incomplete seal. I have no clue what year carbs I bought off ebay nor do I know what year each set of intake boots are. I figure that I will us the tightest fitting set to mount to this new (to me)1990 motor. Then the next question occurred to me that I would welcome some input on... I wonder how many internal carb changes might have occurred between whatever year carbs I have and the 1990 motor I'm getting ready to mount them to and to what degree will those changes adversely effect the performance of the 1990 motor potential performance. These carbs just got brand new diaphragms and fuel enrichment/air cut off diaphragms if I'm gonna need to change jets to match 1990 engine I rather do it now while they're on the bench instead of putting it all back together and having to do it later.
 -
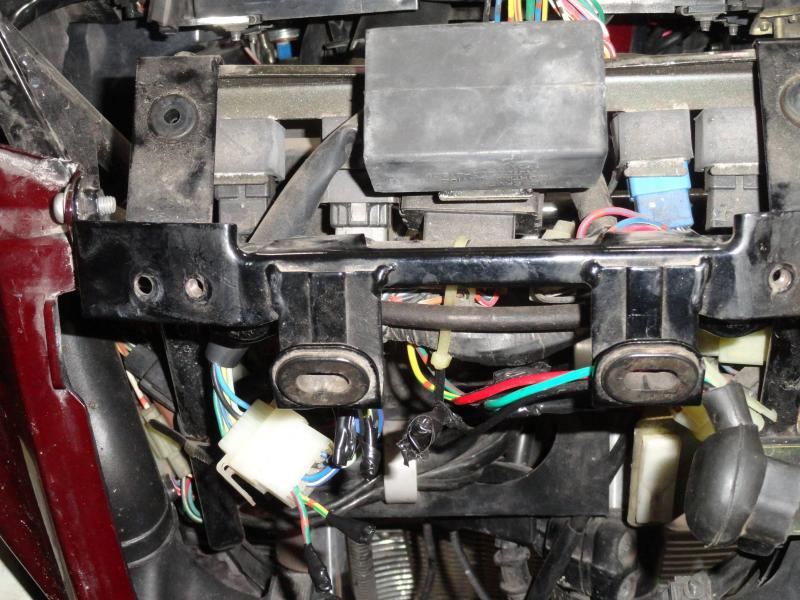
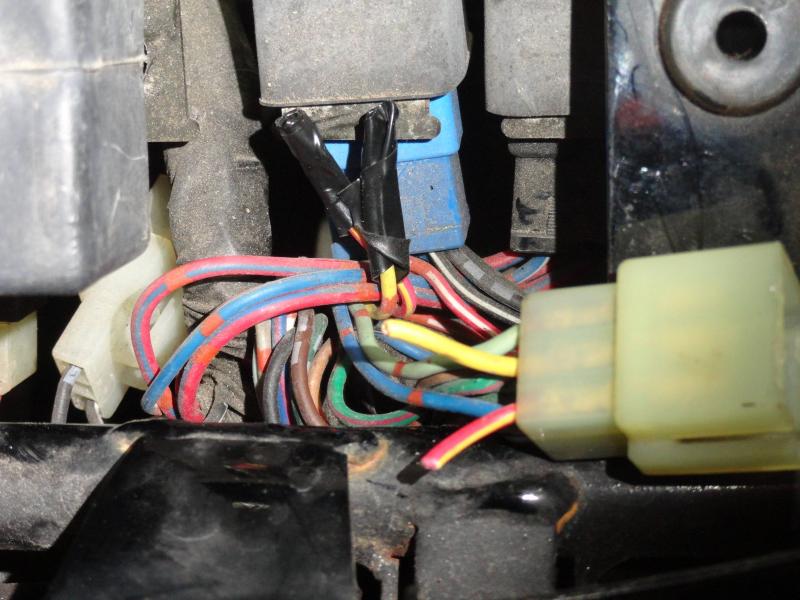
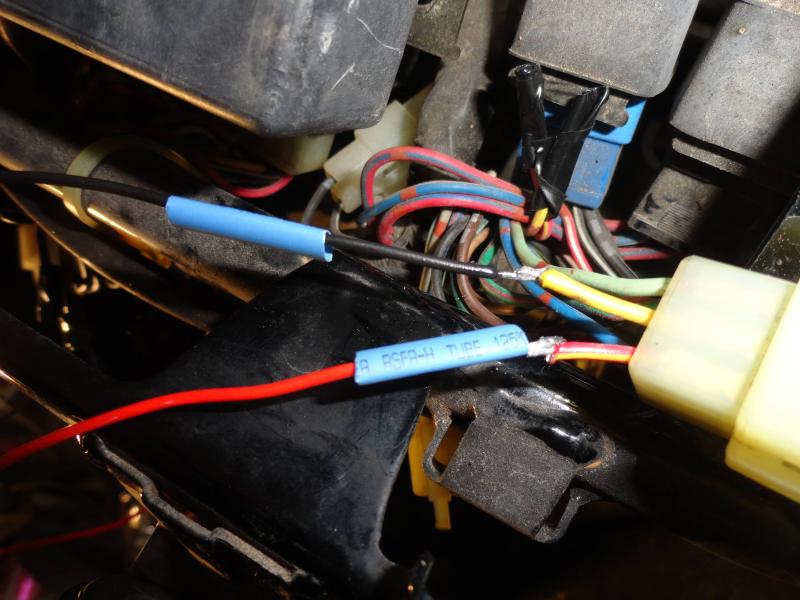
Hey folks. I'm sorry if this has been asked previously and I can't find it - - - I need to wire up a couple of LED daylight running lights (DRLs) that I've mounted to the front of my Second Gen RSV. Obviously need to get at the low beam wire of the headlamp. Can somebody please tell me the quickest way of accessing same at the headlamp. I've printed out a wiring diagram for the bike, and from what I see I need the green wire. The owner's manual that came with the bike is next-to-useless. Tells me how to change a headlamp bulb, but that's about all. Hope y'all have a great 2015. Riding weather down-under is perfect. Warm days and 14 hours of daylight - gotta love that!
-
 Seems a lot of people seem to like the EBC FA179HH front and FA123 rear but 2 sites said HH did not go with our bike and recommended the FA179V semi sintered for our bike has anybody went with these still would probably go organic rear to help soften the lock up. Any input would be appreciated quite confused right now. Also spark plug $3 standard or $10 iridium have to pull the tank to install passing lamps so want all the parts to be ready for spring.
 -
I've had my 2004 venture for right about a month now. I noticed a little oil under the crank case breather tube and discovered it was probably because the oil level was too high. I changed the oil and put a little less in than it had when I got it. Although it was still close to the top of the sight glass when the bike was level. The crankcase tube leak has stopped but now I've noticed twice during the past week or so oil dripping from near the left rear cylinder. Last night I pulled the oil filter and drained a little oil hoping that would solve my problem. I cranked the bike again just a little while ago and now its smoking pretty bad. Any thoughts or ideas on what could be causing the new leak and smoking? Advice on how to remedy this problem would be great as well. BTW this bike has a little over 64,000 miles now and I'm still running Amsoil 20W50 just like the original owner has for the life of the bike. Thanks
-
This bike is about 45 minutes from me and I have looked at it in person. Very clean bike that looks like it has been very well taken care of. Doesn't have one single blemmish on it. I'm pretty sure I could work a deal of an even swap or very close to it with my 2007 RSTD. It has some adds that would save me the hastle and money such as: center stand, passing lamps, Slip Streamer windshield, backrest, trunk luggage rack, auxilary plug for heated gear/battery tender. One thing that makes me wonder if a previous owner was a member here is that fact that it has E3's on it. That doesn't sem like something a regular non VR member would figure out. But, on the other hand, the antennas are on the wrong sides. The PO traded it for a used Harley Ultra. I have one uh oh thing that I'm trying to sort through my brain. I asked the dealership if I could talk to the PO. They were very obliging and they called the PO. The guy told them that he didn't want to talk to me because he really didn't have an opinion on the bike because he only owned it for a month before he traded it in. What's up with that???. I dont' really care if he wants to talk to me, but why did he trade it after owning it for a month? Hmmmm. Makes me concerned that there is something wrong with the bike internally that he wasn't wanting to deal with.I don't know what I'm gonna do, but it's an extremely clean bike. Any thoughts? 2005 Yamaha Royal Star Venture Stock: 05A009088 | Sunrise Preowned
-
has anyone done this. Was thinking maybe going to a lighter bike. Just pulling a trailer behind me. Is there a windshield for this bike and a hitch. Been seeing them for around 4 to 5 thousand for a 2005 model. Looks like there 300lb lighter. So by the time I sit on it will weigh about the same as a venture. What do you all think, am I crazy. Will this bike last as long. Don't look like you could put soft bags on it. Pros and cons please
-
05 Venture with 93K on the odo. Some extras like lights and Gps. I have a batt indicator light that after a few days of sitting showed the batt was low. Batt was over a year old so replaced it and now it still shows low after a few days. Bike will crank with yellow light have not let it get to red yet. So it looks like I have a slow batt drain somewhere or possible my light is defective but don't think so. I have done no troubleshooting so far was just wondering if someone knows a weak part on this bike for me to take a first look at?
-
Middle of January, 0 degrees C and snowing (feels like -5 C)...and I'm at the point where I could use a ride on the bike. :-(
-
 Check this out!!! Even though Holly Wood dont know an air cooled bike from a water cooled,, or how to tell the model year,, they do have good taste for a Mad Max special!!!! Yamaha Royal Star | eBay https://www.youtube.com/watch?v=F-XSesrhXgw&feature=youtu.be
 -
Last year a member asked me to help fix his bike, turned out that water had got into the motor and it was ceased. He picked it up and has it parked since then under cover. It's been a few years since it has been used. He wants to donate it to somebody deserving. Let me know if you're interested. It's in Georgetown Ontario