Search the Community
Showing results for tags 'panel'.
-
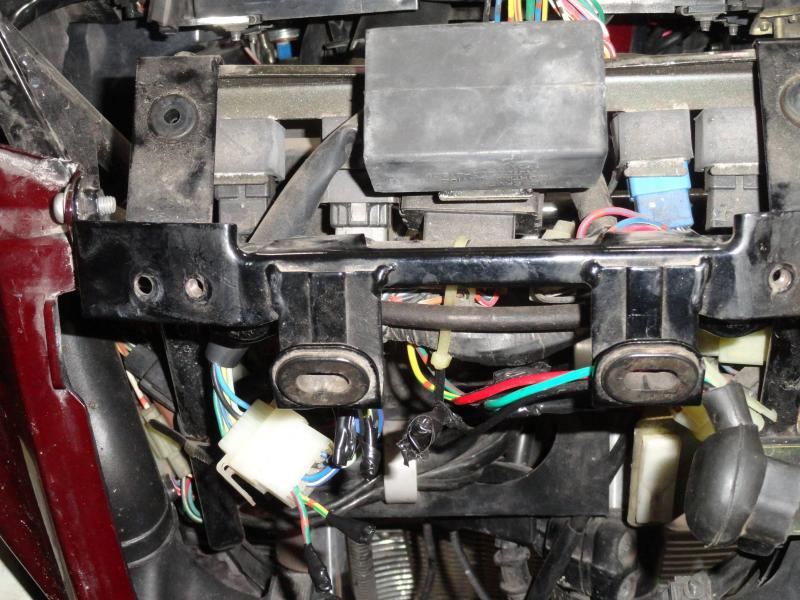
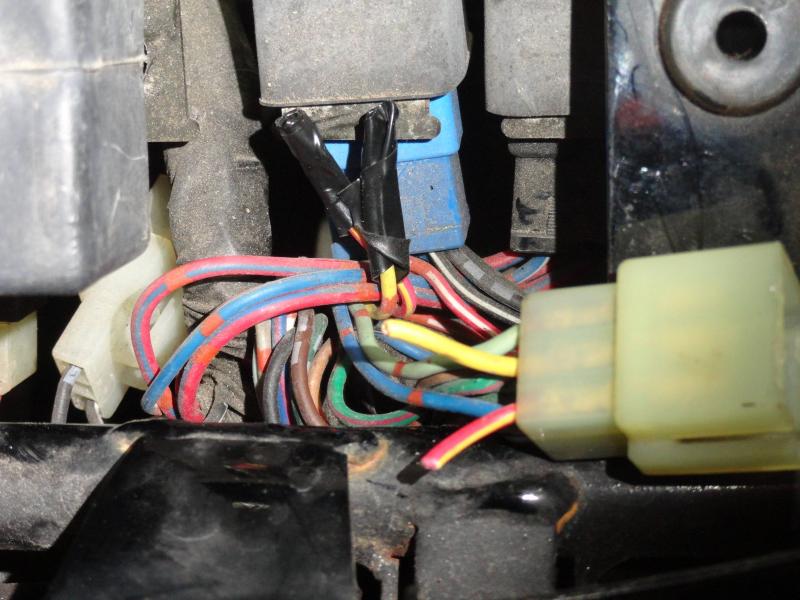
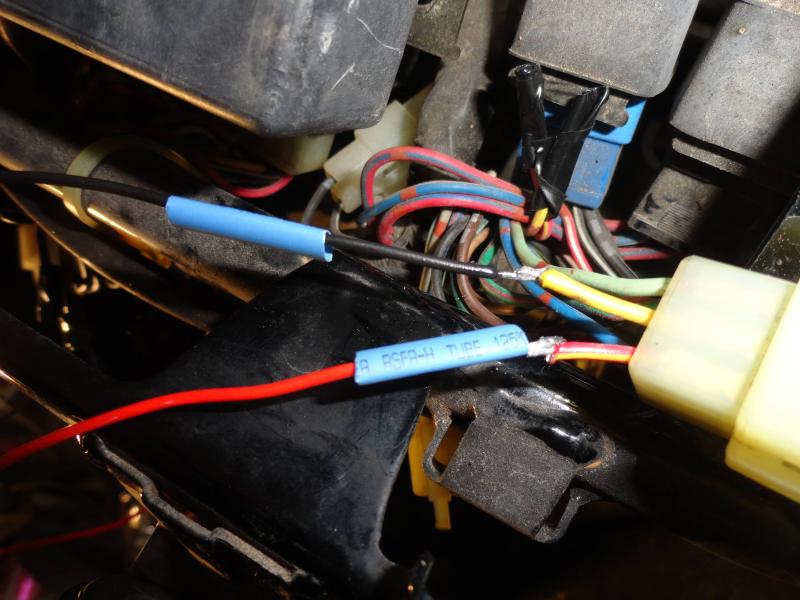
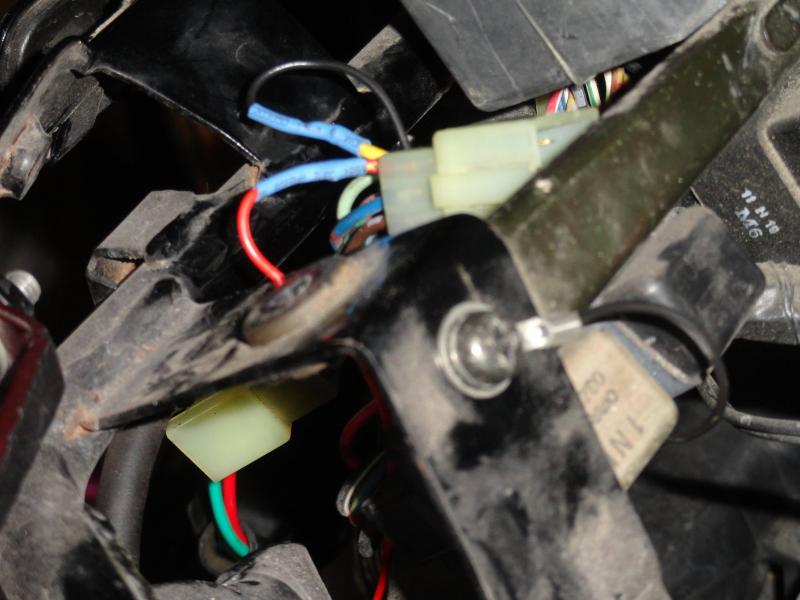
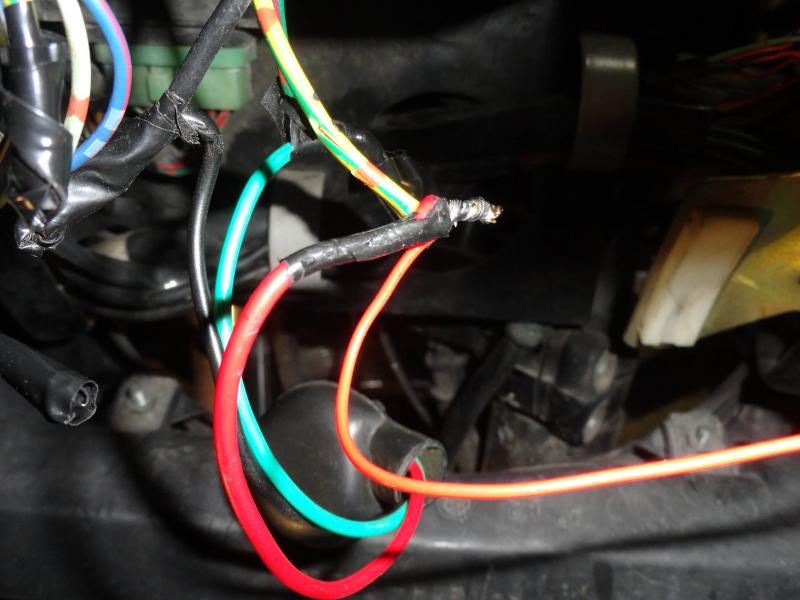
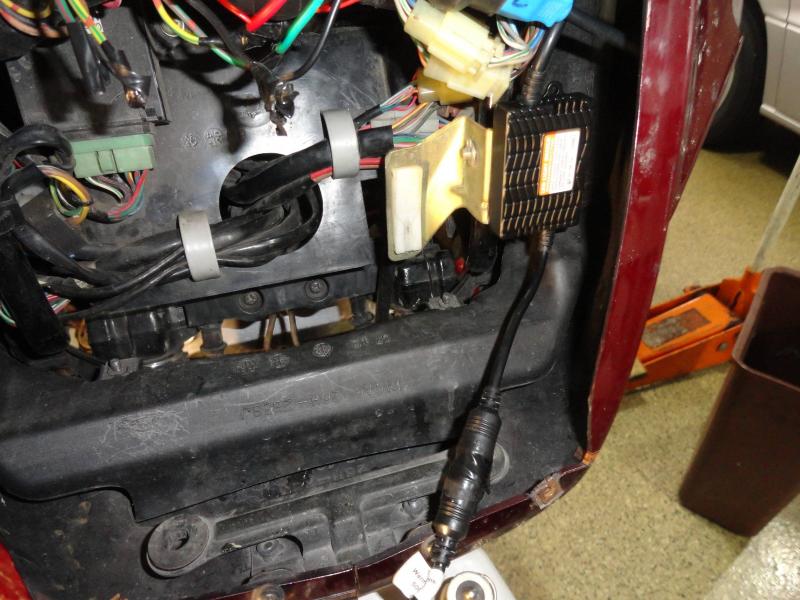
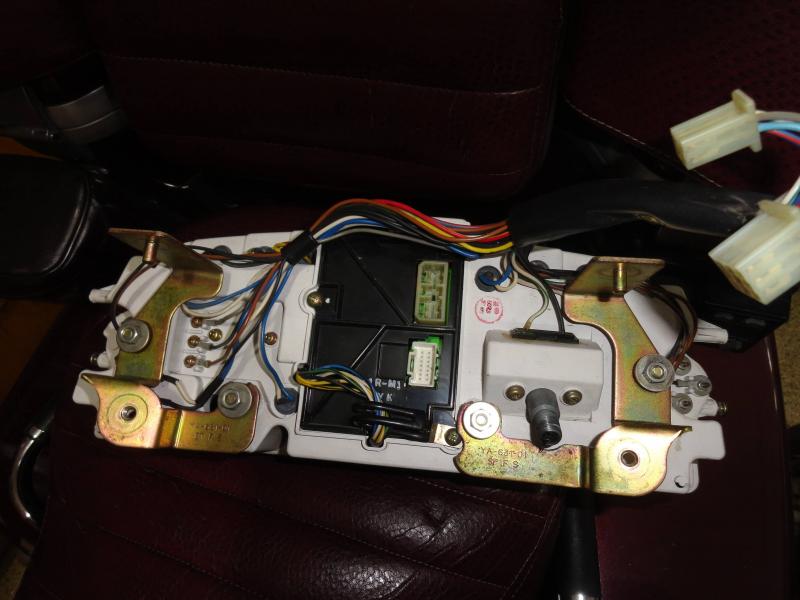
 I just bought the SpeedMetal 2200/2400 Lumen LED headlight conversion kit from CycleGear for $60. I don't know he long they'll have this sale, but they have it every so often. I wondered about the light pattern, so I removed the headlight from my bike and took it down to my workshop. I used a big wooden 'C' clamp to position it in a repeatable position. Before I took the Sylvania Silver Star bulb out of the headlight, I applied 13 volts to it and observed the light pattern on the basement wall. I marked the top of the main part of the light beam with a marker, and then repeated this with the high beam. I also marked the workbench where the 'C' clamp was so that I could put it back in the same position. I switched to the LED lamp and powered it up. There appeared to be very little difference in the beam shape or position, but of course the light beam was much brighter. The light beam on low was just a tiny bit higher, and the high beam was more than a bit higher. It looked great. I connected it to the bike, and I had the headlight alarm in the CMS on, and I couldn't switch between high and low beam. Dingy recently showed a picture of the CMS printed circuit board and also where to jumper to eliminate the alarm. http://www.venturerider.org/forum/first-generation-venture-tech-talk/92274-jumper-cmu-leds-bulbs-prevent-warning-light-coming.html Of course, the instrument panel has to be removed from the bike first. It's not a bad job, just take the windshield off and take the screws out for the front turn signals and let them hang by the wires. Look inside the turn signals mounting at the openings to the sides of the instrument panel. On each side you will see 2 phillips screws that hold the instrument panel cover to the instrument panel. Take the 2 that prevent the cover from sliding upward completely out, and loosen the 2 screws that prevent the cover from sliding toward the rear of the bike. Then just slide the cover toward the rear of the bike. To remove the instrument panel, using a 1/4” ratchet, long extension, universal joint, and 10mm socket, reach upward from the headlight opening and remove the 2 bolts from the bottom of the instrument panel. DO NOT REMOVE THE NUTS---they just hold the brackets to the instrument panel. Also when I had the bolts out of the threads, but still in the hole, I reached in from the top with a magnet tool and prevented the bolts and washers from falling when I pulled the socket off the bolt. Looking through the headlight opening, towards the left side of the bike (look right into the opening) you will find 2 connectors for the instrument panel---disconnect them. Disconnect the speedometer cable, and then pick up the instrument panel slightly to slide the top pins out of the grommets, and move the panel towards the rear of the bike slightly. Reach in and disconnect the 2 connectors on the back of the CMS (BTW, CMS=Computer Monitor System). Now remove the instrument panel. Place a soft cloth on the work bench and set the panel down face down. Take the screws out that mount the CMS, and remove the CMS. Take it out as 1 piece, there is no need to slide it apart yet. Lift the side that has the wire bracket under a screw first, and then when it's clear of the hole, slide it towards where the wire bracket was mounted. You'll see that the other side has a clear plastic piece on it that allows the panel bulb to illuminate the CMS. Separate the CMS but be careful. One board has a connector that can be pulled to separate that board. However 2 boards have a ribbon cable that you can't easily remove, so don't stress this area too much. The CMS light monitors have a magnetic proximity switch wrapped with a coil of wire. The lamp current flows through the coil, and creates a magnetic field, that closes the proximity switches. You need to solder a small piece of wire across the proximity switches for high and low beam headlights. Dingy has arrows pointing to the correct places to put the jumpers. Then re-assemble the CMS and re-install it in the instrument panel. (see picture of the back of instrument panel) (See picture #1) You can see the RLU (Reserve Lighting Unit) at the top of the picture. Follow the wiring out of it to the connector. On the motorcycle side of the connector, cut and tape the G/R, Y/G, and the light green wires (the light green isn't shown in the picture). Now, you'll be able to switch between high and low beam, and the HEADLIGHT white lamp on the instrument panel won't come on, but the blue high-beam light on the instrument panel won't work. To get that working, on the motorcycle side of the instrument panel connector, cut the Y and the R/Y wires leaving about 2” of them still on the connector. Tape the 2 wires not in the connector (that you just cut). Using two 12” lengths of 16-20 gauge connect them to the Y and the R/Y wires from the connector. I soldered mine and used shrink tubing to insulate them, but you could use butt connectors. (picture #2) Connect the Yellow wire to ground. I used a terminal and put it under the screw in the picture (picture #3). Shorten the wire before putting the terminal on it. Connect the R/Y wire to the headlight high beam lead (Y/R). On my bike, I've replaced the headlight socket, so I had soldered and taped connections to the new socket. I just untaped mine, wrapped the R/Y around the previous connection, soldered it and then taped it again. If you still have the original headlight socket, use a pocket knife and strip a short length of the Y/R wire, wrap the R/Y wire around the bare wire, solder it and tape it. (picture #4) This completes the necessary wiring changes and your LED headlight should work on both high and low beams, and you should have no alarms. Also, your blue high beam light should work. Now you need to mount the LED light control module. In picture #4 you can see where I mounted mine. Then when I was installing the headlight into the bike, I saw that the control module was hitting the side of the headlight. I ended up using a heat gun to get the double sided adhesive pad to release and then I moved the control unit about 1/4” more to the left side of the bike. The connector between the LED bulb and the control panel has a lock nut, but on mine the lock nut wouldn't stay tight. To cure this, I wrapped the connector with electrical tape to prevent the nut from loosening. Now it's time to install the headlight. Position the original headlight and the LED to control module wiring so that they won't get pinched by the headlight and the height adjusting mechanism. Last night I rode the bike for a bit to 'test' the headlight---Low beam was a lot brighter than the OEM bulb, and the pattern seemed a bit wider. Nobody flashed their lights at me though. It's not a road burner. However when I rode along side of a car with halogen headlights, his beams looked like they were made by candles. The high beam wasn't that much better than the low beam. The high beam pattern seems to be pretty high.
-
The sight glass on my front brake cylinder burst, I caught it all, and super glued the sight glass (it does not drip. Remotely sight usable) But, it seems despite that, the lower half of the plastic on the terminal panel that holds the CLASS, and the CB is severely gone now, the "seat" for it all is still fine. (And, gone as in. The CB bounces >.>) Anyone have that panel? http://www.mrcycles.com/fiche_section_detail.asp #45 here
-
My class has an e-1 error. When the key is turned to acc there is no sound from the system. I used another none good panel with the same results. Any ideas where to start or any known issues that cause this code?
-
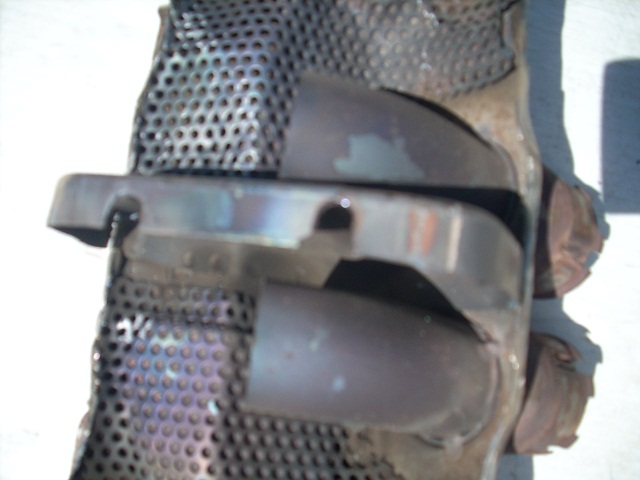
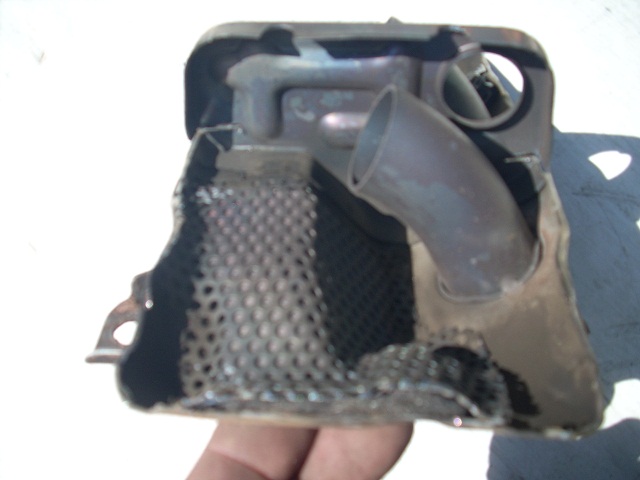
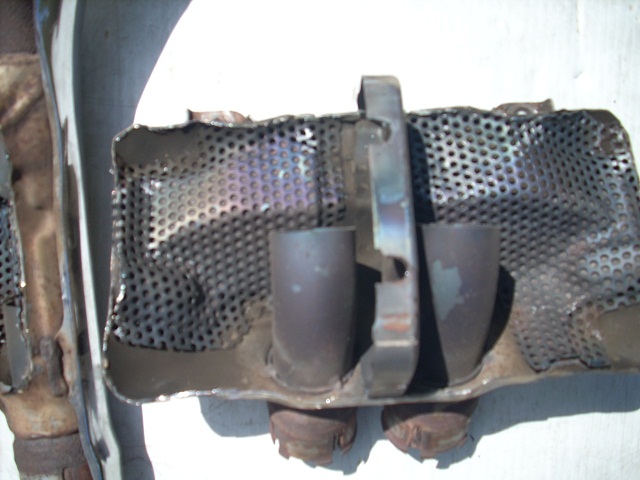
 For anyone who followed the thread, my 87 was making some crazy exhaust noise that caused me to remove and inspect the collector, the mufflers and the pipes several times. The issue was resolved when I replaced a seemingly healthy collector. I took the problem collector and cut it apart to see what was inside and what caused the problem. Lemme tell ya. A healthy collector would be very tough to get apart without destroying it. Using a die grinder with a cutoff wheel, I first cut along the perimeter of the bottom side hoping to peel away the skin with no luck. I was trying not to destroy it in the process, so I flipped it over and cut around the perimeter of the top, and although I had to cut through some of the perforated interior screen, I was able to get it apart mostly intact. This was only possible because of what ended up being the problem, which was that the two welds that hold the bottom panel to the one baffle on the inside were broken. This must have been causing the loud sound and the rattle that I had. I ended up re-welding the perforated screen anywhere that it had been pulled out during dis assembly. I then drilled 4 holes in the bottom panel where it contacted the baffle so that I could weld the baffle back on once I put it back together. I then welded the bottom panel that I'd cut back in place, then put the top back on, held it in place with a C clamp and welded it back on. I then flipped it over and welded the baffle to the bottom panel through the holes I drilled earlier. I think the takeaway is that if you are getting these crazy sounds, it'd be worth it to run 3 sheet metal screws through the bottom panel into the baffle, in line with the 2 existing spot welds, one in the middle, and one forward of the front weld and aft of the rear weld. If that cures the problem, you at least know what the problem is, and can opt to leave the screws in and see how long it lasts, or pull the collector, drill a few holes like I did and weld the baffle back to the bottom panel without taking the thing apart. In any case, I've welded mine and would be comfortable putting back on the bike, expecting no further issues. If anyone else has this problem and can get their collector to me, I'd be happy to weld the baffle back in for them. Should be pretty easy now that I know what to do.
-
For anyone who followed the thread, my 87 was making some crazy exhaust noise that caused me to remove and inspect the collector, the mufflers and the pipes several times. The issue was resolved when I replaced a seemingly healthy collector. I took the problem collector and cut it apart to see what was inside and what caused the problem. Lemme tell ya. A healthy collector would be very tough to get apart without destroying it. Using a die grinder with a cutoff wheel, I first cut along the perimeter of the bottom side hoping to peel away the skin with no luck. I was trying not to destroy it in the process, so I flipped it over and cut around the perimeter of the top, and although I had to cut through some of the perforated interior screen, I was able to get it apart mostly intact. This was only possible because of what ended up being the problem, which was that the two welds that hold the bottom panel to the one baffle on the inside were broken. This must have been causing the loud sound and the rattle that I had. I ended up re-welding the perforated screen anywhere that it had been pulled out during dis assembly. I then drilled 4 holes in the bottom panel where it contacted the baffle so that I could weld the baffle back on once I put it back together. I then welded the bottom panel that I'd cut back in place, then put the top back on, held it in place with a C clamp and welded it back on. I then flipped it over and welded the baffle to the bottom panel through the holes I drilled earlier. I think the takeaway is that if you are getting these crazy sounds, it'd be worth it to run 3 sheet metal screws through the bottom panel into the baffle, in line with the 2 existing spot welds, one in the middle, and one forward of the front weld and aft of the rear weld. If that cures the problem, you at least know what the problem is, and can opt to leave the screws in and see how long it lasts, or pull the collector, drill a few holes like I did and weld the baffle back to the bottom panel without taking the thing apart. In any case, I've welded mine and would be comfortable putting back on the bike, expecting no further issues. If anyone else has this problem and can get their collector to me, I'd be happy to weld the baffle back in for them. Should be pretty easy now that I know what to do.
-
Hi Everyone. Having recently been stood at the side of the road after a camping trip with a flat battery. (Was my own daft fault) I have added the following system to my bike to top up the battery whilst it is stood in places without power. I have at home an Oxford Oximisor battery tender in my garage but use camping sites with no power on them. I purchased a cheap 12v 100ma solar panel and fitted it with two copper pipe clips with screws and spacers to fit into the panel screw holes which enables me to clip the unit onto the rack on the back of the bike. It can be fitted and face in any direction to catch the sun. I then converted a 12v plug in acccessory unit with a plug that fits my battery tender, you just plug the unit into this and can run 12v items from it or charge a mobile phone, sat nav etc. The unit comes with crocodile clips too so you could charge a loose battery too. I know it is not the ultimate charger nor the ultimate system but it will come in very handy. Neil. (Old Miner) Cost about £20 would be $15 ish.
-
Sorry to be a newbie PIA. I searched on rubber grommets and got a cazillion hits. After wading through several I just decided to post the question directly: What is a good source for the rubber grommets that the side panel posts snap into? There is only one on my new 87. Thanks Dean
-
So I've ruled out a 20 kw generator for I can do what I want with a 10 kw portable generator. I found a TriPower generator that has 3 independent fuel system (gas/propane/natural gas). I just spoke to a sales rep and he described the switching process from one fuel system to the other. One does not need to purchase any additonal generator accessory to do this. I currently have a 500 gal propane tank to just heat my home including hot water tank. It would be nice to have both source of fuel (Gas & Propane) I hope to purchase one before this coming fall. http://www.unitedgenerator.com/proddetail.php?prod=HPS12000HE So my general plan is to move all the 30/40/50 breakers from my main panel to a sub panel and feed the sub panel with say a 125 amp breaker from the main panel with a transfer box. Then move all my 15/20 amp breakers to a sub panel and feed it with a 100 amp breaker from the main panel with a transfer box. With power management I would think that I could power all my power needs during an emergency. Opinions welcome.
-
My CD player stopped working. I split the fairing and checked the connection there and while I was at it, I put the dielectric grease on all the connectors. Everything seems to be properly connected, but the cd selection does not come up on the control panel. Is there a separate fuse for the cd player? It worked great when we used it last in August.
-
As so many here, no doubt know, the side cover over the coolant reservoir (and its mate on the starboard side) only have one functional fastener and two rubber mounted "posts". After working all day yesterday on the bike the last thing I had on my to do list was a quick check of the coolant level... I removed both bolts in the side panel, pointless, I know, but no harm, no foul. Then I tried pulling out on the panel, when it did not come out easily, I did not want to bend it so I decided that the lip must be inserted under the center panel (in front of said reservoir) so I removed the top bolt in the center. Can you hear it? "Click, tink,tink"... dang nut fell down behind that panel, but never hit the ground..pulled on the side panel again and it came out which is when I realized that I did not need to take that blasted bolt out to begin with... an hour of looking, rocking, cursing and disassembly later and I heard finally it hit the floor. OK... I walk around the bike and slide the nut up behind that panel, put the screw through the hole.. and drop it again. Can you hear it? "click,click" but not to the floor. Another hour of looking, rocking, and cursing and my wife made me go to bed without finding it "For my sanity" she said. Tonight I go back at it, and after loosening the reservoir that started all this, I see a loose nut lodged behind the bracket that hold the thing into the bike. A couple of quick bolts later and I have it... except it was not the one I dropped Pull the reservoir completely and wedged down in the coil brackets I find my missing nut. :cool10: Now it is all back together... and I have a story to tell... 3 plus hours and 2 loose NUTS! Oh... the coolant was fine.
-
Here is a pic of the fuse panel. What do you think? Bike runs, but no turn signals. Thanks in advance, Don
-
I installed a J&M Headset/Mic unit in my helmet yesterday to use on my 2000 MM. I checked all the connections for the helmet unit, but nothing comes through it. In selecting options on the audio panel of the bike....HS is not an option...it does not come up after SP. SP and all the rest of the adjustable controls seem to work fine, but no HS Option. I tried the rear headset plug also...nothing. I don't know if HS have ever been used on the bike. I think the previous owner did not use them. Is there something that needs to be connected/adjusted on the bike, before HS option is made available on the audio panel and they will work? Or am I looking at a new "part"? The J&M unit is the correct one for the bike and should work if HS can be selected. Thanks in advance for your interest and answers...
-
 Had a little incident with my bike & need to replace the fairing, maybe both the front cowling and the front panel (or inner piece). The front cowling comes off easy by just removing a bunch of screws, no problem. How about the front panel inside piece? How much of the wiring has to be disconnected to remove that piece? I could run out & take a look but it's late & I'm here so thought I'd ask! Is it just a matter of unscrewing the headlight, tape deck, etc and then lifting it off over all the wiring while still connected? Or does the wiring have to be disconnected one by one and fed thru holes in that piece? Just wondering how big of a job that would be ...of course if I do it, the tape deck will NOT be reinstalled!...I'll be hitting up Ponch for a set of gauges instead!
 -
I lost one of the clips that hold the side panel in place. The rubber and metal thing that holds the side panel down??? Does Yamaha still have this things listed?? Can they begotten?? Or has someone come up with a better way to secure these things. Any Ideas? joe:fishin:
-
I have a '99 RSTD. The other morning I lost power to the headlight, speedo, and brake light. I found the fuse panel with the 20 amp fuse for the headlight and it looks like it had a big meltdown. I pulled the fuse out with a pair of needle nose pliers ( it was melted and came out in about three pieces). I cleaned up the fuse panel, put another fuse in and all is OK now with the headlight and speedo light but I have no brake light. I changed the bulb and still no luck. Is there a separate fuse block with a fuse for the brake light? The previous owner put a modulator in for the brake light but I don't think that has anything to do with it. Thanks for any help.
-
I am looking for the CB panel, both the base piece that mounts to the fairing, and the actual console part, that the CB and CLASS system mount into. The panel is P/N#: 26H-2837M-01-00, according to the Yamaha website. I have tried E-Bay, and various other places. But no success yet. Does anyone have one they can sell, or part with. If so, please let me know. Thanks
-
 2006 Midnight RSV gave me a bit of a "hello" wake up call waaaay back in the boonies ealier today.. wow.. I was riding with a new rider and he decided to pull over for gas (smaller bike) and I had a quick glance down to see how my levels were holding, a good half tank.. When I turned around to rejoin him at the gas station (it was a surprise stop).. I looked down and huh.. no indications on the instrument panel.. Oh oh.. No turns signals.. wow.. As he was fueling, I did a quick check of what was and wasn't working or showing up on the panel.. Turn signals not working or indication, front - rear brake pedals not working the brake light. High beam light and indicator working, Cruise Control lights working.. But no Neutral light indicator, no clock, odo or speedo info showing up there at all.. it's a blank .. wow.. If you recall I had a miserable time with this bike last summer with the steering locks scissoring my wires to heck.. I wonder if that happened again when I did my u-turn just then.. Huh.. but nothing is down there or near there.. Fuses.. Ok, pull off left panel, and yup. 10A Signal Fuse is blown.. wow.. One fuse, and all of those things won't work on your bike.. I thought that wow.. what a silly way to set things up.. But think about it.. You'd NEVER know your brake lights weren't working.. you 'might' notice your signal lights not indicating on your dash... but you WILL notice if your fuel, speed and odo were missing from the panel.. Mayhaps some brainiac at Yamaha thought this one up as a "hey dopey, your fuse is out" method, or someone accidentally wired it this way and hey look, it made sense.. Now, because of all those problems I had last year, blowing fuses all the time, I had a good stash of fuses with me... but no 10A.. lol... Go figure.. of all the fuses, not the one I needed.. Happily the gas station gave me a couple to make sure I got home OK.. Quick steering stop to steering stop tests and no probs.. NO idea why that fuse blew.. Apart from wiring in a 4W LED driving lights in a week ago.. nothing's changed.. So far the system is working well but man.. what a "oh oh" cold feeling for a second out in the middle of nowhere... time to get some more 10A fuses... just in case.. And how was YOUR day?
 -
stopped to fill up and after that I had neither speedo nor odometer. No funky noises implying impending doom, it just quit. The connector on the wheel was not tight but that didn't help, and the cable housing is not falling down. Now I thought the odo was electronic, so what might have happened to crash both? Panel light are still working. If someone has a spare or a spare cable and is going to the Ga MD let me know. In case you didn't see it in my sign on, it's a '83 royale. Thanks.
-
Just purchased 1988 Venture and I am in the process of cleaning up and changing fluids. I am in need of the side panel vents/louvers (both). If anyone has a pair let me know.. cimack77
-
Don't know if I listed the name right, but what I'm looking for is the plastic panel cover that has the openings for the CB, and the has the door with the Leveling Unit and opens to refill the radiator overflow bottle. Just need the panel, not the CB, Leveling unit or door. For a 1989 Venture Royale
-
 Sleeperhawk is in the process of installing his new instrument panel. He had painted it this week and it really looks good! Pecker came over to help and supervise. Wanderer and Patricia came by a little while ago to get the rear tire removed and Ted was taking it to town to get a car tire mounted on the rim. He just got back and they are in the process of putting it back on the bike. More pictures to come later! (By the way, Sleeperhawk cringed at the first drilling into the front panel!)
 -
How do I get at the handle bars to adjust. I see an allen screw in the front of the instrument pannel and two bolt on the rear(tank side). If I take these out will the instrument panel come off so I can adjust the bars? Also, can I place a 1" riser without changing cables? Thanks for any advise. Mark
-
 I have recently aquired an 86 venture that has had the front body removed but still has the rear luggage intact. Is it possible to change out the luggage to the 83? anybody tried this before? I am also looking at pulling the wiring harness and changing all the electrics as well. instrument panel and all. this will also give me the air-ride system. and cruise control. Any thoughts on this. Major projects are my favorite...................
 -
 I keep seeing the Kuryakyn Master Cylinder Switch panels. This would solve all my switch problem at one stroke. I have two switches installed in my right hand dash cover as of now but they are a bit awkward in that position. I want to mount my digital volt meter in the dash where the switches are now and find a way to mount a switch panel on the left side handbar. I would like to have 3 switches or even a 4th one. They don't seem to have anything that's bolt on for a 1st Gen, Doh!, no surprise there but I was hoping that someone here has made a mod for something like this. Any suggestions? Mike
 -
 I have been searching all morning for what to use to replace my fuse panel with something that is far better and more modern. what have the rest of you used? what fit's in the same spot? I really want blade fuses, and would like to expand it from the all used up 6 circuit to an 8 circuit to allow me to separately fuse accessories. Also has anyone upgraded the switched with a relay and a secondary fuse panel?