Search the Community
Showing results for tags 'beam'.
-
 Please help! On the way down to Panama City yesterday my low beam went out along with the driving lights. I still have the high beam, and the headlight fuse is OK. Does anyone have any thoughts or suggestions before I search for the dealer here? Also, if the bulb simply needs changed, how do I do that? The owner's manual and the service manual are not much help...
 -
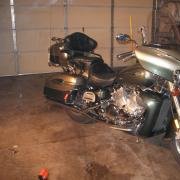
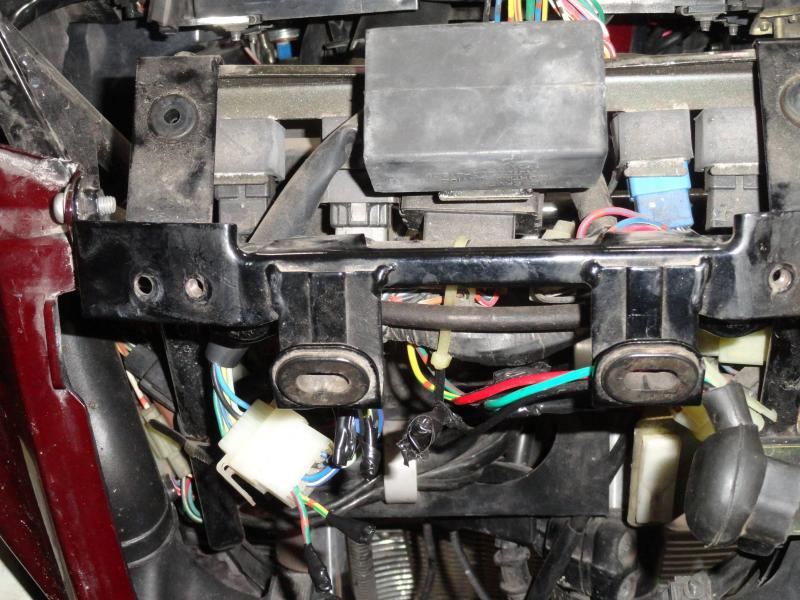
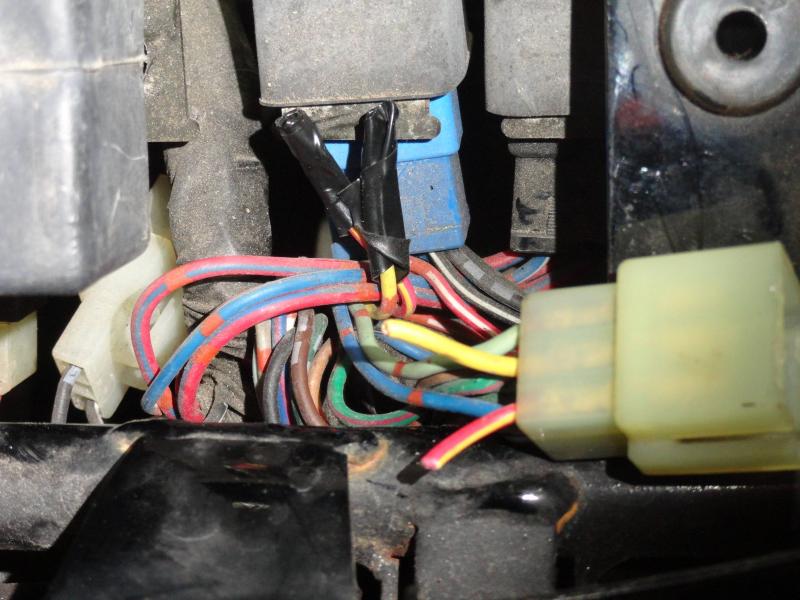
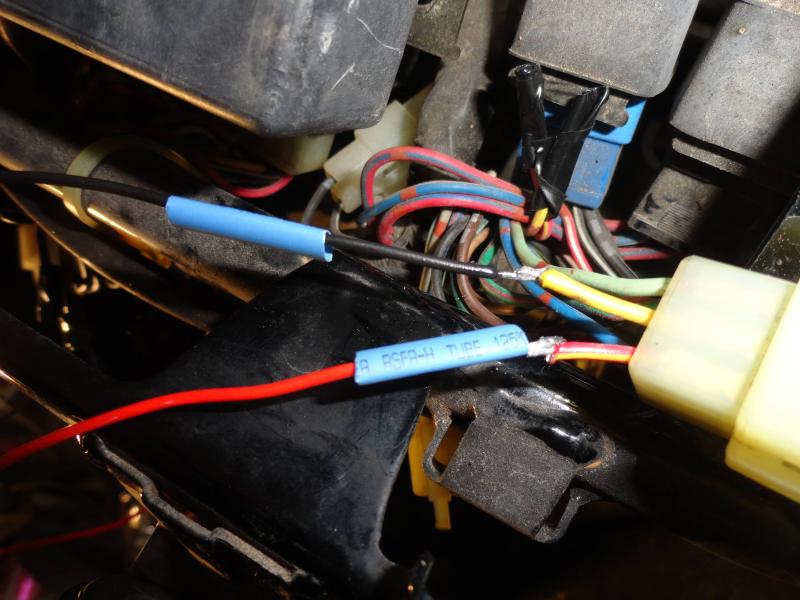
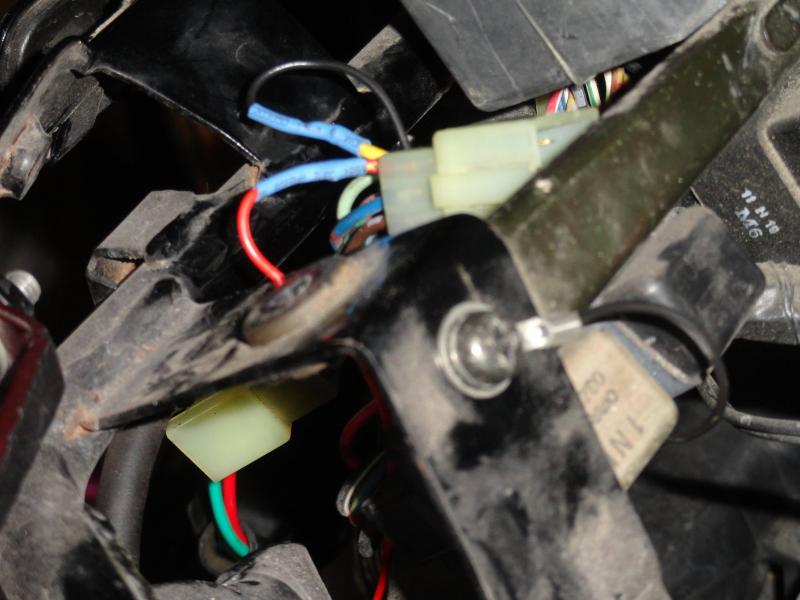
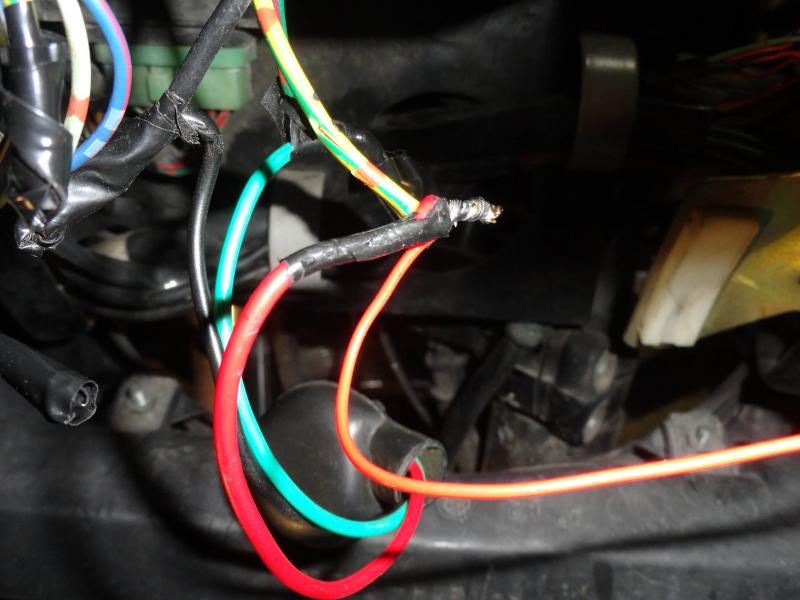
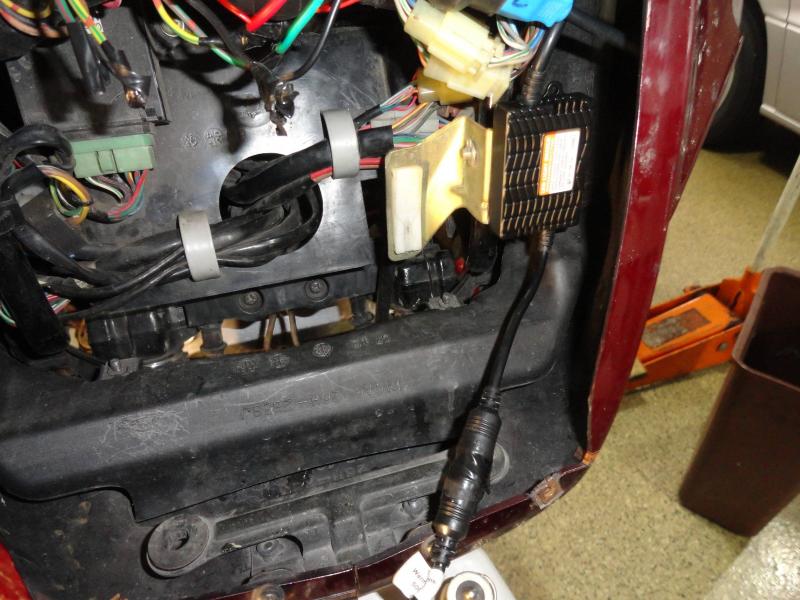
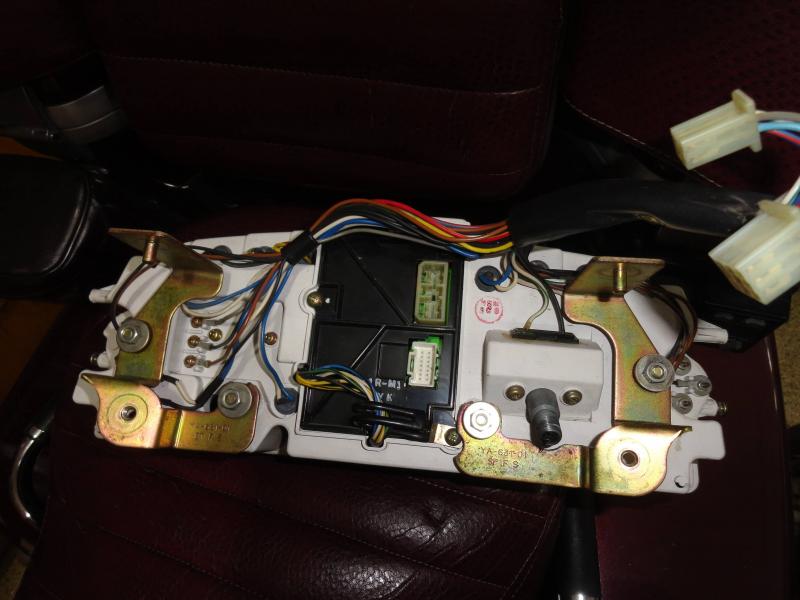
 I just bought the SpeedMetal 2200/2400 Lumen LED headlight conversion kit from CycleGear for $60. I don't know he long they'll have this sale, but they have it every so often. I wondered about the light pattern, so I removed the headlight from my bike and took it down to my workshop. I used a big wooden 'C' clamp to position it in a repeatable position. Before I took the Sylvania Silver Star bulb out of the headlight, I applied 13 volts to it and observed the light pattern on the basement wall. I marked the top of the main part of the light beam with a marker, and then repeated this with the high beam. I also marked the workbench where the 'C' clamp was so that I could put it back in the same position. I switched to the LED lamp and powered it up. There appeared to be very little difference in the beam shape or position, but of course the light beam was much brighter. The light beam on low was just a tiny bit higher, and the high beam was more than a bit higher. It looked great. I connected it to the bike, and I had the headlight alarm in the CMS on, and I couldn't switch between high and low beam. Dingy recently showed a picture of the CMS printed circuit board and also where to jumper to eliminate the alarm. http://www.venturerider.org/forum/first-generation-venture-tech-talk/92274-jumper-cmu-leds-bulbs-prevent-warning-light-coming.html Of course, the instrument panel has to be removed from the bike first. It's not a bad job, just take the windshield off and take the screws out for the front turn signals and let them hang by the wires. Look inside the turn signals mounting at the openings to the sides of the instrument panel. On each side you will see 2 phillips screws that hold the instrument panel cover to the instrument panel. Take the 2 that prevent the cover from sliding upward completely out, and loosen the 2 screws that prevent the cover from sliding toward the rear of the bike. Then just slide the cover toward the rear of the bike. To remove the instrument panel, using a 1/4” ratchet, long extension, universal joint, and 10mm socket, reach upward from the headlight opening and remove the 2 bolts from the bottom of the instrument panel. DO NOT REMOVE THE NUTS---they just hold the brackets to the instrument panel. Also when I had the bolts out of the threads, but still in the hole, I reached in from the top with a magnet tool and prevented the bolts and washers from falling when I pulled the socket off the bolt. Looking through the headlight opening, towards the left side of the bike (look right into the opening) you will find 2 connectors for the instrument panel---disconnect them. Disconnect the speedometer cable, and then pick up the instrument panel slightly to slide the top pins out of the grommets, and move the panel towards the rear of the bike slightly. Reach in and disconnect the 2 connectors on the back of the CMS (BTW, CMS=Computer Monitor System). Now remove the instrument panel. Place a soft cloth on the work bench and set the panel down face down. Take the screws out that mount the CMS, and remove the CMS. Take it out as 1 piece, there is no need to slide it apart yet. Lift the side that has the wire bracket under a screw first, and then when it's clear of the hole, slide it towards where the wire bracket was mounted. You'll see that the other side has a clear plastic piece on it that allows the panel bulb to illuminate the CMS. Separate the CMS but be careful. One board has a connector that can be pulled to separate that board. However 2 boards have a ribbon cable that you can't easily remove, so don't stress this area too much. The CMS light monitors have a magnetic proximity switch wrapped with a coil of wire. The lamp current flows through the coil, and creates a magnetic field, that closes the proximity switches. You need to solder a small piece of wire across the proximity switches for high and low beam headlights. Dingy has arrows pointing to the correct places to put the jumpers. Then re-assemble the CMS and re-install it in the instrument panel. (see picture of the back of instrument panel) (See picture #1) You can see the RLU (Reserve Lighting Unit) at the top of the picture. Follow the wiring out of it to the connector. On the motorcycle side of the connector, cut and tape the G/R, Y/G, and the light green wires (the light green isn't shown in the picture). Now, you'll be able to switch between high and low beam, and the HEADLIGHT white lamp on the instrument panel won't come on, but the blue high-beam light on the instrument panel won't work. To get that working, on the motorcycle side of the instrument panel connector, cut the Y and the R/Y wires leaving about 2” of them still on the connector. Tape the 2 wires not in the connector (that you just cut). Using two 12” lengths of 16-20 gauge connect them to the Y and the R/Y wires from the connector. I soldered mine and used shrink tubing to insulate them, but you could use butt connectors. (picture #2) Connect the Yellow wire to ground. I used a terminal and put it under the screw in the picture (picture #3). Shorten the wire before putting the terminal on it. Connect the R/Y wire to the headlight high beam lead (Y/R). On my bike, I've replaced the headlight socket, so I had soldered and taped connections to the new socket. I just untaped mine, wrapped the R/Y around the previous connection, soldered it and then taped it again. If you still have the original headlight socket, use a pocket knife and strip a short length of the Y/R wire, wrap the R/Y wire around the bare wire, solder it and tape it. (picture #4) This completes the necessary wiring changes and your LED headlight should work on both high and low beams, and you should have no alarms. Also, your blue high beam light should work. Now you need to mount the LED light control module. In picture #4 you can see where I mounted mine. Then when I was installing the headlight into the bike, I saw that the control module was hitting the side of the headlight. I ended up using a heat gun to get the double sided adhesive pad to release and then I moved the control unit about 1/4” more to the left side of the bike. The connector between the LED bulb and the control panel has a lock nut, but on mine the lock nut wouldn't stay tight. To cure this, I wrapped the connector with electrical tape to prevent the nut from loosening. Now it's time to install the headlight. Position the original headlight and the LED to control module wiring so that they won't get pinched by the headlight and the height adjusting mechanism. Last night I rode the bike for a bit to 'test' the headlight---Low beam was a lot brighter than the OEM bulb, and the pattern seemed a bit wider. Nobody flashed their lights at me though. It's not a road burner. However when I rode along side of a car with halogen headlights, his beams looked like they were made by candles. The high beam wasn't that much better than the low beam. The high beam pattern seems to be pretty high.
-
 I have been chasing this problem for way too long. So before I have this bike sent to a salvage yard, I am going to reach out to the experts. Problem - low beam is way to dim. 1. Bulb has tested good. 2. Dimmer switch replaced and is good as well as clean. 3. Not real sure how to check the reserve lighting unit but I have three of them and same symptom with all three. This pretty much eliminates a bad RLU. 4. I also removed the CMU to check for a faulty solder point and could not identify any but re-soldered the plug solder points anyway. Reinstalled - dim low beam still. Since I had another complete dash unit, I checked the replacement dash and found no issues and installed that one. Still a dim low beam. High beam is as bright as it should be, just a dim low beam. Battery is 12.6. How should I proceed from here? I'd hate to part this thing out; it runs just too good to do that. Thanks in advance for your help. herb
 -
I am working on an 88 venture and have a fault on the display...it is when the headlight on low beam....I soldered all the connections in the CMS...but when the low beam light is on the warning light is on and the display shows the headlight...any information would be great...Thanks in advance.
-
On my in to work this morning my low beam went out everything is okay hi beam and charging.. So my question is I have the rubber boot off and bulb unplugged, does that bulb just pull out or does it need to be turn, there is a clip there as well and does that need to be remove... Geez I wish my daughter was here her hands are much smaller... Thanks in advance
-
i have no low beam. it worked, very dimly, for a short period...maybe a couple weeks. started it this morning and no low, high beam works but shows a draw on gauges. bulb is about a month old. any ideas?
-
Recently my 05 RSV has taken on the habit of blowing the headlight fuse whenever I switch to high beam. I was hoping some of you guys could give me some suggestions as to where to start. Thanks for your help. You guys are a weath of knowledge.
-
Changed the bulb on my 2001 RSV tonight,split the fairing etc. and started the bike up and no low beam.So I checked the old bulb with a multi meter and it shows the old bulb is good.Any ideas anyone?My bike has no modulator.When I tear into it again I am going to check the pigtail to the headlight for current on low and high beam.I am thinking either wiring problem or the switch.Any other things I should check?I do have high beam and running lights work.
-
I had a friend give me a 1988 venture royal. It hasnt ran in a couple of years, after some good cleaning and fresh gas and oil i have it fired up and running. I am having a problem with the battery draining down and going dead over night. and all light work except the head light. the bulb is good just not getting any power to it. checked the high low beam switch and not getting any power there either. Ive chexked all the fuses i can find and they are all fine. Im not sure if the two problems i have are related or not. Any helpful hints on where to look next would be great.. thanks for reading my post.
-
 I'm getting some of the stock running lights for my 2006 RSTD. There are two sets of lights for sale. One is sealed beam, the other is Halogen. What are the pros and cons of each? I have the original headlight....but would not hesitate to replace it with some thing better. I'd like the lights to match....
 -
My low beam on the driver side went out, but still have high beam. Replaced the headlamp and all is fine for 24 hours then the same low beam goes out. Being that that the Passenger side both hi and low works I tested both the old and the new lamp in the Passenger side and yep both the low beams are out on the old and recently new one. I then put the good one from the passenger side and put it into the Driver side and the Driver side now has both low and high beam. I can see why the low beam on the old headlamp go out after nearly 17 years but why would the brand new headlamp low bean go out within 24 hours. If there is a short wouldn't the fuse blow instead of the headlamp low beam? I now that one possibility would be that the low beam on the new one might be defective. I sure would like to know other possible reasons. Thanks Brian.
-
...on one side. As far as I can tell, these are the original Yamaha passing lamps. Is there another sealed beam that will work or must I buy the original Yamaha lamp?
-
I have just started noticing that my passing lights are on sometimes, and not at others. Since I bought the bike with them installed, I have never seen a switch for them. I thought they ran with my low beams, but lately if I pull up to someones back end at a light, in the reflection they are sometimes on and sometimes off. I think it is a short, but wanted to check to see if I am missing a switch. High/low beam doesn't make any diference. I guess I could rewire them to run with both. Is it better to wire a switch in, like I had on my 1st gen?
-
 I had the local stealer install the Yamaha driving lights. I had them wire the lights so they are on all the time except when the high beam is on. They didn't install the switch. So now I'm thinking is that practical or even safe? I ride at night and want as much light as possible on the road. I replaced the stock headlight bulb with a PIAA intense white. I'm wondering if I should re-wire them so they are relayed through a switch and I can turn them on and off regardless of whether or not the headlight is on low or high beam. How do you run your driving lights? Any comments or suggestions are welcome. Chris in Red Deer, AB
 -
Just noticed yesterday that my high beam is no longer working. I'm assuming that this is not a fuse issue as the low beam is still working, so will someone please direct this dumba$$ as to how to change out the bulb! I checked the 2nd Gen Tech Library and didn't find anything. Thanks. Signed, Dumba$$
-
Ok here goes. Sorry this took so long but things have been totally crazy around here. First thing you need to buy is a 12v garage door opener. Here is the one I used. http://i82.photobucket.com/albums/j256/Shinufu/0909101242.jpg Next you will need some electrical wire, solder gun and solder. Open the garage door opener so it looks like this. http://i82.photobucket.com/albums/j256/Shinufu/0909101243.jpg Take out the battery. Now the rest is quite simple. You need to solder a POS and NEG wire on the battery posts. Simple enough. Now in the next picture you will notice the SW1 on the left side. There are two tiny posts the run up thru the plastic. They need to be soldered together. That is for the constant connection. http://i82.photobucket.com/albums/j256/Shinufu/0909101244.jpg Once everything is soldered into place you can file out two small grooves for the wires to go thru and put it all back together. Test it buy using the 12v battery that came with the remote. If all works your install ready. I split the fairing and pulled the headlight assembly out to get a good look at the wires. There are three on the plug for the headlight. One is for low beam, one is for high beam and one is a ground. You want the HIGH BEAM and GROUND. I used wire clips to attach the remote to the wires. Use plenty of electrical tape to secure the wires and put it all back together. WALAH!!!!!!!! You should now be able to open your garage door with your highbeams. I hope this helps!!!!
-
 I just installed my headlamp bulb with a Silver Star Ultra. After install, low beam was dim but high beam was super bright. Now I get the headlamp message on display. After having it in for a week the low beam is not on at all but works on high beam. This morning low beam was on and very bright for a few minutes then went off. High beam still works fine. Did not have any issues with the other unknown bulb that was installed from PO I was surprised to see the wattage to be 55/100 with no name or numbers on bulb just the words not for use in Germany. This is the old bulb. Do you think the Silve Star is defective or my scooter just didnt like me changing out a perfectly good headlamp? I would really like to run with the Silver Star as it is much brighter looking. Maybe with some of your suggestions I can get it to work. Thank you for all of the support this site provides! Bob
 -
I'm posting this in the watering hole rather than the RSTD tech section because I think it has wider appeal. But, you mods can move it if you want. I bought the Canadian Cruiser Customizing HID lamp that is all the rage. I went over to Cupcake's/Squidley's this morning and he installed it while I lamely assisted and Jus Monkeyin Around provided moral support. They are ace, by the way. I'll post install photos tomorrow after some shuteye. Last night I took some "before" photos of Roxie wearing the Sylvania Silver Star Ultra headlamp. Tonight I took some "after" photos for comparison. My first shot is from the house looking down the street. For these shots, the top photo is of the Sylvania, the bottom is the HID. You can clearly see that the HID is white, while the Sylvania is yellow. Interestingly though, the Sylvania is lighting up the Stop Sign at the end of the street, while the HID is not. http://farm5.static.flickr.com/4082/4741266254_bd0efa6d96_o.jpg After that shot, I went to the end of the street and my better half took a low beam shot then a high beam shot. I should mention that all the shots in this series use the same settings, which were right for the first photo (f/4, 1" exposure, ISO 400). On low beam, the HID is clearly brighter. http://farm5.static.flickr.com/4136/4740631365_34785ce898_o.jpg Then I flipped on high beam. Check it out: the Sylvania is kickin' HID tail. Or so it seems. To me, I think the HID is maintaining a very tight focus, while the Sylvania is giving out greater intensity AND spill. So the Sylvania seems to be whuppin' up on the HID. But the center of the HID is completely burned out in the photo, like it was getting smashed by a laser. There are serious photons hitting the camera. http://farm5.static.flickr.com/4075/4740631765_a91c0530a5_o.jpg Next, my wife decided to snap a shot as I drove up. I'm glad she did, because you can compare the light blob. You can also see how the HID is making the street light up from reflected light. http://farm5.static.flickr.com/4102/4740632603_3ee425bcbf_o.jpg I pulled the bike next to the camera, and shone on the garage. First low, then high beams. It looks to me like the HID on low beam is very similar to the Sylvania on high. When the HID is on high, you can see that the gutter is very over exposed. http://farm5.static.flickr.com/4080/4741268474_eb45db8586_o.jpg http://farm5.static.flickr.com/4095/4741268940_4b6216b907_o.jpg So what are my conclusions? First, although it is claimed to not be the case, I think the HID is aimed higher than the Sylvania. I understand it should be a simple switch out, but it just seems to me that the HID is aimed too high, especially on high beam. My office has a nice location in the garage where I can aim lights, and the next time I ride to work I will do that. Secondly, the Sylvania Silver Star Ultra is a superb light. I've had riders that I follow comment on how bright that bulb is. I especially like the enhanced spill I get on high beam. I almost don't need my passing lamps to spot deer. Almost. If you don't want to make the jump to HID, I can easily recommend this light. Lastly, the HID is very very bright. The photos don't show it, really. You can see that on some of the photos, there is a white haze... which I believe is overloaded sensors. The lamp is very tightly focused, which makes it hard to capture the brilliance. My wife told me when we went inside five minutes after I drove up the street that she was still seeing spots from the HID. She thinks it is too bright. I'll let you judge. I'm also interested in your comments. Dave
-
Wellll... after going thru 2 pairs of those crappy adjure 20 dollar special passing lamps, I have decided to go with a sealed beam from napa 70,000cp 55wt. Got one reinstalled on the bike and WOW I love it. Go to install #2 and for the life of me that metal ring for the sealed beam grew legs and split!!! I have searched and searched so now I ask for your help. Any chance someone has one laying around I could get?? Please let me know ASAP Thanks Guys
-
 I've reviewed the headlight posts and can't seem to find a solution to my problem. I have an idea what it is. The headlight warning kicks on randomly, but the headlight remains lit. If I toggle the high beam/low beam, the light goes out for a little while. It was with just the high beam, and would go off when I switched to low beam. Now it will come on randomly on either low or high beam and will randomly go out (the warning, not the headlight). Flipping the headlight switch usually works temporarily. I'm wondering if it's an issue of Computer cold-soldering...or a bad headlight switch? Any ideas? Thanks.
 -
 Ok, put in the HID kit from that everyone is raving about. Well of course, Murphy's Law now steps in. I have low-beam but no high-beam, put the old bulb back in, both beams work. Called the Canadian company and they say not enough power to the ballast for the high-beam or could be a faulty low/high beam switch on the bike. Took the switch apart and of course it is a sealed plastic unit with three wires coming out. Now I slowly push the switch to high beam and the HID high beam comes on, but that is with the switch barely depressed and when fully enaged, no HID high beam. So anyone have a possible answer, otherwise I am going back to the standard bulb.
 -
I am looking to change/upgrade the passing lamps on my RSV. They are the Yamaha OEM sealed beam style, and I would really like to change to something with a replaceable H3 bulb. I would still like to use the existing mounts, is there a way or a different lens housing I can use? I also hate that the sealed beam is "yellow" compared to my Silverstar Ultra. Any and all help you can provide would be great.. Thanks JM
-
 My lens is cracked and I can't find just a lens for sale anywhere, the only way I can see to buy it is the whole assembly with the mounting flange and adjusters for like $125 at the cheapest. Anyone know of a place that sells just the glass? or have any cheap alternative to replace it? Would it be possible to just use a plain sealed beam headlight even?
 -
 I've been thinking about adding a relay to power the headlight hi/lo directly from the battery, essentially bypassing the connection through the CMU. It could be done using one relay with normally closed going to the lo beam with the switched circuit going to the hi beam operated by the dimmer switch. Or alternatively using one relay for each of the hi and lo beams. I pulled this quote from another thread. Gary what relay option did you use? The first one would seem the simplest but may not allow the lo beam to be shut off by the start circuit.
 -
Well, i have managed to change out the electrics (wiring harness and all) from the 86 to my 83. The bike cranks and runs fine, everything seems to be working so far Except for the headlight and the flashers, no hi beam, no low beam. no left right or emergency flashers. the emergency flasher switch is attached to the harness. Any ideas what may be wrong?..............................front park lights are on, and i tried another headlight with the same effect.


.thumb.jpg.9dfefb49018580a1813c8128f131546e.jpg)