
Search the Community
Showing results for tags 'instrument'.
Found 15 results
-
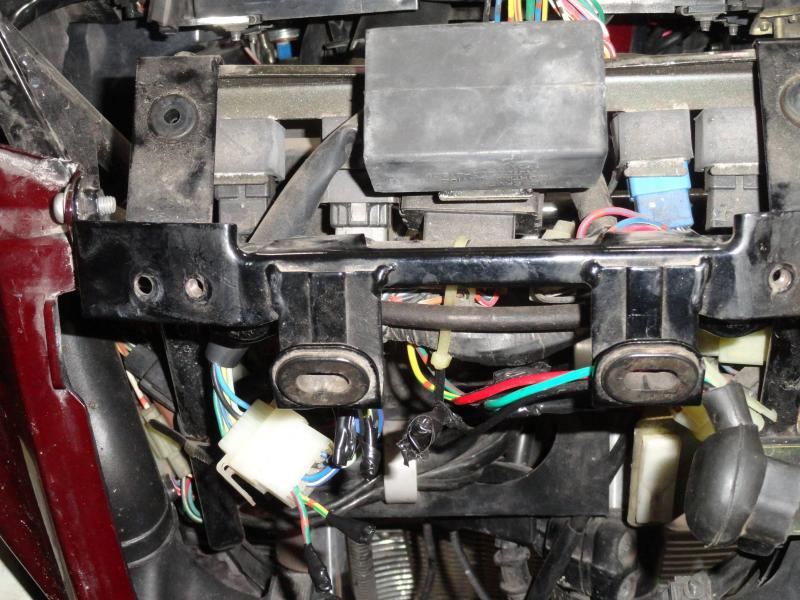
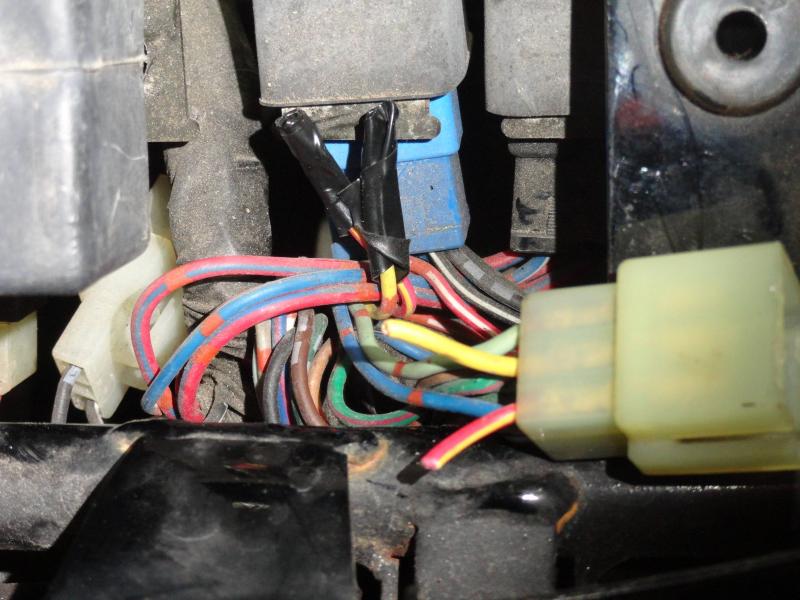
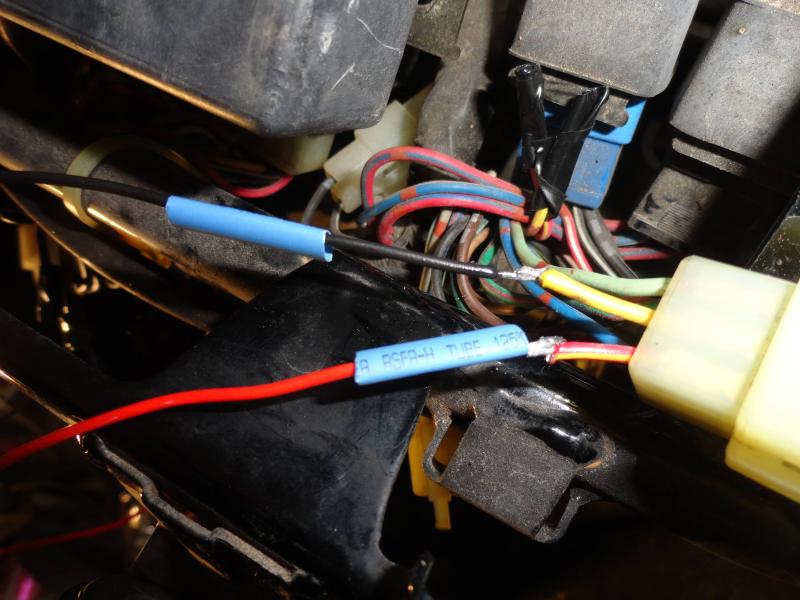
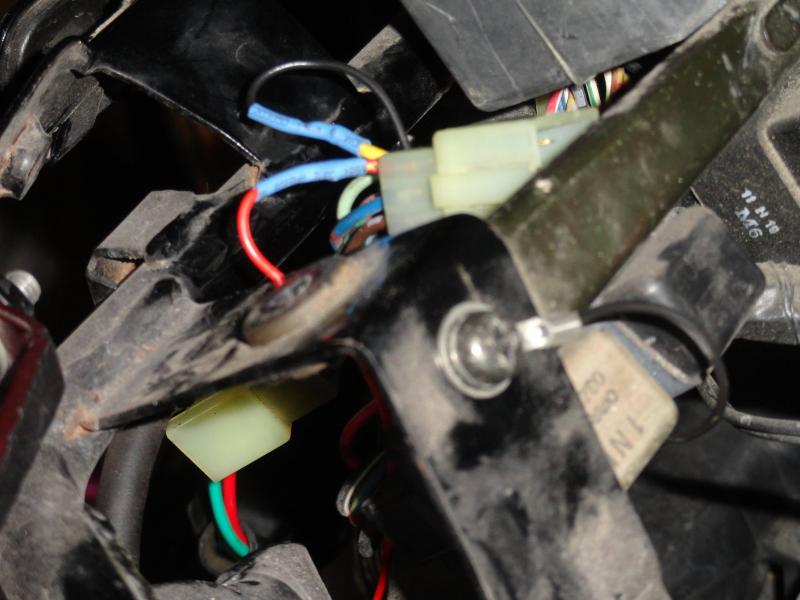
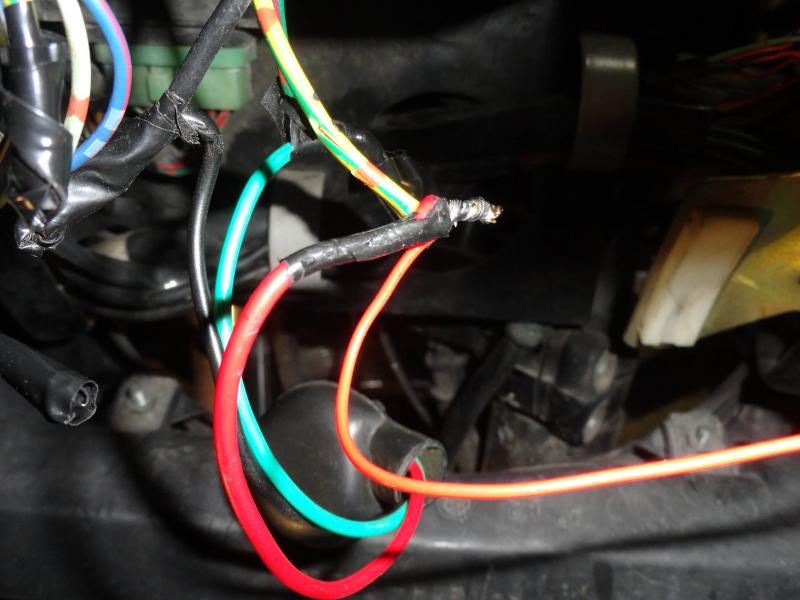
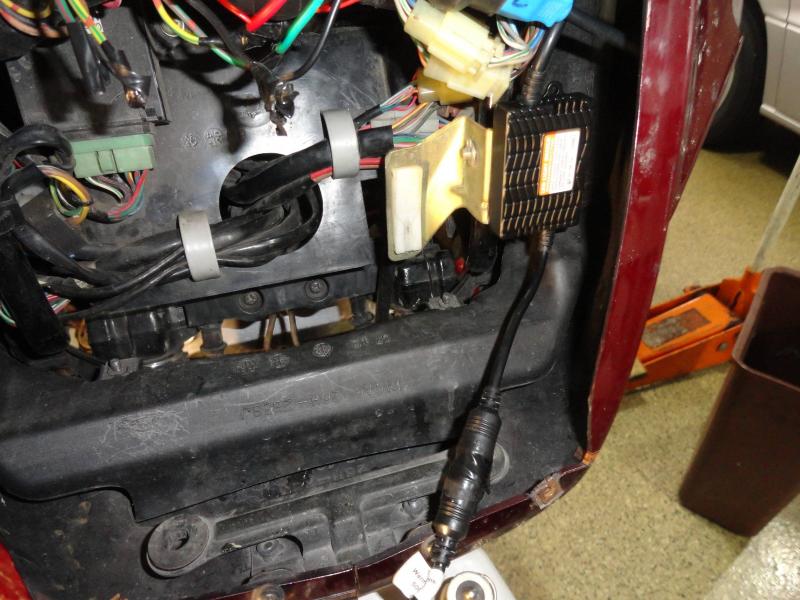
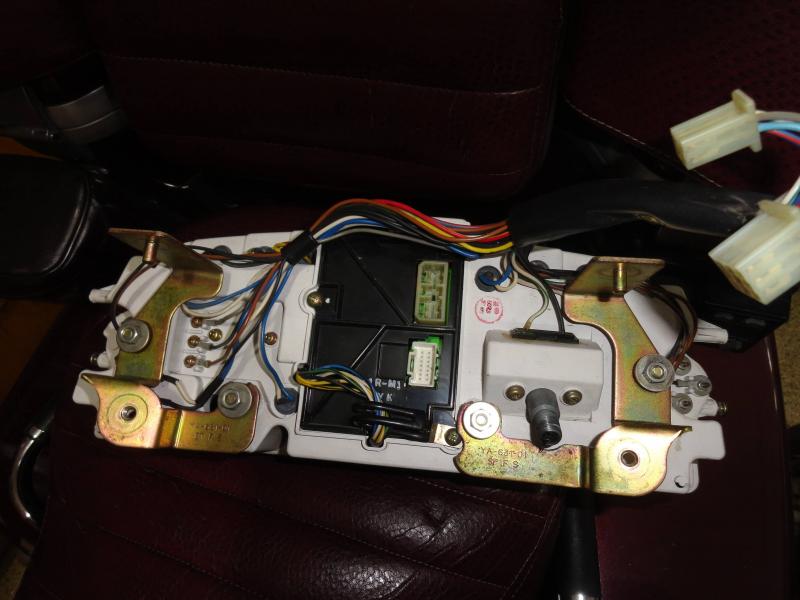
 I just bought the SpeedMetal 2200/2400 Lumen LED headlight conversion kit from CycleGear for $60. I don't know he long they'll have this sale, but they have it every so often. I wondered about the light pattern, so I removed the headlight from my bike and took it down to my workshop. I used a big wooden 'C' clamp to position it in a repeatable position. Before I took the Sylvania Silver Star bulb out of the headlight, I applied 13 volts to it and observed the light pattern on the basement wall. I marked the top of the main part of the light beam with a marker, and then repeated this with the high beam. I also marked the workbench where the 'C' clamp was so that I could put it back in the same position. I switched to the LED lamp and powered it up. There appeared to be very little difference in the beam shape or position, but of course the light beam was much brighter. The light beam on low was just a tiny bit higher, and the high beam was more than a bit higher. It looked great. I connected it to the bike, and I had the headlight alarm in the CMS on, and I couldn't switch between high and low beam. Dingy recently showed a picture of the CMS printed circuit board and also where to jumper to eliminate the alarm. http://www.venturerider.org/forum/first-generation-venture-tech-talk/92274-jumper-cmu-leds-bulbs-prevent-warning-light-coming.html Of course, the instrument panel has to be removed from the bike first. It's not a bad job, just take the windshield off and take the screws out for the front turn signals and let them hang by the wires. Look inside the turn signals mounting at the openings to the sides of the instrument panel. On each side you will see 2 phillips screws that hold the instrument panel cover to the instrument panel. Take the 2 that prevent the cover from sliding upward completely out, and loosen the 2 screws that prevent the cover from sliding toward the rear of the bike. Then just slide the cover toward the rear of the bike. To remove the instrument panel, using a 1/4” ratchet, long extension, universal joint, and 10mm socket, reach upward from the headlight opening and remove the 2 bolts from the bottom of the instrument panel. DO NOT REMOVE THE NUTS---they just hold the brackets to the instrument panel. Also when I had the bolts out of the threads, but still in the hole, I reached in from the top with a magnet tool and prevented the bolts and washers from falling when I pulled the socket off the bolt. Looking through the headlight opening, towards the left side of the bike (look right into the opening) you will find 2 connectors for the instrument panel---disconnect them. Disconnect the speedometer cable, and then pick up the instrument panel slightly to slide the top pins out of the grommets, and move the panel towards the rear of the bike slightly. Reach in and disconnect the 2 connectors on the back of the CMS (BTW, CMS=Computer Monitor System). Now remove the instrument panel. Place a soft cloth on the work bench and set the panel down face down. Take the screws out that mount the CMS, and remove the CMS. Take it out as 1 piece, there is no need to slide it apart yet. Lift the side that has the wire bracket under a screw first, and then when it's clear of the hole, slide it towards where the wire bracket was mounted. You'll see that the other side has a clear plastic piece on it that allows the panel bulb to illuminate the CMS. Separate the CMS but be careful. One board has a connector that can be pulled to separate that board. However 2 boards have a ribbon cable that you can't easily remove, so don't stress this area too much. The CMS light monitors have a magnetic proximity switch wrapped with a coil of wire. The lamp current flows through the coil, and creates a magnetic field, that closes the proximity switches. You need to solder a small piece of wire across the proximity switches for high and low beam headlights. Dingy has arrows pointing to the correct places to put the jumpers. Then re-assemble the CMS and re-install it in the instrument panel. (see picture of the back of instrument panel) (See picture #1) You can see the RLU (Reserve Lighting Unit) at the top of the picture. Follow the wiring out of it to the connector. On the motorcycle side of the connector, cut and tape the G/R, Y/G, and the light green wires (the light green isn't shown in the picture). Now, you'll be able to switch between high and low beam, and the HEADLIGHT white lamp on the instrument panel won't come on, but the blue high-beam light on the instrument panel won't work. To get that working, on the motorcycle side of the instrument panel connector, cut the Y and the R/Y wires leaving about 2” of them still on the connector. Tape the 2 wires not in the connector (that you just cut). Using two 12” lengths of 16-20 gauge connect them to the Y and the R/Y wires from the connector. I soldered mine and used shrink tubing to insulate them, but you could use butt connectors. (picture #2) Connect the Yellow wire to ground. I used a terminal and put it under the screw in the picture (picture #3). Shorten the wire before putting the terminal on it. Connect the R/Y wire to the headlight high beam lead (Y/R). On my bike, I've replaced the headlight socket, so I had soldered and taped connections to the new socket. I just untaped mine, wrapped the R/Y around the previous connection, soldered it and then taped it again. If you still have the original headlight socket, use a pocket knife and strip a short length of the Y/R wire, wrap the R/Y wire around the bare wire, solder it and tape it. (picture #4) This completes the necessary wiring changes and your LED headlight should work on both high and low beams, and you should have no alarms. Also, your blue high beam light should work. Now you need to mount the LED light control module. In picture #4 you can see where I mounted mine. Then when I was installing the headlight into the bike, I saw that the control module was hitting the side of the headlight. I ended up using a heat gun to get the double sided adhesive pad to release and then I moved the control unit about 1/4” more to the left side of the bike. The connector between the LED bulb and the control panel has a lock nut, but on mine the lock nut wouldn't stay tight. To cure this, I wrapped the connector with electrical tape to prevent the nut from loosening. Now it's time to install the headlight. Position the original headlight and the LED to control module wiring so that they won't get pinched by the headlight and the height adjusting mechanism. Last night I rode the bike for a bit to 'test' the headlight---Low beam was a lot brighter than the OEM bulb, and the pattern seemed a bit wider. Nobody flashed their lights at me though. It's not a road burner. However when I rode along side of a car with halogen headlights, his beams looked like they were made by candles. The high beam wasn't that much better than the low beam. The high beam pattern seems to be pretty high.
-
 Vibration reduction of Instrument Cluster on 83-85 Venture. I have experienced a lot of vibration / bouncing of my instrument cluster on my 83 Venture when riding on rough roads. I recently had the cluster off of the bike and found that the two brackets that mount the cluster to the fairing sub frame had excessive play in them. There is a rubber grommet over a shoulder stud at two points on each bracket for vibration dampening. I placed a new 3/8” washer between the existing washer and bracket to reduce the free play in the brackets. The 3/8” washer will fit over the shoulder of the stud allowing the bracket to slightly compress the grommet some more. The existing washer is replaced back over new washer and will only allow the nut to be tightened until contact with the shoulder of the stud. When the washer is placed correctly and the bracket is bolted back on the cluster, the threads of the stud will be about even with the back of the 10 mm nut when tightened. With this modification in place, the vibration of the cluster has been significantly reduced. There is still some flexing of the cluster that will absorb road vibration, but not nearly as much as before. The 4 conductor connector in the1st picture is for my shift position lights. The mounting bracket for the cluster is removed in this picture. The mounting studs for it are to the top left and bottom right of the electrical connector. The second picture shows where I placed washers. Gary
 -
.thumb.jpg.9dfefb49018580a1813c8128f131546e.jpg) i found this really cool sight that makes overlays for instrument clusters. www.whitegauges.net. . i sent them a pic of my 83 cluster and they said they could make a kit for it! wouldnt that be cool!! they have all different kind of colors too! maybe we can get a group buy?? tell me what you think. i would need to send them a spare cluster for developement. anyone willing to do so? how bout you gen2 guys? want in?http://www.whitegauges.net/product_images/color_changes/yellow_small.jpghttp://www.whitegauges.net/product_images/color_changes/brightblue_small.jpg
i found this really cool sight that makes overlays for instrument clusters. www.whitegauges.net. . i sent them a pic of my 83 cluster and they said they could make a kit for it! wouldnt that be cool!! they have all different kind of colors too! maybe we can get a group buy?? tell me what you think. i would need to send them a spare cluster for developement. anyone willing to do so? how bout you gen2 guys? want in?http://www.whitegauges.net/product_images/color_changes/yellow_small.jpghttp://www.whitegauges.net/product_images/color_changes/brightblue_small.jpg -
Try this again! I just came across this site advertised on Craigs List. Its not RSV related, but I know a lot of you have different bikes also. www.gravesj44.webs.com If your bike isn't listed, they say bring it by and they will design you an instrument face for free. This place is just down the road from me, though I've never been there or seen their work.
-
 It looks like my speedometer finally gave up the ghost. Anyone know what speedometers are compatible with an 84? I find everything from 83 to 91 but no 84s. I figure it would be easier to replace the whole instrument console than the speedometer itself but wanted to make sure everything would play well together before I buy a part from a different year. Thanks.
 -
 Sleeperhawk is in the process of installing his new instrument panel. He had painted it this week and it really looks good! Pecker came over to help and supervise. Wanderer and Patricia came by a little while ago to get the rear tire removed and Ted was taking it to town to get a car tire mounted on the rim. He just got back and they are in the process of putting it back on the bike. More pictures to come later! (By the way, Sleeperhawk cringed at the first drilling into the front panel!)
 -
How do I get at the handle bars to adjust. I see an allen screw in the front of the instrument pannel and two bolt on the rear(tank side). If I take these out will the instrument panel come off so I can adjust the bars? Also, can I place a 1" riser without changing cables? Thanks for any advise. Mark
-
 I have recently aquired an 86 venture that has had the front body removed but still has the rear luggage intact. Is it possible to change out the luggage to the 83? anybody tried this before? I am also looking at pulling the wiring harness and changing all the electrics as well. instrument panel and all. this will also give me the air-ride system. and cruise control. Any thoughts on this. Major projects are my favorite...................
 -
 Can someone please tell me where to find instructions on removing the instrument cluster on an 83 venture? My speedo cable came undone and I don't want to break something pulling the cluster to screw it back in. Thanks!
 -
Sorry how is this> Here are the instructions and pictures I took of this. I have a 83 Venture standard and was having the false warnings, dim headlight, and my fuel gauge would go to empty right after filling then back full again. This caused the fuel warning to come on, then go off. http://www.venturers.org/Tech_Library/attachments/cms1.jpg First remove the windshield trim. (4 screws). http://www.venturers.org/Tech_Library/attachments/cms2.jpg Remove the windshield. (4 screws). http://www.venturers.org/Tech_Library/attachments/cms3.jpg There are four screws holding the hood in place. I loosened the front ones. http://www.venturers.org/Tech_Library/attachments/cms4.jpg Then I removed the rear ones. http://www.venturers.org/Tech_Library/attachments/cms5.jpg Then removed the hood. http://www.venturers.org/Tech_Library/attachments/cms6.jpg Then using a 10mm wrench and a socket, I removed the 4 nuts and washers holding the instrument cluster. http://www.venturers.org/Tech_Library/attachments/cms7.jpg I then unhooked the large connector and 3 smaller wires that connect to the instrument cluster. http://www.venturers.org/Tech_Library/attachments/cms8.jpg I then disconnected the speedometer cable. I did this last as I could pull up a little on the cluster and get more room to unscrew the cable. http://www.venturers.org/Tech_Library/attachments/cms9.jpg I then removed the cluster from the bike. Here is the removed cluster with all the tools I used to remove it. http://www.venturers.org/Tech_Library/attachments/cms10.jpg Now to remove the CMS from the instrument cluster. I first removed the 4 ourter screws, then the four inner screws. http://www.venturers.org/Tech_Library/attachments/cms11.jpg Then you remove the mounting plate. http://www.venturers.org/Tech_Library/attachments/cms12.jpg I had to work mine out of there one side at a time. Part of the problem was the wires that connect the two pieces together, and a piece of clear plastic which is to light up the LCD at night. Here is the rear view of the removed unit. http://www.venturers.org/Tech_Library/attachments/cms13.jpg And the front view. http://www.venturers.org/Tech_Library/attachments/cms14.jpg All you need to do to split this is, remove 4 screws on the back and disconnect the wire between the two units. I used a pencil type soldering iron heated very hot. http://www.venturers.org/Tech_Library/attachments/cms15.jpg I soldered both rows where the connector is soldered to the board. The iron is pointing at one row. http://www.venturers.org/Tech_Library/attachments/cms16.jpg And here it is pointing at the other row. http://www.venturers.org/Tech_Library/attachments/cms17.jpg Once completed, just reverse the sequence to put it all back together. Some of the mounting bolts are buried and hard to get to, but if a little patience is used, you can get to them. There are three connectors that I didn't show, and I found those hard to put back together, but again a little patience and they should be fine. Now that I had it all back together, I had to try it out to make sure I had not created a error or problem. http://www.venturers.org/Tech_Library/attachments/cms18.jpg It took me about 30 minutes to take the instrument cluster out fo the bike. Removing the CMS from the cluster and soldering took about an hour for me. Putting the cluster back together took about 15 minutes, and returning the cluster to the bike and finishing up took about another 20 minutes. Remember I was taking pictures and taking great care.
-
 My speedometer neddle is resting on bottom of the instrument panel. Been this way since I bought the bike. I thought I would open up the instrument panel and see if i can re-attach the needle. I have the instrument panel out of the bike (using the great instructions found on this site). I've removed the 6 pan-head screws located along edge of the back panel. The illumination knob seems to be preventing a complete speration however. There doesn't appear to be an obvious way of removing the knob externally. Am I missing something (probably)? Any help help or suggestions greatly appreciated. Thanks, Vince 84' Venture
 -
My brother just gave me a 1986 Venture royale that's in rough shape 80% of the plastic is cracked or has broken tabs and most of the accessories don't work.I don't want to restore it to its original glory but rather I'd like to strip it down to a almost bare/naked bike.I want to ditch the instrument console and need to know if there is any problem with just mounting a different speedo & tach or does the bike need any signals from different components enable to start it?Can anyone think of any other obstacles I might encounter.Thanks
-
 I've removed the instrument cluster and can't get the face off until I remove the Illumination control. Anyone know how to remove the control ? Does it just pull off or what ???? Jim O'D..
 -
Tuesday evening while riding home from work, the 18 wheeler that was ahead of me was flashing it's brake lights at me. It was not dark yet, so I thought that perhaps my headlight was out and I kept riding. About 5 miles later, I smelled something that smelled like brakes burning and I attributed the smell to the truck that was flashing his brake lights at me. About a mile later, lots of smoke from under the instrument panel. Being between off ramps, I decided that I could make it another 1/2 mile to the next exit, so slowed down and kept going. When I was exiting I-80, the instrument panel burst into some flames. I pulled off the road, shut it off, pulled my stuff out of the trunk, dialed 911 and ran to the nearest house for a bucket of water. By the time I got back there were 3 foot flames. A bucket of water didn't do much. The fire department put it out within about 3 minutes. I had time to pull the fairing today to find about 10 inches of the wiring harness gone. All of the relays are gone, of course the windshield, the clutch hose and switch are burned up. Headlight adjuster knob is oblong shaped. Throttle cable is a bit crispy... ignition switch cover is gone. Both side panels on the fairing are melted. Emergency flasher switch is melted. Right hand mirror inside trim and rubber boot is melted. I have a spare wiring harness and am considering a rebuild. I would need: Clutch hose from lever to hard tube. clutch switch L and R side panel covers R mirror windshield relays emergency flasher switch instrument panel and cover Any idea what that might cost?
-
I have a 1986 Venture Royale. I was out riding and the instrument panel just went dark. It came back up after a bit then dark again. Brake lights are gone, turn signals, and none of the gauges work. One oddity was that when there was no load, the instrument panel would light up but any load would darken it (putting down the side stand, turning on signals, etc). Fuses are all ok. Any ideas on where to start dx this problem?

.thumb.jpg.0def0cd11f551e85e5aebca6947d2cdb.jpg)
