Search the Community
Showing results for tags 'clip'.
Found 18 results
-
On my in to work this morning my low beam went out everything is okay hi beam and charging.. So my question is I have the rubber boot off and bulb unplugged, does that bulb just pull out or does it need to be turn, there is a clip there as well and does that need to be remove... Geez I wish my daughter was here her hands are much smaller... Thanks in advance
-
 Uncledj is having a 'new' noise on his Venture. I can not determine what it is either. It is a somewhat metallic sound in the low end RPM ranges, seems to clear up above 4000 or so when I rode bike. I tried recording a clip of sound on each side with my Iphone, but noise is not very obvious on recording, and the right side clip sounds totally different from left side on recording which is not actual case. He has had complete exhaust system apart with nothing apparent found there. Gary [ame=http://s1007.photobucket.com/albums/af193/gdingy101/?action=view¤t=IMG_2923.mp4]IMG_2923.mp4 video by gdingy101 - Photobucket@@AMEPARAM@@file=http%3A%2F%2Fvid1007.photobucket.com%2Falbums%2Faf193%2Fgdingy101%2FIMG_2923.mp4@@AMEPARAM@@file=http%3A%2F%2Fvid1007.photobucket.com%2Falbums%2Faf193%2Fgdingy101%2FIMG_2923.mp4[/ame] [ame=http://s1007.photobucket.com/albums/af193/gdingy101/?action=view¤t=IMG_2922.mp4]IMG_2922.mp4 video by gdingy101 - Photobucket@@AMEPARAM@@file=http%3A%2F%2Fvid1007.photobucket.com%2Falbums%2Faf193%2Fgdingy101%2FIMG_2922.mp4@@AMEPARAM@@file=http%3A%2F%2Fvid1007.photobucket.com%2Falbums%2Faf193%2Fgdingy101%2FIMG_2922.mp4[/ame]
 -
This is not bike related. I have an Otterbox Defender Series protector for my Droid X. I have had it about a year and 2 months. The other day, the tab that holds the phone and its protectors in my belt clip broke. I checked the website and realized that the warranty was only a year. OK, so I will just buy a new belt clip. After not finding just the belt clip to buy, I contacted customer service via email explaining the circumstance and asking how to buy a new belt clip. In about an hour, I had a response that in short said give me the numbers off the clip, your name and address and I will send you one. Today, a replacement belt clip showed up in the mail as stated. This just does not happen with most businesses. I am impressed. I believe in passing on the good as well as the bad. I hope this helps someone decide to spend the extra money on a good item that is obviously backed by the company. :thumbsup2: :thumbsup2: FIVE THUMBS UP!
-
What is the 'recommended' position of the E clip on the carb diaphragm needle valves? Needle valve is similar to one on bottom of attached picture, not exactly but close. I am getting these carbs closer on Speedy, but I stil have a slight popping below 3,000 RPM's & gas mileage is somewhat lower than expected. About 25-30mpg range. Carbs are 35mm mikunis with stock VMax jets in. 150 mains, 90 PAJ2, 170 PAJ1 & 37.5 pilot. Gary
-
I dismantled the starter switch and housing to clean all the internals of the switches. I'm in the process of putting it back together. There is a wide half circle clip that I forgot where it went. Any suggestions please. See picture. Please ignore the other 2 parts.
-
[ame=http://www.youtube.com/watch?v=lF4qii8S3gw&feature=related]Victor Borge Phonetic Pronunciation - YouTube[/ame]
-
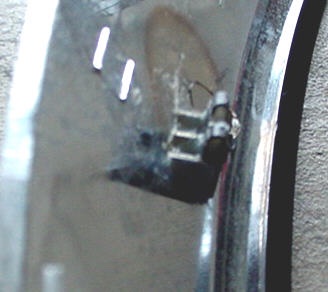
I'm attempting to remove and replace the headlight bulb without cracking the fairing (at the suggestion of the experts here!) Before I break something, I thought I would get a little help/explanation on removing the bulb from the experts. I've attached some photos showing the back of the bulb. Question is...how do I remove the bulb? There was some discussion on a "spring clip" that holds the bulb in place. Is the tab with "top" written on it the spring clip? Do I simply push it forward (up) away from the wiring receptacle? Can someone fill in the blanks for me? Any other hints/tips/tricks would be greatly appreciated! Thanks!
-
I've improved gas mileage now on about 12 bikes. This works especially if you are under 40 mpg. I'm consistantly getting mid to high 40's on all my 1100-1200's. Easy 1-2 Hour job 1. Remove the carb cap, 4 screws. 2. Remove the spring. 3. Remove carb slide and diaphram, it's black with a needle hanging out the back. 4. Remove the jet needle, there's a large screw inside the middle of the carb slide holding it in. 5. There is a white spacer under a circle clip. Remove it. 6. Replace the white spacer with any small washers about 1/2 the thickness of the white spacer under the circle clip. 7. Ignore the fact that the white spacer has a small tit on one side. 8. You may want to add extra washers on top of the circle clip. (I didn't on my Venture and a friends) 9. Put it all back together in the same order it came apart. New washers, jet needle with circle clip tight (check it), 1 or more washers on top of circle clip, small spring, plastic screw, in that order. 10. Carefully reinstall slide and diaphram. Notice diaphram has a tap. 10. Do only one carb at a time. (Can use others as reference) 11. Go for a ride checking gas mileage and performance. My friends 87 Std. went from 37 to 45 mpg. 12. Clean and check spark plugs before and after. Correct color is gray, tan or clean depending on type of gas used. Slightly white electrodes is Ok if the plug base near threads is darker. white base and tip is too lean; black is too rich. 13. SO: Add washers under circle clip to richen, remove washers to lean. 14. My bike is faster now lean (hotter combustion) 15. I set pilot jet screws to 1 3/4 turns out 16. All 4 Ventures were way out of synch before I did them. Much smoother now. Questions? Send me a PM or email: chuckfrench48@gmail.com (mention VR)
-
This works on all motorcycles with carbs. I've slightly revised this for better clarification. And I posted to this section for 2nd Gen's to read. Easy 1-2 Hour job 1. Remove the carb cap, 4 screws. If 1 screw is a security screw used vise grips to turn. 2. Remove the spring. 3. Remove carb slide and diaphram, it's black with a needle hanging out the back. 4. Remove the jet needle, there's a large screw inside the middle of the carb slide holding it in. Pay attention to the order the parts come out. 5. There is a white spacer under a circle clip. Remove it. 6. Replace the white spacer with any small washers about 1/2 the thickness of the white spacer under the circle clip. 7. Ignore the fact that the white spacer has a small tit on one side. 8. You can add 1-2 washers on top of the circle clip to take up the space. (I didn't on my Venture and friends) 9. Put it all back together in the same order it came apart. New washers, jet needle with circle clip tight (check it), 1 or more washers on top of circle clip, small spring, plastic screw, in that order. 10. Carefully reinstall slide and diaphram. Notice diaphram has a tab. 11. Do only one carb at a time. (Can use others as reference) 12. Go for a ride checking gas mileage and performance. My friends 87 Std. went from 37 to 45 mpg. 13. Clean and check spark plugs before and after. Correct color is gray, tan or clean depending on type of gas used. Slightly white electrodes is Ok if the plug base near threads is darker. white base and tip is too lean; black is too rich. 14. SO: Add washers under circle clip to richen, remove washers to lean. 15. My bike is faster now lean (hotter combustion) 16. I set pilot jet screws to 1 3/4 turns out 17. All 4 Ventures were way out of synch before I did them. Much smoother now. Questions? Send me a PM or email: chuckfrench48@gmail.com (mention VR)
-
I want to install a set of Nasty Boys 4-2-4's on my 06 RSTD but would like to hear them first , is there anyone who has an audio clip that I could hear
-
 Probably an old thread but for a part that requires frequent replacement (owners manual) This is incredible. I have spent over an hour and am only more frustrated. I can see it ,I can barely get two fingers on the top and wiggle it bit --what ever is holding the boot (which I can't see, won't budge and I am afraid to muscle it. There was another black rubber clip above it which O removed from a bright metal clip but that did not help and now I can't get a hold of that to put it back on. All three access panels are off// fuel pump is unbolted and slack -battery is out What the heck gives-- I have not removed the coolant contanier yet--and am now looking for a cutting torch. This is nuts especially since all wrenching to get to it was so easy. I only have the (just enough info to get ya in trouble) owners manual. The doctor has told me the stitches in my hand can come out in 6 weeks but the bump on my forehead from hitting my head against the wall may take longer. What am I doing wrong? Please help Thanks in advance--Ed--2000 venture salsa red:think:
 -
If you think you have a bad day... you may want to have a Kleenex nearby. What a test of fath. This clip reaffirms how very fortunate I am. [ame=http://www.youtube.com/watch?v=2I0DRk8dFjI]YouTube - ?????[/ame]
-
I have to thank yamahamer for not only installing these for me, but for also taping this short clip of how they sound. I did a lot of research and ask a lot of questions on here about which pipes to get...thanks for all your help. [ame= ] [/ame] PS. I was also having a radio issue, which he also fixed.
-
A friend emailed this to me today and although it has nothing to do with Ventures...I thought you might all appreciate God's special gifts. Clip 1: http://www.tagtele.com/videos/voir/7383/1/> > http://www.tagtele.com/videos/voir/7383/1/ Try Outs.
-
You will never look at a shooting star the same again. After viewing this you may understand why some of your wishes do not turn out like you thought they would. P.S. Hope the clip plays! [ame=http://www.youtube.com/watch?v=cn_u1Ebasek]YouTube - Where shooting stars come from....[/ame] or http://1stinfoproducts.com/jokes/shootingstar.wmv
-
Ok I got the 84 out (trailered it to the camp). Yesterday I decided to install the new front tire I had mounted on a spare rim. In the process of cleaning up the front end ( saturated in fork oil ) I decided to remove the front brake pads to clean the brake calibers. At the camp I didn't have the proper needle nose pliers and I managed to break a circle clip the one in the brake pad retaining pin. I assume this has to be in to keep that retaining pin from coming out. Today is Sunday is this a Yamaha only part or can I get lucky at the local ACE hardware. It would be nice to ride today.Dealer not open on Sunday.:confused24:
-
has anyone balanced their own tires. where did you get the weights.were they clip on or stick on weights thanks
-
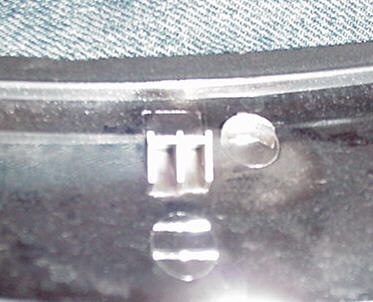
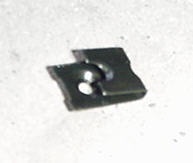
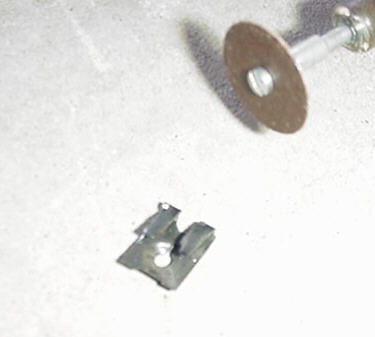
Repairing Broken Windshield Trim Tabs The great things about this forum is the fantastic ideas that we get from each other. This one is so good and so easy that I sure would like to take credit for it but the fact is, the idea came from expanding on a post made by SteveO where he used these type clips to take the slack out of the holes that the tabs actually snap into. His post gave me an idea for repairing the tabs that were actually already broken. The tabs on the back of the plastic chrome windshield trip break very easily. Most people who have ever had the piece off, have broken at least one of them. The following is an easy way to repair them to better than new condition. I had a couple of them broken off and this is so much better and stronger, I actually broke the other two off and did this on all of them. Here is a picture of one of the broken tabs. At most auto parts stores, you will find these clips. They were called "Speed Nuts" at Autozone and I believe these were size 14. It was the smallest ones that they had. Here is what they look like when you take them out of the package. Now...as the top picture shows, there is a center "bar" or "Support" in the center of what is left of the broken tab. In order to slide the "speed nut" over the broken support, you will need to cut the center out of the back of the clip. Also, because the clip is just slightly too wide, you'll have to shave just a bit off each side of the back side of the clip that you just cut the center out of. I used a Dremel tool with a thin cutting disk to do both. Here is what you end up with. Now, simply slide the clip over the broken support and you have a brand new clip that fits right into the slot where it should. It fits pretty tight but just to be sure, I filled the grooves with two part epoxy. They aren't going anywhere.