
Search the Community
Showing results for tags 'weld'.
Found 19 results
-
Hello all, Well my 1999 RSV trunk has finally blown apart. A couple of years ago the plastic around the two rear screws shattered, used some JB weld and put it back together. Well, you guessed it, the JB weld only last so long. Does anyone have one they want to get rid of? Or, a good source for one? new they are about $575, found one on ebay for $120. Also, wasn't there a "recall" from Yamaha and they added a steel plate on the bottom of the inside of the trunk? Thanks ahead of time.
-
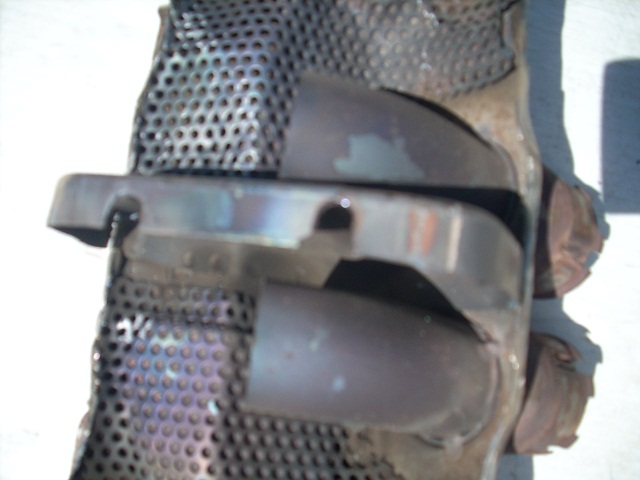
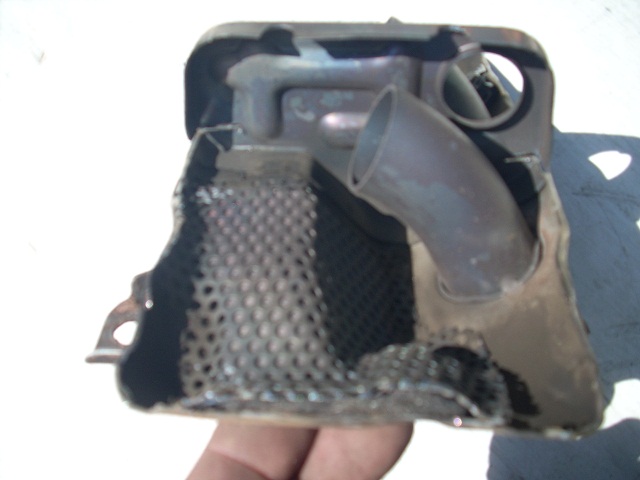
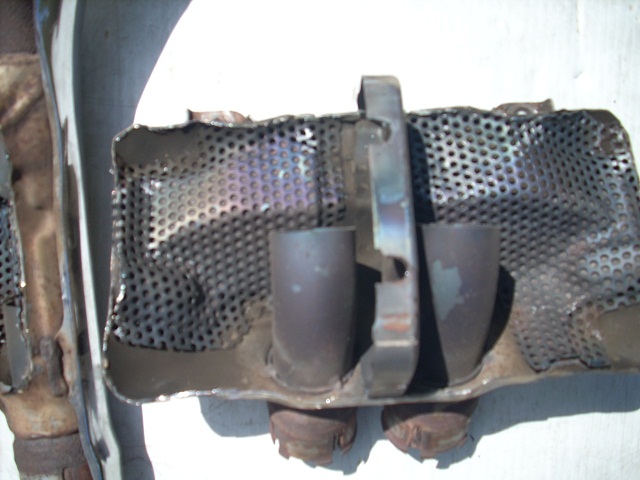
 For anyone who followed the thread, my 87 was making some crazy exhaust noise that caused me to remove and inspect the collector, the mufflers and the pipes several times. The issue was resolved when I replaced a seemingly healthy collector. I took the problem collector and cut it apart to see what was inside and what caused the problem. Lemme tell ya. A healthy collector would be very tough to get apart without destroying it. Using a die grinder with a cutoff wheel, I first cut along the perimeter of the bottom side hoping to peel away the skin with no luck. I was trying not to destroy it in the process, so I flipped it over and cut around the perimeter of the top, and although I had to cut through some of the perforated interior screen, I was able to get it apart mostly intact. This was only possible because of what ended up being the problem, which was that the two welds that hold the bottom panel to the one baffle on the inside were broken. This must have been causing the loud sound and the rattle that I had. I ended up re-welding the perforated screen anywhere that it had been pulled out during dis assembly. I then drilled 4 holes in the bottom panel where it contacted the baffle so that I could weld the baffle back on once I put it back together. I then welded the bottom panel that I'd cut back in place, then put the top back on, held it in place with a C clamp and welded it back on. I then flipped it over and welded the baffle to the bottom panel through the holes I drilled earlier. I think the takeaway is that if you are getting these crazy sounds, it'd be worth it to run 3 sheet metal screws through the bottom panel into the baffle, in line with the 2 existing spot welds, one in the middle, and one forward of the front weld and aft of the rear weld. If that cures the problem, you at least know what the problem is, and can opt to leave the screws in and see how long it lasts, or pull the collector, drill a few holes like I did and weld the baffle back to the bottom panel without taking the thing apart. In any case, I've welded mine and would be comfortable putting back on the bike, expecting no further issues. If anyone else has this problem and can get their collector to me, I'd be happy to weld the baffle back in for them. Should be pretty easy now that I know what to do.
-
For anyone who followed the thread, my 87 was making some crazy exhaust noise that caused me to remove and inspect the collector, the mufflers and the pipes several times. The issue was resolved when I replaced a seemingly healthy collector. I took the problem collector and cut it apart to see what was inside and what caused the problem. Lemme tell ya. A healthy collector would be very tough to get apart without destroying it. Using a die grinder with a cutoff wheel, I first cut along the perimeter of the bottom side hoping to peel away the skin with no luck. I was trying not to destroy it in the process, so I flipped it over and cut around the perimeter of the top, and although I had to cut through some of the perforated interior screen, I was able to get it apart mostly intact. This was only possible because of what ended up being the problem, which was that the two welds that hold the bottom panel to the one baffle on the inside were broken. This must have been causing the loud sound and the rattle that I had. I ended up re-welding the perforated screen anywhere that it had been pulled out during dis assembly. I then drilled 4 holes in the bottom panel where it contacted the baffle so that I could weld the baffle back on once I put it back together. I then welded the bottom panel that I'd cut back in place, then put the top back on, held it in place with a C clamp and welded it back on. I then flipped it over and welded the baffle to the bottom panel through the holes I drilled earlier. I think the takeaway is that if you are getting these crazy sounds, it'd be worth it to run 3 sheet metal screws through the bottom panel into the baffle, in line with the 2 existing spot welds, one in the middle, and one forward of the front weld and aft of the rear weld. If that cures the problem, you at least know what the problem is, and can opt to leave the screws in and see how long it lasts, or pull the collector, drill a few holes like I did and weld the baffle back to the bottom panel without taking the thing apart. In any case, I've welded mine and would be comfortable putting back on the bike, expecting no further issues. If anyone else has this problem and can get their collector to me, I'd be happy to weld the baffle back in for them. Should be pretty easy now that I know what to do.
-
I had a nice 160 mile ride in the desert today. Stopped and had lunch then off again for a great ride. I had to stop at a rest area (you guys over 50 know what I mean) Well I’m Pretty much 50 miles from anywhere and go to put my kick stand down and the lowering loop broke off, weld snapped. Kind of tuff getting this old large man off the bike without a side stand and under stress needing to GO as bad as I had to. But I did it keeping the 900 pound beast steadied and bending down to put the stand out by hand. I thanked FREEBIRD for the center stand because it was nice to have a backup, Stopped and got gas and again it was a site to see with no one to help hold her steady, and then home in the garage. By this time I was getting to be pretty good at it. Thanking freebird again for that center stand because it is nice to have it there. For making this site and all the knowledgeable people here. So check your welds guys/gals .Now I have to see who will weld this one or find one……………Ron
-
Hi Well since last yr when I would start my 83 VR I got a loud rattle from down under the bike. So today I took off the exhaust collector. I think it came off in a fare amount of time about 30 mins, So I made 3 cuts and folded the flap open. took out the screen that was loose. Now hears where Im not sure about something. On the inside there is a layer of screen that is tight to the skin or the top of the collector. It dosent feel or look loose can I leave it and weld the collector back up? Or should I try to get it all out? Also should I drill holes in the corners that I cut to stop any cracking before I weld? Thanks Bull463:fingers-crossed-emo
-
After reading the threads this winter I found mention of an exhaust leak at the Y. I got my bike out of storage yesterday and sure enough I have the same leak on both sides. I am taking my bike to the dealer next week and will ask them to replace the exhaust under warranty. I see a number of members have had the exhaust replaced under warranty. I was wondering if anyone has not been able to get this fixed under warranty? If I can't get this replaced under warranty, I will plug the leaks with JB Weld. I see a few members have gone this route. Does anyone know how the JB Weld fix has held up? Also, what are side effects of having the leak?
-
I was checking to see if someone can help me. The first set of pictures is of my highway pegs bracket. I am wanting to know if anyone can tell me what they are made out of and if there is a way for me to cold weld them back together. I don't know if something like J-B weld will hold them. I really hate to buy a new set when all I need is this one piece. The second picture can somebody please tell me where on the bike these go. The last set can somebody tell me what they fit. I bought them off Ebay because I thought they would fit my bike. They have don't have the flap to make them open like a door. They have a lever in place of a lock and then 2 pegs sticking out on the other side. I don't know if they fit something with the radio or not. They don't fit my bike and i would be willing to trade them or sell them. I am looking for a set for the left side I don't have a radio just the pocket.
-
Does anyone make a side-stand extender for the 1st Gens? With my progressive springs, it would be nice to have a little more length. If not, I can just weld some metal on the bottom.
-
Well, I am getting back to the Venture, and finding more and more problems as I go along. Are the fuel tanks interchangeable among all the first gens? I guess if you weld a tank and then smear JB weld all over it, and use cheap paint, it'll last long enough to get it out of your hair. Are there any solutions to the dash panels, other than more broken ones off ebay? Has anyone successfully fabricated something that will work in lieu of the panels? If so, can I see some pics? Is it within the realm of possibility to graft a radio into a non-Royale Venture? Other than that, I am almost done giving it the "Krylon Touch" (Rustoleum to be honest) which has turned out surprisingly nice. I still need to sort the carbs. I have been through them but get big puffs of black smoke at full throttle, maybe I have some jets in the wrong place. Starting to get excited about it again.
-
Hi, I recently developed an afterfire on my 84. Upon further inspection, I have one fair sized crak near the very rear of my collector.. I imagine there may be more.. Time to fix I suppose...How much effort and job to remove this and weld....I think the baffles are okay. Any tip or trick to speed removal or make it easier? Thanks Clay
-
I've been toying with this idea for a couple years and thought if I aired out my idea here it would help me with a decision. I want 4 real pipes on my Midnight Venture.I want to take 4 small diameter fishtails with muffler and weld them in 2 pairs very close together side by side ....I figure a couple small straps under them to weld them parallel. Then locate and install bracket to attach to bike. Then similar to a old style Royal Star run seperate pipes to each muffler. But doing it to keep my passenger pegs in stock location will require a couple special shaped hook ups to original pipes coming out of the 4 cylinders. Mess up my passenger comfort would be bad for my sex life! I have a friend who had 4 fishtales on 1996 Royal that was so cool of a sound. Get that sound with our higher horse power motors gives me goose bumps! LOL I was looking at some of the old 650 V-Star shields that would work to cover new pipe sections and match Yamaha Chrome. I have them laying around but even if I had to buy some other Yamaha shields that shouldn't be too painful $$$$. I think it would look and sound great! Now lets hear it guys....what you think. JerryK
-

Let's fix the passenger footpegs once and for all!
Guest posted a topic in Royal Star and Royal Star Tour Deluxe Tech Talk
OK folks I have read just about everything I can find on the forum here (and several others) and seen a few of the mods that folks have done to lower and stretch out the passenger floorboards/pegs. Perhaps with a consolidated effort we can master this and come up with something we can all use. Sooooo - let's limit this conversation to a "custom fix/fabrication" and stay away from recommending the Diamond R etc. It seems most of those do not drop the position just lengthens it. Here is how Boe did it on an '06 RSTD: http://www.venturerider.org/forum/showthread.php?t=23575&highlight=passenger+highway+pegs And here is how Jercoupe did his mod: http://www.venturerider.org/forum/showthread.php?t=16960 And according to another post I read we can use peg mounts from a Road Star - since the mounting has not changed. If this is so - then we should be able to use this Kury adapter: (attached below) With this attachment - we should be able to mount this on the back of the stock mount (maybe a spacer or two) and then attach a Kury longhorn offset with a peg - and retain the original floorboard. (This is the first picture attachment - I decided not to go this way) Whatcha think? OK - let 'er rip - let's solve this issue once-and-for-all so that we can all benefit with lower pegs/floorboards Shep Information added 10/11/08 OK folks - I decided to go with Jercoupe's modification with a few "slight" changes. The main change being that I decided to weld my 1/4 in angle-iron "onto" the existing passenger bracket. (I thought it might have a little more strength this way and allow me to use slightly shorter bolts to put everything back together. I am going to try and give a step-by-step of what I have done so far. (And I want to say "Thanks" to those who have gone before me on this mod - really they have done most of the engineering.) 1. I bought a 3' piece of 1/4" 2X2 angle iron from Lowe's - Home Depot didn't have it. You won't use it all - but that was the shortest piece I could find. 2. I cut 4 pieces off the end at 3 1/2 inches long. (you will need 2 for each bracket) 3. Next I drilled 2ea - 5/8 in holes - 2 inches on center on one side of the angle iron. Keep these holes as close to the top as you can. This will allow more at the bottom of the bracket to but up against the frame for rigidity. (remember you will need to do this for 2 brackets.) 4. This one might be a little hard to explain - There is a U-shaped bracket that comes with your Longhorn clamps. The bolt that holds the clamps on goes through the clamp first - then this U-shaped bracket and this bracket is what keeps the peg from turning. (Picture attached) a. The edge of this has to be trimmed off to fit over the edge of the 1/4 angle-iron where the peg will mount. (check out Jercoupe's mod above - he has a good picture of this. 5. Once this bracket and the corner of the angle-iron is "form fitted" to each other you can drill the hole in the corner of this piece of angle-iron. No guess work here - because the bracket gives you the location of the hole. 6. Now you are ready to weld the two pieces together. (Picture included) 7. Now you have some grinding to do to get those welds flat. (You must do this before your next step of welding your new bracket to the old one or you will not be able to reach the weld between them. 8. Slip new bracket with the 2 5/8 in. holes over the old floorboard bracket and weld together. (It helps to "round out the tops" of the new bracket holes to allow for the welds on the old bracket so it will set flush better. (No turning back now:Laugh:) Now you are ready to "fit" everything" together as a dry-run: 9. Bold up the Longhorn and its peg first (leave loose for adjustment). 10. I bought new metric bolts 1/2 in longer to mount the entire bracket to the frame. 11. You will need spacers between your new "system" and the frame - this allows the bottom of your new bracket to hit the frame at the bottom and also keep your mount - tight at the top. I just slipped a couple of larger nuts over the bolts for the dry run. But have since bought spacers. 12. Everything should bolt up well and as you can tell from the pictures - this adds a new variable passenger position with about a 5 1/2 in drop. (If you need more forward as well as the drop - just slide the botton angle-iron piece more to the front of the bike before you weld them together. Will add more as I make the other side and smooth them all out for paint. Shep -
Some how the bracket that holds my lower left cowling on broke. It's the one that has the screw on the backside of the cowling toward the outer edge next to the crash bar. I tried JB Weld but it did not hold. Anyone have any suggestions. It was holding up OK but I guess the vibration broke it loose. I haven't laid the bike over or brushed up against anything to cause the JB Weld to break loose but it did. I guess the vibration caused it to come loose. Any body with any ideas???? :confused24: Moakster
-
Don't ask me how I did it but, I broke the extension off the kick stand. I was wondering if anyone has an extra one they would like to sell. If not I will probably just weld the extension back on and go on with it. Almost $200.00 is a lot to pay for a kick stand. Thanks.
-
I have a set of Ultra Classic mufflers and I am going to drill the baffles using a 1 1/4 hole saw. After I drill thru the front or rear baffle plate does that completely disconnect them or will I have to twist and shake it to break it loose from a tack weld farther in the muffler? I have read all the posts I could find and I know the procedure except for this. AL
-
 There is a small heat shield on my exhaust by my right footpeg. It had cracked and been fixed by a PO, but it is cracking again now. The shield seems to be part of the larger exhaust, and so not easily replaceable. Given that it is chrome, is this something that can be welded back together, or is it a soldering job, or is there some other fix like JB weld that might hold this together. Thankfully, it isn't highly visible, since getting that chrome look back may not be easy either.
 -
 I'm rebuilding the Black Beast from the accident I had in November. While I have it down I am doing several mods. I will talk about those in another thread and reserve this one for the bar end weights. I wanted to keep the bar end weights to reduce vibration and have a place to rest my hand while I was using the cruise control. Once I got the handle bars stripped down here is what I came up with. The threaded plugs that the weights screw into are welded in with just a spot weld on the bottom side of the bar. I went out to my brother-in-law's shop and ground the weld out. (Since the stock bars were ruined I didn't get real creative about saving them). If you want to save the stock bars it would be easy to grind just the weld, then reweld the plugs back in later. I marked the new bars so I could drill a 3/8" hole in them to weld the plugs back in. Then I had my brother-in-law spot weld the plugs in. Now this is important. DONT PICK THE BAR UP BY THE HANDLE. IT'S HOT!!!!!! (Yeah I know. I knew better. But since the brain surgery in January my short term memory seems to be shot:whistling:.) I now have a set of Flander's bars with the option to use the bar weights or not. All it cost me was 30 minutes of my brother-in-law laughing at me cause I burnt my hand. The things we suffer through to ride:confused24:. I hope this can be of use to someone out there. Ride safe.
 -
I read sometime back that someone here had used JB weld to correct an exhaust leak. I thought maybe it was Freebird or V7Goose, but I'm not sure. Does anyone know who used JB Weld and more important, did it actually work? :think:
-
After reading the great article on how to fix the "H" pipe baffle rattle,I'm wondering if any one has tried this without removing it from the bike???? The only down side that I see is trying to weld it back together while laying on your back. Any thoughts??????????


.thumb.jpg.f728770fad1ac7ebf6a720ed6af3a09c.jpg)


