Search the Community
Showing results for tags 'metal'.
-
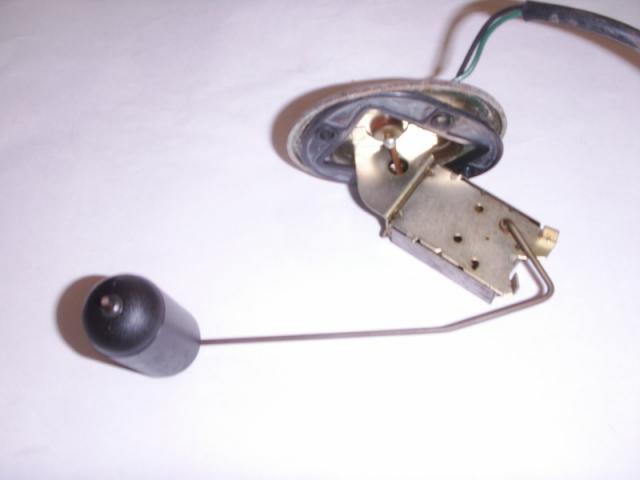
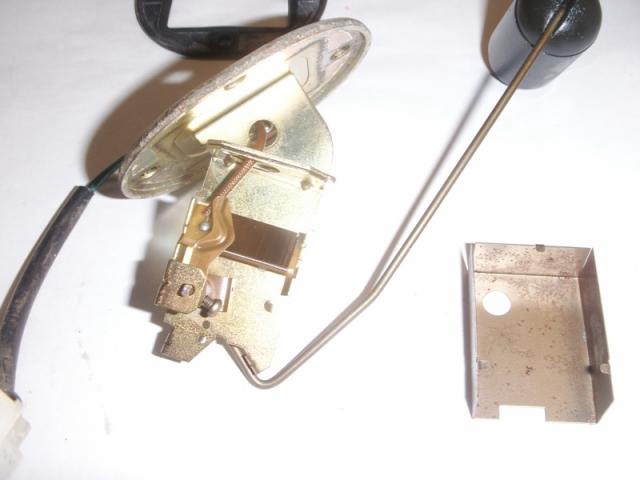
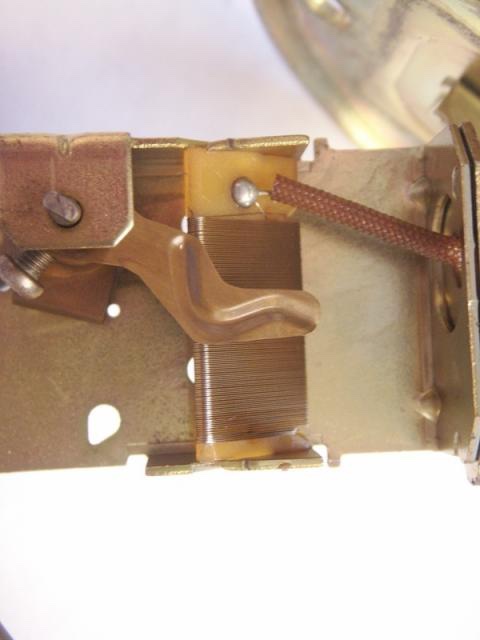
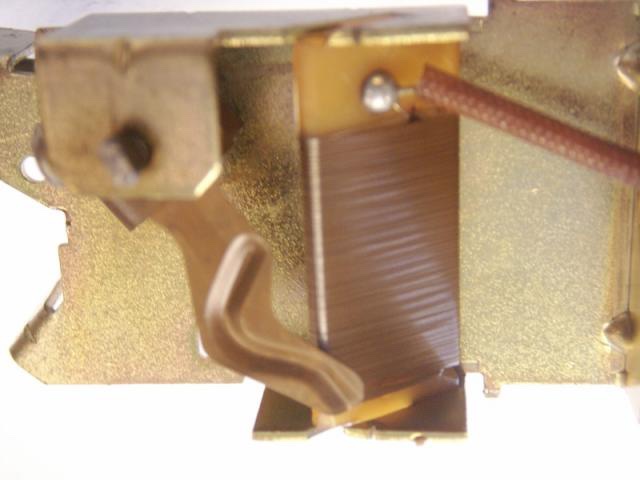
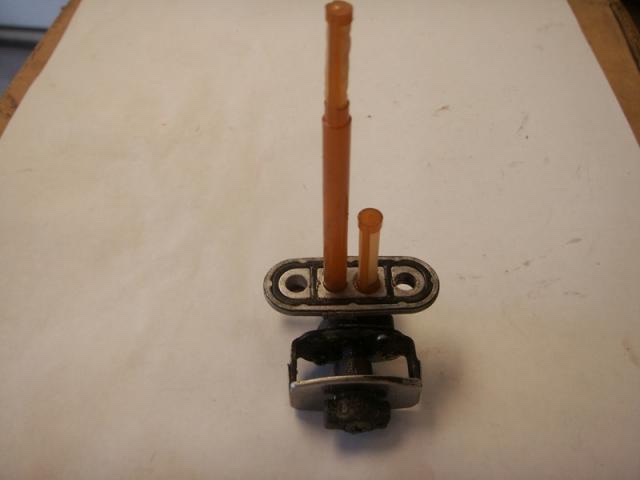
 A few posts have been made in the past about the workings of the fuel tank level sender & the petcock. I pulled these parts out of my spare gas tank and took some pictures of them to show how they work for interested members Picture of the sender unit as it came out of the tank. Picture of sender with metal cover removed. The tabs do not have to be bent to remove metal cover. Just spring sides of cover out slightly and cover will slide back. Close up of the wire wound resistor. The metal wiper contact is at middle position in photo. In this view float is all the way down, at the empty position, metal slider contact is now positioned at bottom of wire wound resistor. View of petcock showing adjust lever. View showing the two screens that go into to the tank. The longer pickup tube is for the regular selection. The shorter tube is for the reserve side. Gary
-
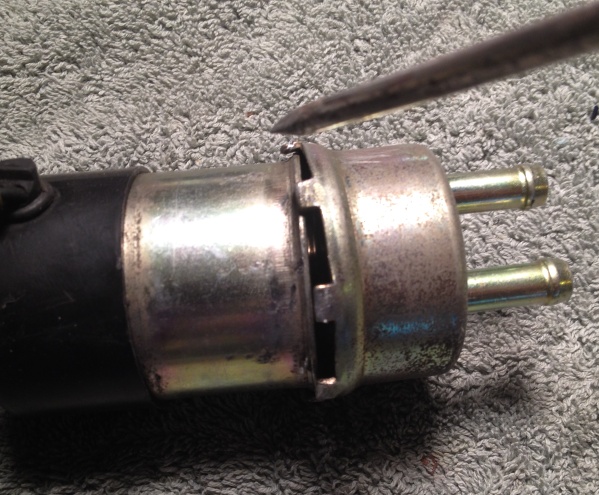
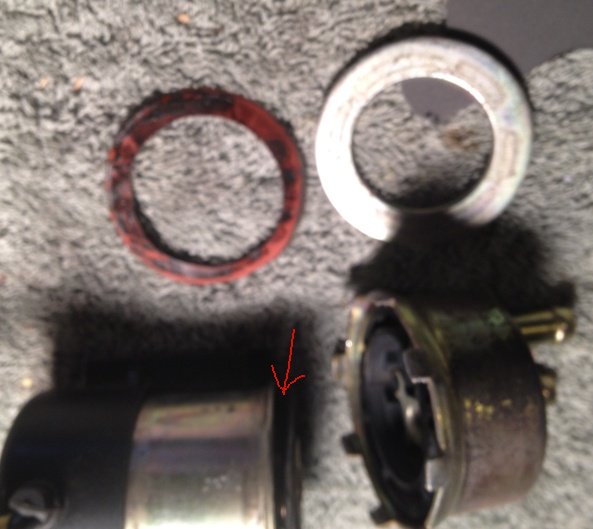
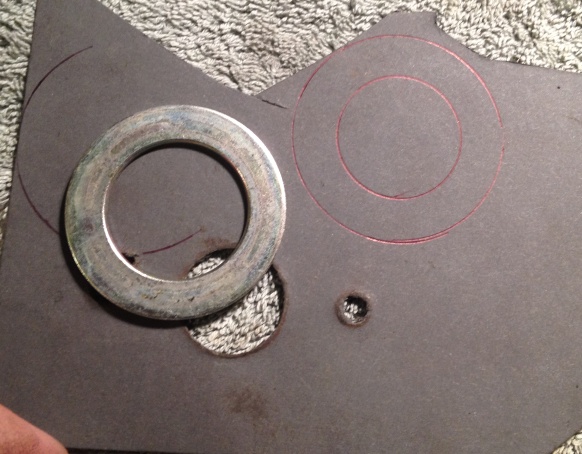
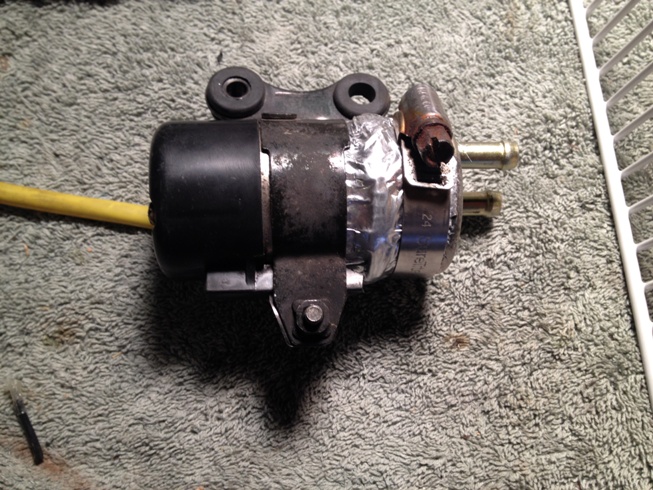
 This will be kind of a long one, so read the first paragraph then you will see if you want to skip the first section on fuel pump rebuilding. The other two sections are not very long. If you want to read about gravity feed (fuel pump bypass) go to my next post in this thread. If you want to read about the Cheap Ebay Fuel Pump, go to my third post in this thread. Last week my RSV was leaking lots of fuel while I had it running to warm up for a ride so I had to abandon my ride and figure out what needed fixing. It turned out to be the fuel pump; it was leaking lots of fuel from the seam where the two halves come together. Apparently this is not a common failure and I could not find a diagram of the fuel pump exploded into component parts. It is only listed as a complete assembly, although you can replace the points if needed. New pumps cost approx. $200 for OEM so I began researching what my alternatives would be: Repair, replacement, or bypass Since I could not find a diagram of what’s in the pump, I decided to see if I could have a look for myself. Hopefully I would see something that can be tightened, patched, or replaced! Nothing to lose right? I removed the pump from the bike and took off the metal mounting clamp that secures the pump onto the bike. I wiped the pump clean and concluded that what holds it together are the little tabs that are bent over the middle seam. In this pic I have already pried them open to separate the two halves. (Now I wonder if the first thing I should have tried was to just hammer all the tabs down tighter!) The next pic shows the two halves apart, and a large washer and very thin gasket that were inside. The half on the left has a rubber diaphragm that is ‘pinned’ to the unit at its center, so the metal washer and gasket had to be pulled up from under the diaphragm by flexing the diaphragm through the hole in the washer. I hope I explained that well enough, because I don’t have a good picture of that. Anyway, the washer and gasket went where the red arrow points, with the flimsy little gasket going between the metal washer and the metal pump body. After looking things over, I decided it seemed that the most likely cause of the leak was the little gasket. Did I mention it was really thin, floppy, and flimsy? I tried to put it back together but couldn’t get the washer and gasket over the diaphragm again without distorting or wrinkling the gasket. It looked like it needed to be seated perfectly and in such a tight space, I wasn’t sure I had done it. (To shorten this part of the story up….it didn’t work. Gas still came out of the seam so I took it apart again, still pretty sure the gasket was the problem.) Next, I went to the local Napa and asked if they had thin, gas-proof gasket material, and showed the guy my pump. He went in back (they are an auto repair shop also) and came up with a partial sheet of 1/32 gasket material that he said should work, and gave it to me for free. I traced the washer on the gasket sheet and then cut it out with a razor. I reassembled the pump and hammered the tabs back down. I gently blew into the ‘inlet’ stem and it made kind of a honking noise, which I took as a good sign because no air was coming out of the seams as far as I could tell. I installed it and turned on the key. It made the usual clicks for a moment, then stopped once pressurized, and did not appear to be leaking. I started it and let it run for a few minutes and then turned it off. I felt around the pump and my fingers did not get gas on them. I let it sit for a while longer then felt it again and there was a very small drop on my finger from the underside of the pump. I pulled it out again and looked it over. I wiped it off and blew in it but still no obvious air leak and a good ‘honk’. Then looked at all the metal tabs and realized some of them could be tapped down a little tighter and more evenly. Doing this did seem to tighten things up and may have been good enough, but I decided to do one more thing. I have some metal HVAC tape so I wrapped the pump body with it twice around. I put the mounting clamp around the middle of the pump, which helps tighten the tape like a hose clamp would and put a hose clamp on the other side. See pic I went for a 30 mile test ride, stopping frequently to feel for gas on the pump, and so far it is working. I’ll leave that side cover off next time I ride so I can keep checking until I am satisfied it will hold.
-
 I removed the front cowling/fairing that goes over the headlight. Three of the plastic mounting points have completely broken off (the piece with the metal screw clips on them. Does anyone have a fix for this??
 -
I know we have a lot of different craftsmen and professions here on the site. I have a question for the builders here. I have a 30X40 metal building that I use for a garage, it has a 20X30 upper loft type area. The weather down here in the Houston area has been crazy, 75 one day 45 the next. The humidity is crazy as well. What is happening is it's literally like it has rained inside the garage. The floor is soaking wet and has small moisture puddles on the floor, everything is sweating. It has a metal corrugated roof and there is obviously no venting of it. What do I need to do, to stop the sweating inside the garage. I am thinking of spray foaming the inside ceiling, I know the heating and cooling is creating condensation and I need to get some sort of vapor barrier. Any words of wisdom from y'all in the know would be greatly appreciated. Here's a few pics of the garage also.
-
Going in tomorrow to get service and also replace back brake pads as there is a metal on metal sound so using front right now.Figured should get more than 11500klms before having to change brakes.Might get them to change fronts because when slowing down is fine but the make noise when they come to a stop. Sometimes they will squeel just before stopping.
-
Would anyone out there in VR world happen to have the dimensions for lowering links? I'm fabricating my own and looking to make the job a bit easier! I'm trying to get away from a lot of scrap metal by the trial & error method.... It'd be great if ya could help a fellow VR out!!! -Greg
-
I need some help...I just recently switched to LED turn, run and brake lighting. They work great thanks to Custom Dynamics. I also changed my driving lights to LED Sun spots and they too are great. So here's the problem: I have a Phase 7 LED headlight to replace the original, but HOW DO YOU OR CAN YOU REMOVE THE METAL HOUSING BUCKET FROM THE GLASS? I need the housing in order to mount the new LED bulb. Is this possible because without the metal housing I cannot mount the new LED bulb? If I cannot use the metal housing can anyone shed some light on a possible alternate solution. I really cannot use the LED driving lights with a regular headlight bulb because it doesn't look good at all. Thanks in advance:) Jakbag
-
20 hours to tentative departure (minus time to post this) for 3 week east coast trip and I find a missing piece of plastic and cracked plastic around backrest to trunk connection last night. I've read of this problem somewhere, should have payed closer attention to these threads. Get right to it, looking for any advice next 12 hours for temp fix to get thru trip & NYRally. Materials I've picked up : A pint of 2 part Dominion Plastic repair Rigid Flex Bonder, JB Weld putty stick, PF230 pinch&bond weld primer, 14 gauge sheet metal. Plan is to cut 2 pieces sheet metal, one for the missing piece and a large one to replace the existing metal plate and cover the entire cracked area from the inside. I've worked on small areas prior with the Dominion plastic. Not to sure about the long term affects on plastic using the PF250, so might drop that step. Any suggestions welcome (1st gen one liners:no-no-no:) Off to cut up some sheet metal... Will check back periodically. thanks Max
-
I was doing some work on the bike today and took off the fake gas tank lid and a lot of metal stuff seemed to look rustier that it did the last time I had the lid off, (it might have been last fall) While cleaning things up and wiping dust and residue off everything under there i noticed that the drain tube was off my battery, probably happned when the bike got laid over last fall. Screws for the air cleaner, metal rings to tie down the battery and even some of the plastic were rusted or had a harsh residue on it. So have a good look and reconnect your battery drain tube if its not connected anymore. For those of you with the glass Mat battery just ignore this message. Brian
-
]I am in the process of swapping out the tranny of my 83 and transplanting a tranny from an 86. Now back in 2005 after the very first Vogel, I had to replace the pinion gear in it. We pulled it out, dropped the oil pan to make sure there wasnt too much debris left in the engine. Its been 7 years and I have been riding around until about a year ago and the tranny finally quit shifting and I had to lay it up for this repair. We finally got it opened up this weekend and once we did we were in for quite a surprise to find quite a bit of metal bits, not just shavings but nice size chunks of the pinion gear, we fished it out with a magnet and got all of it out. We first realized what we were in for when I pulled the oil pump out and quite a few bits of metal fell out of it and when I shook it you could hear it rattling around inside of it. Take a look at the pinion and all the metal we took out 7 years later!!! If you take a look at picture #2 you will notice that the threaded part is broken off, this is what precipitated the destruction of the pinion........and when we pulled it all apart, the rest looked fine with the exception of the star wheel that rachets the shift, one of the pins was loose, becasue the tab that was supposed to hold it in place was bent and the pin was slipping out. I believe that is where my main problem was. [ATTACH]66290[/ATTACH][ATTACH]66291[/ATTACH] [ATTACH]66292[/ATTACH][ATTACH]66293[/ATTACH] [ATTACH]66294[/ATTACH]
-
Well spent most of the day out in the shop with K-Rider, we made good headway on the engine teardown and tranny swap. Got the 83 engine all apart got the tranny out of it and out of the 86 donor motor. Gene had to leave early, so I finally got it into the 83 cases, wasnt easy by myself but finally got in in and started closing up the cases. We found a bunch of metal shavings in the bottom of the engine, those had to be left over from when the pinion gear got all tore up. We think we got it all out, I forgot to bring the little baggy in, so I will post pictures of it tomorrow. It was amazing how big some of the metal was. I had to order all the gaskets but forgot one, have to go back and order the water pump cover gasket, also ordered the new fusebox upgrade from Skydoc. Lookin forward to getting back on board the Venture.
-
tried to remove the bolt in the rear brake resevior and snapped a big chunk of the casing off, can it be repaired or does it need replaced, white metal.
-
I have to make decision on building TODAY!! Finally gets here and rushing me but I want to get it DONE!! Question is; Metal or block building??? He claims he can bring block in for close to price of metal. I'm thinking block has a lot of advantages but hard to finish inside once up? Any thoughts quickly?? I have to let him know this evening!!!!
-
I'm having a challenge installing my clearview xxl tinted shield. First, I come to a conclusion that I need to get all 4 longer screws. The shield thickness is much thicker than my stock shield making the stock screws too short.. Second the shield curve up by the mirror installation, where the screw goes in, there is a bend in the shield to match the curvature of the faring. The bend does not butt up to the curvature of the faring. When I screw the screw in with the metal washer/collar, in order to get the screw tight I'm pushing the shield bend towards the fairng until the metal washer/coller butts up to the bracket. Is the bend of the shield suppose to butt up again the faring or is it ok to just screw the screw in with the metal washer/collar tight until the metal washer/collar butts up against the bracket. I'd appreciate talking to someone who recently installed a clearview xxl & tall shield on an MKII.
-
In an attempt to track down any vacuum leaks, I was changing out the o-rings that go between the carb manifolds and the head. The outer screw on the left front carb boot had metal shavings on it as it came out. I am not sure if this is from a previous attempt at a repair and it is part of a helicoil coming out, or if it was just tightened too much and stripped some of the aluminum from the head. Anyhow, it will not tighten up now, and leaks oil profusely on start up. I also worry that some of this metal got into the engine since this is in an oil galley. Does anyone have a suggested way to repair this? Can I tap it out to the next size up? Help!
-
Has anyone ever pulled a dent out of sheet metal? My wife has a dent in her vehicle and I heard that dry ice can shrink the metal and pop out the dent (not large), and was wondering if anyone has ever tried it. Thanks
-
Hi guys, I purchased two MOSFET R/R's a while back in the group buy along w/the weather proof connectors. Put one R/R on my '83 Vison. It's great. Now I am putting the other on my 87 Royale. Well, I buggered up one of the metal terminals that are to be used w/OEM weather proof connector. Seems after 30 years in electronics I still make mistakes. I like the weather proof connectors. I checked Eastern Beaver electrics for the parts. I only need a $.59 metal terminal. But, they have a $20 minimum order. Again, I want to use the weather proof connector assembly. So, does anyone have spare metal ternimals for this connector type or knows where to get them w/o a $20 min. order? Thanks in advance...Jason
-
I have a 93 Cougar v-6 needing a new head gasket, I'm an old scholl kid so when I see a kit with graphic head gaskets at the parts store I back off real slow... Like I said, I have no familiarity but always thought a good ole metal head gasket sealed well but also REALLY helped transfer that heat. And I still say aluminum heads are junk! Anyone have some real info on this variant? I know Ford offers the metal ones but they want my next born for them... but if that's the proper route...
-
I picked up a bottle of Sea Foam at Wally World. It says auto and marine, gas and diesel. Is the right stuff? It's a 20oz metal "bottle" do I use a full half or should I use less on my 09 RSV? Thanks everyone!
-
Looking for a part no. for the metal impeller as mine has a plastic one. Any help would be appreciated?
-

metal shavings in clutch slave
Sandbagger posted a topic in Royal Star Venture Tech Talk ('99 - '13)
Preface- Every thing I do to this bike is the first time so I don't have a frame of reference. My bike is a 2000 RSV with 35,000 miles. I've owned it for a year. I was working around my clutch slave area so I decided to rebuild it. To my surprise it was full of metal shavings. Quite an alarming amount to me. I felt the cylinder and could not feel gouges. Made me feel that the shavings had come from the master cylinder and settled in the clutch slave over time or as fluid had been changed over the years. Was not having clutch problems that I could notice. Getting ready for a trip so don't want to rebuild the master, but am thinking that this is the proper next step. Question: Has anyone seen this issue before and identified the cause? Thanks, Bob -
 I had a look at my rear brake pads today and was surprised at how much material was still there after 20,000 miles of hard riding. I use a lot of rear break for low speed stability, and city riding etc. these are the EBC Double H Sintered pads and thus far have already outlasted the previous OEM rear pads. I haven't pulled them out of the bike to measure them against a fresh pair but looks like less than half worn, and even the inside one doesn't appear to be as much worse worn than the outside one, which is typical for our bikes. I was planning on just swapping them out, in for outside to get equal wear on them.. I wasn't expecting so little wear on them. Wow.. I always carry a spare set of pads with me on the bike (doesn't take any space) as I got caught once with metal on metal pads on the wrong side of a long weekend holiday out of country.. ugh. and those had less than 20,000 in them.. but thus far I must say I am very happy with these pads over OEM Your mileage, as they say, may vary.. (opinions too)
 -
Ok, yes its poor mainentance, but I've just got the old brake pads out from the rear wheel to find the left one is metal on metal, Ouch, right one is not much better. The caliper pistons are reluctant to go back and the repair kit here in the UK is crazy money. I have'nt tried really hard to get them back as I will need to clean them first. Anyone got any ideas?
-
I put the bike up on the lift to do an oil change and noticed staining around and below the weep hole on the water pump. I've read a few threads that mention replacing the impeller with a metal one. Can someone point me to a supplier that carries the necessary parts?
-
Hi All Im starting to look for a drink mount and a mount for a sirus radio. I would like somthing made out of metal not out of plastic. Thanks Bull463


.thumb.JPG.3f1849be2171e599daf53751f716091f.JPG)