Search the Community
Showing results for tags 'rear'.
-
 Can anyone tell me which wire coming rom the TCI module goes to which coil? I have determined that number one cylinder is the left rear, number two is left front, number three is right rear and four is right front. Now, there are four wires coming out of the TCI- Orange, Grey, Yellow and White that go to the coils. I need to know which wire goes to which cylinders perspective coil. Any help greatly appreciated! Tim
 -
When the wife and I went for our first ride on the new bike, two things were apparent. I was not happy with low speed handling and she was not happy with the rear shock. For the second ride, I had discovered (through this site) that the rear shock was pneumatic and required pressure and I ordered the appropriate air pump. Since the range in the manual called for 0 - 57 psig. I decided to split the difference and go for 30 psig. It turned out to be a good decision because not only did it improve the low speed handling, it also greatly improved the ride. My question is, what is everyone else running from solo to fully loaded?
-
A couple of weeks ago, I pulled the rear wheel, differential and drive shaft to do the typical maintenance items. All came apart as expected, and all went back together as expected. Question -> Is there any kind of rear wheel alignment that has to occur? Or does the bolt-up procedure insure proper rear-wheel alignment?
-
In the process of wiring up my new Polk 401 speakers. From what I have read the rear speakers are only mono. Has anyone rewired the rears for a true stereo sound? Can this be done? Everything is apart so I can run new wires to the rear, bypassing the stock wiring. Thanks for any info.
-
 Sooooo, changing the rear brake pads I have discovered the pistons are stuck. Had the rear master cylinder opened and still couldn't push the pistons in, just barely moved. Questions: -Before rebuilding, what if I try a bigger hammer so to speak, and C-clamp these into position? -How hard is it to rebuild? Will I have to bleed the brake? -Saw used rear calipers on Ebay for $50, no idea if the pistons compress. Other thoughts, ideas? At least it's raining so, I am not missing riding today! Cheers,
 -
Ok, I've given up on my dream for an affordable rear shock for the 2nd gens. Part # 4XY-22210-10-00 The best price I can find on a rear shock is $348.02 + 17.50 shipping for a total of 365.52 from www.motorsportssupercenter.com from www.motorsportssuperstore.com , it's 375.77 + 5.95 shipping with my RSW discount. from www.yamahasportsplaza.com , it's 343.32 + 19.32 shipping , total of 362.64 So come on all you cheapskates, find me the cheapest shock. Im pricing the 2008 model shock, it's different then the 99 model. Hopefully it's more gooder.
-
 Ok, I pulled the rear a while wheel a while back and cleaned up the hub splines and when I was working on that I notice a tick in the rear bearings. I ordered the bearings, seals and a new o-ring and now I'm into the replacement. A local shop offered to install the bearings for $5.00 per side and I figured fair enough. Save me some time. When I took the wheel in today they took one look at it and said they could not do that type of set up. At least they were honest about it. So here I am looking at my rear wheel. The manual is vauge in the statement to push the spacer aside and drive out the bearing. First, the spacer don't move far enough to the side to get a good bite on the bearing from either side. I'm using a 5/16 brass flat nose punch to do this. I was able to pull out the larger seal and retainer ring on that side but it looks like I need to drive out the larger bearing from the smaller side to remove the smaller seal from that side. Which side do I start from and how is the smaller seal removed? Any suggestions will help. Mike
 -
Well, Mine finally went after 30k miles on my 05.Its got oil all over the boot and the lower mount.I wonder how many here have had the shock replaced at least once, and how many have had it replace more than once. If you have had to replace your rear shock post a quik reply so maybe we can get a count. Just added some pics of what to look for for those that have not had this problem yet
-
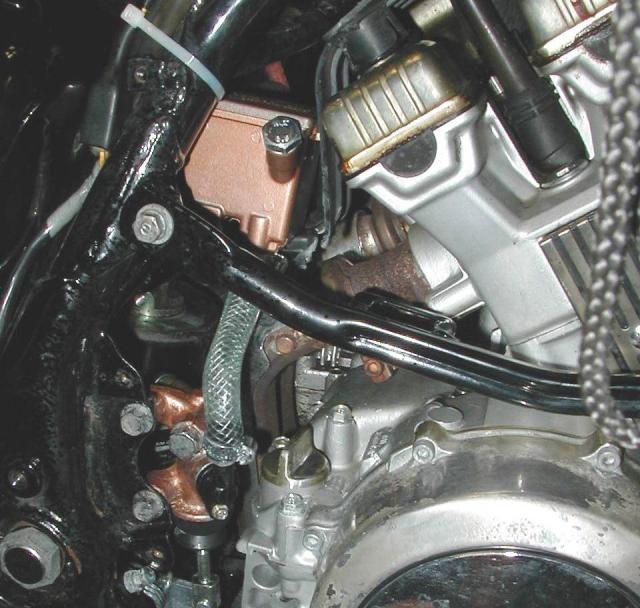
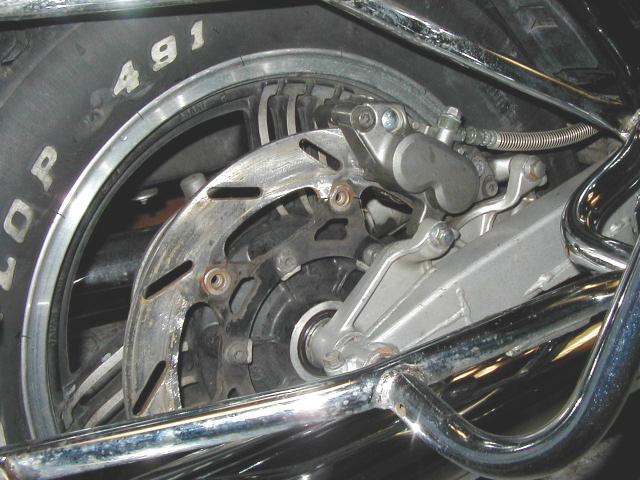
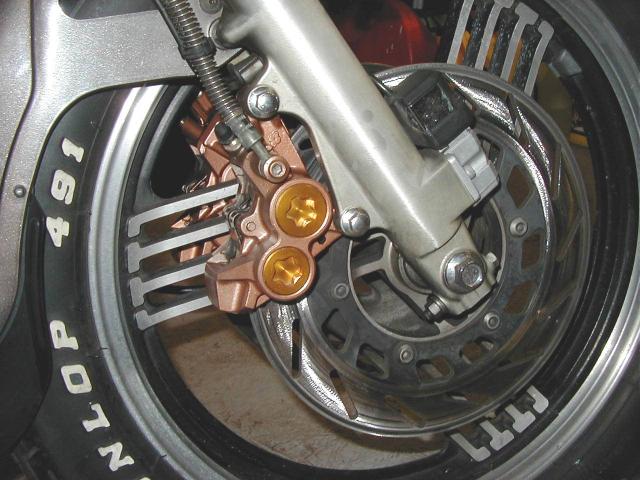
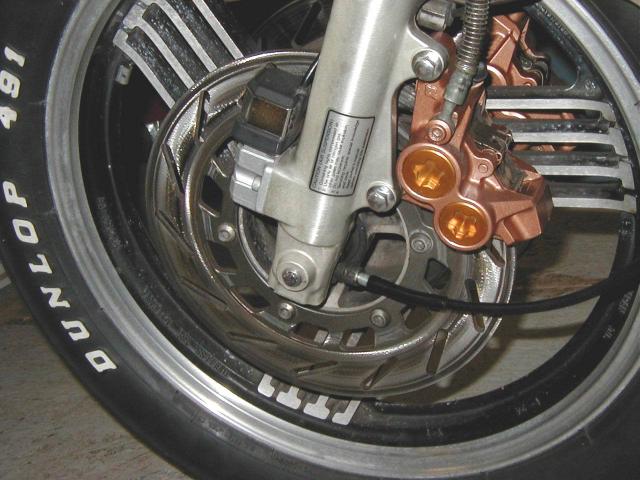
When I purchased my 1987 Venture Royale I noticed right off the bat that the left front rotor/caliper had major problems as did the rear caliper. The left front caliper was sticking so badly that it destroyed the LF rotor. After pricing rebuild kits for the three calipers, the rebuild kits for the front and rear master cyls. and the replacment of the bad front rotor my navigator/accountant said that perhaps I should just part the bike out! I sung the blues to SQUEEZE ( by the way thanks very much for giving me the courage to do this!)and he assured me that the solution was to replace the calipers with calipers from the Yamaha R1 and "de-link" the braking system. I really liked this idea because I also have a Honda V65 magna with the usual braking system. Both front discs operated by the hand lever and the foot pedal operating the rear brake. I purchased 2 front calipers from a 2002 R1 from Ebay for $40.00 with shipping. I also purchased a brake line set from a 2002 VMAX for $28.00 with shipping. Lastly, I purchased a set of stock, used rotors from Ebay for $55.00 with shipping. I picked up a front and rear master cyl. rebuild kit from Rick @ Buckeye Performance (by the way Rick, thanks a bunch!) and althou he was not too keen on me de-linking the brakes he was very friendly and provided excellent service, plus gave me a nice VR ORG. discount. Once the parts arrived, I removed ALL of the old brake lines, rebuilt the front and rear master cyls., installed the VMAX brake line set, moved the right front brake caliper to the rear (waiting on another good buy on a RF R1 caliper.) added a set of speed bleeders on all three calipers, and this was the beginning of the good part, I bled all three wheels out in 8 minutes!! Needless to say the braking is nothing short of UNBELIEVABLE! During one extremely hard brake test I came VERy close to lifting the rear wheel off the ground with NO front brake lock-up, and the decell was breath taking. The more brake lever you grab, the harder these new calipers work! I have included some pics, Part 2 will be the addition of an R1 rear caliper and part 3 will be the replacment of the stock front rotors with a set of modified R1 floating rotors. I will keep you posted as the rest of this story unfolds. Any questions, please feel free to ask me, SQUEEZE is the Master, I'm just the desiple. Ride Safe, Stop Safe, Earl.

-
 I got the posts and write-ups here on the site about greasing the splines and dampers under the circlip on the rear wheel. I have it all torn down here while the hurricane is overhead. I got Honda moly 60 lube. While in here lubing it, should I go ahead and pull the driveshaft so I can moly the driveshaft and u-joint? My '87 has 87,000 miles on it and I bet the shaft has never been serviced... Thanks to all!
 -
I need some help finding long distance touring tires. My Yamaha dealership swamped me into a Vons claiming they would rival Michelin long-distance tires. The michelins claimed double the usual expected mileage. That would equate to 40,000 k. I have since learned my Yamaha dealer may have totally lied about the capability of the Avon tires. Not wishing to rely on them for advice I'm asking here. The Dunlop Elite 4 tires seem to claim amazing range. What is my best option and does anyone know where I could get them installed in short notice.
-
 83 Venture Rear Wheel Bearing Replacement (This document in Word format attached)83 Venture-Rear-Wheel-Bearings-Replacement.docx. My apologies for the formatting below - outlines don't come out very well in plain text. See the Word doc. I was experiencing some rear noise and vibration when leaning to the left and it was becoming progressively worse. I had never done the ‘Venture Rear Wheel Service” as documented in the forum (Ozlander 09-17-2015), so I decided to undertake that. I took the original write-up, and broke it down into numbered steps so I could check each one off as I went (I just find that a little easier to follow). I have included that below. I did not find any problems until I came to the bearing inspection part of the process, I did notice a little bit of roughness in the gear-side bearing (the needle bearing), but even more unusual, there was significant play in the inner bearing collar that forms the inner race of that bearing (it would slide in and out about 3/8’s of an inch). So I decided to undertake a replacement of the entire set. I searched the forums high and low for information on how to do that, and found a number of them, but there are differences between the different generations (to be expected), and there may be differences between the 3 years of the first gens. I can only speak about my experiences with this 83. After reviewing the various forums, I began the process of ordering the parts. Here is the complete list of parts as extracted from the YAMAHA parts website (https://www.shopyamaha.com/parts-catalog/parts/star-mcy?ls=Star&dealernumber=#/Yamaha/XVZ12TK_-_1983/REAR_WHEEL ) 1983 XVZ12TK & TDK per Yamaha's web site Item # Part # Description Yamaha price 3 93317-32635-00 BEARING, CYLINDRICAL | Use w/Item 28 38.78 kit 2 90560-20235-00 Spacer 19.37 4 90387-200J2-00 COLLAR 14.22 5 93306-30417-00 BEARING 32.18 kit replaced by part # 93306-30437-00 6 99009-52500-00 CIRCLIP 6.41 7 93102-25064-00 OIL SEAL 7.64 kit 12 93440-45022-00 CIRCLIP 6.67 13 93210-68347-00 O-RING 4.72 kit 14 2H7-25315-00-00 FLANGE, SPACER 5.5 partzilla 15 93106-40027-00 OIL SEAL 8.27 kit 28 90387-203H7-00 COLLAR | Use w/Item #3 15.41 partzilla Total $ 159.17 Don’t let the Yamaha price scare you, as you can’t order any of this from them anyway. I listed it just for reference purposes as I shopped around. I found a reference in one of the forums to a kit from OEMCYCLE (Pivot Works part # PWRWS-Y23-000) and it was available for $55 so I ordered it. The only drawback was that they did not list the detail parts that were included in the kit. So I waited until it arrived to find out exactly what was in it – those are noted in the list above by ‘kit’ - it was missing two critical parts – Item 14 (FLANGE,SPACER), and Item 28 (COLLAR). The name for Item 28 is a bit of a misnomer as it is actually the inner piece of the needle bearing that functions as the inner race for that bearing (and is the piece that I noted above was moving in and out suspiciously) – the YAMAHA site specifically states that it should be ordered in conjunction with Item 3 (the outer portion of the needle bearing). OEMCYCLE did not list that part as orderable (nor did the Pivot Works site either), so I was able to find it on Partzilla (along with the SPACER FLANGE – more about that below). The parts I did not order and reused were the two circlips, the SPACER (Item 2), and Item 4 (COLLAR) which is more of a washer that is external to the bearings and seals. I should note at this point, that in my original Service Manual for the 83, the Rear Wheel Diagram (Page 5-7) does not show Item # 28 (the COLLAR that forms the inner race for the bearing) – it is present on the Yamaha Website diagram – I have now penciled it in on my manual. REMOVING THE OLD BEARINGS: I searched the forums for some details on this, and was not confident that what I found would actually pertain to the 83. I was able to find a webpage (by searching for the bearing part numbers) which documented bearing removal for an XS11 and looked exactly the same as what I was seeing on the 83 Venture. It was good up to a certain point, but then deviated from the reality of the 83 as I will note below. So here is the link – good pix and text – I will summarize the steps my buddy (Tim Tucker) and I actually took and where we had to deviate from the XS11 procedure. Link to pix from XS11 Yamaha – had same part # for one of the bearings: http://www.xs11.com/xs11-info/tech-tips/repairs/32/193-rear-wheel-bearing-replacement-pictorial.html 1. Starting on the brake side, we used a seal puller to remove the oil seal, exposing the circlip underneath. 2. We removed the circlip, so the bearing could now be pounded out from the opposite side (in theory, once you have that side opened up). 3. We turned the tire over (setting it on a pair of wood 2x4’s to protect the brake disc) and tried to follow the step in the XS11 procedure – it shows using a seal puller to remove the seal and collar – that does not work for the 83 – the seal and collar are a different part. The seal on the 83 is rubber/vinyl with an external metal ring (that is pressed into the hub) but more importantly, it contains a tiny embedded coil spring – the spring is what prevents the collar from pulling completely out of the bearing. We ended up cutting the outer rubber portion of the seal all the way around until we exposed the spring, then pulled that out with a pair of needle nose pliers. That allowed the inner collar to slide completely out. With the extra room, we were then able to grab the rest of the seal with a pair of diagonals, distort it, and twist it completely out. So what you are left with at this point on the gear side is the outer race and needle bearings. 4. The XS11 procedure now states to hammer out the big bearing from this side, by shifting the flanged spacer over, to gain access to the outer race of the big bearing. This is an oversimplification of what needs to happen (for the 83 at least) and is a good time to describe what is actually in this hub and how it is meant to fit together. The design is that the long Spacer aligns with the inner race of the large bearing and with the inner race (the ‘collar’ noted above) of the needle bearing so that those parts remain relatively stationary while the wheel itself rotates with the outer races. The Spacer Flange is there to maintain the proper alignment of the long Spacer with the center of the large bearing – because the cavity at that end of the wheel hub is the diameter of the large bearing, so there is all that space for the long spacer to flop around. The Spacer Flange is basically a donut that is the same diameter as the large bearing, and the long spacer fits inside the donut hole, lining up with the inner race. At this point in the removal, we did not understand that. We could not get the spacer to ‘shift’ as the XS11 procedure stated – it would wiggle very slightly, to reveal the edge of the inner race, but no more. We eventually resorted to hammering on the spacer with a large drift pin, which basically distorted the Spacer Flange until the long spacer came loose from the center of the Spacer Flange and was then free to slide all around the inside cavity of the hub, revealing the outer race of the large bearing and making that accessible to hammering with the drift pin. Of course the Spacer Flange was sitting on top of the large bearing, but being thin metal, it was perfectly fine to hammer on it to pound out the large bearing. Once that popped out, the mangled Spacer Flange came with it, and the long Spacer fell out as well. Knowing what we know now, we suspect that it would have been possible from the needle bearing side to pull the Spacer/SpacerFlange assembly up thru the needle bearing (the Spacer is the same diameter as the needle bearing collar we removed above) just enough so that the Flange portion would clear the housing above the large bearing – it might pivot just enough to get a drift pin down thru the spacers and catch the outer race of the large bearing, allowing you to hammer it out – the next person to follow this procedure will need to update this document with their findings. 5. That left just the needle bearing still in the wheel on the gear side. The XS11 procedure had a picture showing two cutouts in the inner wheel housing that would allow you to insert a small drift pin to hammer out the needle bearing from the opposite side. Unfortunately, there were no cutouts on the 83’s hub. The hub completely blocks any access to the bearing from the opposite side. I considered drilling my own holes, but eventually decided against that. So at this point I cried uncle, and took the wheel to a local bike shop. For a half-hour labor’s charge, they told me that they ripped out the needle bearings form the outer race, then used a small bearing puller that budged it enough so the inside edge of the bearing was then exposed enough to catch it with a drift pin from the other side, and finished by hammering it out. 6. Installing the new bearings: we laid out the parts and slid them onto the axle to verify we understood how it needed to go back together. Started with the large sealed bearing, then the Spacer Flange (open side against the bearing, followed by the long Spacer, then the Collar (Inner Race of the needle bearing) and then the needle bearing itself (which we had not yet greased up and so we did not actually slide the collar into it). This is the point where we first really understood how it all was meant to work. When we initially slid the Spacer Flange up against the large bearing, it was contacting the bearing’s rubber seal and wanted to turn with the outer race. We knew that couldn’t be right, and it finally dawned on us that the long Spacer was meant to fit through the Spacer Flange and thus keep the flange from contacting the rubber seal. a. So the next step was to insert the long Spacer into the Spacer Flange. This is accomplished simply by laying the Spacer Flange on a flat surface (open side down) and tapping the long spacer through the center until it comes into contact with the flat surface. The end result is the long Spacer protrudes thru the flange to allow it to contact the bearing while preventing the outer edge of the Flange Spacer from touching the bearing seal or outer race. We verified that by sliding everything back onto the axle and now the only parts touching were those that lined up with the inner race of both bearings. b. Lay the wheel with the large bearing side up c. Insert the Spacer/Flange Spacer assembly into the hub (long spacer first – it will protrude out the other side of the hub). d. Insert the new large bearing into the hub and gently hammer into place. We used the tip from the XS11 instructions and had already cut a notch out of the old bearing, so we laid the old bearing on top of the new one and hammered on that until the new one was completely seated. The old bearing pops right out of the wheel housing when squeezed with a pair of plyers. e. Install the circlip f. Install the new seal g. Flip the wheel over – the Spacer/Flange Spacer assembly should slip back down and sit on the newly installed bearing h. Grease the new needle bearing i. Install new needle bearing – again we used the old needle bearing (which we also had notched) as a hammering tool. j. Apply a little grease to the new Collar (inner race) and insert into the needle bearing (smaller end first). It should butt against the Spacer inside the hub. k. Install the oil seal l. Reinstall the hub per the instructions in the Rear Wheel Service document i. Apply grease to the inside of the hub and to the six posts that fit into the wheel. ii. Check the o-ring on the wheel to be sure it is in place before you replace the hub and circlip. 7. The wheel is now ready for installation. Venture Rear Wheel Service You may ask, "Doesn't my dealer do that?" NOT UNLESS YOU TELL, HIM THAT YOU WANT IT DONE. This service should be completed every tire change or 10,000 miles (16,000k) or at least every two years; but in most cases it isn't done because we don't always have a dealer replace our tires and/or we don't tell him to do the work. So if you just bought the bike or you are not sure it has been done, it would be a good time to think about servicing the rear wheel of your Venture. The procedure is fairly simple to do on bikes without a trailer hitch and only a little harder if your bike has one. 1. Remove the rear bags 2. Remove the right muffler 3. Remove the rear brake caliper 4. Deflate the tire; then remove the rear wheel: a. Remove the axel cotter pin, washer, and axel nut b. Remove the caliper and loosen the pinch bolt c. While supporting the brake torque stopper plate, pull out the rear axel d. Move the wheel to the right side and separate it from the final gear cases and remove the rear wheel. 5. If your Venture is a 1983, 84, or 85 you will need to remove the rear drive or differential and remove the drive shaft: a. Remove the final gear case assembly b. Remove the drive shaft. 6. Clean the drive shaft and coupling, then grease both ends before putting it back in (note: make sure that the shaft goes back into the u-joint. If you are not sure, remove the spring on the boot covering the u-joint and check it. Next clean the spline or gear on the rear drive and grease it with a good quality grease, personally I use a medium Moly based grease. 7. Wheel cleaning/inspection: a. Now find a couple of 2" x 4"s and place the rear wheel (spline side up) on the boards. b. When you clean the hub and splines off you will see the spring clip or circlip that holds the hub in place; i. remove this clip and before you remove the hub mark the position of the hub so you can replace it in the same holes it came from. ii. Now clean the hub and inspect it for wear iii. Then apply grease to the inside of the hub and to the six posts that fit into the wheel. iv. Check the o-ring on the wheel to be sure it is in place before you replace the hub and circlip. v. Check the bearings inside of the wheel and check the bearing movement; if they are rough or worn replace them. 8. Now for the mono shock pivots: a. Place a jack under the rear drive to take the strain off of the mono shock then dissemble. b. Clean and grease all of the pivot points and reassemble (if you have a 90 - 93 or you have had grease fittings installed, just give them a squirt). 9. Before you install the rear wheel take the axle and put it back through the swing arm into the final drive to check the alignment. If you find that it is in a bind you will have to change the wedge shim between the final drive and the swing arm. 10. Check the oil level in the rear drive or replace the oil if it has been 10,000 miles since it was serviced and check the brake pads for wear. 11. You can now reassemble your bike and have another year or two of trouble free riding.
 -
 Can't get the rear drive oil filler plug out on my red bike. It seems stuck fast. I have tried some heat and currently have some kroil soaking on top of it. Its dark now, so I'll leave it soak till tomorrow. I am afraid of deforming the hex of the plug if I put on too much force. I havent tried the drain plug bolt yet but everything is very dry on this bike so I'll bet it will be a problem too. Suggestions? Thanks, Brian H.
 -
 I have oil collecting at the top of the left rear cylinder just below the chrome cover. I thought it was only occurring while running, but the bike has been sitting in the garage since Dec. 7th at which time I cleaned it thoroughly. While installing a Speed Bleeder and changing my clutch fluid over the weekend, I found oil there again. On the car I'd suspect a valve cover gasket. Do I have a valve cover gasket or similar on my RSV? Suggestions welcome. Ken
 -
 Hi All, I have been lurking for a while and posted a few things, mostly trying to get some more knowledge before tearing into my bike getting it ready for Spring. Great site and lots of information here! Here is the story, My wife and I started riding 2 years ago and just fell in love with it. We have a great group of friends and family who we get to ride with and it has been a new and awesome experience for us. We started on a 1982 Honda Silverwing Interstate with 7,000 original miles on it. We put 10K miles on it over the last 2 summers and it was a great starter bike for us. I sold is on E-Bay and it now has a nice new warm home in Florida. I have been looking at Royal Stars for about a year and decided that is what will be our next bike,.. Well I found this 1997 Yamaha Royal Star Tour Classic with 32K miles on it: http://i1306.photobucket.com/albums/s564/Darrin-GT/1997%20Yamaha%20Royal%20Star%20Makeover/1996YamahaRoyalStar001_zps4b5dccf3.jpg http://i1306.photobucket.com/albums/s564/Darrin-GT/1997%20Yamaha%20Royal%20Star%20Makeover/1996YamahaRoyalStar002_zps5db08446.jpg http://i1306.photobucket.com/albums/s564/Darrin-GT/1997%20Yamaha%20Royal%20Star%20Makeover/1996YamahaRoyalStar003_zps3b34d541.jpg http://inlinethumb01.webshots.com/33920/2141459730101950171S600x600Q85.jpg http://inlinethumb63.webshots.com/47038/2219161110101950171S600x600Q85.jpg It was at the Auto Auction (I own a car lot) late last fall. I was high bidder on it for 2K and bought it for $2,220.00 and rode it 60 Miles back to my shop the same day. It was too great of a deal to pass up! My wife and I are very excited about it! I put a new rear tire and rear brakes on it last fall, was able to put about 200 miles on it before snow flew and it has been sitting ever in my shop since. Few other things that I have done to it was buy a stock windshield, rear floor boards, front lowers, and a luggage rack. Since I got it from the auction I have no idea where it is as far as maintenance is concerned So now it is time to start working on it. Here are the plans: Do all of the basics Full Fluid: Change, Oil, Rear Drive, Front Forks, Tune Up, Plugs, Clean the K&N's Sync the Carbs Adjust the Valves. For Modifications: Install Fairing with full gauges: volt, Temp, Oil, and tac 6x9 Speakers Small Amp for a MP3 Player, dont want a big car radio. Tall Riders Back Rest Luggage rack Few more saftey chrome items. The plan is to start working on it in the next few days and have it all done before spring. Here are some pics of it so far: Fairing test fit: http://i1306.photobucket.com/albums/s564/Darrin-GT/1997%20Yamaha%20Royal%20Star%20Makeover/1997RoyalStarTourDeluxmakeover002_zps08625be4.jpg Side Shot tank, seats, side motor covers removed: http://i1306.photobucket.com/albums/s564/Darrin-GT/1997%20Yamaha%20Royal%20Star%20Makeover/1997RoyalStarTourDeluxmakeover003_zps8573ebce.jpg http://inlinethumb44.webshots.com/45931/2789621260101950171S600x600Q85.jpg Didnt know the bike has K&N Filters! http://i1306.photobucket.com/albums/s564/Darrin-GT/1997%20Yamaha%20Royal%20Star%20Makeover/1997RoyalStarTourDeluxmakeover004_zps10513349.jpg http://inlinethumb52.webshots.com/45235/2789763760101950171S600x600Q85.jpg Shot of the rear quad pipes: Think they are Barons Nasty Boys http://i1306.photobucket.com/albums/s564/Darrin-GT/1997%20Yamaha%20Royal%20Star%20Makeover/1997RoyalStarTourDeluxmakeover005_zpsfd156eb7.jpg http://inlinethumb12.webshots.com/3275/2607327560101950171S600x600Q85.jpg Yamaha's Comfort Cruise Seats made by Corbin, and Tank: http://i1306.photobucket.com/albums/s564/Darrin-GT/1997%20Yamaha%20Royal%20Star%20Makeover/1997RoyalStarTourDeluxmakeover006_zpsdbda4006.jpg http://inlinethumb53.webshots.com/46708/2694000440101950171S600x600Q85.jpg Side Motor Covers to be blasted and re painted: http://i1306.photobucket.com/albums/s564/Darrin-GT/1997%20Yamaha%20Royal%20Star%20Makeover/1997RoyalStarTourDeluxmakeover007_zps1f362dd9.jpg http://inlinethumb51.webshots.com/48050/2556630150101950171S600x600Q85.jpg Fairing Backside: http://i1306.photobucket.com/albums/s564/Darrin-GT/1997%20Yamaha%20Royal%20Star%20Makeover/1997RoyalStarTourDeluxmakeover008_zps678f716f.jpg http://inlinethumb40.webshots.com/359/2310931100101950171S600x600Q85.jpg Rear seat and windshield: http://i1306.photobucket.com/albums/s564/Darrin-GT/1997%20Yamaha%20Royal%20Star%20Makeover/1997RoyalStarTourDeluxmakeover009_zps49835fea.jpg http://inlinethumb59.webshots.com/13306/2960733780101950171S600x600Q85.jpg Oil leak on the right side: http://i1306.photobucket.com/albums/s564/Darrin-GT/1997%20Yamaha%20Royal%20Star%20Makeover/1997RoyalStarTourDeluxmakeover011_zpsfb610ef2.jpg http://inlinethumb01.webshots.com/26176/2902507960101950171S600x600Q85.jpg Left shot of bike: http://i1306.photobucket.com/albums/s564/Darrin-GT/1997%20Yamaha%20Royal%20Star%20Makeover/1997RoyalStarTourDeluxmakeover012_zps33e48000.jpg http://inlinethumb45.webshots.com/46700/2436787720101950171S600x600Q85.jpg So I will keep everything in this post as progress slowly moves forward. I am sure that I will be needing some advice as I get into this project. We plan on keeping this bike for some time so if you have any suggestions or advice I would be happy to hear it! Thanks! Darrin
 -
 Hello all Time for a rear tire and I want to pull the rear wheel off myself and take to dealer. Do i need to remove the saddlebags, exhaust, ect??? Never pulled rear wheel before. This is on a 99 RSV, Thanks!!!
 -
 Perhaps a poll is warranted(pun intended)... for second gen rear air shocks, asking if your rear shock went out before the 5 year warranty, and if so, how many times was it replaced? AT HOW MANY MILES YEARS? would be good to know what percentage of our organization has this problem?.... would be good ammo when addressing the yamaha customer service reps and just might force them to address the problem(use a better replacement shock).
 -
 Seems a lot of people seem to like the EBC FA179HH front and FA123 rear but 2 sites said HH did not go with our bike and recommended the FA179V semi sintered for our bike has anybody went with these still would probably go organic rear to help soften the lock up. Any input would be appreciated quite confused right now. Also spark plug $3 standard or $10 iridium have to pull the tank to install passing lamps so want all the parts to be ready for spring.
 -
Has anyone ran a car tire on a RSV? I have a 2000 and would like to find a car tire for the rear. I used to run one on a Valkyrie and really liked it. Thanks, Oldman
-
Merry Christmas Venture family! Is it possible to get some technical advice from the electrical gurus here, I own a 08 Cadillac SRX, it has one quirk that can not seem to be solved even at the dealer! The daytime running light bulbs will burn out repeatedly . Sometimes within a week of replacing them. When that happens the signal lights will flash fast and the rear LED taillights will do all kinds of weird things. I just replaced the bulbs last week and they went out again. Both rear taillights will flash when I turn on the right or left signal and the brakes are applied. The systems are all tied together in the computer and all the research tells me its the cars way of telling me the bulbs are burned out. I have changed the bulb sockets as suggested by GM replaced the bulbs cleaned and checked the sockets and plugs. All the other lights are operational. To change the bulbs one has to remove the front wheels and take the complete inner fender off to get at the housing for the bulbs. To do both sides it can take a couple of hours. who in the world designed this? On to my question, can I replace these bulbs with a LED and hook some kind of resistor inline to fool the computer into believing it has a incandescent bulb in it? Kind of like the battery probe mod on my 1st gen? How would I find the right resistor to use ? From what I have found online the bulbs get hot, and the sockets get hard and cause a bad connection, high resistance and the element will burn out. I am not sure if the DRLs can be disabled and have everything else work as it should. Im at a loss. I wanted to sell the car but I sure would feel bad if a new owner had the problem and it caused a wreck because of the signal lights. Any ideas?
-
OK.. having lots of fun trying to get rear wheel back in. Don't want to let the air out of tire and don't want to loosen the rear drive bolts either since I have it nicely aligned. Even with a jack it's just not going in. Same size tire as old one, too... Other ideas or tips?? thanks! david
-
Rear tire went flat the other day so I put the jack underneath and Proceeded to pull the rear tire and wheel from the bike which I have done many times before as I have owned 5 different Ventures from 1963 to the current 1999. Took the 4 nuts that hold the rear drive shaft and removed it. Replaced the rear tire and reinstalled the drive shaft the same way I have always done it. Put everything back together and now the trans is locked in neutral can not shift to any other gear. Does anybody any idea what I might have done wrong and how to fix it. Any ideas would be great Thanks
-
Has anybody tried one or established the fit up with the stock rear pad. I really would like to get one but am unwilling to shell out the busks to find out it doesn't fit.
-
Removed lower fairings repositioned components installed highway bars and rad chrome Removed and blocked AIS complete Installing VMAx rear end Installed Dyna 3000 ign unit on upper curve Lowered ft end 1" and rear 1/2 inch (I'm inseam challenged) Installed and tuned Supertrapp exhaust Installed 4 single KN filters and installing Ivan's jet kit Custom paint LED headlamp and passing lamps Changed out Cassette deck for a power distribution unit and aux input New Avon rear and smaller Avon front tire
-
 I sold an 83 Venture to my BIL in 2006. Just before selling it to him, I had completely repainted it, rebuilt the carbs, installed a new stator assy, put new tires on it, had the seat redone. It was in a outstanding condition and ran really well. With the new paint job it looks really bada$$, too. I was visiting him a few months back and the bike was parked in his garage and covered. I could tell that he hadn't be on it in some time. So, I asked him when was the last time he rode it. To my bewilderment he had put only a little more that 300 miles on it since he bought it from me. He also stated that in had deteriorated somewhat since he hadn't been on it much. He hadn't even started it in over 5 years. Since he now has spells of being dizzy (he is 76 now) and can't ride he offered it back to me. I really wasn't interested because I have trouble keeping one bike up properly and surely didn't need a second one again so I told him I wasn't interested in buying it back. He said he didn't want to sell it to me but that I could just have it for free if I just got it out of my garage. I accepted. Since the bike has been back in my possession, I have installed a new battery, and gone through the carbs twice, cleaned out the fuel tank, changed oil and all those other necessary maintenance items. The bike again runs like a top; quiet as the day it was made. It even has 180 on all four cylinders. The only issue I now have and can't figure out is the rear brakes. I have read there is a third bleed valve up around the steering head somewhere. If there is, I surely cannot find it. Apparently after all those years of just sitting there, a rat or mouse or something ate a small hole in the brake hose; the one from the reservoir to the actual master cylinder. I replaced it and have been trying to bleed the rear brake system for over a week. My question is; did all 83s have that third bleed valve? I now do not get any air bubbles from the front bleed valve, but have gotten air from the rear bleed valve for probably over 100 bleeding attempts. What is going on? Any ideas will be greatly appreciated. Thanks


.thumb.JPG.a7ecab44ca5a487b6c43626aaa290fcc.JPG)