Search the Community
Showing results for tags 'clips'.
Found 11 results
-
 I removed the front cowling/fairing that goes over the headlight. Three of the plastic mounting points have completely broken off (the piece with the metal screw clips on them. Does anyone have a fix for this??
 -
Of the little guys that hold these bags to the trunk? I just won these of ebay to put on my 84. I put the MKII trunk on my MKI about 1.5 years ago so I have the clips that hold the bags onto one side, and I took the intercom controls off the other side. So I need a couple clips to put the second bag on that side. Thanks Bill
-
Trying to change plugs on my '88 VR but can't get the socket into left front and right rear heads. The coolant line clips are creating just enough interference were I can't get the socket to go in straight (zero tolerence ) . Tried to move the clips, got them broken loose but won't slide up the hose. any ideas? thnx Markus
-
A local leather shop made this bra for me. His suggestion was to fasten the bottom through the bottom tank bolt rather than use clips. I am very happy with it. Only cost me $50.
-
Do anyone had the two clips that attach to the tank that holds the intercom lead that they can part with?
-

fairing and plastics help?
woz111 posted a topic in Venture and Venture Royale Tech Talk ('83 - '93)
I've finally repaired most of the fairing and side plastics, they were in a hell of a state, some were snapped into 3 parts and one side had no tabs left to screw the sides onto. I managed to sort this out with a product called Plastex if anyone's interested. I bought it from here:- http://www.repairproducts.co.uk/page20.htm in the UK. I'm now trying to buy the screws and support clips (the metal clips that push onto the 3 fairing tabs each side) Anyone know where I can buy these from in the UK? I've looked in a few places but no luck yet, or will I have to buy them from Yamaha?file:///C:/Users/Warren/Desktop/04052008047.jpg -
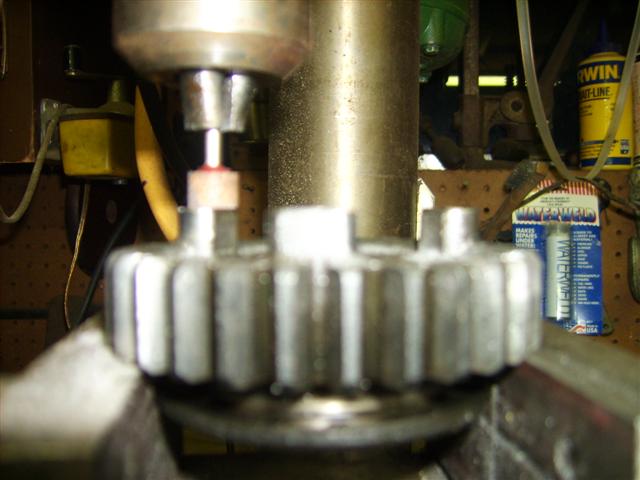
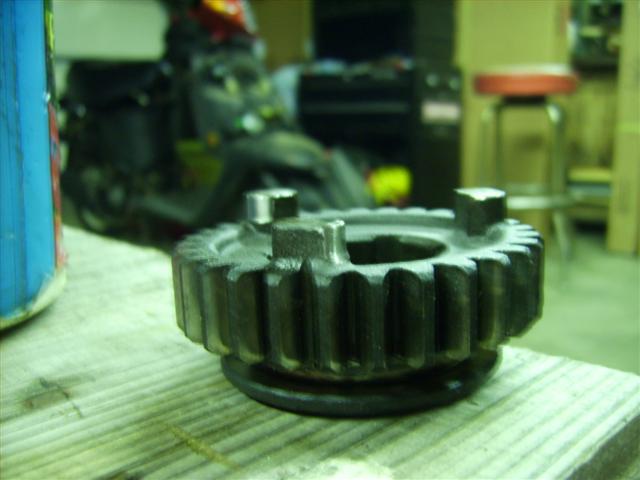
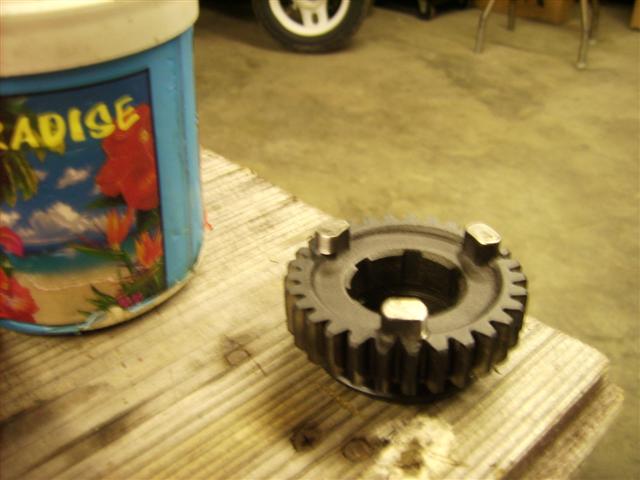
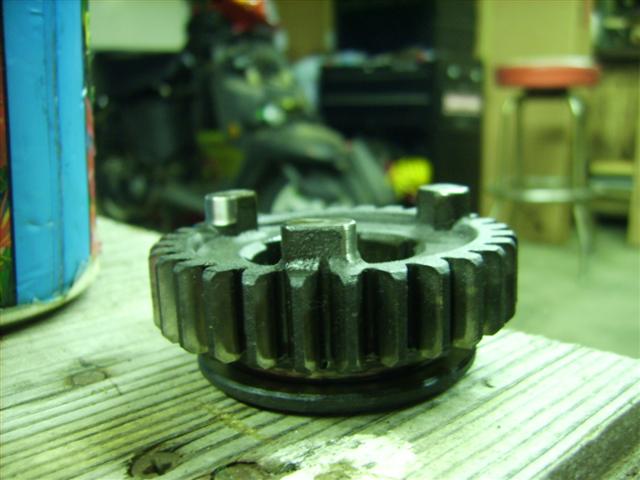
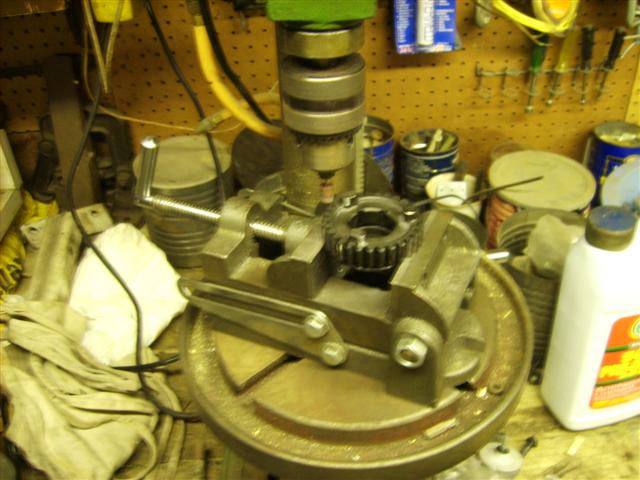
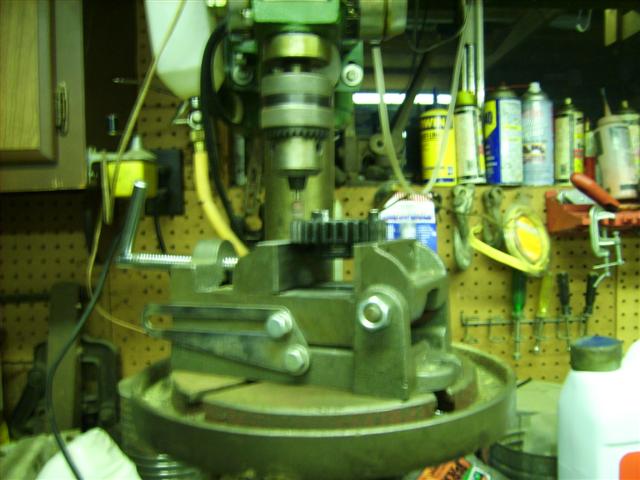
(Custom).thumb.JPG.9e28ea2111ab3dc9d16dacf3023dbe7d.JPG) Finally got up the courage to cut my 5th gear dogs today. Set it up in my drill press with an adjustable angle vise. I thought this might help keep it straight and I should be able to do the back cut also by angling the vise. Need to get a new stone first, will try that tomorrow night. I just rotated the gear and vice lightly around the stone (as it was turning, of course!) following the curve of the dog. Two dogs started at .0476, the other one was .0484 dimension across the widest part of the curved faces. Cut all three down to .0466 +/- .0001. Looked pretty good, and I believe all the rounded top is gone. Did not grind the other side (deceleration side) as I could not see any rounding on them. Will also try to backcut the slots with the vise as I can duplicate the exact angle I used on the dogs. Thought it might be easier than doing "freestyle" with the Dremel tool. Here are some measurements on the old and new thrust washer and clips and the clip groove in the driven axle: Plate washer: Old 1.98mm thick 25.23mm ID 4.38mm wide (ID to OD) New 2.02mm thick 25.28mm ID 4.38mm wide Thrust clips Old 3.06mm thick 6.67mm width groove cut in by wear .85mm New 3mm thick 6.5mm width Groove on shaft where split clips go-- 3.22mm So, I guess, there is meant to be about .15-.2mm play in the groove where the split clips go? I hope it's ok, 'cause I really don't want to spend $225.00 on a new axle. Any thoughts? I can't figure out why they would make the "new" split clips thinner than the old. Couldn't see much rounding on the pressure side (outboard) of the groove in the axle. Here are some pics Hey, I work in this garage, ain't got time to keep the bench lickety split clean!!!!!
Finally got up the courage to cut my 5th gear dogs today. Set it up in my drill press with an adjustable angle vise. I thought this might help keep it straight and I should be able to do the back cut also by angling the vise. Need to get a new stone first, will try that tomorrow night. I just rotated the gear and vice lightly around the stone (as it was turning, of course!) following the curve of the dog. Two dogs started at .0476, the other one was .0484 dimension across the widest part of the curved faces. Cut all three down to .0466 +/- .0001. Looked pretty good, and I believe all the rounded top is gone. Did not grind the other side (deceleration side) as I could not see any rounding on them. Will also try to backcut the slots with the vise as I can duplicate the exact angle I used on the dogs. Thought it might be easier than doing "freestyle" with the Dremel tool. Here are some measurements on the old and new thrust washer and clips and the clip groove in the driven axle: Plate washer: Old 1.98mm thick 25.23mm ID 4.38mm wide (ID to OD) New 2.02mm thick 25.28mm ID 4.38mm wide Thrust clips Old 3.06mm thick 6.67mm width groove cut in by wear .85mm New 3mm thick 6.5mm width Groove on shaft where split clips go-- 3.22mm So, I guess, there is meant to be about .15-.2mm play in the groove where the split clips go? I hope it's ok, 'cause I really don't want to spend $225.00 on a new axle. Any thoughts? I can't figure out why they would make the "new" split clips thinner than the old. Couldn't see much rounding on the pressure side (outboard) of the groove in the axle. Here are some pics Hey, I work in this garage, ain't got time to keep the bench lickety split clean!!!!!
-
Ok, just noticed on my bearings on both shafts, only 1 has a full circlip on it(Big bearing on main axle). The other two ( small bearing main axle, opposite end from pinion on drive axle) only have half-clips that are in the lower case half. No parts left in the main case. Is that how they're supposed to be? MamaYama manual shows full clips, the case is grooved for full clips. Inquiring minds want to know!!!!!! Dan
-
A few short clips from Cache La Poudre Canyon: [ame=http://www.youtube.com/watch?v=WkevVyBC-is]YouTube - Powder Canyon 1[/ame] [ame=http://www.youtube.com/watch?v=lsdh5gdp-fw]YouTube - Powder Canyon 2[/ame] [ame=http://www.youtube.com/watch?v=YvA5BKvVBkY]YouTube - Powder Canyon 3[/ame] [ame=http://www.youtube.com/watch?v=2Qbl4nYfGos]YouTube - Powder Canyon 4[/ame] [ame=http://www.youtube.com/watch?v=3ytpR3y0kz8]YouTube - Powder Canyon 5[/ame] [ame=http://www.youtube.com/watch?v=byyzR3s86w0]YouTube - Powder Canyon 6[/ame] [ame=http://www.youtube.com/watch?v=Bva3L8QIZjs]YouTube - Powder Canyon 7[/ame]
-
These are some clips on the way down Mount Evans. The fifth clip includes some VentureRiders heading up the mountain. We had wanted to get video of them making the top but Irene couldn't handle the altitude so we had to head down earlier than intended. [ame=http://www.youtube.com/watch?v=_IWcsdaQ2hU]YouTube - Mount Evans 1[/ame] [ame=http://www.youtube.com/watch?v=FuUbVeIPu84]YouTube - Mount Evans 2[/ame] [ame=http://www.youtube.com/watch?v=TOjlILyp_uw]YouTube - Mount Evans 3[/ame] [ame=http://www.youtube.com/watch?v=E9SkI95dt-w]YouTube - Mount Evans 4[/ame] [ame=http://www.youtube.com/watch?v=087cJxJ_8vs]YouTube - Mount Evans 5[/ame] [ame=http://www.youtube.com/watch?v=wtIzF4ahFvM]YouTube - Mount Evans 6[/ame] [ame=http://www.youtube.com/watch?v=jrAOZDhNIuw]YouTube - Mount Evans 7[/ame] [ame=http://www.youtube.com/watch?v=CyugsSdjORY]YouTube - Mount Evans 8[/ame] [ame=http://www.youtube.com/watch?v=dA8kjkSUWGk]YouTube - Mount Evans 9[/ame] [ame=http://www.youtube.com/watch?v=_BqCtXaKacQ]YouTube - Mount Evans 10[/ame] [ame=http://www.youtube.com/watch?v=xj1m1gk00VY]YouTube - Mount Evans 11[/ame] [ame=http://www.youtube.com/watch?v=szIXzRMoDaY]YouTube - Mount Evans 12[/ame] Yes, at one point I'm being outrun by bicycles. The shame of it all.
-
One of the first things that I noticed, and others commented on also, after purchasing my '99 Royal Star Venture was the fact that there was simply not enough lighting on the rear. I did some investigating and found a number of LED light bars made specifically for motorcycles but the prices were crazy. Then as I was browsing through my local "Autozone" parts store one day, I happened upon a LED light bar with a price under $20.00. The LED bar contains 20 LEDs and is made by Pilot. The part number is WE6-197. It was the perfect length to mount under the truck of my new Venture so I bought it and went about figuring out the best way to mount it. I made a trip to my local "Home Depot" and browsed through the hardware and fastener section until I came up with an item that they called "handlebar clips". Basically they are just spring steel clips available in various sizes. I bought a couple of them, drilled a 1/8" hole in the base of them, took the LED bar across and secured the clips to it with small screws through the holes I drilled in the clips and matching holes drilled in the housing of the LED. I made the connections to the brake wiring behind the license plate. You must take care here that you connect the positive lead coming out of the LED bar to the positive (hot) lead of the brake light or running lights depending upon how you want to wire the LEDs. This is perhaps the cheapest modification you can make to the rear of your Venture and is worth every penny due to the increase visibility that it will give the rear of your bike. http://www.venturerider.org/pilotlight/831.jpg http://www.venturerider.org/pilotlight/light_bar1.jpg