Search the Community
Showing results for tags 'bolts'.
-
 The Barnett clutch was installed this evening. Took about an hour since I also cleaned up the areas I normally can't get to. Also took 15 minutes to find my darn 1/4 ratchet (never did find it - one of the kids must have borrowed it and forgot to put it back - Grrrrr). As promised, here is the installation with pictures. Here is the Barnett clutch plate as received. http://2000rsv.smugmug.com/Motorcycles/Barnett-Clutch-Upgrade/i-rLB7KNp/0/M/P1000116-M.jpg These are the tools required. Ball end Allen wrenches, mechanics picks, and an in-lb torque wrench. Not shown is a 10mm socket/combo wrench for removing the Stebel horn (if installed - not sure if you need to remove a stock horn) and the stock spring holder ring. You will also need a pair of needle nose pliers. http://2000rsv.smugmug.com/Motorcycles/Barnett-Clutch-Upgrade/i-FQTRxKX/0/M/P1000118-M.jpg Put the bike on the side stand and put an oil pan under the clutch cover side. No need to drain the oil unless you smoked your clutch. Then an oil change would be needed. Put the transmission in neutral. http://2000rsv.smugmug.com/Motorcycles/Barnett-Clutch-Upgrade/i-JGw69SQ/0/M/P1000119-M.jpg Take off the horn and hang it from the rear foot board with a piece of coat hanger. http://2000rsv.smugmug.com/Motorcycles/Barnett-Clutch-Upgrade/i-4xXPJzH/0/M/P1000120-M.jpg Take the cover off the clutch. Pay attention to where the bolts go. There are two different length bolts. I suggest taking a piece of corrugated (cardboard), draw the cover shape including the oil fill for reference. Use a small screw driver to poke holes and insert the bolts in the appropriate location in the pattern. You may notice the gasket stayed intact on the engine. I reused it. http://2000rsv.smugmug.com/Motorcycles/Barnett-Clutch-Upgrade/i-j9rgXjB/0/M/P1000121-M.jpg Remove the 6 bolts holding the spring in place and remove the spring and pressure plate. http://2000rsv.smugmug.com/Motorcycles/Barnett-Clutch-Upgrade/i-v7v9BWC/0/M/P1000122-M.jpg Here are the parts removed. http://2000rsv.smugmug.com/Motorcycles/Barnett-Clutch-Upgrade/i-Zck5Cvw/0/M/P1000123-M.jpg Note the notches in the friction plate edges and the two punch marks on the clutch cage. This is important when reinstalling. http://2000rsv.smugmug.com/Motorcycles/Barnett-Clutch-Upgrade/i-sFfdMgK/0/M/P1000124-M.jpg This is where the mechanics picks come in handy. Makes the removal of the clutch disks really easy. http://2000rsv.smugmug.com/Motorcycles/Barnett-Clutch-Upgrade/i-Gv4cfxF/0/M/P1000126-M.jpg When all is removed, it looks like this. http://2000rsv.smugmug.com/Motorcycles/Barnett-Clutch-Upgrade/i-V3w5RwF/0/M/P1000127-M.jpg I had done the Freebird mod which removes the inner half friction disk and small bellville spring and replaces it with a full disk. This mod reduces the friction zone on the clutch handle. I wanted the additional friction zone so I am putting the half and half back in. Here are the pieces including the wire. You are supposed to use a new wire every time. However, I was really careful when removing it and am reusing my old wire (plus, I didn't think ahead of time to buy a new one). http://2000rsv.smugmug.com/Motorcycles/Barnett-Clutch-Upgrade/i-7C5gF4Z/0/M/P1000128-M.jpg To be continued. RR
 -
I'll try to explain where my problem exists. On the side of the rear fender, bolted to the fender, there is a chrome strip that the passenger "Oh Sh** handle" and the forward luggage rack support bolts to. I found two bolts missing, one for the passenger handle and the front luggage rack support. My question is; Are there nuts on the inside of that chrome strip, or are there threads built into the strip or some kind of plate fixed on the inside of the chrome strip that the bolts screw in to? Do I need to remove this strip? Does it require removal of the rear wheel? Thanks in advance for any answers.
-
R1 and delink the brakes
Squidley posted a topic in Venture and Venture Royale Tech Talk ('83 - '93)
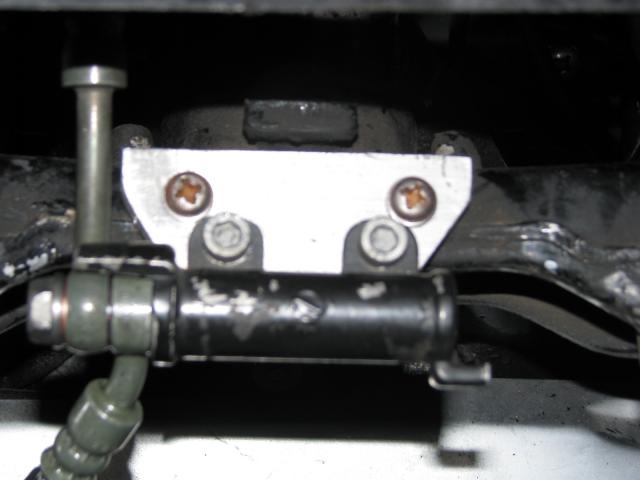
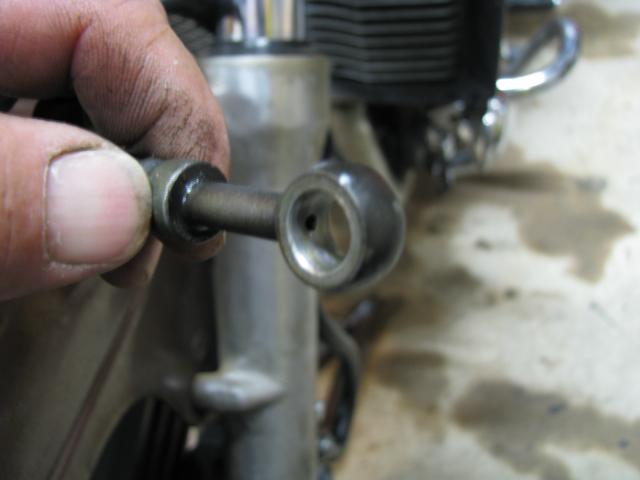
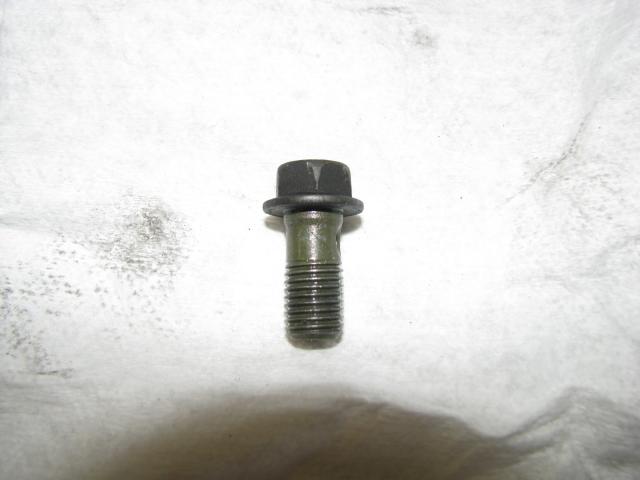
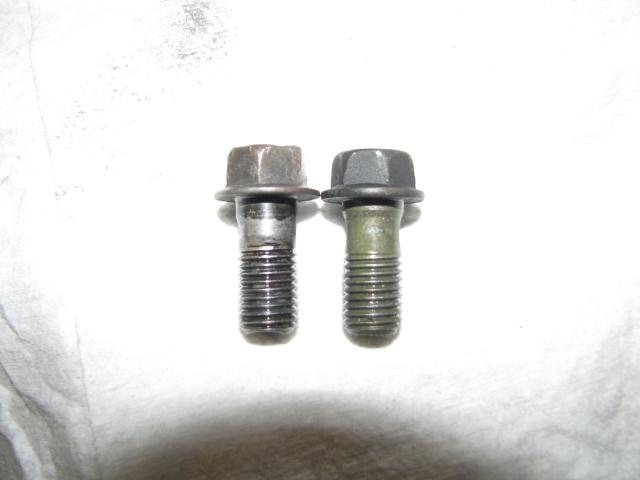
Just wanted to toss up a quick note to all the 1st genners that are thinking of delinking their front brakes and going with the R1/R6 front calipers. I just finished this mod on the '86 I currently own, and I used several different lines. The main line from the front brake master cylinder was off a 2nd gen. I sent this down to what I think was a Vmax splitter and then the R1 calipers I bought had the lines with it and I used them to the calipers. The reason I am writing about this is I ran into a problem when I 1st put it together. I want to save you fellas some headaches should you want to try this. Let me start out saying that all banjo bolts are not the same. Also all brake line connectors are also not the same. The original equipment lines on the 1st gens have a groove inside the fitting and the banjo bolt has a full sized shank. The 2nd gen line does not have this groove in the line, nor does the R1 lines, so there has been an engineering change with this and the bolts are not interchangeable. What I ended up doing, was grinding a groove in my old bolt at the splitter, and also on the master cylinder bolt as I wanted to use the original ones to make sure they worked properly. I used the banjo bolts that came with the R1 calipers on them. The pics below are of the differences in the bolts, and the mod plate I did to mount the splitter. I bled the brakes out tonight and have a good feel to it with newer lines.
-
 I'm getting nervous because of the amount of force I'm having to use to get the water pump off so I thought I should stop and ask someone.. I've taken 5 bolts out of the cover I've taken 4 remaining bolts out of the housing.. Does the housing just pry off now?? And I should expect the impeller to come off with the housing? I don't have to somehow remove the impeller first do I? My housing isn't budging. I see that I've got the plastic impeller so thats gotta go, along with replacing the mechanical seal and what not.
 -
Hello all i'm looking for some help with my 87 venture. I recently took the bike down to the frame and now with most of the work done i'm rebuilding it but as i have discovered I am missing a lot of pieces (I didn't lose any they just didn't come with the bike) so now that i have all the fairing repaired i'm trying to put them back on the bike but when i got the bike all the fairing were zip-tied on so here are my two questions. What size bolts i need to put the fairings back? how dose the inner fairing(the one with the coolant overflow tank) attach to the bike? I know i should have took pictures of when i tore the bike down but you live and learn any pictures you guys have of how the fairings are attached would be appreciated Thanks in advance
-
 Since I bought my 2007 RSTD Midnight last year I have wanted to install a Tri-pouch Windshield Bag. I searched the forums here and elsewhere trying to locate one that would work, never finding what I wanted. Recently I took a chance and purchased a Carolina Leather Windshield Bag Number 721 http://www.carolinaleatherworks.com/winbag721.html This weekend I finally got a chance to install it and I am very happy with the results. I simply took off the windshield, Removed the three center bolts, inserted the bag, aligned it, marked the location of the holes, and drilled the plastic backer attached to the bag. I then installed the backer between the shield and the metal bar on the rear of the shield and reinserted and tightened the bolts. The only problem I had was getting the bolts reattached with the extra thickness of the plastic in there. After numerous tries I was able to get all the bolts reattached and everything reinstalled. I did loose the right side cables from their guide on the frontend of the bike to enable the bags to slide on and had to slightly adjust the cables to get the shield back on. So if you’re like me and searching for a windshield bag for a RSTD this might be the answer for you. Scott
 -
 Replaced my stator with a high output one from Buckeye and all was well until yesterday morning I started it up and when I revved it up just a little I got a buzz (vibration) so I took the covers off again and the bolts are tight but I can still move the stator very little by hand so I am going to get some shorter bolts to see if that helps. Could not see any places where anything made contact.
 -
 I think I finally got it altogether. What you'll get: 2 side covers,laser cut, mirror stainless 1 stainless bracket for left side 2 spacers glued to the back of the right side cover 4 stainless screws to attach the covers (metric) 2 replacement bolts to attach the left side bracket 2 washers for the above bolts 2 spacers for the above bolts 1 banjo bolt, if you need to replace the one sticking out from the rear brake master. 2 crush washers for above banjo bolt. Instructions: On the left side you need to remove the 2 bolts on top of the middle gear. You can store these for another purpose. Install the 2 new bolts from the package with the bracket as shown. Spacers go down first, then the bracket, facing out, and the the supplied washers and bolts. Torque to 17 ft lbs. On the right side you might need to remove the banjo bolt that is facing the outside from the rear master cylinder and replace it with the thinner headed banjo supplied. The supplied crush washers are also thinner, so use all supplied components. This is necessary as the OEM banjo sticks out too far to make a nice flat installation. You will need to bleed the rear brakes again, so before tightening the banjo, pump a bit of fluid through the joint to eliminate as much air as possible. Total cost will be $150 or less, including shipping. Please indicate if you want to join in the party. Once I have a count, I can then get a firm price for the stainless, let you know the actual cost and get your money before we make them. This will be a one time only deal. Sorry about the dirty scoot, I've been too busy trying to put this together to worry much about it.
 -
 So, you've removed the running lights to make repairs under the fairing and the 2 spacers between the bike's bracket and the lights mounting bar fell out. And then, you're fustrated trying to get them back in place when re-installing the lights. Not easy, huh? But, here's the million dollar's worth solution to simplify the process: First coat one side of the spacers with excessive amounts of "Silicon Ruber Sealant". Next, run the bolts through the spacers and just slightly attach the bolts to the bike's bracket. Then press lightly on the spacers to make total contact. Leave it alone now until the next day. Now, as the bolts are removed, the spacers stay in place and the lights can easily be put back in place. That's it! All ready to ride again! Owen.
 -
 A couple of my RSV friends have moved their trunk & passenger backrest back 1" by removing the mount bolts and and repositioning the whole assembly back one set of holes. Seen it done with 4 bolts and 6. Seems like a simple idea to give the passenger an extra inch of breathing room. I did not see this in the RSV tech library. Is there already a post on "How to"? I hope to do this today. (hints from my friends: Remove the passenger seat when you do it because when you move the trunk, it will pull on the com cord. The one with 6 bolts got said he picked up 6mm bolts from Lowes.)
 -
Damn, I hate letting the dealer work on my bike. I prefer to do my own work. After some great tips here on how to replace my steering bearings, I thought it was a bit much for my knowledge base and tool box, so after a good deal from the dealer (350.00) I took it there. Three days later I go pick it up and WOW! What a difference. On the way home, I notice my modulator is not working, so I figure they moved the sensor under the tank. Upon further examination, the eye is where it should be, so now I figure they must have turned the switch off while it was apart. As I start looking, I grab the passing lamps and they move? They got about a half inch play in them. Go get a wrench to tighten and it's tight as hell, both of them. Sooooooo, I remove both bolts to find that neither one was in correctly, BOTH stripped, deep in the fork frame!!!! Damn damn. Once I split the faring, found indeed they had switched the modulator off and also ther is an electrical connection not plugged in and I have no idea where it goes too? The two holes for the passing lamps are totally stripped and is my supposed to be leaving for a. Two week trip to Fl next Tue. I do hope they take responsibility of it and fix it (just don't know how). I guess drill out the holes and install helicoils. It seems that the two brackets on the inner faring were too low and didn't allow the bolts to go in correctly so the mechanic just forced them. I cannot get them to raise and am afraid to crack the faring. I tried to pry them up a bit, but they hardly budge and it seems to,stress ihe faring. Damn, I'd hate to have to take the cage on vacation................... Just venting. Thanks
-
 How do I get the left fork tube off my 2007 RSTD? I took the 2 pinch bolts out of the top, and removed 2 allen bolts at the middle that looked like they were holding the middle cover on, but no budging. Is there something else? Seems like there should be more to it than that, but the aluminum covers/protectors don't allow me to see anything else. Thanks
 -
 A couple of weeks ago, Dingy posted some great 1st. Gen service bulletins. One of the items concerned the bolts that join the right lower section to the main frame. This is the section that you remove to pull the motor. While I was working on the 89 yesterday, I thught of this proceedure and decided to make sure mine were tight. I pulled the right footpeg bracket, and tightend the bolts.....mine were about 1/4-1/3 turn loose. I also checked the forward bolts, and 1 of them was a little loose. BTW, Yammie suggested that they'd be checked every time the bike was in for service. I didn't think the bolts were so loose that they'd cause a problem, but today I noticed that the bike seems to turn a bit better. Thanks Gary!! Frank D.
 -
Got started on servicing the swingarm today and when I removed the Y pipe one end just slipped off without loosening the clamp. Looked in service Manual for a part number but didn't find any listed or shown pg 3-32 . Discovered this after removing the exhaust bolts at the head on one side and then realized that it wasn't necessary. Also found a pin hole which I should be able to weld up. Been having a little bit of popping now and then so now is the time to get the exhaust tightened up.
-
.thumb.jpg.4e1b3809c4633f365ba67afc212f21df.jpg) This warning about Locktite is posted here periodically, but since I just worked on a bike today with massive ABS plastic damage due to stupid Locktite use, I thought I'd start it again. The bottom line is that Locktite is known to damage many plastics, and ABS is one of them. We often caution people to never use Locktite on any screw that goes into plastic, but the problem is much worse than that. NEVER use it on anything that is even near ABS plastic! Every once in a while someone gets a bit uppity about these warnings and tries to say it is BS if a screw/bolt is going into metal, but I will give you first hand information about how much damage can be done by ignoring this warning. Had a guy come by today with 2nd gen trunk where all of the mounting points inside the lower trunk for the latching mechanism had busted loose. This just does not happen on this bike, so I was puzzled by why it had happened to him. The initial examination looked like maybe the plastic was defective from the factory. I have 100,000 miles on my RSV, most of which have been with the trunk over-full, and I have never had any problem, so why did his all break? Well, it became obvious while we were fixing it. Turned out that the plastic all around the latch mounting points had just disintegrated - no clean breaks at all, just crumbling plastic. And when I was removing the mounting bolts, I was struck by how tightly they were frozen into to the tinnerman nuts that fit over the plastic mounting tabs. These bolts should easily unscrew, but not his. Closer inspection showed that some poorly informed person had used Locktite on each of these bolts. Although these bolts do not directly screw into the ABS plastic, the tinnerman nuts clip over the plastic tabs so the bolts fit through a hole in the plastic, and the Locktite fumes damaged all of the plastic around the bolts. So the standard warning remains as strong as ever - NEVER use Locktite anywhere near ABS plastic! Goose
This warning about Locktite is posted here periodically, but since I just worked on a bike today with massive ABS plastic damage due to stupid Locktite use, I thought I'd start it again. The bottom line is that Locktite is known to damage many plastics, and ABS is one of them. We often caution people to never use Locktite on any screw that goes into plastic, but the problem is much worse than that. NEVER use it on anything that is even near ABS plastic! Every once in a while someone gets a bit uppity about these warnings and tries to say it is BS if a screw/bolt is going into metal, but I will give you first hand information about how much damage can be done by ignoring this warning. Had a guy come by today with 2nd gen trunk where all of the mounting points inside the lower trunk for the latching mechanism had busted loose. This just does not happen on this bike, so I was puzzled by why it had happened to him. The initial examination looked like maybe the plastic was defective from the factory. I have 100,000 miles on my RSV, most of which have been with the trunk over-full, and I have never had any problem, so why did his all break? Well, it became obvious while we were fixing it. Turned out that the plastic all around the latch mounting points had just disintegrated - no clean breaks at all, just crumbling plastic. And when I was removing the mounting bolts, I was struck by how tightly they were frozen into to the tinnerman nuts that fit over the plastic mounting tabs. These bolts should easily unscrew, but not his. Closer inspection showed that some poorly informed person had used Locktite on each of these bolts. Although these bolts do not directly screw into the ABS plastic, the tinnerman nuts clip over the plastic tabs so the bolts fit through a hole in the plastic, and the Locktite fumes damaged all of the plastic around the bolts. So the standard warning remains as strong as ever - NEVER use Locktite anywhere near ABS plastic! Goose -
Do you have problems reaching your seat bolts? Answer: Get two "ALL THREAD" female bolts. They are approx. 1 1/2 inch long. It a sweet fix!
-
I'm replacing the bolts in the brake disk and I'm not sure what grade they are but I purchased some SS bolts online and wondered if they would be alright. They are 18-8.
-
I was about to put some anti-squeak compound on the back of my front brake pads. I notice that the manual says 18 ft-bls of torque for the caliper retaining bolts. In the tech section there is a "service data" sheet that states 29 ft-lbs for the front brake caliper bolts. So... I'm assuming that the 29 ft-lbs is for the two bolts that attach the caliper "carrier" to the fork and the 18 ft-lbs is for the bolts holding the caliper to the "carrier". Can anyone verify that for me before I take things apart? Thanks. Andy
-
I replaced a faulty ignition switch today, and while there is plenty of info on the forum on how to do it, I wanted to share how I dealt with the tamper proof bolts that hold the switch to the frame. There is no "head" to get a tool onto these bolts, so many guys use a dremel or die grinder to cut slots into the head so they can remove the bolts with a screw driver. Another option is to just drill out the bolt and then remove the remaining bolt after the switch has been removed. I decided that since I didn't need to salvage the switch or the housing (it was already broke) it wouldn't hurt to break it more. I used a small sharp chisel to break part of the switch base so I could get at the recessed bolt heads. http://i15.photobucket.com/albums/a373/gat803/ignitionchange014.jpg Then I used the chisel to tap into the side of the bolthead, making a gouge for the tool to bite into and loosening the bolt. It was just a matter of a couple of revolutions and I could turn it the rest of the way by hand. http://i15.photobucket.com/albums/a373/gat803/ignitionchange015.jpg http://i15.photobucket.com/albums/a373/gat803/ignitionchange018.jpg I replaced the factory bolts with a couple of metric allen head bolts from my collection and I'm good to go. http://i15.photobucket.com/albums/a373/gat803/ignitionchange021.jpg Total time, start to finish to replace the switch.....1 hour, give or take.
-
Riding home from a 170 mile ride this afternoon, the radio started cutting out, as I hit the back brakes. I made it to a gas station, filled up and no start. so I checked all the wiring, No lose battery bolts, nothing grounded that i can tell. and the battery is some what new. Throw some Idea's at me, please.
-
 I need to replace the gasket on the left side crank case cover and I'm wonder what "special" considerations I need to be aware of. I've read and printed the service manual instructions and looked at a few pics on the site. After removing the multiple allen bolts that hold the cover on will it come off with the stator attached to the cover or do I have to remove the smaller cover first (with Yamaha emblem)? Any advise would be greatly appreciated. Brian
 -
 Ok so here's the deal. I bought a 99 RSV 2 years ago up in Toledo, OH. It had been totaled out and needed some TLC. It had been sitting in the garage for like 6 or 7 years. The guy's son in law tried to put back together a lot of it, but there was still a lot needed. I have got just about everything I need to get her back together......at least all the big stuff. The problem is the guy that tried to put everything back together used common nuts and bolts from the hardware store and I have noticed a lot of smaller things missing like spacers, rubber pieces, various screws and bolts, ect. What I would love to do is find someone somewhat local to me that has an RSV for comparison. That way we can comb through the bike and know everything that is needed to complete it......any takers? I am open to suggestions......
 -
I bought and after market, Harley tour pack and the back rest offered by the manufacturer. The back rest has brackets and the lid needed to be drilled for the back rest brackets. Okay, have that. Between the back rest bracket and the bracket that bolts to the lid, they provided a rubber insulator. This turns out to be a rubber bushing of about 1 " in length with the head of a bolt embedded in each end, giving threads sticking out each end of the rubber bushing. The problem is, I haven't even finished my mounting bracket for the bike and the bolts are popping out of the rubber already. What does everyone use? I considered a piece of all thread in each of the three locations, with jam nuts on each side of the bracket. What have others done for this?
-
.thumb.jpg.9dfefb49018580a1813c8128f131546e.jpg) got it today. i wasnt really sure what i felt at first. i thought it might be larger (46L). i was concerned that my large, full-faced helmet, wouldnt fit. it didnt in the stock trunk. i had to force it closed. overall, i wanted to fit my helmet, save weight, and have lights. well, thats what i got. JUST that. the Bestem came with a universal mounting plate which worked perfectly, except, i had to use bolts that were about an inch shorter to clear the taillight lens. no biggie. i am a little disappointed in the wiring harness. its really fine gauge wire. and, the LED harness seems like an afterthought. but it works. wiring was straightforward, but, it did not come with directions...weird. it also came with an extra set of side panels in black, instead of this orangy-red, but, i kept the red ones on. obviously, i got this for more visability. my old trunk leaked, rattled like a can of bolts, and was cracked in several places, not to mention, it weighed 23lbs. the Bestem weighed in at 12lbs. thats what i wanted. so far, ive shaved off almost 60lbs off my ride! enjoy!
got it today. i wasnt really sure what i felt at first. i thought it might be larger (46L). i was concerned that my large, full-faced helmet, wouldnt fit. it didnt in the stock trunk. i had to force it closed. overall, i wanted to fit my helmet, save weight, and have lights. well, thats what i got. JUST that. the Bestem came with a universal mounting plate which worked perfectly, except, i had to use bolts that were about an inch shorter to clear the taillight lens. no biggie. i am a little disappointed in the wiring harness. its really fine gauge wire. and, the LED harness seems like an afterthought. but it works. wiring was straightforward, but, it did not come with directions...weird. it also came with an extra set of side panels in black, instead of this orangy-red, but, i kept the red ones on. obviously, i got this for more visability. my old trunk leaked, rattled like a can of bolts, and was cracked in several places, not to mention, it weighed 23lbs. the Bestem weighed in at 12lbs. thats what i wanted. so far, ive shaved off almost 60lbs off my ride! enjoy! -
Another Saturday working on the bike, we got the engine back in, since there was only 2 of us it took some extra time to get it in, we had a few memory lapses, loosing tools, nuts, bolts, you name it we misplace it at one time or another. Got the clutch working after a little difficulty, but finally got it bled out and working. A couple of nuts and hex screws got misplaced and it took some time searching, so we finally gave up and I saw K-Rider off, I went back out to the shop and low and behold I picked up a coffee cup and there they were with a bunch of other bolts I will probably be looking for later. So I continued working getting the motor all bolted back in and all the frame rails attached. Still had some daylight left so I figured I would start installing the newly painted side cases. Got all but one installed and trying to download the pics. [ATTACH]66771[/ATTACH][ATTACH]66772[/ATTACH][ATTACH]66773[/ATTACH] [ATTACH]66774[/ATTACH][ATTACH]66775[/ATTACH][ATTACH]66776[/ATTACH] [ATTACH]66777[/ATTACH][ATTACH]66778[/ATTACH][ATTACH]66779[/ATTACH] [ATTACH]66780[/ATTACH][ATTACH]66781[/ATTACH][ATTACH]66782[/ATTACH] [ATTACH]66783[/ATTACH]