Search the Community
Showing results for tags 'seat'.
-
Hi all, I haven't posted in a while, been reviewing a Tenere 700 and now a Honda 300 Rally. I take my Gen 2 out for the LONG day rides - like 500-800 miles, and the seat foam has given up. Any suggestions on how to rebuild it, it is the pillow top with buttons. Thanks for any guidance.
-
Bought a 2005 RSTD which came with a new looking Mustang Seat including drivers back rest. Problem is I road this bike about 150 miles and my legs went numb. Love the look and backrest but have a 3500 mile trip coming up and am worried this seat isn’t going to work. With that said I am wondering if anyone would like to do a seat swap for a spell to let me test other seats and let you try the Mustang?

-
When i got my 85 I thought the seat was dirty. It also was sticky to the touch on the passenger seat. Its already stained a pair of the girlfriends pants. I've tried cleaning it with everything i can think of . So far Windex and nail polish remove have worked BUT Now I'm wondering am i taking a color layer off the top of the seat or am i removing some sort of foreign goo that has been deposited by the prevoius owner in cleaning/treating the seat. The sticky layer can be "rolled" with the finger like glue on a sticker. I read on another site that Armor All might be the culprit If so is there a way to remove it or do i have a seat that needs replacing?
-
 Hey Guys, After having completed my seat modification to over a dozen pillow top seats since the first of the year, I thought I'd give you all an update on my progress. I think I have come up with the best process for this seat, since it's foundation foam shape is like no seat that I have ever encountered. If you take a look at your OEM pillow top, you will note a slight forward pitch and the back of the seat is flat which creates a pressure point at the back of your butt just above the tail bone. When you take the cover off and pull loose the 1" layer of foam that creates the pillow top effect, you will see two bumps at the outer edge of the seat. I have no idea whey they chose to put these bumps in the molding, except to possibly provide more support to the outer edge of the seat? Anyway I have attached 5 pictures show the main steps that I go through in modifying the pillow top seat. 1. My 1st cut is to the back if the seat to put some curvature to sit back into. 2. the 2nd mod is to cut those bumps off and slope the base of the seat back a bit resulting in lowering the seat about 1/2" at the back. 3. Then I narrow the neck and cut my tail bone relief in. 4. Once I get it roughed out, I take my right angle pneumatic grinder with a 60 grit sanding pad and smooth the seat out and shape it to fit the butt better. 5. Now it's time to replace the 1" of standard foam with a layer of 1 1/2" memory foam cut to the same shape with the same cuts to keep same the pillow top effect. The memory foam keeps pretty much the same shape of the original seat. But when you sit on the seat you will feel that your butt fits the seat much better and the memory foam does not resist like standard foam and lets you sink down into the pillow top to the new foundation. So there you have it and if I can help you with making your pillow top more comfortable I am here to help. Maybe a few of the guys whose seat I have done will speak up as to what they think of this change? And I've also done a couple of passenger pillow tops, where I mostly just narrow the neck and cut in my tail bone relief before replacing the pillow top with memory foam. The last picture is to show a modified seat on the bike with a stock pillow top sitting on the rear seat. Rick (aka Butt Butler) Oh, if you don't know I have an ad (Butt Butler Seat Mod) in the classified section of 2nd Gen Parts with more info.
 -
I have a 2004 Venture that I just purchased, and it's sitting a little too high for me. After reading through some threads, I decided the first thing I'd like to try to is have the seat re-worked to lower my riding position about 2-3". My problem is that I've seen a lot of posts suggesting people to do it, but none are still working. Any ideas on who can do this for me? Thanks in advance!!
-
 Hello All, Got my96 RS on the road and need to replace the original seat, not comfortable at all. I have been looking at Mustang and Corbin Dual Touring seats and would like some feedback.All will be appreciated.
 -
I m rebuilding the forks on a 1990 Venture Royal. The plate seat came out. My question is there is a rubber ring that appears to bonded to the the plate seat is this necessary to have the rubber on it since fluid can get around it any way or do I need a whole new plate seat cause the rubber ring is important? Please look at the pictures Thanks.
-
I recently purchased an 08 venture and it seems really high considering the seat height specs. I am not a tall guy at 5'7" and I'm not comfortable with it. Can anyone offer suggestions other than lowering the bike? I've had many people tell me a mustang seat has lowered goldwings as much as 3 inches for seat height?
-
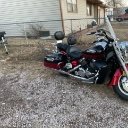
So I talked to Rick about reworking my seat and he says it's a corbin and can't be done easily so I'm looking to buy a comfier seat (and matching passenger seat) Anyone got one for sale/trade, or can recomend one? I included a picture of what my seat looks like now, and I really like the studs and fringe, but it's not worth the pain in my butt. http://i917.photobucket.com/albums/ad19/fsatatkid/royalstar.jpg
-
Barb and I are down in Murfreesboro TN at our daughter's house. My son-in-law and I got to talking about the bikes he has test ridden, and the topic of the BMW 1600GTL came up. He'd gone to the Nashville dealer (Bloodsworth) and looked at it, but it was raining that day so he couldn't go for a test ride. Today we went up there and Barb and I went for a ride. It sure is a lot different than a MKII first Gen!!! The luggage is pretty small. The travel trunk is real big on the outside, but it's 2 layers, so the inside is way smaller than the MkII. The sadle bags have a real neat mounting system. They go on and off the bike in about 2 seconds flat. The motor is fantastic. Super smooth and unbelieveable power--everywhere. I ran it from a 3000 rpm run in 1st gear. You could feel the computer cut the power back whenever it would start to lift the front tire. Even in 6th gear from 55 mph, the power is great. Barb says it doesn't souind like a motorcycle though. The transmission shifts good, but there is a lot of gear lash in the driveline---way worse than either my 89 or my 83 with 150K on it. It turns great. Really great. I think it's because of the front suspension. The brakes are way too touchy. If you are old enough to remember getting into your friends early 60's Olds. or Pontiac and coming to a screeching stop while just touching the brake pedal, that's what the BMW brakes seem like. Even when I was trying to stop real gentle, it was an abrupt stop. There is some time delay between the throttle by wire and the motor responding, but it's not too bad. The passenger portion of the seat comfortable, but it took Barb some time to get used to it. She liked the seat heater, but says the back rest was terrible. I hated the front seat, but it had the shorter one. The dealer says he thinks he'll get a higher seat in soon. The wind protection from the fairing is no where as good as the first Gen. You have to use a bluetooth if you want communication with your passenger. I didn't play too much with all the toys, except I did switch the damping on the suspension. In the comfort position, it rides smoothly, and it gets stiffer when on normal or whatever they call the higher position. There is a lot less passenger room compared to either a 1st. or 2nd gen. If I left anything important out, please ask away..... Frank D.
-
Well after talking to several members who have given their unanimous endorsement, My 84's seat is on it's way to Rick Butler for modding! I honestly don't know what I would do with my Venture if not for the members here. BEST $12 buck a year I EVER spend. Thank you all for you help!~ Andy
-
Shipped my Road Glide seat off to Rick Butler this morning. I have put some miles on it and was pleasantly surprised with it for a stock seat. I've done a Saddle Sore and a Bun Burner on it so I know that I can do a thousand mile day on it with no major problems. There is still room for improvement though so I figured that with the snow on the ground, it was a great time to let him work his magic.
-
Wife and I planned a trip from Northern Delaware to Western North Carolina. We just returned via the Blue Ridge Parkway and Skyline Drive. We had a wonderful time thanks to this site. We have been reading about seats for many months and slurged for the Russell Day Long based on remarks from all of you. Initially, I did sit about 1" higher and the wings were a bit of a pain. However, within the 500 mile break in period all was good. I am again flat footed when stopped (I have a 29" inseam) and the wings have broken in a bit making stops no problem. Wife was complaint free relative to butt issues on our trip, and so was I. Thanks for all of your great information. Here are some seat pics.
-
Last Friday was the second happiest day in my boating life - I sold the boat (got what I was asking too)!! Now is the time to do some upgrades. One of the things I am looking at is a better seat. A member has a nice Corbin he has upgraded to the Russell (due to a hip problem the Corbin apparently wasn't as comfortable anymore) and he is offering it up for sale. Before making this change, I would like some input as to the relative comfort for these saddles. I ride long distances (Iron Butt runs and ralleys) and the stock (non-pillow-top) seat is limiting. I use an AirHawk and/or sheepskin and it helps, but not enough for really long rides. Had my seat redone by Rick Butler and that also helped, but again, not enough. Ran 4000 miles in 5 1/2 days earlier this spring and the last day or so was pretty brutal. Tailbone pain is the worst. I am looking to do a 5000 mile / 5 day run this year and I know the current seating arrangement won't hold up. Any input would be helpful. Thanks. RR
-
Just got back last night from having my new (10th) Russell Seat made for me. I always ride down to their location outside of Redding, CA. to have it done. Pics.... [ATTACH]69501[/ATTACH] [ATTACH]69502[/ATTACH] It is nice to have a seat with internal suspension, for those long rides.
-
I lost one of my seat hold down nuts awhile ago and figured if I replaced it with an original I would lose it again eventually. I picked up a couple of drawer pull knobs for .99 ea. They are all plastic and are not threaded. I just happen to have a 6mm tap so after drilling them(5mm or 13/64") I tapped the hole in the knob. It has been on there quite awhile.It makes removing the seat a breeze and are easy to check and give them a quick twist if needed. Keith
-
 I have a 06 Royal star tour deluxe, a buddy of mine is selling me a 09 Royal Star Venture Corbin Dual Tour Seat, and i wanted to know if it would fit on mine or not, he is on a different state so im not able to check. any help would be greatly appreciated. thanks C""
 -
 Inspired by THIS POST, I installed the Electrical Connection Turn Signal Conversion Kit (EC-01315, bought HERE) on my 2006 Royal Star Tour Deluxe. There was one crucial step that was puzzling, and I made a few false steps. What follows is what I would do if I had to do it over again. I am posting this in the spirit of sharing lessons learned. *Insert more disclaimer stuff* I got a rolling seat for Christmas as well as two magnetic parts dishes. These were great for not losing parts. Spend a minute and organize where you'll put stuff. 1. Put the bike up on a stand. I love the Carbon_One "RSV / RSTD Lift Frame Adapter" as sold HERE, especially with the legs. Puts the bike solidly at a good working height. Note that you will want the bike up in the air, since you will be working inside the rear fender. 2. Remove the blinker lens cover and silicone-glue in the LEDs as per the instructions. Note that although the LEDs are white, they will shine red. 3. We'll do the hard part one side at a time, and for fun's sake I'll pick the left side. The turn stalk is in two parts held together with a bolt. Before you loosen the stalk, remove this bolt to let the halves pull apart. Doing it while the stalk is on the bike is simply more convenient because it is solidly anchored. 4. Go inside the rear fender and unclip the left turn signal wire. There are three thin metal clips that hold the wire inside the fender. Bending them out and freeing the wire will give you slack. Note that dirt may fall out of your fender and into your eyes. Be smarter than me and use eye protection when you look up into a crud caked fender. 5. Remove the two bolts and heavy clip that hold on the left turn stalk. Note that the turn stalk may flop and ding your fender paint. Just be aware. You can push the slack wire out the exposed fender hole. 6. With the turn signals dangling, use a screw driver to pry apart the slot in the outer stalk, allowing you to separate the stalk into two parts. 7. Now, examine what you have and what you have to do. You will need to somehow thread the LED leads past the turn bulb seat and through the stalks. This is the step that stymied me for a while. Once I figured that out, the right side took 15 minutes. There are undoubtedly many solutions, but this is what I did: 8. I removed the bulb, then removed the two screws and thin metal strip that holds the bulb seat. 9. I used a metal skewer to slide from the stalk end into the blinker housing, between the rubber bulb seat and the metal outer housing. The bulb seat seems to be affixed, perhaps with glue but more likely a tight fit and age. I thought I was going to use the skewer to make a hole for the wires to go. Instead, I noticed the bulb seat was moving into the blinker housing. The skewer seemed to have broken whatever bond there was, holding the bulb seat in. Using a pair of pliers, I gave a gentle pull and the bulb seat came free. There were two wires still attached to the bulb seat, so I had to be gentle. 10. With that crucial step completed, I used the supplied vinyl tubing to thread the LED leads through the housing, then through the other part of the stalk. At this point, untwist the LED leads so that they will lay flat between the rubber bulb seat and metal housing. 11. Reinstall the rubber turn signal bulb seat. I ended up having about 2.5" of LED lead sticking out, situated on the bottom of the housing. I don't think it matters much, but make sure you keep plenty of wire showing as you shove the bulb seat back into place. I happened to have a 6mm socket handy, and it fit perfectly into the bulb seat. I used that to press the seat in evenly. I did not get it all the way back in how it was. Perhaps 1mm extra is sticking out and it threatens to contact the bulb. But since the bulb only blinks intermittently, I am unconcerned. If you are concerned, maybe you could take more care than me. *TIP: Use WD-40 to lubricate the outside of the turn signal seat. That will allow the seat to slide in easily and not damage the LED leads. Electrical Connection says that this is the location with the most frequent problems--a pinched wire. They will cut a groove into the seat with a Dremel, but that seems risky to me. See my post below describing the problems I had. 12. I went ahead and reinstalled the amber turn bulb. This involved installing the metal strip and two screws that holds the housing in place. This is when I noticed how slack my attempt to reinstall the bulb seat was. Oh well, the bulb fit in and works. The steps 8-12 above took me 2+ hours to figure out, even with some hints from VentureRider.org. Lots of anguish over this. But the result seems pretty good, and took 15 minutes on the other side. I think making sure the wires are flat is important. 13. I used the skewer inside the supplied vinyl tubing to push the tubing through the rubber gasket holding the wires through the fender. Then I fed the wire through the tubing and into the inside of the fender. Almost home! I pulled out the tubing when it was all fed through. 14. My wife helped me for two minutes as I re-installed the turn stalks. She held it in place while I pulled the slack out of the wire, pushed the wire back over the retaining clips (including the new LED leads), and installed the heavy clip + two bolts. Wiping dirt from my eyes, I crawled out and put the turn stalk halves together using the nut and bolt. It looks like there is some red locktite on this bolt, but I don't have any. I'm not sure anyways. I'll make sure to check the bolt. 15. Remove the license plate to expose wiring. I was greatly surprised to see that there was a bundle of wiring back there. This is, I think, what the instructions in the Shop Tip mean about the "mustache. " I have a mustache, but I don't think my bike does. Anyways, this is where I did all the connections. I snipped the zip-tie holding the bundle together. Maybe there is a better way to unbundle than snipping. Will someone let me know? Separating the bundle and looking at the wires, you can make sense of how the wires come out of holes on the fender from either side. You can see which wires feed the left turn signal and which feed the right turn signal. 16. [Optional] remove the brake light lens cover. That way you can see the blue and yellow wires that operate the turn signal. I found it handy to have that visual color cue as I did the wiring. 17. I used the same piece of vinyl tubing plus the skewer to poke through the fender again and into the license plate area. I pulled the slack out of the LED leads, removed the tubing, and got more dirt in my eyes bending the retaining clips back inside the fender. At this point, the left side wiring is done. If you are nervous (I was), turn on your lights to make sure your turn signal still works. 18. Do the right side, learning from the left side. If you want, you can do the connection stuff for the left side first so that you can see how the turn signal gasket goes back using the right side as a guide. The gaskets for the turn signal lenses constantly fell out for me, and I eventually just learned how they went back. I did the right side wire-routing first, before doing the connections behind the license plate. 19. With the right side done too, you can start the wire connections. I found this part scary, because I am not an electrician. But connecting the supplied heavy red-green-blue wires turned out to be easy. 20. I snapped the T-Tap onto the heavy Blue and Yellow wires from the brake light. 21. I wound together the two green wires from the supplied three-wire strands, and then crimped on a one connector. That's what they mean in the instructions that "The 2 greens can be connected together." (Hey, go down and read Step 30 and make a decision about how much wire you need.) 22. I wound together the two blue wires from the supplied three-wire strands, and then crimped on a one connector. That's what they mean in the instructions that "The 2 blues can be connected together." 23. Now you have a blue and a green connector ready to plug into the T-Taps on the blue and green break wires. What would you do? I assumed the blue wire connector went to the blue wire T-Tap. That turns out to be wrong. The supplied blue wire connects to the T-Tap on the yellow brake wire, and the supplied green wire goes to the T-Tap on the blue brake wire. If you do it backwards (I did), all that happens is that the LEDs come on all the time with brake-strength. If you do it right, they LEDs come on with running-strength, and power up when you pull the brakes. 24. At this point, I completed the instructions for the left side. That means connecting the supplied red wire to the black/white LED lead. Oh, it also means cutting the LED leads to length, and stripping the wire. You also use a T-Tap to connect the black LED lead to the colored turn signal wire. The turn signals have a color wire and a black wire; tap the colored one coming from the correct side of the bike. Left LED lead goes to left colored wire, etc. At this point, I experienced my first real dissatisfaction. The skinny LED lead simply does not want to stay in the crimped connector. I used vise grips to crimp the snot out of it, but I know it will pull out. I plan to get a soldering iron and make sure the connection is solid. Luckily, all I have to do to access these flimsy connections is remove the license plate. 25. Plug in the leads onto the LEDs glued to the left turn signal lens, following the directions. 26. I turned on the bike and, GLORY!, I had a dazzlingly bright red LED running light! Try the turn signals. It works! Pull the brake handle. The LEDs get even brighter (if you connected the blue/green wires correctly; supplied blue=>yellow brake, supplied green=>blue brake). 27. Turned off the bike, stuff the leads into the housing, make sure the gasket is correct, and screw the lens cover back on. The entire left side is done. 28. Do the right side, trying not to grumble too much about the crimped connector. Plug in the leads, test it, and reassemble the lens. Note: while the leads on the right side clearly had a black and white stripe, down at the plug end I really couldn't tell which wire was which. When I tested the light, the LEDs did not come on. Simply switching the plugs made it work. 29. With the wiring all complete now, test it to make sure the functions are working. At this point, I realized the LEDs were burning at full brake-strength all the time. I switched wires. You can never do too much testing. 30. [if you did step 16] Put the brake cover back on. 31. Now put all the wires back into the nook behind the license plate. Reinstall the plate. I realize now that I should have cut the red/green/blue wire bundles, because there is a huge amount of wire trying to be jammed into the small nook. You have maybe 6" of wire when you need only a couple inches. The pre-stripped wire ends were simply too appealing, and I should have cut them. Now I have no spare connectors so I am kinda stuck. I'm going to a electronics/electrical parts store to see if maybe I can find some more connectors. I'll cut the wires when I solder the LED leads. 32. There is no step 32, because after step 31, you are done. Well, at this point you can take pictures and feel a bit of pride. You can also let me know if I screwed something up in these instructions. Sharing lessons-learned is one of the best parts of this site.
 -
i was wondering if anyone has an air hawk seat cushion and what they think of it? we are thinking of getting some but are they worth the money? thanks mike and t
-
So...I got an 89 and just bought a set of beadrider seats and am anxious to install them. Except how do I remove the seat so that I can cinch up the stretchy cords on the seats? Sweaty in Iowa Iowa Guy:confused24:
-
anyone interested in unloading used passenger armrest from Ultimate Seat. Want to try out; not sure if I really want or not. Thanks. Satifka@aol.com
-
A gell seat cushion made for autos at Wall-mart for $19.96. Yes gell seat covers are sold for $100.00 or more with the sheep skin cover just for bikes. If I could find just a sheep skin cover now to go over the geel pad, I would be in high cotton..... I hear that it works fine for our bikes from another rider here about two days ago. I found one at the local store here and I am going to go pick it up. The first store was sold out and the next store only had one, so they put it back for me. Evidently they are popular. I am driving the car to get because wifey wants to go to dress store and drive car. So I will give update later on the true effects of the pad. Right at this moment I am in somewhat of pain from a ride the last two days, about 725 mile total. Not to bad but need a little extra something in the seat. I did the Rick Butler seat mod and it is nice, but still need a little something else, and I am not getting any younger. If this works out, this will be a good seat cover for a whole lot less money. More money for gas to ride.... :mo money: Fuzzy
-
Curious what tricks you guys may have used to get a lower seat height? Road my first gen for the first time ever last week and the biggest issue I have is reaching the ground. I had to take all the air pressure out of the rear shock just to have a chance of reaching the ground with some limited confidence. With time, I'm sure I can get accustomed to it, but I'd feel better if I could flat foot this sucker. For the record, I'm not the tallest guy around. I'm about 5-7 or 5-8 with a 31" in-seam.
-
 Ok, when I purchased my 2003 RSV about 6 weeks ago, the guy stated the previous owner was a female. True or not IDK. The bike came with a Corbin seat, that the guy claims he doesn't know if it fits, but came with the bike so OK. A few days ago I removed the seats and installed the Corbin. Here's the dilemma ( with pics to help): the rear portion of the seat seems too short. The little stem that should slide under the back seat post doesn't seem to reach. I was able to bolt down the front and it didn't seem to move at all. I just don't know enough about the bike or Corbin seats to see if it indeed is the proper seat. The sticker on the back says Corbin VENT-DT and the number next to the barcode reads 2303449. Can anyone help to determine if what I have indeed fits, or I have a $475 paperweight. It looks as if the end of the back seat is a bit further forward or "shorter" then original seat, but I would say not by very much. I am also showing some of the front, to see if thats the normal position. Any and all advice is appreciated. *** I can not seem to add more then one pic*** grrrrrrr
 -
I am wondering if anybody who has a a Corbin also has a sheepskin cover? I have been looking but haven't found anything.