Search the Community
Showing results for tags 'stock'.
-
 So after a lot of searching, I was not able to locate any threads specific to putting Flanders bars on an RSTD other than which ones and that they work well. I have wanted to do this for a while but was apprehensive about the cable and hose length when I saw different pictures of scooters with the new bars on. After starting to develop a sore left shoulder blade, my wife said it was time for me to go for it. Worst case, put the stock bars back on and sell the Flanders. Good enough. Since I couldn’t find a thread specific to RSTD's, I figure this was a good chance for me to contribute to the site and other RSTD owners who may want to put these bars on their scooter but are not sure how to do it or may be a little nervous about tearing apart their bike. Who knows, it may even end up in the tech library . I am mechanically inclined and I do most all my own car/house/electrical work. In hind sight, this job can be done by anyone with a small amount of skill, a few tools and the guts to try something. Really, what’s the worst that could happen? That being said, after I bought the bars, I was ready to tackle this project. I tore into this about 5 PM on Thursday and finished up around 10 PM (without putting the end weights on, more on that later) that same night. I did some internet price searching and found the bars that are recommended at a great price on this web site http://www.xtremerevolution.com/Store/spc-12346-19-7-flanders-1-inch-handlebars.aspx. I want to throw a BIG plug for these folks. They listed the bar for $120.95 on their site which is a GREAT price IMHO. I figured out that their store is here in San Diego, so I called them and went to pick up the bars (no shipping cost). When I got there, they sold me the bars at a discount as compared to the online price (maybe a break for being military) and I got them for $120.66 out the door (after the ‘governator’ got his cut of course). ALL the folks there were really friendly and most of them ride. Overall had a great experience and will go back for other custom parts. Here are the specifics on the Flanders bar as compared to the stock bar: 650-08373, Flanders Pullback Handlebars, Chrome, Metric Knurled (4" in side x 5" out side) - - - - - - - - Flanders - -Stock (06-09 RSTD) Height: - - - -9”- - - - - -8” Pullback: - -18.5”- - - -16.5” Center: - - - 8.5” - - - - 8” Width: - - - - 33”- - - - -33” Diameter - - 1”- - - - - -1” Here is the visual difference: The first two pics shows the pull back, the bar knurls are on top of each other. This one shows the added rise: Here are the steps I took. First step was to remove the windshield and put somewhere safe. Second and probably the most important one, COVER EVERYTHING in the area that is painted or chromed (ask me how I know this). I covered the tank, light bucket to start and then the cowling (after the aforementioned ‘ask me’ incident) so as not to ding anything as I went. After covering everything, I removed the speedometer, two 8mm bolts in the back and 1 allen bolt in the front. Once the speedo is loose, there is one connector covered by a rubber boot. To remove the connector, slide back the boot and there is a catch on the top in the center (yellow arrow). Push that in and the connector will come right out with a little jiggling. Below the speedometer are two black quick release zip ties. Lift the tab sticking out of the tie to release the lock, remove and set aside for later. After the zip ties, I released the plastic clamps that hold the cables on the sides of the stock handle bars, no pics of this, I just slid the clamp portion apart by hand and they opened right up. Now all the cables and hoses were loose. Next I removed the brake and clutch reservoirs. Pop out the chrome caps that cover the bolts then remove the two allen bolts that hold the clamp to the bar. HOLD ONTO THE MIRROR as you loosen the bolts, it will slip and turn (ask me how I know this one too). Once the bolts were out, I placed the assembly over the front of the forks between my head lamp and driving light. Repeat same process for the other side for the clutch reservoir. After the clutch is off, it’s easy to get to the two Phillips screws that hold the turn signal housing. Remove the screws and both assemblies can be put off to the side or front to keep them out of the way. Next I removed the throttle housing held in by two Phillips screws: Once the two screws are removed, the back half with the cruise control buttons and kill switch can be placed off to the side, just slip the wire housing out from the bottom of the front piece of the chrome housing. I had forgot this until later when it FELL OFF and hit the cowling (see first ‘ask me’ statement). Next, I loosened the throttle cables so the grip and the rest of the housing can be removed. I loosened the lock nut on the cable and then turn the adjusting screw to the stop to allow the most slack on the upper cable. This loosened the top cable enough to allow for removal from the throttle. I turned the throttle clockwise (as looking) at it as I slipped a scribe under the cable to pull it over the channel and then pushed the end through the holder. Picture isn’t real clear in the area I was working, but you get the idea. With the upper cable removed, the lower cable comes off easily the same way. Now the housing can be put off to the side. Next step is to remove the bar end weights. Pop the chrome cap and remove the center allen bolt. If this is the first time you are removing this bolt, it may be tight due to having red thread lock on it. With the bar end weight off, the throttle will slip off easily (make sure it doesn’t fall off when you remove the bar end weight). Remove the clutch side bar end the same way. At this point the stock bars should be pretty naked, accept the clutch side grip. I held off on removing this grip until I knew that the bars were going to fit the way I wanted, but it can be remove easily at any point. I slipped a scribe (small screw driver will work) between the grip and the bar and slowly moved it around the bar being careful not to damage the inside of the grip. Then I sprayed some lube (I used Sea Foam spray lubricant, but WD-40 or equivalent will work) between the grip and the bar. I worked it back and forth, this loosened the grip and it slipped right off. The stock bars are now ready to be removed. They are held in by two clamps with two allen bolts each. Loosen one bracket at a time. When you loosen the second bracket, HOLD ON TO THE HANDLE BARS (ask me how I know this one, glad the tank was covered). With the clamps off, the bars are free for removal. The new bars are ready to be put on. Just install them in the clamps and make sure they are centered between them. I positioned them in a neutral spot for height knowing I would have to adjust them once everything was on. This allowed for testing cable, wire and hose lengths. In order to make things easier, I removed the bracket at the top of the forks. Two allen bolts and it comes right off. This can be done before installing the new bar; I just didn’t realize I needed to until I got to this point. I found that the left side cables and hoses had plenty of room, but the right was going to be the challenge. The first thing I noticed that would need to change was the routing of the throttle cable. The cable was under the wire run to the headlight. The pencil in this picture is on top of the throttle cables and is pointing to the wire going to the head light is. In order to get the cables over the top, I needed to remove them from the chrome housing. I didn’t want to try and fit the chrome housing through the small space and scratch it when getting the cables off was so easy. One Phillips screw holds the clamp for the top cable and then it slips right out. The bottom one is screwed in, need to release the lock nut and then turn it off. Count the number of turns to remove so you know how far is goes back in when you reinstall. No pics, but pretty easy to do. Once the cables are out of the housing, it was a simple matter of feeding them back under the wire going to the head light. The cable now goes over the wire giving extra length and better options for routing. I had to test fit the throttle over the ends a couple times to find the right routing. The mounting of the throttle housing needs a hole in the bar to hold it in place. I measured the stock hole location so the mounting would be the same on the new bars. Stock location should be 6 19/32”. The tape was slipping when I took the picture, but 6 9/16” would work. The length from the end was easy; getting it the right way vertically was more challenging. I lined up the stock bars next to the Flanders to get a good idea of where to hole should be. The rest I just eyeballed. I marked the hole and then placed the housing pin over the mark to make sure it was in the right place. The picture shows two marks, the first one was for horizontal, the second for vertical, so the lower mark is the one I was using to test with. After lining up the housing and checking the about 10 times (a little nervous about drilling a hole in the bars), I took a swig of beer and hit the mark with a punch to dent the bar. Then a couple more swallows of beer, it was time to drill. After drilling a small pilot hole, I used a graduated metal bit to enlarge the hole to the right size. I put the throttle housing in the hole and everything lined up great. Next hurdle was the brake line. The stock position is in front of the forks and there was not enough slack to position the brake reservoir properly without really putting strain on the hose. I decided that I wanted to move the hose to the back of the forks as others have mentioned doing, but I didn’t want to remove the brake hose to do it (draining system, re-bleeding, blah blah). After some fiddling, I figured out that there was not enough room to fit the reservoir between the forks and the tank without some help by removing parts. I removed the right mirror (NOTE: the threading on the right mirror is reverse, that is why there is a notch in the lock nut) and the brake handle. The headlight bucket was also in the way and had to be moved to the left. Three 8mm bolts from the inside and it was loose and moved out of the way. With the fork at the left lock, a little fiddling and slow moves, I fit the reservoir through the gap in the forks. I had to go hose first, reservoir upright and clamp hole toward fork. Sorry I didn’t get pics of that step. I did the shift without hurting anything. I can tell you it was a tight fit, but go slow and you can do it. Once I had the hose through, the main thing I was concerned about was pinching the hose between the forks and the frame or tank when the bars were at the right locks. As long as the hose is next to the fork, there was no binding or pinching. This was accomplished later by zip tying the hose to the wires. If you use Zip ties, do not pull them too tight, don't want them hurting the brake hose. Just enough to hold it in place worked. (I had to go back and take these pics because the first ones didn’t come out well so these show everything put back together.) The wires and hose for the right side going to the cruise control and the brake had to be routed under the speedo and closer to the handlebar bracket. I thought I might have to pull the tank and find more slack on the wires, but turns out just messing with the routing gave enough play. The throttle cables used to go under the bracket for the windshield, when I was done; they ended up coming through the gap in the speedo housing. I had to bend the guide down to get the cables to stay down some. This shows where the cable goes under the Speedo housing. The left side was much easier. The wires and hoses just ran tighter to the bars but there was plenty of room. When I put on the left grip, I figured I would have to use some grip tape or adhesive. I was positioning the grip in place just to test fit and after it sat for a minute or two, the thing didn’t move, so I just left it. (fortunately, it was in the right place) I figure there must have been enough adhesive residue left on it to hold. Since finishing, I have had the bike out in the sun and heat and it still doesn’t move, so I held off putting anything under it. If it shifts at all, I will put some grip tape under it. You may want to use some to start with, your call. Everything gets mounted back the same way it came off except the bar end weights (more on those at the end). There is no alignment hole for the turn signal housing, just put it the way you had it or whatever is comfortable. You will have to re-align your mirrors because of the height and pullback change, but that is easy. I am sure everyone has done that, but if not, the directions are in the owner’s manual. Before putting the speedo and the headlight back on, I moved the bars lock to lock several times to make sure there was no binding or pinching. Everything was clear, so I put her all back together. Tested the throttle several times as I went, pulling lock to lock to make sure there were no issues. Worked great with no binding. I also tested the bar height to get close. I knew I would have to adjust them after riding and I was right. I had them too high to start so I just pull the speedo back off, loosened the clamps a little and pulled them down. Just make sure they don’t hit your legs at the locks. Last step was to reset the throttle play by tightening up the cable nut and then setting the lock nut. After everything was back on, I had to wait until the next morning to test ride. Between the late hour and having consumed several Guinness drafts during the change, I opted to wait until morning. My buddy that was helping me told me when we were done that we should have got picture of the arm position with the stock bars and then with the Flanders. Of course, we didn’t think of this until after the Flanders bar was on. Oh well, not putting the stock one back on for that. I can tell you that these bars are incredible. It is so much nicer to have that extra pull back, has to be one of the best mods next to the air horns. Not sure if I notice the height change as much, but there are more options for positions overall. Here is what you can expect to see when the project is done. (Ignore the man in the mirror, he is insignificant) ======================================================================== THE STOCK BAR ENDS As promised, here is my idea for keeping the stock bar end weights. Not sure if I should have put this in a separate thread, but here it is. I have read where several people changed to the ISO grips with the Flanders handle bars, but I really like the stock grips and weights, and I don’t like the stiletto bar ends that go with the ISO grips, so I had to figure out how to put the stock weights back on. I read Freebird’s tech article on switching the stock bar end weight holders, but when I took the grips off, there were no tack welds to be found. I think they may be pressed in. I pulled on them, put a bolt in and hit it with a hammer and the things won’t budge. So that solution wasn’t going to work. I may try more later on, but I don’t want to hurt the stock bars as I plan on selling them at a later date. Here is my fix for keeping the stock bar ends. It was a little different, but it worked. I figure they need some rubber so they are flexible and absorb the vibration so I came up with this plan. I went to the hardware store and picked up a 1/4x4” bolt, ¼” flat washer and matching nut. Also picked up a nylon spacer, 1” long, 1/2“ OD and .257” ID. They are in the bins at Home Depot in the bolt isle. I cut the spacer in half with a hack saw at a heavy angle so it looked like this: Then I ran the bolt through the weight and the spacer, putting a washer in between the spacer and the nut on the end. The theory being that if the spacer is pulled together, it will expand as I tightened the bolt. Next I covered the spacer with a strip of old inner tube I had lying around (kind of a pack rat). I wrapped it until it was the same diameter as the inside of the handle bars, about 7/8”. I had to keep test fitting and cutting back on the amount of tubing until it was snug inside the bar. The final layer was a short piece of grip tape (from changing my golf club grips, again, I am a packrat). Make sure the first layer of rubber hits the nut to keep it from moving. I could have glued the nut to the spacer, but this worked too. I ended up with the tape because I found the rubber would slip a little while trying to tighten the end down. Now it’s ready to fit into the bar. Before putting it in the last time with the tape, I put a light layer of lighter fluid on the tape. This allowed the rubber and tape to slip into the hole and evaporates pretty fast. After it set for a minute to let the lighter fluid evaporate, I twisted the bar end clockwise and it snugged right up. I tugged a couple of times and it held. It took several attempts to get it right, including pushing rubber into the throttle, and having to thump the left one with a rubber mallet to seat it, but with a little patience, it worked. I have ridden the bike several times since I did this and the bar ends are just as tight as when I started. I was a little worried about losing one, but it seems to be holding. If this changes and one pops out, you folks will be the first to know. I am still going to try and get the stock nuts out of the stock bars, but that is later. Hope this helps some of your folks out. (I can tell you this. I have a new respect for all the contributors who have written articles for the tech library.)
 -
 Last Updated 11/11/13 I will do my best to keep this post updated with the latest info. For now, this is only information for 83-89 (MKI) This is a continuation of a discussion that started here. The cliff notes...... A company in the Czech Republic, IgniTech, makes replacement ignition boxes and was working on one for 1st gen VR's. I had had several used TCI boxes take a dive and felt the need for a new TCI rather than installing another 20 year old used part, so I decided to pursue the IgniTech solution. After a few e-mails in broken English, I was able to provide them with the additional info they need to complete the development for a 1st gen box and I ordered one up. When ordering your own, tell them you want a TCIP4 for whatever year Yamaha Venture you have. 83-89 boxes and programming are all the same but because of the language barrier I'd be as specific as possible. It would be nice if they implemented a part # system but no such luck so far. Note: The stock 83 TCI is not the same as 84-89. But for the purpose of ordering a IgniTech TCI, they are the same. Their current pricing, including shipping and taxes is 157.14 Euro. At current exchange rates, that's $223.83 You can do the conversion here. This is what was in the shipping box. http://farm3.static.flickr.com/2534/3881510658_52c2e48a85.jpg The ignition box, depending on the programing, works on a bunch of different bikes, so the harness is to mate the box to the Venture harness. The bag of pins that match the box side of the harness are to add wires to perform functions not used on the VR or to add in a MAP sensor.....more on that later. The CD contains software that lets you alter the ignition curve and some other parameters. You plug the pigtail on the box into a serial port on your laptop to access those functions. It will run OK on the stock map but leaves something to be desired. It's substantially smaller than the stock TCI http://farm3.static.flickr.com/2493/3883265968_09565e407a.jpg Looking at the connectors, I see that they combine the 4 pick-up coil wires into 2 inputs to their box. (the brown and yellow wires) http://farm3.static.flickr.com/2608/3883367448_c210082490.jpg They had said that they would need to do this to make it work. I believe that's why they needed the order in which the pistons come to TDC from me. I also noticed the the 2 wires for the pressure sensor are not there. This means that in this configuration there is no vacuum advance like the stock TCI http://farm3.static.flickr.com/2455/3883369706_578f1be0e0.jpg It runs fairly decent without the stock pressure sensor but adding a MAP (vacuum) sensor back into the mix really wakes it up. More on that later. I had already moved my TCI to the top of the airbox so installing it was a piece of cake. I used some Scotch brand Dual Lock (part# RF9730) to mount it to the airbox cover. It's Velcro-like stuff, but has interlocking pins that create a more positive grip. http://farm3.static.flickr.com/2601/3883268106_256d897483.jpg http://farm3.static.flickr.com/2456/3882477735_b2905d9759.jpg http://farm3.static.flickr.com/2523/3882480987_ec4bba4254.jpg It clears the tank cover with no problem and doesn't push it up at all like the stock TCI did. I kinda tucked the serial connector up and out of the way. Edit on 9-30-09 updated info After putting approximately 500 miles on it, fuel mileage was off (verified) and power seemed down (seat of the pants). I found some info on their website that suggested the the pre-programmed advance curve might just be a guess on their part. So using the supplied software, I started adjusting the advance curve. It isn't possible to copy the stock TCI curve since the Ignitech box doesn't use the pressure sensor, so I basically added advance across the board until it started to ping during a 2000rpm, 3rd gear roll on. I even went so far as to stop and let it idle until the fan came on to get it as hot as possible before testing. Then I dialed it back, slowly, until it didn't ping anymore and then a touch more just to be safe. Here is the pre-programmed curve. http://farm3.static.flickr.com/2640/3897735550_cf24b7543e_o.jpg This is what I ended up with. http://farm3.static.flickr.com/2005/4506033451_d562c0f614_o.jpg Mileage and power are much improved. I rode an entire season with it tuned like that. But it still lacks some part throttle response compared to stock. At the bottom of the post is a link to this file and instructions on how to load it into your TCIP4. ______________________________________________________________________ If you're willing to invest a little more time and money, you can get an experience as good as or better than stock. Even though the bike ran pretty well with the modified map, timgray mentioned trying to put a vacuum sensor back into the system and this got me to thinking. The IgniTech box is set up for using a Throttle position senor input but not a vacuum sensor, but it seemed like with a little 'creativity' it could be made to work. After input from Tim and others, it was decided to use a GM MAP senor. (MAP = Manifold Absolute Pressure, it's basically a vacuum sensor) For reasons that you can read in the thread, I don't think using the stock vacuum sensor is the best option, but I'm still looking into that possibility. After some head scratching and trial and error, I was able to install a MAP sensor and ignition timing map that works pretty darn well. The throttle response is much improved along with MPG. I feel it runs as good or better than the stock TCI. For details about how I arrived at this configuration, you can read through the thread. Here are some additional parts you will need for the MAP sensor installation. 1- General Motors 1 Bar (non-turbo) MAP sensor and connector. http://farm5.static.flickr.com/4136/4809338814_03c324d519_t.jpg 1 - Vacuum restrictor - Dorman# 47311, NAPA# CRB 2618, Usually found in the "Help" section at auto parts stores or you can order one here. http://farm5.static.flickr.com/4114/4809350006_de61dcbc3f_t.jpg 3 butt connectors to attach your 3 - 1ft. pieces of wire to your MAP sensor connector. http://farm5.static.flickr.com/4094/4808737617_a0aa590e79_t.jpg 3 - connector pins from the bag that came with your IgniTech box. Note: at least one member didn't get any additional pins, so if you are planning on running a MAP sensor, you might want to request them from IgniTech or order some additional ones from their site. 3ft. of vacuum hose. 3/16 worked for me but it's a bit tricky since not everything you need to hook up is the same size. 3ft. of gauge wire, 3 - 1ft pieces of different colors would be best. I used a General Motors, old style (larger) MAP sensor. Sensors for newer cars are smaller, but tend to be more expensive. One from any non-turbo car will work. You'll also need the corresponding connector. Here at Rock Auto is a sensor and connector for a 9 Chevy Pickup for less than $50. Edited on 11/11/13 to update purchase links and add VPV and NAPA sensor info The original sensor link above no longer includes the connector. Here at is a link to the connector you will need. Member KISA found this MAP sensor on eBay. http://farm6.staticflickr.com/5528/10813201475_0f68ae7def.jpg It's a Finnish company. They are currently priced at $40 US, including shipping, and come with the connector you need. I'm not having an issue with the GM sensor I have but I ordered a VPV MAP sensor because it looks more compact and easier to mount on a vertical surface then the GM. It took several weeks to get since it's shipped from Finland. Now that I have it, it looks like a quality unit. It has a billet aluminum housing and rubber insulated mounting points. I don't have it on yet, it will probably be a winter project. Here is the ebay link but who knows how long that will be good. You can also order them from www.piilix.fi but it's a bit of a convoluted process. On their homepage it says "Mainly selling low cost overstock batches". And the VPV Racing website, with the help to Google Translate, says "VPV Motor Racing has stopped working", which I believe means they're out of business. So these will probably go away at some point. Your local NAPA dealer can get you the connector under part# EC14 And a MAP sensor under part#'s PS10075, 2-1961, or 3-1961 Or you can go to your local salvage yard or auto parts store. Chevy used the same one on non-turbo vehicles from the early 80's until early 2000's. A 1990 Chevy P.U. with a 350 engine is good vehicle to use when having the parts guy look it up. Thanks to timgray, Here is another source for a MAP sensor. They also have a connector w/o the pigtail that makes it so you don't have to use the butt connectors. It's a little more difficult to do but results in a cleaner look. You need to connect your new hose to the #1 or #2 cyl. sync port. On 84-89's remove the vacuum hose that goes to the stock vacuum sensor and just let it hang out of the way. On my 84 it was on the L.R. cylinder (#2) but it's my understanding that most are on the L.F. (#1). On 83's the stock vac sensor goes to a ported source on the #2 carb. You could remove the hose and cap the fitting on the carb or just leave it connected since the stock sensor won't be used anyway. On my 84 there was a hose connector/fitting a couple inches from the carb. I disconnected the hose there, put in my new restrictor, then added the new hose, routed around the carbs and behind the frame tube and and tucked the MAP sensor in just to the left of the fuel filler. http://farm5.static.flickr.com/4093/4810745879_0e346f1357_b.jpg To wire it up, connect pin A on the MAP sensor to pin 7 (ground) on the TCIP4, pin B to pin 6 (sensor voltage) and pin C to pin 17 (5v ref). Edited on 11/11/13 to include VPV Racing sensor pinout and update pinout images easier to understand For the VPV Racing sensor, The Red wire on the sensor (pin 1) goes to pin 17 on the TCI harness, Black (pin 2) to pin 6 and Blue (pin 3) to pin 7. http://farm3.staticflickr.com/2875/10814737246_e5cb6586f3_z.jpg http://farm6.staticflickr.com/5510/10814735346_0e151e2a4a.jpg http://farm3.staticflickr.com/2869/10815083995_abb0e30369.jpg This is what my finished MAP install looks like. My wires are plenty long but I wasn't sure were I was going to put the sensor when I started. Also, disregard the black wire, it was for testing purposes. I ran the vacuum hose up from the carb, behind the frame tube, to a spot just behind the airbox. http://farm7.static.flickr.com/6133/5924665643_8f4f97f009_o.png The sensor tucks in right next to the gas cap splash guard on an angle. I slid the extra wire length between the guard and the airbox. I looked at all kinds of places to mount it and brackets to hold it but this is simple and works great. Once the faux tank cover is on, it can't go anywhere and has been fine for several thousand miles now. http://farm7.static.flickr.com/6021/5924667343_e414b545f3_o.png Note: These files are for 83-89 (MKI) bikes only. Here is a link to the latest non-MAP sensor file. Use at your own risk! Here is a link to the latest file to use with a GM 1 Bar MAP sensor. Use at your own risk! Edit on 7-5-11 to clarify programming info You will need a laptop with a serial port or a USB to serial adaptor. The adaptors can be temperamental but it's worked fine for some. After clicking on one of the above links, click the "Download" button and save the file to your Desktop. To install a new map in your IgniTech TCI you have to connect a computer to the serial port on the TCIP4. The TCIP4 has to be plugged into the bike with the key on too, so a laptop works best. Insert the CD and open the file on the CD called 090715a_tcip4.exe. This is the IgniTech programming software. In the IgniTech software click the "Folder" button. Note: It seems the latest TCIP4's are being shipped with updated programming software, version 80. The file is named 100907a_tcip4A_v80.exe. http://farm6.static.flickr.com/5013/5448184931_e2cd52d823.jpg Then navigate to your Desktop and select the file you downloaded, either "Venture without MAP sensor" or "Venture with MAP sensor". Note: If you're using v80 software, You will get a warning popup. Click OK and continue. Then click Program. http://farm5.static.flickr.com/4134/5448185023_1cc707c2f8.jpg In the lower right of the software you'll get a notification saying "Program device" with a progress bar. When it's done it says something like "Program OK'' in green. I don't remember for sure. I'll try to get a screen shot of that soon. Close the program, turn off the key, disconnect the PC and go for a ride! I now have over 5000mi on my IgniTech TCIP4 without a single hiccup.
 -
Okay, I decided that it's time to upgrade my stock Stator to something which offers better performance. From what I have read, Buckeye's seems to be the preferred upgrade unit to install. Many people who are much more knowledgeable than I am regarding electricity, etc. have told me that I am probably over-taxing my stock stator, and that it would be wise to install a higher-output Stator. My question is . . . would it be reasonable to see if I can find a used Buckeye Stator to save a few bucks? Or, is this the type of thing which I shouldn't chance, and just purchase a brand new one? I want to make sure that this job is done right the first time. I also want to be assured that when I buy a new Stator, that I will have a higher performing unit than the stock one I have been using, and that I will be happy with my purchase and the upgrade difference. Thanks Guys & Be Safe! Pete.
-
So how many haw drilled there stock mufflers to get a louder sound? How many holes? What size? ans where did you drill. The Sampson Fishtails are just a bit to loud but i could deal with it if I need too.
-
Does anyone have a set of second gen stock mufflers that have not been modified, that they don't want ???? I just put a sidecar on today and the bubbs are alittle loud for the rider. When I got the bike it had bubbs on it so I don't have a set of stock muffs. ( anyone want to swap some muffs for a Radiator Grill ?? )
-
guess what i did to my stock mufflers? i took a metel rod and knocked out some holes in the end of the mufflers. gave it a deeper tone alittle more rumble. does anyone know if this is going to hurt my 2006rstd? didnt get anybackfire , maybe time will tell. any one ever tried this before
-
I have a set of 2008 stock pipes I used for my break in period. If anyone is interested in picking up a good set, shoot me an email.
-
Evening Everybody: New to the group and have owned my 2008 venture for a year or so and put about 12000 miles on it. I have the Whine coming from the clutch basket. It is not real bad and I was thinking about modifing the the stock exhaust system by removing the cone from the end of the exhaust and putting some holes in the last baffle. Has anybody done this or heard of the results of doing this. IE: gas mileage, engine performance ect....The hope is to make the pipes loader so I can't hear the whining from the clutch. Any information would be really appreciated. Thanks
-
I am looking to replace the horns on my scoot,but I'm not intersted in anything like the steebles. does anyone know of an electric horn that works better than stock and still looks good. the horn on my wifes honda is loud as h*** and chrome to boot,but when I took hers to the Honda shop they said it was not stock. Just wondering cause like I said not interested in a steeble set yet. Thanks for the info in advance David
-
I was wondering if I should upgrade my stock stator in my 07 RSV. I am running the stock accessories, but I also run a gps and satellite radio. Now I am adding Gerbing heated gloves and jacket liner into the mix. Any thoughts or suggestions?
-
Shipped my Road Glide seat off to Rick Butler this morning. I have put some miles on it and was pleasantly surprised with it for a stock seat. I've done a Saddle Sore and a Bun Burner on it so I know that I can do a thousand mile day on it with no major problems. There is still room for improvement though so I figured that with the snow on the ground, it was a great time to let him work his magic.
-
looking for stock RSV handlebars
-
Ok I just found out today, an interesting piece of information . What are the two biggest " cash cow " business's on the entire planet ?? And they are irreplaceable, and you can't buy stock in these two outfits !! But they are a neat " ride " to go take a look at !!
-
.thumb.jpg.4e1b3809c4633f365ba67afc212f21df.jpg) At the risk of boring redundancy with other threads, I thought I'd post my experience with the PCW clutch spring upgrade in my 05 QuickSilver. The bike has about 40,000 miles on it, and I thought I had been noticing just a bit of clutch slippage on hard acceleration and quick gear shifts. The problem was absolutely confirmed while we were riding back up from Corpus Christi last week and I did a 5th gear roll-on around 80 to pass - wasn't really getting anywhere like I expected, but a quick glance down at the tach showed the engine did pick up speed pretty quick! Ooops, had to take the passing pretty easy for the rest of the ride home. I called PCW to order the spring "kit", and they tried gently to talk me into ordering all new clutch plates too. I demurred and said "just the spring." I did ask them for info about why they wanted to replace the inside special half disk and wave washer with a full disk - why did they think that was better than the original design? The explanation kind of made sense that Yamaha had been extra careful for the wussy American market to design a clutch that was easy to pull and would always engage without any snatch or jerk. Since I don't consider myself a wuss, I decided to go ahead and replace it with the full size plate like they suggest. The kit consists of just the new thicker PCW spring, one stock Yamaha friction plate, and one stock Yamaha gasket. Just like others have reported, the instructions were easy to follow and the job was done quickly and without incident. I did take the opportunity to measure the thickness of my existing clutch plates to check for wear, and found that they were well withing stock tolerance (actually just a bit thicker than the new plate that came with the kit). This matched my expectations, since there is no way a wet clutch should be worn out in 40,000 miles! It is tempting to blame the slipping on the oil I was using, but since it was old-stock Mobile1 red-top, changed only 1,000 miles ago, that doesn't really make sense either. I guess it was just the wussy stock clutch spring. Anyway, I am very happy with the new spring - just a bit more tension noticeable in the hand, but not enough to bother anyone, I think. It does engage a tad bit further out, but that was a very minor change. I have not noticed any jerkiness or change in the smoothness of the engagement from going to the new full sized plate in the inside of the stack. For anyone who does a lot of riding, I would strongly recommend this spring kit now, even before you notice any clutch slipping. It is quite reasonably priced, easy to do, and will probably prevent your ever having any clutch problems for the life of your bike. Goose
At the risk of boring redundancy with other threads, I thought I'd post my experience with the PCW clutch spring upgrade in my 05 QuickSilver. The bike has about 40,000 miles on it, and I thought I had been noticing just a bit of clutch slippage on hard acceleration and quick gear shifts. The problem was absolutely confirmed while we were riding back up from Corpus Christi last week and I did a 5th gear roll-on around 80 to pass - wasn't really getting anywhere like I expected, but a quick glance down at the tach showed the engine did pick up speed pretty quick! Ooops, had to take the passing pretty easy for the rest of the ride home. I called PCW to order the spring "kit", and they tried gently to talk me into ordering all new clutch plates too. I demurred and said "just the spring." I did ask them for info about why they wanted to replace the inside special half disk and wave washer with a full disk - why did they think that was better than the original design? The explanation kind of made sense that Yamaha had been extra careful for the wussy American market to design a clutch that was easy to pull and would always engage without any snatch or jerk. Since I don't consider myself a wuss, I decided to go ahead and replace it with the full size plate like they suggest. The kit consists of just the new thicker PCW spring, one stock Yamaha friction plate, and one stock Yamaha gasket. Just like others have reported, the instructions were easy to follow and the job was done quickly and without incident. I did take the opportunity to measure the thickness of my existing clutch plates to check for wear, and found that they were well withing stock tolerance (actually just a bit thicker than the new plate that came with the kit). This matched my expectations, since there is no way a wet clutch should be worn out in 40,000 miles! It is tempting to blame the slipping on the oil I was using, but since it was old-stock Mobile1 red-top, changed only 1,000 miles ago, that doesn't really make sense either. I guess it was just the wussy stock clutch spring. Anyway, I am very happy with the new spring - just a bit more tension noticeable in the hand, but not enough to bother anyone, I think. It does engage a tad bit further out, but that was a very minor change. I have not noticed any jerkiness or change in the smoothness of the engagement from going to the new full sized plate in the inside of the stack. For anyone who does a lot of riding, I would strongly recommend this spring kit now, even before you notice any clutch slipping. It is quite reasonably priced, easy to do, and will probably prevent your ever having any clutch problems for the life of your bike. Goose -
Seeking a new-looking exhaust pipes for my '06 RSTD. Hopefully inexpensive. If you've replaced yours and and just want to get rid of the stock mufflers, I'll be glad to pay for the shipping to WA. The RSTD I bought came with aftermarket pipes and I prefer the quieter stock ones. Question: I'm assuming that when the previous owner put on aftermarket pipes he had to have the carbs re-jetted, yes? I also assume that this means if I put stock pipes back on that I have to have the carbs re-jetted back to the stock settings, yes? Thanks for any help you might provide.
-
At the risk of redundancy with many other threads, I thought I would recap all of my experiences with front tire choice on the RSV. I'll try to keep this fairly short, but some of you may know how hard that is for me! I did a lot of testing on various tires (both sizes and brands), and I was one of the very vocal members a couple of years ago who posted so much about how great an improvement the narrower MT90 or 130/90 front tire was over the stock 150/80 size. Since then I have amassed even more comparisons and have come to these conclusions: The stock Brickstone 150/80 front tire is the WORST possible tire you can use if you have not raised the rear with shorter suspension links. ANY other front tire will be a vast improvement. Raising the rear of the bike 1" with the Leveling Links will make even the stock Brickstone 150/80 front tire handle like any good tire. Poor handling is not just related to the front tire size. In fact, any rear tire that begins to flatten out in the center from too much straight line riding will make this bike track grooves and jump around on surface irregularities. And the stock Brickstone rear tire is the ABSOLUTE WORST for this!Since my initial testing with my 05 RSV which came with the ****ty stock Brickstone tires, I have been able to compare a stock 07 RSV that came with Dunlop tires, and a stock 07 RSV that had Avon tires in stock size. In both of those cases, the bike felt agile and nimble with none of the horrid slow speed heaviness of an RSV with stock Brickstone tires. Since most RSVs come with Bricksones, but a few lucky ones get Dunlop 404s, I think this explains why so many new owners complain about the heaviness and slow speed handling, while a few new owners say "Huh? Feels fine to me." Bottom line, although I think the MT90 front tire is a good tire for the RSV, I no longer recommend it at all. IMHO, if you have raised the rear of the bike with the Leveling Links, the narrower front tire makes the bike a bit squirrelly as the rear tire begins to wear flat. And even with the stock suspension links, I have found that any other good tire in stock size on the front makes the RSV handle just fine at slow speed (note that this EXCLUDES the Brickstone front tire). So, for those of you who have not already made up your mind on tire brand and size, here is what I recommend: If you have Brickstones, get rid of them immediately. They make the RSV and unpleasant bike to ride, and sometimes a dangerous bike to ride. The only exception to this is if you raise the rear with Leveling links, then the FRONT Brickstone will handle fine and last long time. Decide on any other brand of tire and buy stock sizes, front and rear. I personally will never trust my life to Metzeler tires on this bike (see plenty of other posts on this subject), but even if Metzeler is your brand of choice, the bike will handle just fine with stock tire sizes until the rear tire begins to come apart on you. Sorry, I just could not avoid that bit of editorializing!Good luck and ride safe, Goose
-

Fuseblock Upgrade Revisited
stanG posted a topic in Venture and Venture Royale Tech Talk ('83 - '93)
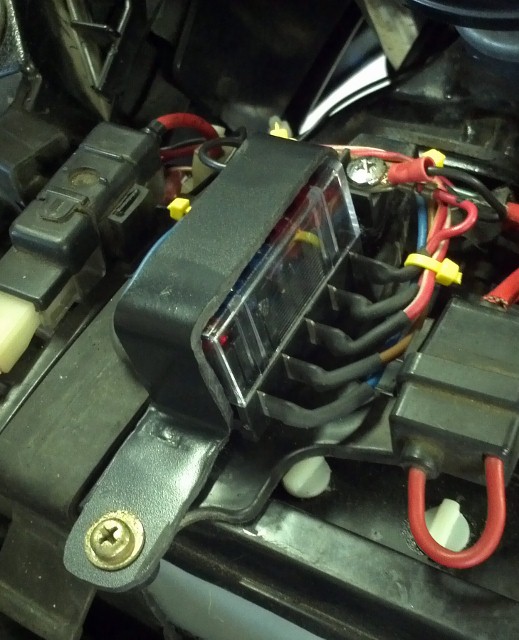
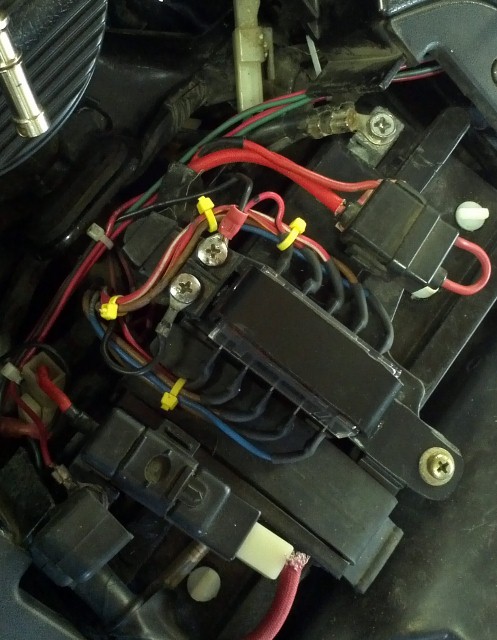
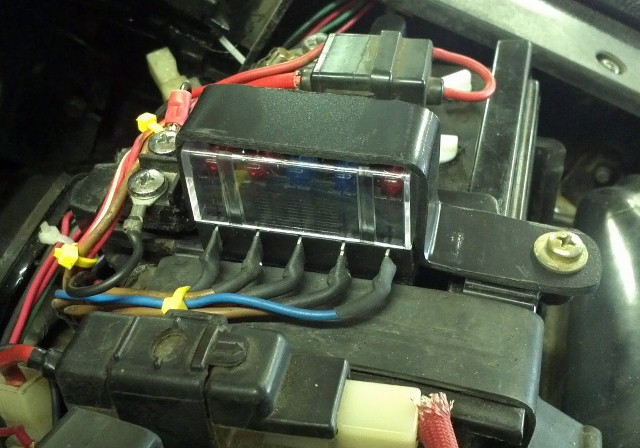
I have recently done away with the glass fuse holder in favor of the ATC fuse block from Littlefuse (part# 350417BP). I picked up my block from O'Reilly Auto Parts but they are available from other sources. I decided to just replace the block, making the least amount of change to stock as possible. Installing the block is pretty straight forward. I just clipped the wires off the old terminals and then soldered them in place on the new block finishing out with heat shrink over the exposed terminal ends and then an application of liquid tape for further protection. I also cut the accessory terminal block from the original holder so that I could continue to use the stock setup. In a departure from other installations, to keep everthing in place and sercure the terminal block, I fabricated a plastic strip from ABS, perfectly forming it to the block with the cover on. Using ABS cement I attached the terminal block to the strip. I used a plastic welder to heat the ABS where the plastic needed to be bent and formed it over a block of wood, holding it place until it cooled sufficiently to retain it's shape. The strip fits into the original front slot in the stock mount and secures with the stock screw in the rear holding everything in place tightly. There are no clearance issues with the false tank cover and it slipped right into place.
-
 Are attached pictures of a stock RSV fork spring or an aftermarket? Gary
 -
 To start off. What size is the bar on a stock 85 Venture? The grips need changing. I have the stock style rubber ons on right now but was thinking of going to foam. I always ride with gloves. Insight? What works best, and bang for the buck? I was looking at highway pegs on ebay. http://www.ebay.ca/itm/Heavy-Duty-Universal-Yamaha-Chrome-Gold-Inlay-Highway-Pegs-Footpegs-1-1-1-4-/271114329183?pt=Motorcycles_Parts_Accessories&hash=item3f1fac5c5f&vxp=mtr They look really cool. Anyone have experience good or bad? Of course the price is right. Thanks Brad
 -
 Ok, so with all the kind help and advice from a number of you great folks, a few days ago I purchased a very sweet 2003 RSV. Yay me! Before it got cold here in Dallas, I had time to get a couple of hundred miles of “get acquainted” time on her, and also about an hour on the practice lot with a few motor-officer friends of mine. I’ve learned a few things, mostly that I LOVE this bike! I have already figured out that she’s a little top heavy, and at slow speeds she is kinda “un-forgiving”. The bike feels heavy in the front end, and almost “wallows” in tight slow speed turns. (I think a lot of that may be the Barons lowering kit she’s got on her). I love my new RSV, and safety and handling (especially at slower speeds) is important to me. So, I wanted to ask a few “new owner” questions, and hope that someone might be willing to offer a little help/experience? 1) I think the Barons lowering kit has to go. I've spoken to my bike mechanic, and he tells me that he can get the OEM Yamaha parts and put her back up to stock height. I've also read about the “Leveling Links” from Diamond R. Do these leveling links install in addition to the OEM parts to bring the RSV back to stock height, or in place of? I’m 6’1”, 225, with a 34” inseam. Would you recommend having the RSV taken back up stock height, or going the “Leveling Links” route? 2) Which helmet communication/intercom headsets do people use and recommend? As far as reliable and good functionally, I mean? When I'm looking/shopping, how do I tell which ones fit the RSV? 3) Does anyone know where I can find one of the Harley brake light frames for the back of my RSV? I am little paranoid about back lights. I was rear-ended at a stop light once, a long time ago. I did NOT enjoy the experience. ;-/ 4) Can anyone recommend a good set of really good “stubby” antenna to replace the stock ones? The stock antennas barely clear the ceiling in my garage. 5) I know I need to be able to adjust/control the air in the shocks. Can anyone recommend a good manual pump for the shocks, hopefully one with a gage built into it? (I'm assuming that it should be manual, rather than an air compressor like I use for my tires) 6) Lastly, I need to go become a supporting member of this great forum, and introduce myself on the “New Member” forum!!! Thanks again for the warm welcome, I’m looking forward to being able to return the friendship and the help!!!!
 -
I am interested in finding a set of stock passenger floorboards for a 2nd gen venture in any useable condition. Doesn't have to have the rubber inserts. Vincent
-
I ma looking for stock handgrips and a cb/fm antenna for 86-93 model. If anyone has a set laying around or knows where I can get them I'd appreciate it
-
Anyone interested in trading 4-2-4 slip on mufflers for your stock mufflers? http://images.leatherup.com/imagesproc/129977_H_SH315_MW355.jpg
-
Hi folks.. I'm looking for some thoughts, ideas and input on some projects I am thinking about doing over the winter. Any thoughts or ideas are greatly appreciated. This is to my 2004 RSV: First project - Lower the front Does anyone have any experience with the Barons Performance front fork lowering kit vs just the spacers being added to the forks. What are the differences in handling? Does anyone recommend the Performance lowering kit or not? Second project - Handlebar replacement and braided cables. Will be giving Buckeye's (I thank that was who is recommended here in the forums) a call to get all the parts. Looking to replace the stock handle bar with the Flanders one with more pull back. I am thinking of adding heated grips at that time and am wondering if anyone has added heated grips.. if so, what was used? I like the stock grips as my hands are on the smaller side. I have used the ISO grips on previous bikes but do not like them due to their larger diameter size. Has anyone used or added heating elements to the stock grips? How do you like them? I am also looking at the Avon brand heated grips. Not sure yet what their diameter is vs the stock grips. I figure while I have everything apart to lower the front, I might as well do the handlebars and cables at the same time. Thanks for all the input... I don't always post a lot but love to read the articles and this site has been a constant source of help when needed.
-
 I just got back from a STAR Touring BBQ in Branson, MO. 2500 miles, 900 of it MO & AR twists and whoop-t-doos. (rode straight home,950 miles yesterday,,, whew. About 18 hours.) So, my stock size Venom is now shot (now at 22k) I called my dealer to get another and was told they can't get it anymore. I looked on Bike Bandit and saw it only on CLOSEOUT for stock size. Guess that narrows the field again on stock size 150/80-16. No Avon, no Michilen Commander II. So I am having them put on a Dunlop E-3 Friday. Mike G in SC