Search the Community
Showing results for tags 'tci'.
-
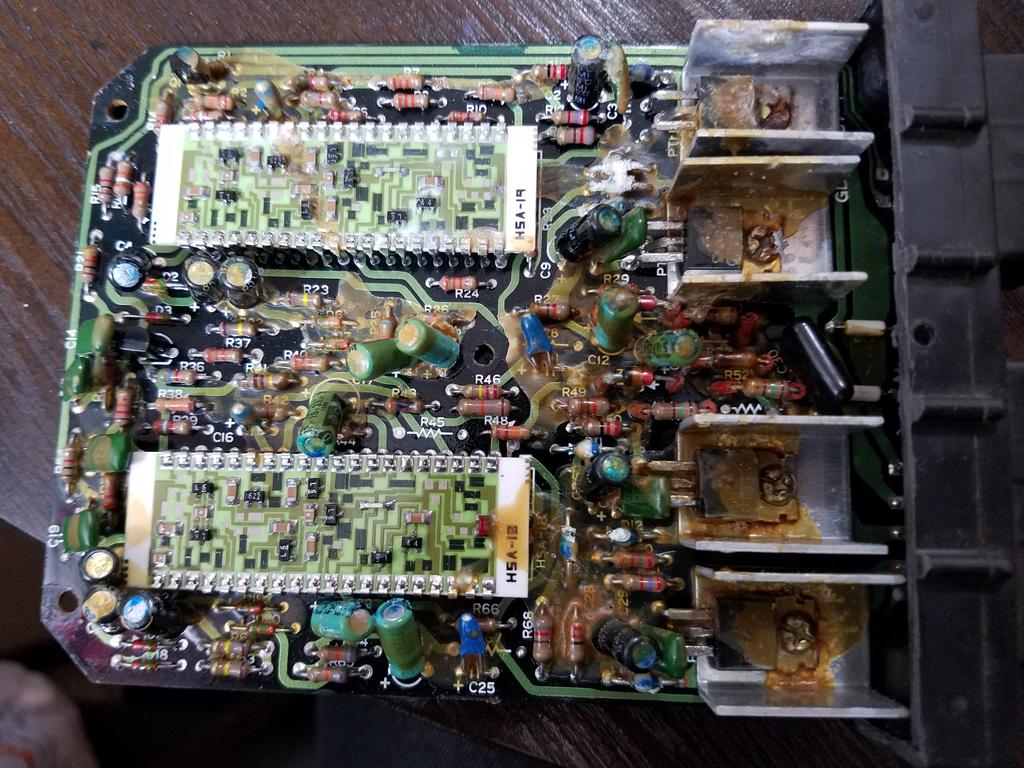
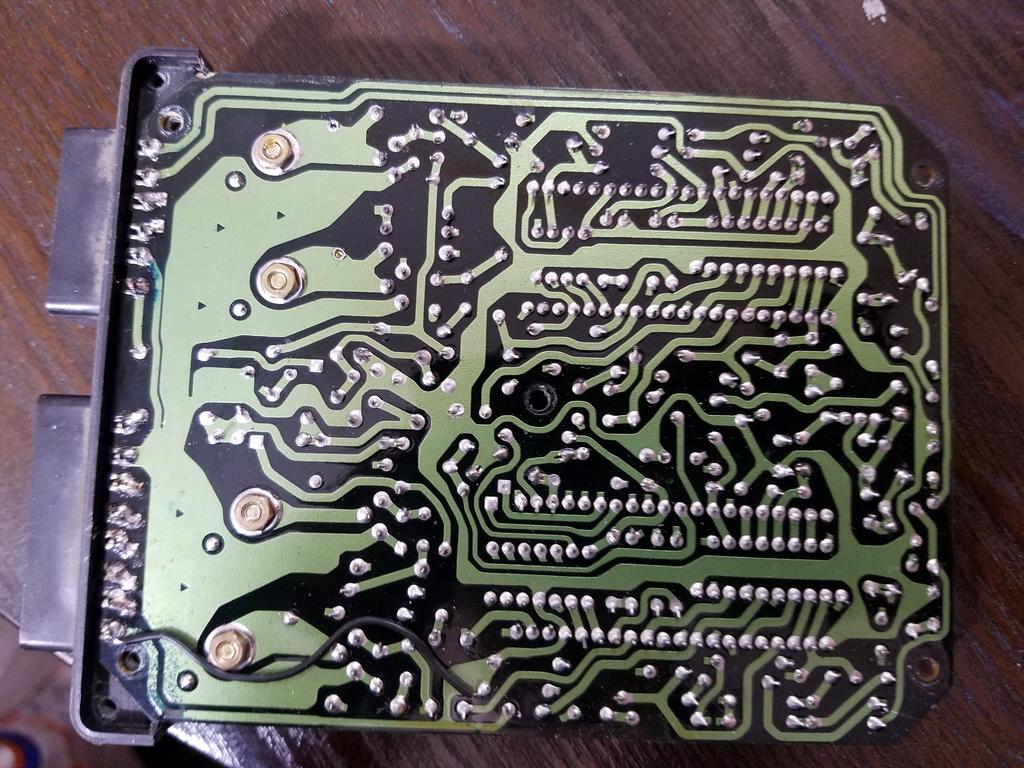
 Hey everyone. New to the forums here and new to ventures. I picked up an 83' which had been sitting for probaly5+ years. I had it running last year but it was running really rough and chugging fuel like a frat boy chugs 4loco. So I ended up tearing the carbs apart and cleaning them. Got it back together and now the bike runs rough (though it starts a lot easier). I can tell she really wants to run but something is holding her back, I am guessing the timing. The tach jumps all over the place and sometimes just sits at zero while running. I have already remounted my TCI and found that the bosst sensor is bad (its putting out 6.3v at atmospheric pressure). Even with that unplugged it runs rough. I also get lots of backfires, mostly just little puffs from the #2 carb. I have also tested the fuses and coils which seem to be good. dash cluster works fine as well. I know all the timing is computer controlled which I hate, I almost exclusivly have owned 80's vechicles because of how easy they are to work with due to lack of computers. That said, for the few seconds at a time when the bike decides to run right I can understand why people love these bikes so much. Anyways, I go another boost sensor on the way and after reading some threads here got brave enough to cut open my TCI and think I found a few issues in it but could use some help as to what I should actually do with it (I do have honed soldering skills) Here are a few images of it. The bottom of the board looks good, that black wire I added in as the eched in wire looked like it was on it way out. As for the top of the board, I think it speaks for itself. Thanks in advance for the help and hope to be able to ride alongside some of the Pacifc North West members soon!
-
 Last Updated 11/11/13 I will do my best to keep this post updated with the latest info. For now, this is only information for 83-89 (MKI) This is a continuation of a discussion that started here. The cliff notes...... A company in the Czech Republic, IgniTech, makes replacement ignition boxes and was working on one for 1st gen VR's. I had had several used TCI boxes take a dive and felt the need for a new TCI rather than installing another 20 year old used part, so I decided to pursue the IgniTech solution. After a few e-mails in broken English, I was able to provide them with the additional info they need to complete the development for a 1st gen box and I ordered one up. When ordering your own, tell them you want a TCIP4 for whatever year Yamaha Venture you have. 83-89 boxes and programming are all the same but because of the language barrier I'd be as specific as possible. It would be nice if they implemented a part # system but no such luck so far. Note: The stock 83 TCI is not the same as 84-89. But for the purpose of ordering a IgniTech TCI, they are the same. Their current pricing, including shipping and taxes is 157.14 Euro. At current exchange rates, that's $223.83 You can do the conversion here. This is what was in the shipping box. http://farm3.static.flickr.com/2534/3881510658_52c2e48a85.jpg The ignition box, depending on the programing, works on a bunch of different bikes, so the harness is to mate the box to the Venture harness. The bag of pins that match the box side of the harness are to add wires to perform functions not used on the VR or to add in a MAP sensor.....more on that later. The CD contains software that lets you alter the ignition curve and some other parameters. You plug the pigtail on the box into a serial port on your laptop to access those functions. It will run OK on the stock map but leaves something to be desired. It's substantially smaller than the stock TCI http://farm3.static.flickr.com/2493/3883265968_09565e407a.jpg Looking at the connectors, I see that they combine the 4 pick-up coil wires into 2 inputs to their box. (the brown and yellow wires) http://farm3.static.flickr.com/2608/3883367448_c210082490.jpg They had said that they would need to do this to make it work. I believe that's why they needed the order in which the pistons come to TDC from me. I also noticed the the 2 wires for the pressure sensor are not there. This means that in this configuration there is no vacuum advance like the stock TCI http://farm3.static.flickr.com/2455/3883369706_578f1be0e0.jpg It runs fairly decent without the stock pressure sensor but adding a MAP (vacuum) sensor back into the mix really wakes it up. More on that later. I had already moved my TCI to the top of the airbox so installing it was a piece of cake. I used some Scotch brand Dual Lock (part# RF9730) to mount it to the airbox cover. It's Velcro-like stuff, but has interlocking pins that create a more positive grip. http://farm3.static.flickr.com/2601/3883268106_256d897483.jpg http://farm3.static.flickr.com/2456/3882477735_b2905d9759.jpg http://farm3.static.flickr.com/2523/3882480987_ec4bba4254.jpg It clears the tank cover with no problem and doesn't push it up at all like the stock TCI did. I kinda tucked the serial connector up and out of the way. Edit on 9-30-09 updated info After putting approximately 500 miles on it, fuel mileage was off (verified) and power seemed down (seat of the pants). I found some info on their website that suggested the the pre-programmed advance curve might just be a guess on their part. So using the supplied software, I started adjusting the advance curve. It isn't possible to copy the stock TCI curve since the Ignitech box doesn't use the pressure sensor, so I basically added advance across the board until it started to ping during a 2000rpm, 3rd gear roll on. I even went so far as to stop and let it idle until the fan came on to get it as hot as possible before testing. Then I dialed it back, slowly, until it didn't ping anymore and then a touch more just to be safe. Here is the pre-programmed curve. http://farm3.static.flickr.com/2640/3897735550_cf24b7543e_o.jpg This is what I ended up with. http://farm3.static.flickr.com/2005/4506033451_d562c0f614_o.jpg Mileage and power are much improved. I rode an entire season with it tuned like that. But it still lacks some part throttle response compared to stock. At the bottom of the post is a link to this file and instructions on how to load it into your TCIP4. ______________________________________________________________________ If you're willing to invest a little more time and money, you can get an experience as good as or better than stock. Even though the bike ran pretty well with the modified map, timgray mentioned trying to put a vacuum sensor back into the system and this got me to thinking. The IgniTech box is set up for using a Throttle position senor input but not a vacuum sensor, but it seemed like with a little 'creativity' it could be made to work. After input from Tim and others, it was decided to use a GM MAP senor. (MAP = Manifold Absolute Pressure, it's basically a vacuum sensor) For reasons that you can read in the thread, I don't think using the stock vacuum sensor is the best option, but I'm still looking into that possibility. After some head scratching and trial and error, I was able to install a MAP sensor and ignition timing map that works pretty darn well. The throttle response is much improved along with MPG. I feel it runs as good or better than the stock TCI. For details about how I arrived at this configuration, you can read through the thread. Here are some additional parts you will need for the MAP sensor installation. 1- General Motors 1 Bar (non-turbo) MAP sensor and connector. http://farm5.static.flickr.com/4136/4809338814_03c324d519_t.jpg 1 - Vacuum restrictor - Dorman# 47311, NAPA# CRB 2618, Usually found in the "Help" section at auto parts stores or you can order one here. http://farm5.static.flickr.com/4114/4809350006_de61dcbc3f_t.jpg 3 butt connectors to attach your 3 - 1ft. pieces of wire to your MAP sensor connector. http://farm5.static.flickr.com/4094/4808737617_a0aa590e79_t.jpg 3 - connector pins from the bag that came with your IgniTech box. Note: at least one member didn't get any additional pins, so if you are planning on running a MAP sensor, you might want to request them from IgniTech or order some additional ones from their site. 3ft. of vacuum hose. 3/16 worked for me but it's a bit tricky since not everything you need to hook up is the same size. 3ft. of gauge wire, 3 - 1ft pieces of different colors would be best. I used a General Motors, old style (larger) MAP sensor. Sensors for newer cars are smaller, but tend to be more expensive. One from any non-turbo car will work. You'll also need the corresponding connector. Here at Rock Auto is a sensor and connector for a 9 Chevy Pickup for less than $50. Edited on 11/11/13 to update purchase links and add VPV and NAPA sensor info The original sensor link above no longer includes the connector. Here at is a link to the connector you will need. Member KISA found this MAP sensor on eBay. http://farm6.staticflickr.com/5528/10813201475_0f68ae7def.jpg It's a Finnish company. They are currently priced at $40 US, including shipping, and come with the connector you need. I'm not having an issue with the GM sensor I have but I ordered a VPV MAP sensor because it looks more compact and easier to mount on a vertical surface then the GM. It took several weeks to get since it's shipped from Finland. Now that I have it, it looks like a quality unit. It has a billet aluminum housing and rubber insulated mounting points. I don't have it on yet, it will probably be a winter project. Here is the ebay link but who knows how long that will be good. You can also order them from www.piilix.fi but it's a bit of a convoluted process. On their homepage it says "Mainly selling low cost overstock batches". And the VPV Racing website, with the help to Google Translate, says "VPV Motor Racing has stopped working", which I believe means they're out of business. So these will probably go away at some point. Your local NAPA dealer can get you the connector under part# EC14 And a MAP sensor under part#'s PS10075, 2-1961, or 3-1961 Or you can go to your local salvage yard or auto parts store. Chevy used the same one on non-turbo vehicles from the early 80's until early 2000's. A 1990 Chevy P.U. with a 350 engine is good vehicle to use when having the parts guy look it up. Thanks to timgray, Here is another source for a MAP sensor. They also have a connector w/o the pigtail that makes it so you don't have to use the butt connectors. It's a little more difficult to do but results in a cleaner look. You need to connect your new hose to the #1 or #2 cyl. sync port. On 84-89's remove the vacuum hose that goes to the stock vacuum sensor and just let it hang out of the way. On my 84 it was on the L.R. cylinder (#2) but it's my understanding that most are on the L.F. (#1). On 83's the stock vac sensor goes to a ported source on the #2 carb. You could remove the hose and cap the fitting on the carb or just leave it connected since the stock sensor won't be used anyway. On my 84 there was a hose connector/fitting a couple inches from the carb. I disconnected the hose there, put in my new restrictor, then added the new hose, routed around the carbs and behind the frame tube and and tucked the MAP sensor in just to the left of the fuel filler. http://farm5.static.flickr.com/4093/4810745879_0e346f1357_b.jpg To wire it up, connect pin A on the MAP sensor to pin 7 (ground) on the TCIP4, pin B to pin 6 (sensor voltage) and pin C to pin 17 (5v ref). Edited on 11/11/13 to include VPV Racing sensor pinout and update pinout images easier to understand For the VPV Racing sensor, The Red wire on the sensor (pin 1) goes to pin 17 on the TCI harness, Black (pin 2) to pin 6 and Blue (pin 3) to pin 7. http://farm3.staticflickr.com/2875/10814737246_e5cb6586f3_z.jpg http://farm6.staticflickr.com/5510/10814735346_0e151e2a4a.jpg http://farm3.staticflickr.com/2869/10815083995_abb0e30369.jpg This is what my finished MAP install looks like. My wires are plenty long but I wasn't sure were I was going to put the sensor when I started. Also, disregard the black wire, it was for testing purposes. I ran the vacuum hose up from the carb, behind the frame tube, to a spot just behind the airbox. http://farm7.static.flickr.com/6133/5924665643_8f4f97f009_o.png The sensor tucks in right next to the gas cap splash guard on an angle. I slid the extra wire length between the guard and the airbox. I looked at all kinds of places to mount it and brackets to hold it but this is simple and works great. Once the faux tank cover is on, it can't go anywhere and has been fine for several thousand miles now. http://farm7.static.flickr.com/6021/5924667343_e414b545f3_o.png Note: These files are for 83-89 (MKI) bikes only. Here is a link to the latest non-MAP sensor file. Use at your own risk! Here is a link to the latest file to use with a GM 1 Bar MAP sensor. Use at your own risk! Edit on 7-5-11 to clarify programming info You will need a laptop with a serial port or a USB to serial adaptor. The adaptors can be temperamental but it's worked fine for some. After clicking on one of the above links, click the "Download" button and save the file to your Desktop. To install a new map in your IgniTech TCI you have to connect a computer to the serial port on the TCIP4. The TCIP4 has to be plugged into the bike with the key on too, so a laptop works best. Insert the CD and open the file on the CD called 090715a_tcip4.exe. This is the IgniTech programming software. In the IgniTech software click the "Folder" button. Note: It seems the latest TCIP4's are being shipped with updated programming software, version 80. The file is named 100907a_tcip4A_v80.exe. http://farm6.static.flickr.com/5013/5448184931_e2cd52d823.jpg Then navigate to your Desktop and select the file you downloaded, either "Venture without MAP sensor" or "Venture with MAP sensor". Note: If you're using v80 software, You will get a warning popup. Click OK and continue. Then click Program. http://farm5.static.flickr.com/4134/5448185023_1cc707c2f8.jpg In the lower right of the software you'll get a notification saying "Program device" with a progress bar. When it's done it says something like "Program OK'' in green. I don't remember for sure. I'll try to get a screen shot of that soon. Close the program, turn off the key, disconnect the PC and go for a ride! I now have over 5000mi on my IgniTech TCIP4 without a single hiccup.
 -
 Hello all, Been a lurker for the last year and I'm finally posting as I need some help and couldn't find the answers I was after in prior posts. I'm afraid my V4 thinks it's only a V-twin! Forgive me that this will be rather long, as I want to give complete information in hopes that will be better able to assist me. Background: I have an '89 VR (Cali model, if it matters) that I bought almost exactly a year ago and have been slowly restoring and returning to road duty on a budget. Approximately 34,000 miles. When I bought the bike it would only run on full choke, and poorly at that. Previous owner bought it that way as a project. He attempted the shotgun cleaning method but that didn't work, then he lost interest. I have no other prior service history, though I can see that a lot of the prior "modifications" were poorly executed, so I have little faith in the competence of the PO (not who I bought it from) to properly repair and maintain the bike. Anyhow, I removed carbs and had a friend who operates an independent bike shop fully clean, rebuild, and bench synch the carbs. I have since installed and also installed new NGK iridium plugs. Running and performance: Bike has been running now for a few months, but not especially well. I have taken it out on a few "shakedown" rides of around 100 miles or so in hopes that riding it around would help it heal after coming out of an unknown period of hibernation. That hasn't fixed it. At start-up it fires right up on full choke but doesn't sound as smooth as I would expect and I hear a periodic popping that I believe to be pre-ignition or some incomplete combustion(???). Riding it it's a bit of a dog at first and I will have to feather the throttle some when I come to a stop (off of choke). It doesn't fall on its face when accelerating, it just doesn't feel as strong as it should. Mileage is horrible - I'm having to get gas after only around 75 miles or so. After riding for quite some distance (more than 15 miles) and especially after really flogging it on a more sustained basis, it seems to run noticeably better, although never 100% (at least I don't think). Still some popping on deceleration and doesn't always want to idle at stops if I let off the throttle. So in my estimation it seems to be running "kinda decent" at these times, though having never ridden one of these, I don't know what a properly running one should feel like. For reference I have owned several V45 Magnas, a ZX-12R (my main bike), and other inline 4's, among others. I have ridden a VMax once, but it was a number of years ago now. My memory of it is pretty limited, but my Venture doesn't feel nearly as powerful as I remember the VMax. My ZX-12R is in another stratosphere, but that's not an apt comparison. Current Symptoms & efforts to diagnose: I've had a suspicion that #4 is not firing, or at least not all the time. I'd previously used a pointable thermometer and saw the temperature (measured pointing at the jug) was significantly lower on #4 as compared to others. Unfortunately, I only ever checked this after starting the bike up in the driveway and riding up and down my street, rather than after an extended ride where it was running "better." I had also previously checked the spark plug in #4 and saw it was wet and likely fouled (cleaned, dried it, and reinstalled since it only had a couple hundred miles on it). This past Sunday I set about to figure out what was wrong, and fix it if I could. I started it up in the driveway on full choke and it fired right up. After letting it idle for a couple minutes I pulled the plug wire off of #4 - no change whatsoever. I stuffed another plug in it while it was still running and I do have spark - I both felt it and touched the plug to the engine and saw spark. I can't really say how strong, as it was in bright daylight, but I could definitely see it. More surprising to me was that I pulled the wire on #3 and had the very same outcome. I then pulled #1 and it immediately started to stumble, so I reinstalled. Didn't bother pulling #2 as it obviously had spark since the bike didn't immediately die when I pulled #1 . Pulled the plugs and inspected. #4 was wet and clearly fouled. Others were ok (not great), with the white ceramics a bit sooty, but not wet like #4 . Weirdly, #3 actually looked the best. Gapped and installed new NGK DPR8EA-9 plugs and crossed my fingers. I also checked the pilot mixture screws and discovered they were set anywhere from 3/4 out to 3 full turns out. I adjusted them all to 2 1/2 turns out as a baseline based upon what I read in other posts. Fired it up and it was no different. Could still pull the plug wires off of #3 & #4 without any effect. I probably should have taken the bike out and really run it before starting all this, but I didn't. Was thinking instead about having to work on a hot engine. Next I did a compression test. 1=190; 2=195; 3=195; 4=175 (eventually). So, #4 was lower and slower to pump up. No idea if/when valve lash has ever been inspected/adjusted. I see that it requires a special tool and shims, neither of which I have. I now suspect this may be at least part of the cause of my problems, but 175 psi still seems like it should be more than enough compression to support combustion. I continued on with checking ignition components, thinking the trouble may lay there. Holy hell what a job to get to the TCI and coils. I checked resistance on the pickup coil at the plug and all tested wires were within spec. I then checked primary resistance on the ignition coils and all 4 were in spec. at 2.9 ohms. I then checked secondary resistance by inserting a probe into plug cap and got the following resistance numbers: 1=22.5; 2=24; 3=22.1; 23.7. At first these numbers alarmed me as they are all much higher than the 15 ohm maximum specified in the service manual, but then I read that the plug cap should be 10 ohms itself +/- 10%, so if I subtract this out, all three coils are in spec for secondary resistance as well. I suppose I could remove the wires from the coils and try to test at the coil directly, but access is limited and I know I'm getting (at least some) spark to all 4 cylinders. Let me say I am not at all excited at the prospect of pulling the upper fairing to change out coils unless it is absolutely necessary. Considering they all test about the same, I'm thinking they're ok, but you guys are the experts on these bikes, not I. Those numbers also lead me to think the wires and ends must be (at least) ok too (I took apart plug wire and end for #4 and everything looked fine (no green corrosion), then I clipped a 1/4" off both ends of the wire and re-assembled). I got the TCI out of its stock location as well. From what I've read these can be the source of all kinds of poor running conditions as they start to fail. It is weird to me that when they fail it is not a complete failure, as that has been my past experience with CDI's. I can't help but wonder if this magic black box is the source of my problems. I did open the cover, but wasn't brave enough to dig out the soldering iron and desolder the pins to the main plugs just so I could look at the top of the motherboard and the diodes that are known to fail. My understanding from reading past posts is that if the TCI is not working properly, there's no fixing it. The diode replacement and resoldering of various connections is only preventative maintenance on properly functioning units. So my thinking was to leave it alone for now, since if it's broke I can't fix it, and if it ain't broke, I might just screw it up with my extremely limited soldering skills. It would certainly be helpful to have a known good one to plug in to rule in/out the TCI as a problem, but alas I do not have one and ones on ebay aren't cheap (for what may be junk anyhow). I've read about the Ignitek computer, but I don't know what my long-terms plans are for the bike and am concerned about budget. Besides, I don't want to just go throwing parts at it - especially expensive ones. I also checked to see if there's fuel getting to all 4 carbs and there is. I opened the drains on each of them and got full bowl's worth from each. So I'm not really sure where to go next with it. Based upon the compression test, I am wondering if valve adjustment should be next, though candidly I was hoping to avoid this job. I welcome suggestions, comments, offers of help, commiseration, jokes at my expense as the FNG, and further questions. I've done a ton of other work on the bike and I'm really anxious to have it finally "done." If I can ever get it running properly, I can turn my attention to the non-functioning cruise control (Grrrrr) and do a final "detailing" of the bike, before planning some longer trips. Thanks all for your patience in reading along, and thanks in advance for your assistance. [P.S. - If I have placed this post in the wrong folder, please feel free to move it and let me know where it should've been in the first place]
 -
 Hey guys, New to the forum. Like the title says I'm having some issues with my 85 VR xvz12. My VR had run great for the last 2 years I've owned it, just had to fill her up, change the oil and go. But my son and I went for a short drive around central Washington and got caught in a freak rainstorm. We stopped and got under some shelter and afterwards the bike just wouldn't start. After about 2 hours of fiddling around with her, she just started up but ran like crap. The Tachometer was dead "at Zero", and she ran like she was on two cylinders. Got her home and blew her off with a leaf blower and wiped her dry. The following weekend, she was still running sick. So I pulled the battery and checked both coils (primary and secondary check), pickups, spark plugs, spark plug cables, emergency cut off switch, pickup coil, stand switch and the voltages were in the ballpark from my service manual. I then read a post from DonB about testing from the TCI connectors to see if there is a short in a wire, I followed his guide and didn't find any reason to think I had a short. So the old girl is still reading zero on the Tach, failing the fire on two cylinders, and starting is hit or miss. I'm at my wit's end really, I figure at this point it's the TCI. It sitting in its original horrible location, and I don't really know how or why I would want to take it out if I'm thinking about ordering a new SPARKER TCIP4 from IgniTech. Is there anything that I'm missing or have not thought of. I have scanned this forum pretty hard. PS: with the massive amount of information on this forum I'm gonna have to pony up the 12 bucks
 -
I just bought a r/r on ebay because my battery was not getting the correct voltage and I did the voltage test that was recommended. The bike was running fine at this point, just not charging the battery. (83 Venture) I recieved the used R/R and installed and the battery picked right up. I thought all is well until now the bike seams to be missing and the tach keeps dropping. from the assorted forums I suspected I had a bad TCI or moisture ect. I did the ohms test on the cables. After removing both plugs from the TCI and testing the 6-pin connector's black wire I did not get a connection to ground on the neg battery cable. the 8-pin connector's black wire tested good. I did notice the ground connection would be made through the TCI if the 8-pin was connected to the TCI. Is this Correct? Shouldn't the 6-pin cable be be indpendent and not rely on the TCI to ground the pick up points. Regardless the R/R that I got seemed to cause me problems because once I disconnect it, the bike runs fine again. I could use some help from some one who may have gone thru this already.
-
Now sorry too post this long issue here. It's just about 3am here and I haven't had the greatest of days. It is Tuesday the 21 of June. Have received a lot of help from a different site called venturers dot org. You can search for Tach power there and a couple Pages in you will start to see my posts. Nickname iSpeedyG. If you do a YouTube search for Speedy G with Venture1 or Venture 1 you might come across about 9 videos of my hell. The final 2 "the day she ran" and the link I am posting below. Seems I have developed a new situation that maybe someone can help with. It's not normal to ask but I'm dead, exhausted, pissed and really in a need of something positive to happen if you think you can help please don't hesitate to reply or even call. Life has been a little trying lately bb when you get to my page you should be able to see venture video of my problems. I'm a tad bit overwhelmed at the moment.
-
So after having a bad experience with a local shop trying to tune my carbs by ear, I decided I would tackle this myself or hopefully with some fellow VRs. So understand this, I have no mechanical background and am clueless on this. Im leaving to Colorado with my 83 first Gen in August (last week) so will be hitting this quickly. My thought is to try to do all at once. So I was looking for help from here to create a checklist of things to do. 1) first on the list is the new TCI from Dingy. After reading many post it seems like this would be a must an because I felt like some of my bikes symptoms are related. Plus it sounds way better than the possible diodes cording in the 30 year old OEM. 2) I believe it sounds like it would be wise to replace the "sliders and diahprhams" in the carb. Sounds like I need 4. Is there a current best place to order them from? 3). Plug and remove the 4 boxes of the Ycis ports. This one is still hooked up. 4) Skydocs's needle shim kit. Question is do I order 4 kits or does 1 kit take care of all the carbs. 5) sea foam of coarse. 6) I guess new plugs are in order since I have been doing the sea foam. Any recommendations what kind. Long story short, the bike ran good before shop adjusted carbs other than lower mpg. Some of the list is preventative maintaince and if I'm there might as well do it. Any suggestions would be great. I'll be ordering a Carbtune too. Last thing, anyone know someone in the Southwest Missouri (Branson) area that could mentor this process on the day of. I would certainly make it worth while. Or possibly someone wanting a Branson vacation :-). I dont care care about popping wheelies but would like to know of this "power". Mainly wanting better mpg. Good thing is there is no fuel leaks on the garage floor after riding it. I have some pro video and photo equipment and would love to document this process for other noobs like myself. Then I'll be filming my adVENTURE to Colorado too thanks in advanced.
-
Well, just got my 83 First gen back from a local shop and the whole ride home I've been sick to my stomach. I took it in for oil change, spedo replacement, and to synch the carbs. He said that the carbs are mechanically synced and that wouldn't be necessary. He did say he adjusted the screws to smooth it out. Boy now I'm messed up. This thing went from running 80% good to 45% good. Feels like it is missing or even possibly fouled out. I can't take it back till Monday but I feel like I messed up by allowing them to work on this carb. I described the synch tool with the four liquid levels but apparently that didn't work. I hindsight I should of ordered the new tci that Dingy sells. Wondering if anyone has any suggestions on how I can communicate to this shop on Monday and if there is anyone in the southwest Missouri area that I can hire to get the carbs back right. Trying to be patient. I'll look in the morning to see if something came unplugged or what but I pulled it out of the shop like this. On top of that they had it for a week and a half. Thanks. P.s. It has ran great for several years now but always felt like it was only on 3 cylinders after doing the cold start test with the occasional back fire through the carb. But even the. It ran better than this. I was getting about 26mpg. So in hindsight it might just be the tci.
-
Here is a question that occurred to me while riding along worrying about my blue '84's intermittent misfire and thinking 25 y.o. TCI. Does anyone make an aftermarket TCI that can be used on the First Gen xvz12 / 13's ? I subscribe to a few classic bike mags and in the small ads at the back there are often outfits that advertise electronic ignition upgrade kits for older, ie 50's 60's and 70's, bikes that originally had points and condenser (British mag) type ignitions. I realize that the first gen xvz12 / 13's would be a small niche market and so on but old bikes from the 50's 60's and 70's can't be that big a market either. I see, or think I see second gen xvz aftermarket TCI's on ebay from time to time. What about Vmax's they share similar engine type and they like to go fast, you'd think some enterprising somebody would have come up with an aftermarket Vmax one by now that would be the cats a$$. So it wouldn't really be that small a niche. Or maybe they exist but cost so much you can buy 10 first gens for the price so no one bothers. What do we know about this folks? Likely I'd have read about such a thing here already if it were a practical solution but, well I had to ask while I procrastinate and generally put off going hunting for my bikes intermittent ignition fault. Thanks, Brian H.
-

New Diodes in Stock TCI
JoeKanuck posted a topic in Venture and Venture Royale Tech Talk ('83 - '93)
Good day. I've been getting more and more paranoid about my TCI lately. I didn't even know it could be a problem until I started reading threads about it. After studying these two threads; http://www.venturerider.org/forum/showthread.php?t=40414 http://www.venturerider.org/forum/showthread.php?t=43357 ...and getting some good advice, (Special thanks to Dingy and Timgray), I decided I should look inside the damned box to see what's what. Before getting into the job, I ran the bike and checked each exhaust pipe with a temperature probe to verify that all four cylinders were firing...and, good news, they were. To get the TCI apart, there are 4 phillips screws on the back cover, and 5 on the back of the board. Now here's the tricky part about getting the board out of the box; the proper way is to desolder the 14 wires from the board which lead to the connectors. I'm ok with a soldering iron but no wizard, and that board has been banged around for 25ish years and I don't know how much more abuse it could take. So I decided to try something different. I used a hacksaw and cut the box around the connectors. It was a pretty easy job and it was no problem cutting only the box and not damaging the board. That bit worked for me. If you choose to do any of this, by the way, you do so at your own risk. Anyway, the attached pics show what I found on the inside. At least 3 diodes, (the blue and tan bulbous units), were showing signs of serious disintegration. HOLY CRAPPOLA...! That sure gave me a bit of a fright. It made me thankful I tackled this bloody awful bit of mechanicking. I refused to pull the fairing off so I yanked the battery, battery box, air cleaner and air box. I also took off the lower right side fairing. This allowed me access to the TCI. I could reach the screws but they were bloody seized. Eventually, I got the left one out. The right one wouldn't budge so I just cut the tab off the box. I wasn't planning on putting the box back in its original spot so I didn't worry about it. Dingy suggested replacing the crap diodes with 1N4001 or higher diodes, so that was my quest for Sunday. The Source, by Circuit City, (formerly Radio Shack in Canada), had an assortment pack with about 20 diodes and as it turned out 10 of them happened to be of the 1N4001 variety. Less than 6 bucks later, I was off to tackle the bike. I won't go into what a frickin' pain it was to fart around inside that bike...I will just say that the cuss words are probably still echoing around that garage. Anyway, I took my time with the desoldering and soldering...(even though it may not look like it). After replacing all 8 diodes, I checked continuity with an ohm meter. One direction would show 600 ohms and the other would show nothing...perfect. I also checked continuity further down the board to make sure my soldering job actually fused to the traces. I had a couple of traces lift while soldering so that took some extra time to resolve. All of the testing seemed to indicate all was well so it was time to try it on the bike. After plugging the TCI and the rest of the bits back on the bike...SHOWTIME...! One stab of the starter and she lit right up. Fantastic. I let it run for a while and used a temp probe to verify that all cylinders were firing...which they were. I haven't taken it on the road yet...it's 4 am and I lost the will to reassemble the rest of the bike and tuck away the TCI. After much soul searching...the TCI will probably go back in its original spot...but held there with zip ties instead of those damed screws. I plan to silicone up the frankenstein-ish scar I hacked into the box, then, once I'm sure the thing is running right, seal the thing up in a bag with some desiccant. Anyway, so far, so good. I definitely feel relieved that I went through the effort. The paranoia was getting to me. Now, I feel confident that my potential TCI worries are probably in the past. One bit of extra advice; desoldering and soldering these bits can screw up your board. The diodes cost me less than 6 bucks. It would take a good electronics tech less than a half hour to do this job...an hour if he's drunk. If you aren't totally confident in your soldering abilities, take the job to a tech. It'll save you from screwing up an otherwise good TCI. Ok...it's 5am...I'll take the thing out on the road tomorrow, see how it runs and report back. -
Not realizing a smooth running acceration and decent Gas mileage since installing the new programmable TCI I decide to plug the old TCI back in and compare the performance between the old and the new. 1st I just plugged the old TCI in with the new map sensor still hooked up with vacumn tube to the #1 Intake boot port but electrically not hooked up. Leaving the tank cover off, I go for test ride to auto parts store. It seemed to run about the same as the new programmable TCI. So I'm thinking the problem is not related to the TCI Old or New. But as I was leaving the auto parts store the bike began backfiring, bogging down then shut off and would not recrank.WTF:confused24: So, I'm sitting on the side of the road for about thirty minutes scratching my head, trying to get the bike to crank and worrying about a two mile up hill push home. Then I noticed the orange wire on the 6 pin plug to TCI is hanging 1/2 way out of the plastic plug. I push in all the way in and the bike cranks. So then I get on the highway to run the bike at highway speeds for a few exits and back. On the xway it runs about the same as the new TCI maybe a little better. But, before I could get back home on three occassions while at a traffic light the bike starts bogging down again and backfiring. After wiggling wires it straightens out. When I get home I wire in the leads to the old TPS into the new 8 pin plug so I can switch back and forth from the old TCI/TPS configuration to the new TCI/MAP Sensor configuration and unplug tube from Map sensor to intake boot and hook up tube from TPS to port. While doing this I notice that the pins inside both the 8 pin plug and the six pin plug are not all bottomed out indicating that the pins are not securely locked inside the new plastic plugs. I'm thinking INTERMITTEN WIRE CONNECTION FAILURE WITHIN THE QUICK CONNECT PLUGS On several occassions since I've owned the bike over the past 10 years poor performance and gas mileage has been traced back to bad electrical connections of the quick connect plugs to the TCI. Numerous other problems resulted from bad connections in multiple other quick connect plugs. I just dont trust quick connect plugs anymore. So, I took some small needle nose pliers and make sure all of the wires are pushed in all the way on the TCI plugs and take a ride around the neighborhood. The acceration was quicker and more responsive than I ever remember it being and the bike litterly flies. Next I'm going to take a longer test ride on xway to see if my theory holds up and the gas mileage improves.
-
 I have a few members interested in getting an Ignitech 1st gen TCI. Main thread on this aftermarket TCI is located at link below. http://www.venturerider.org/forum/showthread.php?t=40414 There was an issue with the prior group of TCI's to be upfront on this. There were a few members that experienced brief ignition cutouts in 3k to 4k range. This seems to have been mostly resolved by using a programing option with the TCI. 90~93 single pickup coil bikes did not report this issue. These TCI's are as close to plug& play as I can get. All that is needed is to unplug 2 cables from stock TCI & plug into adapter cable. Unhook stock vacuum sensor hose from #2 carb & hook in new vacuum tube for new sensor. TCI will work on 1983 thru 1993 Ventures & 1985 thru 2007 VMaxs. I need to know what year bike that the TCI is being used on to get correct adapter & matching program in TCI. TCI cost is $255.00 USD, this includes TCI, adapter wiring harness, new vacuum sensor, instructions & units preprogrammed by me better than what they are from Ignitech. Also includes priority shipping to US address. Paypal payment is $8.00 extra. I would rather not get paid for these as a gift to avoid paypal fees. International shipments will be charged extra cost over US priority fee of $10.50. Shipments will be insured. $5.00 increase over last time to cover insurance. Ignitech warranties TCI for 1 year. I will assist anyone with a return issue. I am only assisting in members acquiring these units. 11/10/12 - Lowered price $5.00 because I can not get the smaller vacuum sensor I was going to get to work. I will use same one as last 40 units, just a little larger physical size. I will refund $5.00 to those that have paid me already. Gary
 -
I have an issue with my '86 that I believe is either the TCI or a Pickup coil. What I'm looking for is a know good TCI to borrow to troubleshoot my bike. I dont want to necessarily buy it, but borrow it to see if my issue goes away. If someone has a good TCI from an '86 to an '89 and is willing to let me borrow it for a week, I'd love to chat with you. I'll obviously pay for shipping both ways, if someone can help me out please PM me....Thanks
-
I'm trying to get the TCI connector plugs out. They wiggle but don't want to come out. There is a tab on top of the plug, is it a latch that needs to be lifted or do I just need to pull harder?
-
(Custom).thumb.JPG.9e28ea2111ab3dc9d16dacf3023dbe7d.JPG) I just talked with the guy who bought my 84, seems like as long as the TCI (relocated on top of the air box) is cool, bike runs great. As soon as it warms up, bike runs like crap. I let him use one of my extra 1st gen TCI boxes and it acts the same but just takes longer to heat up and then start running like crap. Anybody have any experience with this? Anybody repair these PIA TCI's? Or is the new programmable box from Czechoslovakia the only real way to fix it?
I just talked with the guy who bought my 84, seems like as long as the TCI (relocated on top of the air box) is cool, bike runs great. As soon as it warms up, bike runs like crap. I let him use one of my extra 1st gen TCI boxes and it acts the same but just takes longer to heat up and then start running like crap. Anybody have any experience with this? Anybody repair these PIA TCI's? Or is the new programmable box from Czechoslovakia the only real way to fix it? -
Greetings all! My name is Jason... most folks call me "Ghostman." What a great forum and group of enthusiasts you all are! I ride with another member here named Bobby G in STAR Touring chapter #352 So about 2.5 weeks ago I ran across this absolutely sexy old 1983 Venture Royale. Odometer says 47k miles and she appears to have been kept inside for most of her life. I didn't see any leaks beneath her and she started slow but seems to run strong. Seller has the bike on consignment from the owner and it had been sitting for a few months at this point... On the 30 mile ride home we stopped for gas... she started a little slower... stopped for cracker barrel and she started slow again. I figure she needs a new battery since she was sitting for a while. Common stuff right? I fell in love on the highway ride home... what huge difference over my Vstar 1100 and Virago 250 commuter. My tailbone just doesn't like the cruiser seating style... although the Airhawk R cushion helps. After the 5 hour ride to Mrytle Beach for bike week... I was set on more comfortable long distance option than the vstar 1100. Made it home and poked on her for a few then took my gal out to feel how comfy the VR was on the road... start was slower now. Also she had stalled as I arrived home. After a few miles we stopped for drinks at a convenient store then it happened... waaa waaa waaa click. Employee tried to jump us off and no dice. Figuring the battery was needing replacement we goofed around for a while as advance charged up a new battery... walk back and get waa waaa waaa... no start. hmmmm... used a jump box... no start. Frustrated my gal and I push start the big beast and get her going so I can get us the 3 miles home. On the ride back she doesn't stall (new batt) and gets us back. I turn it off and a few minutes later I try to start her up... waaa waaa waaa click. hmmm... Well after doing gobs of research here... I poke around a little and decide to replaced the greasy black starter with a 2nd gen starter for a 99 RSV. Figuring if I was going that deep I wanted the 4 brush starter lol. While installing the starter I discover a 4 gauge battery cable has been installed already! This starter problem has been happening before I bought it and the PO was trying to fix it with tips from HERE! This also means that the slow starter has been taking its toll on the starter clutch too huh? Figuring I will upgrade that with Danos deal later in the year so It doesn't give me trouble later on. The only oring I didn't have on hand was for that bypass fitting at the bottom of the silly tstat housing. It is still currently giving me a mild drip that I am going to have to return to... After topping up the new battery she starts strong and the starter spins fast as crap! Woohoo! Although she sure doesn't like it if that battery is slightly low huh? So as I have things torn apart I start noticing a bunch of things different... seems someone had been actively upgrading this old blonde bombshell. Here is what I found stainless steel brake lines front and rear including front discs tied together rather than linked. LEDs in almost every light 4ga battery cable upgrade wolo horn... unworking (trouble shoot that later) upgraded Hella headlight kit Well as of yesterday she started and idled great... took her out for a run to shake her down. Suddenly the tach drops to zero and it feels like it is running on two cylinders! Up and down... she willl run strong for a few and then the tach drops to nothing again. After a nervous ride home going from to sluggish to suddenly rip your arms off when it catches... I grab the Ipad and head back HERE. From my searching it sounds like the heavy rain a few days back ( while she was uncovered) may have gotten some moisture in my TCI or related connections. So after I check the coil wire connection going to #2 I will tear into it and see what it up with that old TCI and its connectors. Who knows it may have dried out by today and run fine... lol. Not sure I can relocate my TCI though as my headlight ballast seems to have been mounted on top of the air box. We shall see shortly when I throw a leg over... I aim to run seafoam through her this week to help clear out some gunk from sitting... but all in all... for the $1500 I paid for her I don't mind fixing some age related issues! I will continue tuning her up with plugs, wires, check carbs diaphragms, synch carbs etc.... Once I get her wrinkles ironed out I am sure I will be happy camper and put many many more miles on her. Such a comfortable and strong ride... I have paid my $12 today because this site is extremely useful and a store house of knowledge... You all rock! So after some diligent searching I have been able to start troubleshooting this old girl and fixing her up... Thanks to all who have contributed to this forum in the past. Your past contributions continue to help us VR newbs with knowledge we need to keep these MKIs on the road... Now... time for pics yes??? She is quit the sexy old girl and seems to have been fairly well maintained... not to mention it looks like she has almost every piece of chrome available at the time. Love the chrome! lol Well that's my story and now time to see how she rides to day... Ghostman
-
I have had some members express interest in getting an Ignitech TCI. I did the first one in August 2011 and 13 members participated in it here. I have not had any issues with them reported to me. If any of the guys that got them would like to post their experience with the TCI, it may help others decide if this is for them. I have ran this TCI for 2 years now and is works perfectly. This TCI is only available for the 83-93 1st gen Ventures. The RSV's have some dash indication features in it that this module is not set up to handle. I am planning on ordering TCI's the last week of January. That is to give anyone interested in doing this time to get funds together after the holiday season. Cost is $250 including USPS Priority shipping to US addresses. I will send anywhere, but shipping will be more. Due to Paypal fees of 2.9% there will be an added $7.25 for Paypal payments. Checks or money orders would be fine. Last time I took Paypal payments as 'Personal' transactions, but Paypal is shutting some peoples accounts down for this practice. Payment will be need in advance, same as last time. Attached below is a PDF of install instructions I provided & a couple of pictures of TCI. The MAP sensor will be connected to TCI with one connector on it at the MAP sensor itself. You will get following: Pre programmed new, version 80 Ignitech module (warranty by Ignitech) A revised program that is much better than what Ignitech is supplying. Adapter harness for either a 1983-1989 Venture or a 1990-1993 Venture, plug & play & matching program in TCI. Spare terminals for the TCI end connector. Also furnished are replacement ends for the Venture harness connectors & terminals. These are only needed if your harness end connectors are corroded. A new 1 bar GM MAP sensor and wiring connector properly connected to Ignitech harness. Wires will be 24" long and heat shrink covered. The stock vacuum sensor on the bike is not desirable for use on this TCI due to it being 12v based and it is prone to failure due to its age. All documentation and original files from Ignitech along with any useful info I have collected on a CD. Also on CD will be wiring schematics & service manuals for the 1st gens. Marine grade Velcro to attach TCI & MAP sensor. Alcohol wipes to clean surfaces. Small tube of dielectric grease. 24" of 3/16" vacuum hose to connect to MAP sensor. 15 wire zip ties in 3 different sizes. All TCI's for the 1983-1989 will be tested for operation on my bike. I cannot start the 1990-1993 TCI's due to coil differences, but I can program module. An optional item is a 6' long USB to COM cable to allow the TCI to be hooked up to a laptop that does not have a Com port. This is $15.00 additional. Not needed if you are not interested in tweaking the programming of TCI. Ignitech main thread (extensive) is linked below. http://www.venturerider.org/forum/sh...ad.php?t=40414 Previous group buy thread is at link below. http://www.venturerider.org/forum/showthread.php?t=62620 If interested, post here or PM me. Gary
-
First of all I have Googled for a picture of a stock TCI. What I have seen doesn't match what I found on one of my 84 parts bikes. Is this a TCI for an 84 ? Does it work on any other years ? It has the Yamaha numbers 41V-85830-00 on it. When I Googled it it shows up as an "Obsolete control unit assembly" Just wondering.
-
On Sunday Doug(DBeck) stopped over to swap tci's in our bikes to see if that was his problem. It was, with mine in his bike it ran great. The problem is about a month ago my tach started to twitch and drop to 0 when below 1200 rpm. Since the bike still runs great I thought it was the tach, but with my tci while on his bike it did the same thing. So the question is will new diodes save it or is it a lost cause at this point? Also how long will it last before total failure? If the new diodes will fix it is there a member who works on them. Any and all input would be appreciated. Thanks, Ray
-
Does anyone can recondition stock TCI? I know that I can get an aftermarket for around $250, but I can't spend that at this time. I will be trying to clean it up and see what happens from there. Im heading to Montreal near the end osf the month and I need something done soon. Thank you.
-
Just wondering if the TCI from and 84 is interchangeable with one from an 88?
-
 Before my long trip i have accumulated some spare parts to take with me. I am taking TCI, rectifier/regulator and ignition coil (I am taking just 1 spare of the 4 that i have). Is there a way to test the regulator and ignition coil without putting it on the bike? I have already cheched the TCI on the bike. (BTW I am not bike electrical literate.)
 -
Before my long trip i have accumulated some spare parts to take with me. I am taking TCI, rectifier/regulator and ignition coil (i am taking just 1 of the 4 spares that i have). Is there a way to test the regulator and ignition coil without putting it on the bike? I have already cheched the TCI on the bike. (BTW I am not bike electrical literate.)
-
Ok Guys, Looks like I'm running on 2 cylinders.Pulled both caps off left side and no difference in idle. Left side from riders point of view. Pulled battery and box out and can see coils and TCI unit. All the screws are aimed forward so I guess you need to pull the fairing. How difficult is that. Is there anyway to pull the coils and TCI without removing it? Noticed the coils are stacked in pairs towards front, doesn't look like you can get to any of them for testing, but maybe I'm wrong. Hope so. Thanks for any light you can shed on this. Also what are the cylinder numbers and locations?
-
Well I have finally finished my Bench Tester for TCI's. I can now take in anyone's TCI to test and give a report on the results. The test will consist of the following. 1. Test each input coil circuit to see that it activates the corresponding ignition coil output transistor in the TCI. 2. Test the circuit for the kickstand switch ensuring that it deactivates the TCI. 3. Test the circuit for the pressure switch making sure that it advances/retards the timing. 4. Test to see that each ignition coil is getting the proper voltage to energize. 5. Run tests at a simulated 900 RPM up to 6000 RPM at various speeds. I can bench test the TCI without taking it apart by unsoldering the motherboard from the case. I can also test the board even if it has been taken out of the case. I will do this testing for $30 (return postage extra). Any repairs would require taking out the board and replacing components as required. Pricing will depend on what components would be required but total cost above the $30 should be under $75 (postage extra) I just completed a repair for Rich at wera90ex@aol.com and he was quite happy with the results. (He said I could use his name as a reference.) I'm attaching a picture of my test rig which outputs to my scope. The picture shows an output from a good TCI running at about 1000 RPM. It shows a test for input coil #1 with the output going to ignition coil #1. It was very hard to get a good picture but this does show the output. Any queries about this testing can be sent to me at donb@MNSi.net Best regards to all Don Brechun Windsor, ON