Search the Community
Showing results for tags 'map'.
-
 Last Updated 11/11/13 I will do my best to keep this post updated with the latest info. For now, this is only information for 83-89 (MKI) This is a continuation of a discussion that started here. The cliff notes...... A company in the Czech Republic, IgniTech, makes replacement ignition boxes and was working on one for 1st gen VR's. I had had several used TCI boxes take a dive and felt the need for a new TCI rather than installing another 20 year old used part, so I decided to pursue the IgniTech solution. After a few e-mails in broken English, I was able to provide them with the additional info they need to complete the development for a 1st gen box and I ordered one up. When ordering your own, tell them you want a TCIP4 for whatever year Yamaha Venture you have. 83-89 boxes and programming are all the same but because of the language barrier I'd be as specific as possible. It would be nice if they implemented a part # system but no such luck so far. Note: The stock 83 TCI is not the same as 84-89. But for the purpose of ordering a IgniTech TCI, they are the same. Their current pricing, including shipping and taxes is 157.14 Euro. At current exchange rates, that's $223.83 You can do the conversion here. This is what was in the shipping box. http://farm3.static.flickr.com/2534/3881510658_52c2e48a85.jpg The ignition box, depending on the programing, works on a bunch of different bikes, so the harness is to mate the box to the Venture harness. The bag of pins that match the box side of the harness are to add wires to perform functions not used on the VR or to add in a MAP sensor.....more on that later. The CD contains software that lets you alter the ignition curve and some other parameters. You plug the pigtail on the box into a serial port on your laptop to access those functions. It will run OK on the stock map but leaves something to be desired. It's substantially smaller than the stock TCI http://farm3.static.flickr.com/2493/3883265968_09565e407a.jpg Looking at the connectors, I see that they combine the 4 pick-up coil wires into 2 inputs to their box. (the brown and yellow wires) http://farm3.static.flickr.com/2608/3883367448_c210082490.jpg They had said that they would need to do this to make it work. I believe that's why they needed the order in which the pistons come to TDC from me. I also noticed the the 2 wires for the pressure sensor are not there. This means that in this configuration there is no vacuum advance like the stock TCI http://farm3.static.flickr.com/2455/3883369706_578f1be0e0.jpg It runs fairly decent without the stock pressure sensor but adding a MAP (vacuum) sensor back into the mix really wakes it up. More on that later. I had already moved my TCI to the top of the airbox so installing it was a piece of cake. I used some Scotch brand Dual Lock (part# RF9730) to mount it to the airbox cover. It's Velcro-like stuff, but has interlocking pins that create a more positive grip. http://farm3.static.flickr.com/2601/3883268106_256d897483.jpg http://farm3.static.flickr.com/2456/3882477735_b2905d9759.jpg http://farm3.static.flickr.com/2523/3882480987_ec4bba4254.jpg It clears the tank cover with no problem and doesn't push it up at all like the stock TCI did. I kinda tucked the serial connector up and out of the way. Edit on 9-30-09 updated info After putting approximately 500 miles on it, fuel mileage was off (verified) and power seemed down (seat of the pants). I found some info on their website that suggested the the pre-programmed advance curve might just be a guess on their part. So using the supplied software, I started adjusting the advance curve. It isn't possible to copy the stock TCI curve since the Ignitech box doesn't use the pressure sensor, so I basically added advance across the board until it started to ping during a 2000rpm, 3rd gear roll on. I even went so far as to stop and let it idle until the fan came on to get it as hot as possible before testing. Then I dialed it back, slowly, until it didn't ping anymore and then a touch more just to be safe. Here is the pre-programmed curve. http://farm3.static.flickr.com/2640/3897735550_cf24b7543e_o.jpg This is what I ended up with. http://farm3.static.flickr.com/2005/4506033451_d562c0f614_o.jpg Mileage and power are much improved. I rode an entire season with it tuned like that. But it still lacks some part throttle response compared to stock. At the bottom of the post is a link to this file and instructions on how to load it into your TCIP4. ______________________________________________________________________ If you're willing to invest a little more time and money, you can get an experience as good as or better than stock. Even though the bike ran pretty well with the modified map, timgray mentioned trying to put a vacuum sensor back into the system and this got me to thinking. The IgniTech box is set up for using a Throttle position senor input but not a vacuum sensor, but it seemed like with a little 'creativity' it could be made to work. After input from Tim and others, it was decided to use a GM MAP senor. (MAP = Manifold Absolute Pressure, it's basically a vacuum sensor) For reasons that you can read in the thread, I don't think using the stock vacuum sensor is the best option, but I'm still looking into that possibility. After some head scratching and trial and error, I was able to install a MAP sensor and ignition timing map that works pretty darn well. The throttle response is much improved along with MPG. I feel it runs as good or better than the stock TCI. For details about how I arrived at this configuration, you can read through the thread. Here are some additional parts you will need for the MAP sensor installation. 1- General Motors 1 Bar (non-turbo) MAP sensor and connector. http://farm5.static.flickr.com/4136/4809338814_03c324d519_t.jpg 1 - Vacuum restrictor - Dorman# 47311, NAPA# CRB 2618, Usually found in the "Help" section at auto parts stores or you can order one here. http://farm5.static.flickr.com/4114/4809350006_de61dcbc3f_t.jpg 3 butt connectors to attach your 3 - 1ft. pieces of wire to your MAP sensor connector. http://farm5.static.flickr.com/4094/4808737617_a0aa590e79_t.jpg 3 - connector pins from the bag that came with your IgniTech box. Note: at least one member didn't get any additional pins, so if you are planning on running a MAP sensor, you might want to request them from IgniTech or order some additional ones from their site. 3ft. of vacuum hose. 3/16 worked for me but it's a bit tricky since not everything you need to hook up is the same size. 3ft. of gauge wire, 3 - 1ft pieces of different colors would be best. I used a General Motors, old style (larger) MAP sensor. Sensors for newer cars are smaller, but tend to be more expensive. One from any non-turbo car will work. You'll also need the corresponding connector. Here at Rock Auto is a sensor and connector for a 9 Chevy Pickup for less than $50. Edited on 11/11/13 to update purchase links and add VPV and NAPA sensor info The original sensor link above no longer includes the connector. Here at is a link to the connector you will need. Member KISA found this MAP sensor on eBay. http://farm6.staticflickr.com/5528/10813201475_0f68ae7def.jpg It's a Finnish company. They are currently priced at $40 US, including shipping, and come with the connector you need. I'm not having an issue with the GM sensor I have but I ordered a VPV MAP sensor because it looks more compact and easier to mount on a vertical surface then the GM. It took several weeks to get since it's shipped from Finland. Now that I have it, it looks like a quality unit. It has a billet aluminum housing and rubber insulated mounting points. I don't have it on yet, it will probably be a winter project. Here is the ebay link but who knows how long that will be good. You can also order them from www.piilix.fi but it's a bit of a convoluted process. On their homepage it says "Mainly selling low cost overstock batches". And the VPV Racing website, with the help to Google Translate, says "VPV Motor Racing has stopped working", which I believe means they're out of business. So these will probably go away at some point. Your local NAPA dealer can get you the connector under part# EC14 And a MAP sensor under part#'s PS10075, 2-1961, or 3-1961 Or you can go to your local salvage yard or auto parts store. Chevy used the same one on non-turbo vehicles from the early 80's until early 2000's. A 1990 Chevy P.U. with a 350 engine is good vehicle to use when having the parts guy look it up. Thanks to timgray, Here is another source for a MAP sensor. They also have a connector w/o the pigtail that makes it so you don't have to use the butt connectors. It's a little more difficult to do but results in a cleaner look. You need to connect your new hose to the #1 or #2 cyl. sync port. On 84-89's remove the vacuum hose that goes to the stock vacuum sensor and just let it hang out of the way. On my 84 it was on the L.R. cylinder (#2) but it's my understanding that most are on the L.F. (#1). On 83's the stock vac sensor goes to a ported source on the #2 carb. You could remove the hose and cap the fitting on the carb or just leave it connected since the stock sensor won't be used anyway. On my 84 there was a hose connector/fitting a couple inches from the carb. I disconnected the hose there, put in my new restrictor, then added the new hose, routed around the carbs and behind the frame tube and and tucked the MAP sensor in just to the left of the fuel filler. http://farm5.static.flickr.com/4093/4810745879_0e346f1357_b.jpg To wire it up, connect pin A on the MAP sensor to pin 7 (ground) on the TCIP4, pin B to pin 6 (sensor voltage) and pin C to pin 17 (5v ref). Edited on 11/11/13 to include VPV Racing sensor pinout and update pinout images easier to understand For the VPV Racing sensor, The Red wire on the sensor (pin 1) goes to pin 17 on the TCI harness, Black (pin 2) to pin 6 and Blue (pin 3) to pin 7. http://farm3.staticflickr.com/2875/10814737246_e5cb6586f3_z.jpg http://farm6.staticflickr.com/5510/10814735346_0e151e2a4a.jpg http://farm3.staticflickr.com/2869/10815083995_abb0e30369.jpg This is what my finished MAP install looks like. My wires are plenty long but I wasn't sure were I was going to put the sensor when I started. Also, disregard the black wire, it was for testing purposes. I ran the vacuum hose up from the carb, behind the frame tube, to a spot just behind the airbox. http://farm7.static.flickr.com/6133/5924665643_8f4f97f009_o.png The sensor tucks in right next to the gas cap splash guard on an angle. I slid the extra wire length between the guard and the airbox. I looked at all kinds of places to mount it and brackets to hold it but this is simple and works great. Once the faux tank cover is on, it can't go anywhere and has been fine for several thousand miles now. http://farm7.static.flickr.com/6021/5924667343_e414b545f3_o.png Note: These files are for 83-89 (MKI) bikes only. Here is a link to the latest non-MAP sensor file. Use at your own risk! Here is a link to the latest file to use with a GM 1 Bar MAP sensor. Use at your own risk! Edit on 7-5-11 to clarify programming info You will need a laptop with a serial port or a USB to serial adaptor. The adaptors can be temperamental but it's worked fine for some. After clicking on one of the above links, click the "Download" button and save the file to your Desktop. To install a new map in your IgniTech TCI you have to connect a computer to the serial port on the TCIP4. The TCIP4 has to be plugged into the bike with the key on too, so a laptop works best. Insert the CD and open the file on the CD called 090715a_tcip4.exe. This is the IgniTech programming software. In the IgniTech software click the "Folder" button. Note: It seems the latest TCIP4's are being shipped with updated programming software, version 80. The file is named 100907a_tcip4A_v80.exe. http://farm6.static.flickr.com/5013/5448184931_e2cd52d823.jpg Then navigate to your Desktop and select the file you downloaded, either "Venture without MAP sensor" or "Venture with MAP sensor". Note: If you're using v80 software, You will get a warning popup. Click OK and continue. Then click Program. http://farm5.static.flickr.com/4134/5448185023_1cc707c2f8.jpg In the lower right of the software you'll get a notification saying "Program device" with a progress bar. When it's done it says something like "Program OK'' in green. I don't remember for sure. I'll try to get a screen shot of that soon. Close the program, turn off the key, disconnect the PC and go for a ride! I now have over 5000mi on my IgniTech TCIP4 without a single hiccup.
 -
My top menu shows the Member Map, but nothing for the list....
-
The address I have used for Google maps, which was setup to my hometown, has changed. Before, it came up with Johnson City in the middle and I could slide the portion on the leftside of the page out of the way. Now it comes up with a box with a lot of symbols and scrolling down will get me a map of middle Tennessee, but I can not do anything with it. Has anybody else's Google map changed? I have tried downloading several Google Map addresses and it still does the same. RandyA
-
I cannot remember how to color in the states map. I need to fill in Utah after our trip. Any help would be apreciated. I know I'm a dolt so those comments are wasted. Thanks Herb:hihi:
-

Routes from Summerville, SC to Decatur, IL with limited interstate
Guest posted a topic in Watering Hole
Greetings: Denise, my wife, and I are planning a tripp to IL in July and would like to stay off of the Interstates as much as possible, any recommendations or map sites. Thanks Mike -
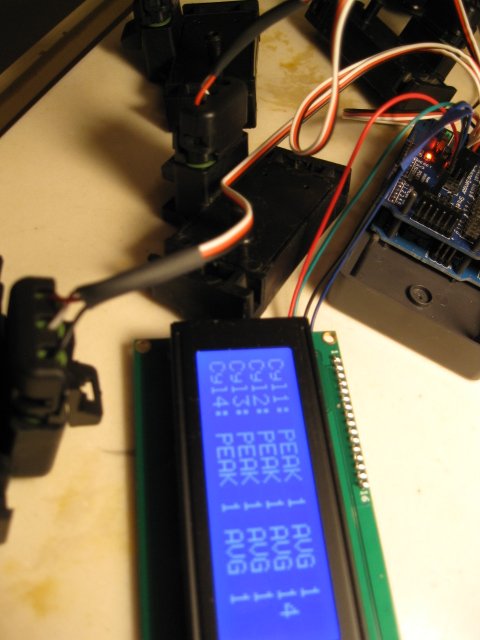
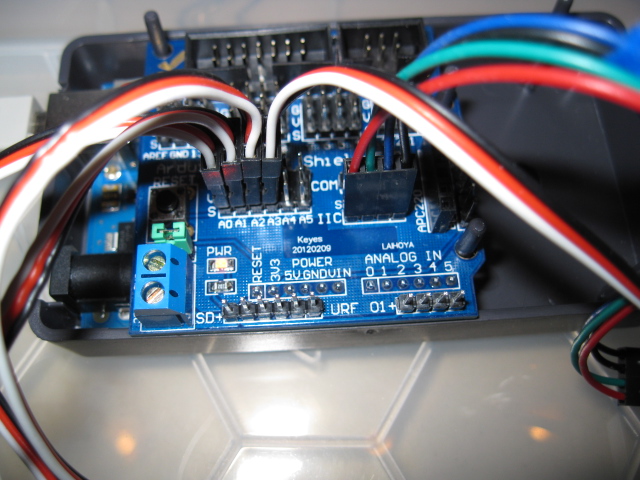
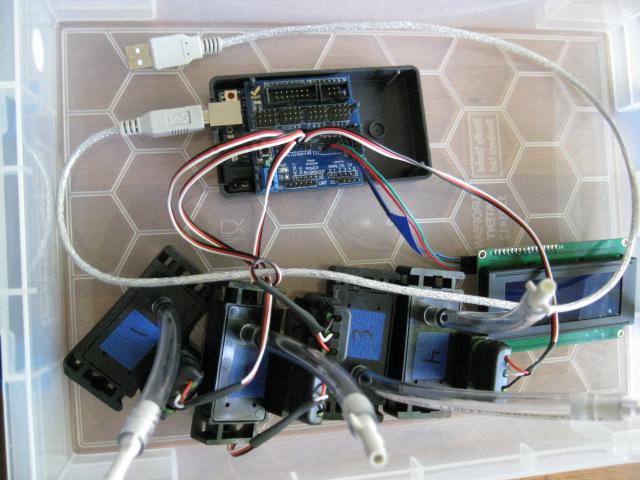
Built a digital sync and you can, too! After reading this forum about installing an aftermarket TCI and in other places about easy to use microprocessing platforms, it occurred to me that one might be able to use multiple MAP sensors to set the carb sync on a bike. I'm no expert on either motorcycles or electronics, so it had to be easy if I was going to do it. And it was easy. The hardest thing for me was figuring out what certain connectors are called and then finding a reasonable source. Point your search engine at “arduino” or go directly to this link: www.arduino.cc to get an idea for the microprocessing end of this. I used the Arduino Uno R3. You can use any, but you'll have to modify my program or write your own. In particular, if you use the kind of LCD display connection I did (IIC) it interferes with two of the ports on the board. On the Uno it's analog 4 and 5, leaving a nice grouping of 0-3 for my 4 sensors to connect. My end goal is to remove the LCD and use a wireless smartphone as the display. When I get that working then this thing could do a 6 carb bike. Goldwing heaven! (On the Leonardo board it's digital 2 and 3.) Here's the parts list. I'll edit this post to improve accuracy as I can. The hard parts (for me): MAP sensors. I found 6 old GM 1 bar MAP sensors for $40 on Ebay and was quite happy. 6 3-tower GM weather-pack housings with male connectors. Spendy with rip-off shipping. You don't really need the plastic housing. You can just solder wires to loose male connectors, and maybe use some heat shrink to tidy up. Save big $$. The rest: Arduino Uno R3. $23. Arduino IDE software (free download). Sensor shield (optional - makes connections easier). $10. LCD IIC display 4x20. $7. 4 count 3-wire board connectors with one end removed and soldered to the weather-packs. $5. 1 count 4-wire board connector to attach the LCD with the +/- polarity rewired. $2. 2 feet 1/4” hose. Cut into 6” lengths and attached to the MAPs. 10 feet 3/16” hose. 4 count ¼ to 3/16 connectors. $5. 4 count caps for the 3/16 hose. $3. The Arduino IDE includes sample programs. I modified one that keeps a running average for input smoothing to load arrays of readings for each cylinder and calculate the peak and average readings. I'm an old software guy but never something like this and never in C. But those old skills came in handy and I wasn't shy about this part. The Arduino doesn't report overflow errors at compile or run time, so I had to do a little digging to debug odd results. For example, if I set the readings array to more than 180, the LCD stopped working. What I figured out was that the sensitivity scale of the readings multiplied by the number of readings had to be less than the max integer value (32k) or it would overflow. If the array got too big the RAM would overflow. I could change to long integers or floating point math I suppose. I could change to a chip or board with more memory because there is a memory size limitation. My rainy weather project will be to go back through and clean up the code. Basically, I just hacked my way forward and didn't worry about the elegance of the code like I did when I was working in software. I didn't know how the compiler or board really worked so why worry about style. The key thing I did was code a self-calibration step. The first time through loading the reading array (with the bike not running), it takes an average of the average of all the MAPS and uses that to establish a calibration adjustment to be applied to all subsequent readings. This way all the MAP sensor circuits are normed to a constant value. It could be normed to zero, but then negative numbers would be more common. To test this live, I hooked up all 4 MAP sensors in turn to the same cylinder on a running bike to see if it would return a consistent value. It did. The nice thing is that build precision is less of a factor which is great for me. It just works with what you have for MAP sensors, wire harness and soldering skills. Assembly is just plugging the shield into the top of the Uno, then plugging in the LCD and the 4 MAP sensors. For power I plugged in a cigarette adapter into my battery maintainer plug, plugged a USB converter into that, and ran a USB cable to the Uno. There are other ways but I had all this handy. The software was already loaded; you just plug the USB into the computer running the IDE and upload. At power up it does the calibration and when you hit the reset button. Nothing to lose by trying. I hooked up 4 hoses to the bike and capped them. Then I tested #1 against all 4 sensors. It read the same, about 159 peak. Then I hooked all 4 up. The bike was in good sync, which I knew because it runs good. But I tweaked all 3 sync adjustments to get them the same. Everything ended up peaking at 158-159. Then I capped the hoses and tested #3 against all 4 sensors. All the same. After that I took it for a ride. Seemed smoother but it was running great already. The numbers don't really mean anything. They depend on how 'sensitive' the software is set. The MAP sensors run at 5v and drop the signal voltage from that as vacuum increases. The UNO board reads an analog voltage and returns a range of integer values. The rest is software. One nice thing - you can crack the throttle without worries. In fact, since you can compare manifold pressure at higher RPMs you may get some diagnostic value if you've got pin holes in a diaphragm or a sticky slide. Hopefully, some engine experts will weigh in on that notion or with better ideas. Things to consider. If you can't find cheap MAP sensors, don't bother. They should all be the same or similar, but the calibration step allows for variances. Try to get the weather-pack connectors included because you'll go broke if you have to buy a small quantity at full retail. If anyone has a better source please let me know. Late 80's GM cars in a junkyard may be a good place to start. There are also less expensive vacuum sensors available for non-automotive applications that are not as rugged. Everything you need can be bought online if you know what to call it. The board connector names still elude me. I just bought stuff until I had something that worked. I'll post the code in a subsequent post. I will be glad for suggestions. I will be especially interested in a) how to build a cool enclosure and b) thoughts about better analysis techniques. I would never post it anywhere else, because the purists would flame you. But this forum is different. Best $12 ever! Lots of pix. If there's a better way to post them I don't know it. Tom

-
How do I add states to the here I traveled Map.
-
I am planning a 'sickle trip for next summer. We plan to ride from Illinois to Niagara area then to Adirondacks, Vermont, Quebec, Maine, New Brunswick, New Hampshire, Massachusetts, Rhode Island, Connecticut, New Jersey, Delaware, Pennsylvania, etc. and back home. About 3500 miles. We plan to camp every night except if it is raining or very cold, then Mom and Pop motels are preferred. I have obtained state highway maps from all the states we will be riding through except for New York. I've spent considerable time online trying to get an official state highway map from New York, but the links to "obtain a state highway map" return a 404 error. I sent away to the "I Love New York, Division of Tourism" in Albany via snail mail, but the letter returned as "not deliverable as addressed" even though that address was on their website. Researching the New York governmental website was a waste of time; kept referring me to same dead link. Registered with the I Love Yew York website and requested travel information, thinking that New York, like all the other states I had requested tourism information, would send along a state highway map, but no. I received a fifty page glossy travel guide, with nary a map. So my question/favor to those New York residents: would you obtain a New York state highway/road map and mail it to me? Does NY offer free road maps at their border Welcome Centers? Does New York have Welcome Centers? Thanks.
-
 I have enough commitment and 6 payments already in hand to definitely proceed with the Ignitech module group purchase. Original thread with some more details linked below. Please note this thread has reference to a used MAP sensor which is not going to be the case (will include new MAP sensor) & price adjusted to reflect new unit. http://www.venturerider.org/forum/showthread.php?t=62223 I am doing this in conjunction with the VMaxForum.net group. I will order the TCI's Sunday night, so I need commitment by then. You will get following: Pre programmed new, version 80 Ignitech module (warranty by Ignitech) A revised program that is much better than what Ignitech is supplying. Adapter harness for either a 1983-1989 Venture or a 1990-1993 Venture, plug & play & matching program in TCI. A new 1 bar GM MAP sensor and wiring connector properly connected to Ignitech harness. All documentation and original files from Ignitech along with any useful info I have collected on a CD. Marine grade velcro to attach TCI & MAP sensor. Small tube of dielectric grease. I am trying to find some 3/16" vacuum hose, but is rare apparently, at least locally. All TCI's for the 1983-1989 will be tested on my bike. I cannot start the 1990-1993 TCI's due to coil differences, but I can program module. Cost is $248 including USPS Priority shipping to US addresses. I will send anywhere, but shipping will be more. Ignitech also has a series of connectors that are a match for some on the Ventures and if any are wanted I will get them along with TCI. Ignitech main thread (extensive) is linked below. http://www.venturerider.org/forum/showthread.php?t=40414 I don't know if this group buy will be done again, due to the number of units I need to get at a time to make it feasible. Gary
 -
I have had some members express interest in getting an Ignitech TCI. I did the first one in August 2011 and 13 members participated in it here. I have not had any issues with them reported to me. If any of the guys that got them would like to post their experience with the TCI, it may help others decide if this is for them. I have ran this TCI for 2 years now and is works perfectly. This TCI is only available for the 83-93 1st gen Ventures. The RSV's have some dash indication features in it that this module is not set up to handle. I am planning on ordering TCI's the last week of January. That is to give anyone interested in doing this time to get funds together after the holiday season. Cost is $250 including USPS Priority shipping to US addresses. I will send anywhere, but shipping will be more. Due to Paypal fees of 2.9% there will be an added $7.25 for Paypal payments. Checks or money orders would be fine. Last time I took Paypal payments as 'Personal' transactions, but Paypal is shutting some peoples accounts down for this practice. Payment will be need in advance, same as last time. Attached below is a PDF of install instructions I provided & a couple of pictures of TCI. The MAP sensor will be connected to TCI with one connector on it at the MAP sensor itself. You will get following: Pre programmed new, version 80 Ignitech module (warranty by Ignitech) A revised program that is much better than what Ignitech is supplying. Adapter harness for either a 1983-1989 Venture or a 1990-1993 Venture, plug & play & matching program in TCI. Spare terminals for the TCI end connector. Also furnished are replacement ends for the Venture harness connectors & terminals. These are only needed if your harness end connectors are corroded. A new 1 bar GM MAP sensor and wiring connector properly connected to Ignitech harness. Wires will be 24" long and heat shrink covered. The stock vacuum sensor on the bike is not desirable for use on this TCI due to it being 12v based and it is prone to failure due to its age. All documentation and original files from Ignitech along with any useful info I have collected on a CD. Also on CD will be wiring schematics & service manuals for the 1st gens. Marine grade Velcro to attach TCI & MAP sensor. Alcohol wipes to clean surfaces. Small tube of dielectric grease. 24" of 3/16" vacuum hose to connect to MAP sensor. 15 wire zip ties in 3 different sizes. All TCI's for the 1983-1989 will be tested for operation on my bike. I cannot start the 1990-1993 TCI's due to coil differences, but I can program module. An optional item is a 6' long USB to COM cable to allow the TCI to be hooked up to a laptop that does not have a Com port. This is $15.00 additional. Not needed if you are not interested in tweaking the programming of TCI. Ignitech main thread (extensive) is linked below. http://www.venturerider.org/forum/sh...ad.php?t=40414 Previous group buy thread is at link below. http://www.venturerider.org/forum/showthread.php?t=62620 If interested, post here or PM me. Gary
-
How do you insert the map into your signiture?
-
I bought my 2001 Venture, and it came with a Hopnel Tuxedo tank bib; however the quicklock pouch was not included... I have searched the interwebs and do not show a pouch being sold separately other than a map pouch. Figured I'd appeal to the masses here to see if anyone has an extra( yeah I know) laying around.. Thanks, Rod
-
Leaving home at 2 am for a 6 am start in Brady, TX. Should cover around 600 miles before the finish in Brady. Live Map with 10 minute position updates is here: http://spotwalla.com/tripViewer.php?id=461d4f9876a08079a Map goes live tonight and will stop when I get home on Sunday. There are 40+ riders taking part this year, this is my first time.
-
Ok. What am I doing wrong? I tried to put a Venture sighting on the map yesterday and could not get it to work. Any tips?
-
New map for Rednecks only.:rotf: http://i1132.photobucket.com/albums/m580/ggrabose/vhg2j55zg3_MapToSee.jpg
-
Seem to remember seeing a map of our active members somewhere...??? Found the: " Venture sightings" map. ????????????
-
I've got a Garmin 450 that came with the bike I bought it works great, actually the speedometer is far more accurate than the one on the bike and much easier to read, but the map is WAY out of date. Garmin wants like $75 to update the map online. I think at that price I can spend a little more and just buy a new GPS . Any one know if there's a way to go online and maybe download something from google , mapquest or anything???
-
I wondering if anyone has gone through this experience yet. I had to send my Zumo 550 away for replacement a week ago as it decided to stop working after 3 years. The screen touch went crazy. I should have the new refurbished one in the next week. I had purchased a lifetime map subscription last year. My question is whether the map update will transfer to my new Zumo. Do I have to call Garmin to make it happen? I also have the XM radio. I am assuming it will work no problem as the antenna/receiver is a seperate piece. Any feedback is appreciated. Thanks JR
-
Saw this today on TigerDirect for $70. And that price includes free lifetime map updates, which normally cost more alone than this price. Good starter unit anyway: http://biz.tigerdirect.com/applications/SearchTools/item-details.asp?EdpNo=1583005
-
Have I just now noticed the blue google chrome location map use symbol under the name display ? Or has it been there for ever ? I like it and it is very neat. You just click on it and there is the map location. Thanks Freebird.... Fuzzy
-
I'm not sure where to post this. How do you get the little map at the end of the posts (of where you've been?) Thanks in advance
-
Attached is a PDF format map showing route to Quaker Steak & Lube restaurant from Freebird's. I will have some printed out available at Don's house Friday. Link to thread below, this is a pre-MD dinner & table dancing extravaganza Friday night. http://www.venturerider.org/forum/showthread.php?t=58761 Rumor is there will be a speech by MarCarl !!! Gary http://i1007.photobucket.com/albums/af193/gdingy101/Minitabledancing.jpg
-
again. just had the same last week. This one looks even uglier than last week. The big radar map shows it stretching from New Orleans to Pittsburg. I raced the front edge of it home an hour ago and got hit with a few drops of rain and some wind gusts. Looks like all H is going to break out from the weather map. probably thats whats happening from Huntsville to Nashville right now. Got the bikes under the carport and a blanket thrown over the car.
-
has anyone ever used this site? It shows that my Garmin 765T 2011 map update is available from here.
-
I went to the website and saved my picture of the states that I've rode. Then went to userCP and added it to my signature. It shows the map uploaded and I see the pic in "your current signature picture" but the map isn't showing in my signatures when I post...Any suggestions about what I'm doing wrong? Thanks