Search the Community
Showing results for tags 'wire'.
-
Hey folks. I'm sorry if this has been asked previously and I can't find it - - - I need to wire up a couple of LED daylight running lights (DRLs) that I've mounted to the front of my Second Gen RSV. Obviously need to get at the low beam wire of the headlamp. Can somebody please tell me the quickest way of accessing same at the headlamp. I've printed out a wiring diagram for the bike, and from what I see I need the green wire. The owner's manual that came with the bike is next-to-useless. Tells me how to change a headlamp bulb, but that's about all. Hope y'all have a great 2015. Riding weather down-under is perfect. Warm days and 14 hours of daylight - gotta love that!
-
 I need a source (auto parts store, amazon, etc) and a part number for a LED Flasher for my 1st gen bike. Do I need a 2 wire or 3 wire flasher? Where is the stock flasher located in the fairing? I read about a dual component flasher and a starter circuit unit that's combined into ONE unit together; then I read of a individual flasher; I'm just a little confused. Does my bike have the dual component or the single flasher? Thanks in advance.
 -
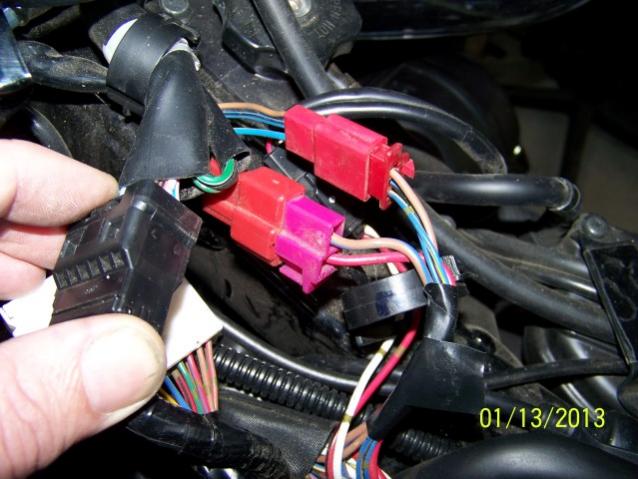
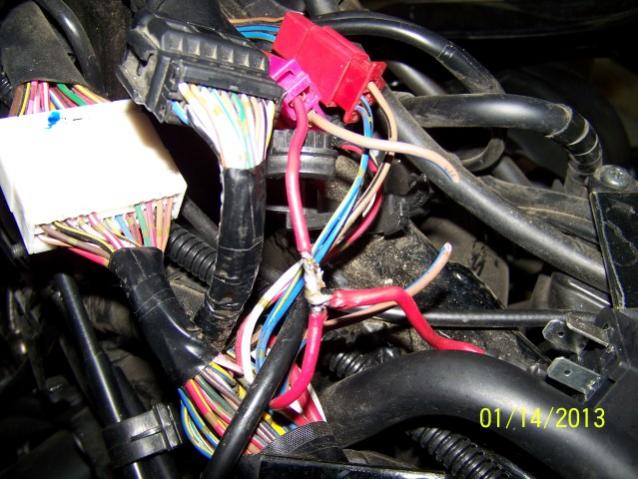
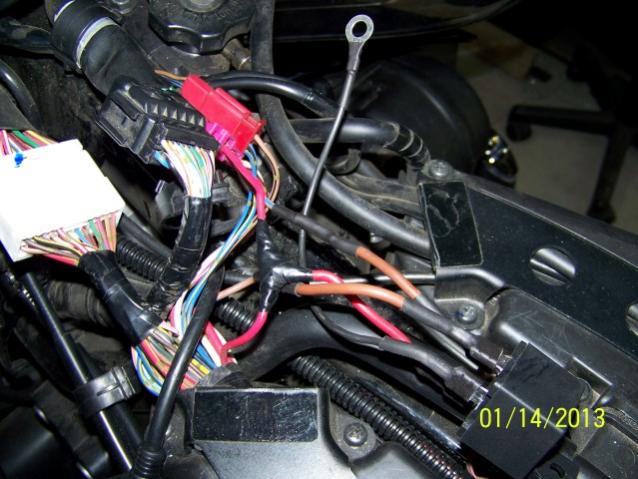
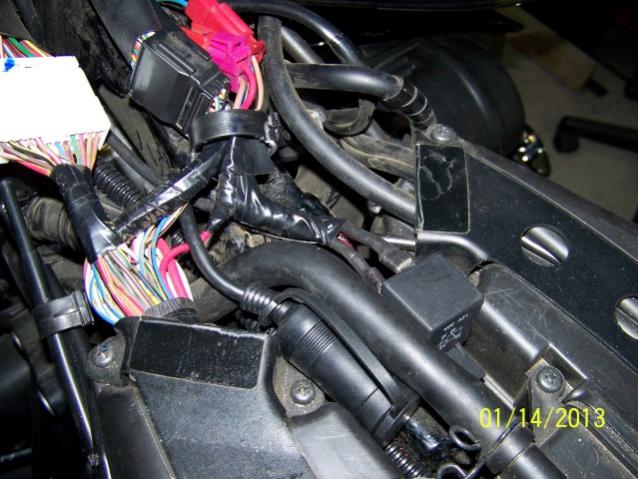
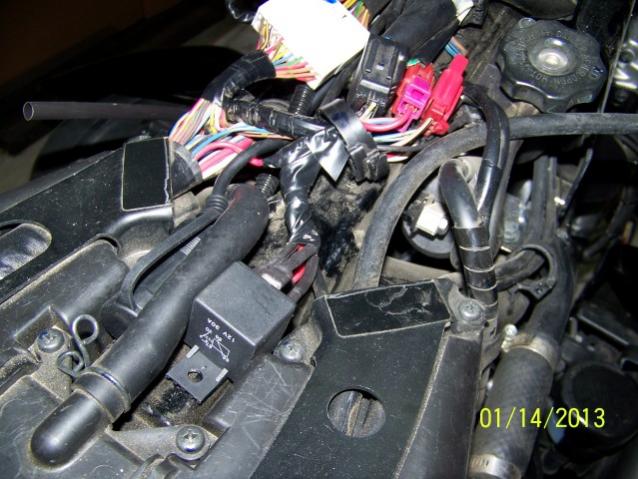
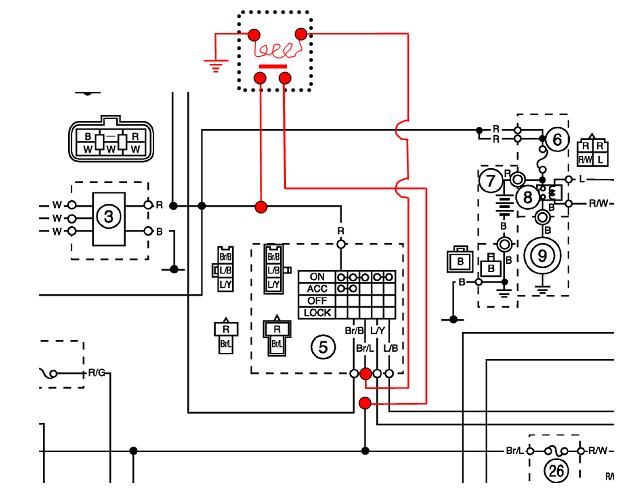
 There's been several times members here have by passed their ignition switch due to either switch failures or as a preventive to ward off failures. Today I decided to also do that to my bike and at the same time do a write up on it per a recent posting on this topic. For those who wonder why this is needed or desired the ignition switch has the majority of the power going thru one wire to feed lights and ignition requirements. Needless to say the switches contacts take a beating over time caused by overheating & normal wear & tear. The accessory part of the switch seems to never have this type of failure so this does lend credence to overloading on the one line being feed. By adding in a common 30 amp auto relay to that part of the circuit we can take the majority of the power off the switch before it gets there and route it directly to the line the switch powers, thus saving the switch. You'll need a couple of short 14 gauge wires, push on terminals, shrink wrap, and a 30 amp auto relay to do the job plus a soldering gun and wire stripper. To start you need to remove the drivers seat and gas tank. The gas tank is held on with a single bolt on the end by the seat plus two allen head bolts on the sides up front. Remove the cover by the ignition/gas cap. Disconnect the overflow vent hose and the fuel sender wires. The tank can be lifted off and set down out of the way now. Disconnect the (-) negative cable from the battery as you'll have one wire live otherwise. On top of the engine locate the wire harness coming from the ignition switch. There will be two red plug connectors going through a holder. Pull those out. The one you'll be working on will be the 2 wire one with a pink plug on one end disconnect that plug. Picture 1 shows it well. The next step is to splice a wire to the red wire with 14 gauge leaving it long enough to work with. Refer to picture 2 Cut the brown /blue wire leaving enough at the plug side to work with. Add a short length to both ends of the cut wire. Using a butt connector, soldered, and covered with shrink tubing will give a solid connection as well as protection . Add a female spade terminal to both of those ends. Do the same for the red wire spliced earlier too. Cover with shrink tubing after soldering them. Make a ground wire with a eyelet end on one end and a female terminal on the other. See picture 3. I used the closest bolt holding the radiator fill cap in place to ground the eyelet. The opposite end will attach to the relay. Connect the wires to the relay follows: spliced Red wire fastens to #30 terminal of the relay the brown /blue wire from the switch attaches to #86 terminal on the relay the brown /blue wire going to the harness connects to#87 terminal on the relay the gounding wire attaches to the #85 terminal on the relay. Wrap the wires up with tape and tuck them back into the harness holder. Pics 4 & 5 show the completed job with the relay as tucked in on top of the engine. Note: While this mod will prolong the life of the switch a long time there's always the posibilty that the switch can still fail through normal wear. If it does you can simply connect together the red wire and the brown/blue wire on the harness side to get you home. Some folks take this a step further and add a toggle switch between the two wires. I don't think it's neccassary on newer bikes but if you're experincing any ignition troubles now then I would certainly see the advatage of adding a toggle switch where you can get to it without having to remove the tank.
-
was on my first night ride. going down the highway thought it was cutting out but wasant sure still had plenty of power. then was town driving stopped at the busiest intersection would not rev up then all power went dead. pushed it to the side nothing. pushed into a church parking lot pulled cover off. reached down to left side of battery. lights came back on. and would start. rode one block same thing. so every time it would start cutting out would reach under left handle bar wiggle wire and it would straighten out made it home doing this. any ideas. not the fuse box or battery cables. wire to computer above the area. :think: why why
-
I started that thread a while back on "The things you find" and it just kept going the farther I got into the New/Used HF Tag-Along I bought a while back. The PO had to be one creative bugger to get the kit as far as he did. But then he did get rid of it before going anywhere and I got a pretty good idea of why he did now. The wiring..... geesh! I think he used a drill and razor wire to fish the harness through the frame. I couldn't go 2 feet of wire without finding a chewed up or broken wire patched with ScotchLocks with the bare ends hanging out inside the frame. In the end I had to replace the entire trailer harness and considering the mods to the taillight housings he did, I broke down and bought the HF LED kit and installed it. At least the LEO's won't be shaking my tree for a license plate light being out. That sucker lights up with the LED's. But after installing the new harness, shielded with harness wrap, and soldering and shrink wrapping every connection from the 5/4 converter all the way to the tail lights I'm sure it will serve me well for quite a while. Still need to tuck in some rubber grommets where the harness goes through the frame but that's a quick fix. Got the 5/4 wire converter tucked in by the frame under the seat. Piece of cake hooking that up. I hooked the side markers and rear tails to the marker lights on my switch panel. That way I can kick the lights on all the way around without the key in the bike. Had one moment there where I was ready to panic because the four ways weren't working until I remembered I hadn't hooked up the brake light wire yet. Whew! I don't like loose wires on my bike so I added a plug holder on the rear light bar for easy access. Nice clean connection. I got the rubber hose installed on the rear spring bolts. New zerks are in. Coupler has been bent back to the original shape and washers installed. One handed hookup now. Siliconed in the frame plugs, or at least three of them. Missing one so that search is on. Cleaned off the Vaseline that HF uses off the wheel bearings and packed them with High Temp and set the bearings. Got my Nebraska trailer plate mounted. Note the size of that thing. I never noticed the bike plates here before but that sucker is gonna cause some serious drag. Suppose I should mount another plate on the other side so it don't lean. Going to make some mini mudflaps for the trailer tires. Need somewhere to mount some of those lil chrome nekked ladies. Well, looking at that pic maybe I won't need mudflaps with that big ol plate hanging there. My friend (The Piper) that pinstriped my helmet last year stopped by and was eyeballing the trailer. I know what he's thinking......He was grinning. So I miss anything? I'm going to have to go out and drag it around now and check out. Looks like it's gonna rain. Guess I'll find out how water proof it is. Mike
-
Going to try this again. Anybody have an old , bad, removed, ignition coil from a 2nd gen laying around ?? If you replaced a coil, could you pull the plug wire out of the " old " ignition coil, and take a photo, or let me know, if the plug wire can be " Re-Installed " after you pull out the old one ?? ie: is there a pointed SCREW inside the hole the same as on the 1st Gen Ignition coils ??? I'm trying to figure out if I can replace the plug wire on these coils, but do not want to destroy a good one in the process. Any help here, appreciated, thanks.
-
Ok, we all know that on 1st Gen coils, you can eaisly remove the plug wire from the coil, and the spark plug cap. On the 2nd gen coils. the plug wire appears to " NOT " be removable, ( or replaceable ) from the coil end, of the plug wire. SO-- I was looking at my right front Ignition Coil on my 08, yesterday, and where the plug wire go's into the Coil, it appears as if there is a " Sealant " applied around the wire where it mounts into the coil. What I am getting at here, is I would like to replace the Plug Wires, with some type of " Shielded Spark Plug Wires " . Anyway, so I am wondering if maby I Could remove , and replace the wires from these coils. Does anybody, have a Used ( ie: removed and replaced coil ) laying around in their garage. If So, any chance I could get you to take the old coil, and pull " out " the plug wire, and take some close Ups, of what the hole looks like, and what is inside the hole after you pull out ( ie: remove ) the old plug wire. I hope this all makes some sence, any way thanks to anybody who might be able to accomplish this, I'm working on " Reduceing " Ignition Noise on the AM radio I have installed on my RSTD. And installing Shielded Plug wires might be of some help. ---------------------------------- Next Qustion : ??? Just curious, has anybody, Installed the 1st Gen Ignition Coils, on a 2nd Gen Bike ???? this would obviously solve the plug wire problem, if the coils will work on the 2nd gen bike . I make this point, because it very easy to replace wires on the 1st gen coils, and lots of them avialable, I allready have two of them, and would only have to find 2 more to do the job, if this is possible. ?? --------------------
-
Always cracks me up. Well, as long as it's not costing me a bunch of money to make right. I just bought a dang near new HF Tag-A-Long right. I got it cheap enough. I knew when I looked at it I had a few things to deal with. The coupler was crushed into the tongue as the PO had not used washers to shim the couple and it has pulled in so tight the latch for the ball would not move without being pried down with a pry bar. I had to remove the hitch and the latch assembly to get it over the ball when I hooked up. Got that corrected today. One handed hookup now. When saw the trailer the first time I knew something was not right with the wiring. I'm no whiz kid when it comes to electrical but I was pretty sure there were too many wires coming into, through the frame and into the tailight housings. I was right. More than needed. There was an extra wire with a female crimp on connector that ran forward with the 4 wire trailer plug. My best guess at first glance was maybe an extra ground wire. I chased it today and it ran through the frame and was spliced and split into both taillight housings. Holes had been drilled and the wires ran inside. I pulled the lens off both sides and it all made sense. And extra 1156 bulb had been installed in both housings. Not to mention one of the 1156 bulbs had come apart and was laying in the bottom. I hooked up a fused jumper wire and powered the extra wire from the front. Blew da fuse. Pulled the wire and it was cut into where the wire ran thought the holes in the frame with zero protection. Nice. So I can kind of understand the thinking here...... maybe the PO just wanted a couple running lights at the rear. Went the hard way about it in my mind. Now when he hits his lights he had (2) 1157's, (2) 1156's and (4) 194 wedge bulbs lit up. Then add the brake lights and the voltmeter has to be taking a nose dive into the red. I'm seeing why the PO may have been happy to trade off the damn near new Tag-A-Long and be done with it. Can't hook it up, throwing sparks and some lights had quit working and the battery was probably taking a beating. I got to admit, I'm enjoying the old "His loss, my gain" moment. Oh, and I checked the zerks and one was not only missing but a plug had been installed in the hole. Nice touch. Mike
-
I'm removing my cassette deck and putting in a mp3 jack on my 87vr. I found a few threads about this but am still a little confused. I understand jumping pins 1 and 7 to bypass the deck. Which ones do I wire in the switch and jack to? Does anyone make something I can just plug into the old cassette wire and go? Any help would be greatly appreciated. I'm mechanical but no electrician, so please be as specific as possible.
-
It does happen, well it seems to anyways,,, and it's not the first time she went and did this,,,can't blame me really, I mean I was trying everything and I really wasn't looking forward to do any straining or hard work. Ya I know, I should have been more cautious out there in the farmers' field doing a slow turn, but crap happens and it happened again yesterday. And then the smoke started coming out of the wires,,, oh no, that means I might have to walk home,,, not a good thing either,,, but hey, all is well that ends well,,, right???? Now the story. Went for a nice ride yesterday to Wainfleet ONT to enjoy the times of yesteryear. Lots to see and do. Followed our fearless leader over hill and vale, around curves and corners, dodged pot holes and road kill and finally ended up at our destination, but alas there was limited parking for kickstand bikes, but if we did a u-turn in a field we could park on some gravel... good thought,,,,, until,,,,,,,,,,,,, well that's where it happened, doing a slow turn, unable to give much throttle, through pasture, the front wheel decided to head further left than it was designed and Scamper did a slow roll over. All seemed to be ok, except for Marca who decided not to stay put,(can't say as I blame her) and put her foot out and promptly fell over and hurt her shoulder, (it's ok now). She says she knows better, we have been down before and she stayed put with absolutely no damage at all,,, interesting to see that,,,, bike on it's side and Marca sitting there yet like it's going somewhere, but not this time. Got help from Wayne and Steve to set Scamper back up and view any damage. Not much really, a broken air wing, a mirror facing the wrong way, hiway peg not in the right spot and just a little smoke coming out of a wire,,, life was good, could have been serious. Turns out, the smoke was coming out of the running light wire, right where it attached to the fuse block,,,was a loose connection, but rode home with the 4 ways on until I could get it fixed,,,, ready to ride again,,,, 10 am Monday. Freebird will want to keep me as a member,,, I pay well.
-
 Hope someone can help with this issue. Two weeks ago my speedometer and all other digital gages quit too. Took apart and checked for power. I noticed that if I disconnected the r/g continuous 12 volt power source wire and then turned on ignition key, all gages would work. And if I reconnected the r/g wire all was fine. But as soon as I turn off key and turn on again with r/g wire connected my gages will not work. Disconnect and turn on key all is fine. So I thought I would connect a toggle switch on the 12v r/g wire and test out on the road. Ok now hear is where the big problem is. I decided to go to gas station to make sure gas gage would work. Started down the road and ran thru first and second gears no problem. Started ramping up in third and when I got to approx. 45 mph the motor just fell on its face. It acted like u just cut off the power. Forth and fifth forget it it will not hardly run at all. Anything over 45 from third gear on will not run. The bike will run fine up to as fast as 65mph in second and not flinch. Shift to third and it will lay down til u get back down to about 40mph and u can cruise there and slower all day long. BTY. Before I started messing with the Speedometer the bike ran like a scalded dog,
 -
 Just replaced the battery in my 86 VR, I noticed the battery that came out of the bike had a wire coming out of the top of the battery, what does this wire do? The new battery has no wire or a hole for the old wire to go into, do I need to drill a hole?Thanks.
 -
 I have nothing displaying on my cmu. Not even when turning ignition on, when it should go thru each item. It was working a month or two ago, but now nothing. Is there a common power wire for the display? The display lights up with the dash lights, but displays nothing else. While putting the bike back together, I did put a small gauge black ground wire on the positive battery terminal. (lesson learned: put down the tools when talking to your 8 year old daughter) The wire melted down, and i followed it to the main negative cable. It was in a factory crimp with a few other grounds. After that, I have had to run new wires on the taillights and brake lights on the positive side, not the ground. No fuses blew, and i don't see any other fried wires. Maybe some damaged wires that I can't see in the harness some where? Time for a harness? Coincidence? sun spots? UFO's?? :confused24:
 -
Would anyone happen to know the wire color and were it might be for the Electronic Speedo for the Second Gen. ? Adding a gear indicator soon. just for another project. I know it doesn't have a relay bit thats OK ! Thanks, Jeff
-
 I started up the bike and started pulling off the spark plug wires one at a time. The ideal change on all them but right rear. I pull the plug and put a new one in and put the plug wire back on and pulled back of the ideal didnt change like the others. i pulled the wire back off and i could hear it fireing and as i was pulling the wire out I could see the arc and it shock me. any ideas. my #843-452-8615 my name is Brantley
 -
I am installing my new OEM passing lights on my '07 tomorrow. There is a tremendous amount of information here on relays, installation, etc. As usual, the fine folks at VR.org make seemingly tough jobs easy. I think I have all the answers I need except one... Dingy posted a great relays101 document here: http://www.venturerider.org/forum/showthread.php?t=43150 This document shows the diagram attached. I want to make sure I understand where I am going with terminal 85. I am going to run from 85 to my toggle switch and from my switch, I will tap into the wire of my choice detailed in the installation instruction chart attached. In my case, I want them on all the time so I will go from 85, to switch to Red/Yellow wire, correct? Thanks all!
-
I'm uncertain if the throttle wire should go on the outside or inside of this axle. [ATTACH]69540[/ATTACH]
-
 I'm considering rewining my stator since it does not seem too complicated. I have examined a XZ550 (Vision) stator that have the same number of coils (18) but is smaller. The copper wire has a diameter of 1.1 mm. Does the XVZ have the same wire size? Here in Europe I can't find high output stators. Probably because the XVZ did not sell in great number here. In UK the Electex company sells replacement stators for 90 £ (140 $) including VAT: http://www.electrexworld.co.uk/cgi-bin/sh000001.pl?REFPAGE=http%3a%2f%2fwww%2eelectrexworld%2eco%2euk%2facatalog%2fOnline_Catalogue_Stator_Kits_424%2ehtml&WD=xvz&PN=G08%2ehtml%23aG8#aG8e They also have RR that seems up to date; http://www.electrexworld.co.uk/cgi-bin/sh000001.pl?REFPAGE=http%3a%2f%2fwww%2eelectrexworld%2eco%2euk%2facatalog%2fOnline_Catalogue_Regulator_Rectifier_206%2ehtml&WD=xvz12&PN=RR36%2ehtml%23aRR36#aRR36 I have read about the cooling kit but it's perhaps a bit overkill here in Sweden (not being so very hot...)? So back to my first question; the size of the copper wire on the oem stator, please!
 -
Did this on the Wing so posting here ... The dilemma I was facing was how to put together a nice, clean, somewhat out of the way wiring connection for the trailer. Different hitches might present a different way of doing this but the design of the Rivco hitch doesn't offer much for possibilities. So, I figured I could install a "flush mount" type round plug underneath the trunk, next to the side bag and trunk release levers. As I had already installed a trailer wiring isolator kit designed for plug-and-play at the back of the bike, it was just a matter of taping into the wiring coming out of the isolator. Here's pics of my install... Product Used... [ATTACH]68744[/ATTACH] Backing Plate... [ATTACH]68745[/ATTACH] Wire Routing... [ATTACH]68746[/ATTACH] Marking for the holes using the metal template... [ATTACH]68747[/ATTACH] All cutout and ready for the plug... [ATTACH]68748[/ATTACH] The plug from underside of trunk bellypan... [ATTACH]68749[/ATTACH] The inside of the plug waiting for wires... [ATTACH]68750[/ATTACH] All wired up (had to use same color wire coz I didn't have others but that's no problem) [ATTACH]68751[/ATTACH] Finished Product ... male connector yet to wire up. [ATTACH]68752[/ATTACH]
-
 I removed the teardrop passing light / turn signals off of my RSTD. The LED's did not seem to attract the other drivers attention well enough and I had multiple situations of people cutting in front of me. Scary. So I got the Yamaha passing lights and put those on. I had already installed a relay, seperate small fuse panel, etc. so the passing lights are working. I must have accidently touched a wire to ground and blew the headlight fuse. I haven't replaced that yet, but the reason I blew the fuse was I was pecking around for the wire for the parking lights in the front. I have the turn signal part of the bulb wired and they work. I thought the black / white wire with the dual connection in the headlight bucket was the parking light wire. But I got nothing out of it. Is there a fuse panel other than the one behind the left side cover? Do I have the wrong wire?
 -
 I was adding some acessories and needed to move some wires around near the battery, when this one broke off. The wire comes from the accessory side of the OEM fuse box and goes into what looks like and EOM retangular male/female plug and the single wire is white with a red stripe. The broken piece fell down and I've not been able to get it out yet. The wire from the Accessory side of the fuse box to the connector was spliced and a couple of what looked like a 2 inline resistors were added. the thin wire that connected the two inline resistor broke. The added resistor could not be OEM for it was crimped on. Anyone have any ideas as to why these 2 Resistors were added. And then maybe I don't need it?
 -
Got this geared motor at work today from one of the other engineer's. There may be a couple of more available. I don't know what it was intended for. 12V motor, not a servo motor. Only 2 wire input. What can this motor be made to do on a Venture. Really, you know me, I may just try the best ideas. Gary
-
My '83 Royale with cruise fried the plunger on the brake light switch. I mistakenly ordered the two wire switch, when,of course, I NEED the four wire switch. Given that the four wire switch is several times the cost of the two wire switch, is there some way to use the two wires for the brake light, and do something else with the other two wires to fool the cruise into working? Possibly tying them together to complete the circuit, or applying 12V to one or the other? Any help greatly appreciated!
-
1984 ( old goats bike )
chuck6121 posted a topic in Venture and Venture Royale Tech Talk ('83 - '93)
Hello , First off let me say that I believe that Old Goat is a stand up guy and that he told me everything he knew about the bike good and bad ... Question #1 I put some seafoam/gas into the bike started it up so the seafom would get into the carbs to maybe help out .. It ran for a bit and noticed the temp gauge didn't move .. the fan never came on ... then I noticed the the antifreeze come from underneath..(over heating ).. so i pulled the knob located next to the ignition.. the fan came on.. I have removed all the plastic from the bike ... where the temp gauge is there is a green/red stripe wire ,a black wire and a brown coming from the back of the temp gauge .. I tracked the green/red striped wire to the sending unit it was hooked up.. where the sending unit screws in there was a black wire with a male end that was screwed into the piece that the sending unit screws screws into was not hooked up.. I looked around and found another black wire (same gauge wire) with female end . ( the male end and the female looked factory) should these be hooked together ? Is this the ground for the gauge? also there was a blue wire that came out the same place as the green/red stripe wire .. it is hooked to a black wire ( not factory i don't think ) that goes to the knob i pulled to start the fan.. If i plug the black wires together will this make the temp gauge work? And is there a way I can test without starting bike ? Question #2 if you were standing at the side of the bike looking at the engine .. Between the back and the front set of cylinders there is a oblong piece of metal (don't know name ) That has hoses running to it.. On this piece of metal looks like a metal tube sticking up from it nothing attached ... Right above it is a hose (seems to be 3/8 ) that looks like it should attach to it ... Should these two be attached ? ... I'm going to replace all the hoses and clean all contact points .. since i have it this far apart.. I will have plenty of more dumb questions for you in time .. A big thanks to all that take the time to respond.. -
Ok, Trailer wiring question. I found an led stop turn strip. I put two smaller LED's at the top of the trailer as stop turns and hooked the center to running lights and was going to do stop then it dawned on me I was running a four wire system so they are stop turn. I am running a four wire system. Short of running another wire is there a way to grab the stop / turns from both sides, run it through some relays so I can get another center brake on the trailer???


.thumb.jpg.176b2ebbe9863175975d94710375c414.jpg)