Search the Community
Showing results for tags 'resistor'.
Found 16 results
-
see attached pdf I provided link for radio shack relay, but is in fact not the one I used- and not sure where I got the one I used but the one I used is rated 12vdc 10a, and radio shack link I provided is 12vdc 1a. Not strong enough contact rating for incandescent bulbs, as all power goes thru this relay contact as well as the ep29 flasher which is rated for 20a. any spdt 12v relay will work if contacts rated at least 10a. I also need to rethink the resistor option, as upon review I propose placing it direct from ep29 to ground, and this would continusly provide the .02a sense current for the ep29, causing the ep29 to flash all the time, although the turns would not flash as they are open at the turn switch. Unnecessary wear on the ep29. I suspect a resistor would not even be required in any pratical install, but if it was required, the value would have to be experimented with at an amount greater than 600 ohms, so that the load of the actual turns plus the value of the resistor would cause .02a load, but the resistor buy itself(turns off) would create less than .02a load (higher resistance). As example: a 1K(1000)ohm resistor would provide a .012a load,and if the turn lights provided at least .008a load, then all would be fine for the ep29, and the resistor would consume .14w, so a 1/4w resistor would work fine with safety margin. 60880.pdf
-
 I am going to put in the bypass for the battery level sensor on my '83 VR. I notice that there is already a resistor in the line. It looks factory. Do I remove this resistor when I put the new one in or do I just add the additional resistor?
 -
Here is what I need help with, in cleaning up my shop I found this part and dont remember where it came from, well I do know it came off of the old fuse holder when I upgraded it with Skydoc's fuse block. So where does it go and what does it do, I havent noticed anything amiss when I am riding. The second part is I lost the battery probe, I went out and bought the resistor for the probe and now I can not find it, does anyone have a spare one they can let me have, I will glady pay for it. Thats it..........
-
I've checked the other posts on bypassing the battery monitor resistor and most people are saying to use a 1k or 2.2k resistor. The thing is I want to keep the monitor in place and my resistor wire is coroded and needs replacing, but the bands indicate that the original is only a 680ohm resistor. What would be better? Try and find another 680 or would a 1k work as the original did? Thanks Markus
-
 I was adding some acessories and needed to move some wires around near the battery, when this one broke off. The wire comes from the accessory side of the OEM fuse box and goes into what looks like and EOM retangular male/female plug and the single wire is white with a red stripe. The broken piece fell down and I've not been able to get it out yet. The wire from the Accessory side of the fuse box to the connector was spliced and a couple of what looked like a 2 inline resistors were added. the thin wire that connected the two inline resistor broke. The added resistor could not be OEM for it was crimped on. Anyone have any ideas as to why these 2 Resistors were added. And then maybe I don't need it?
 -
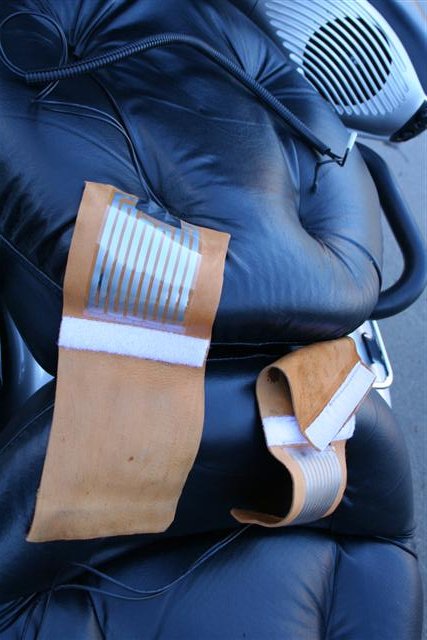
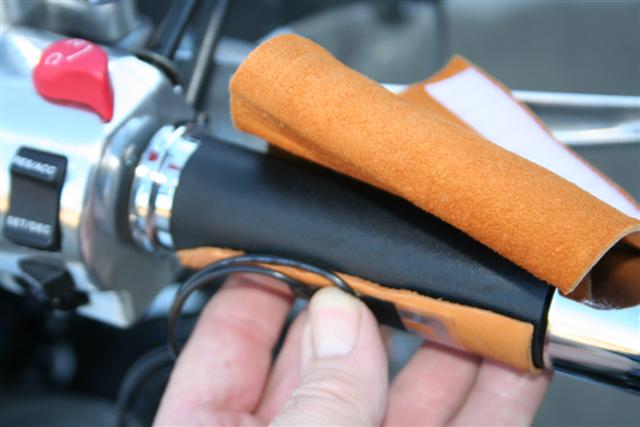
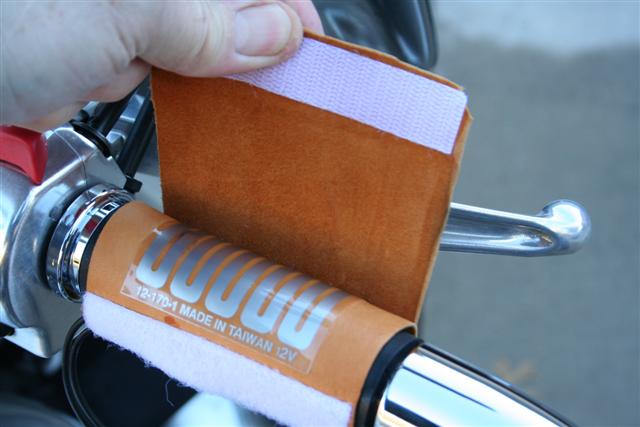
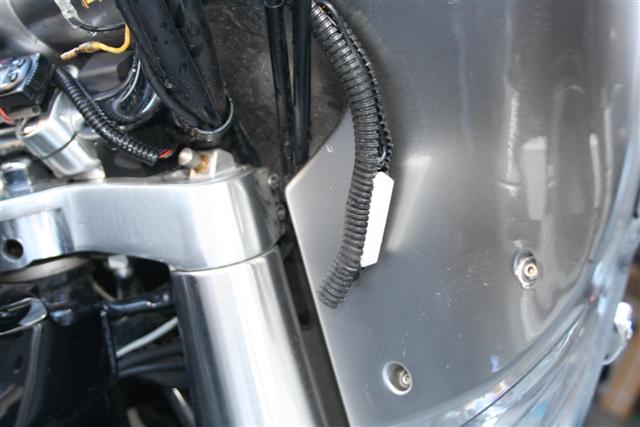
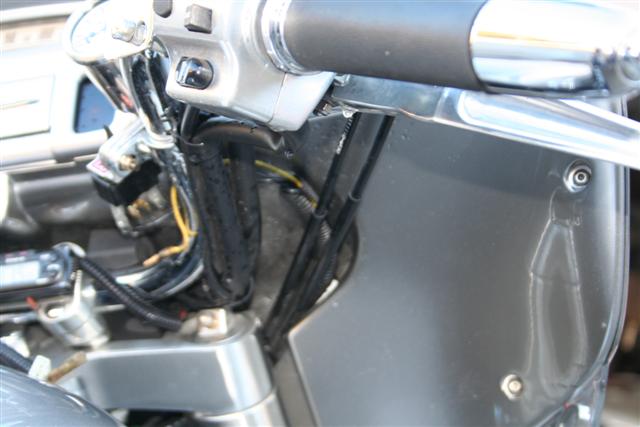
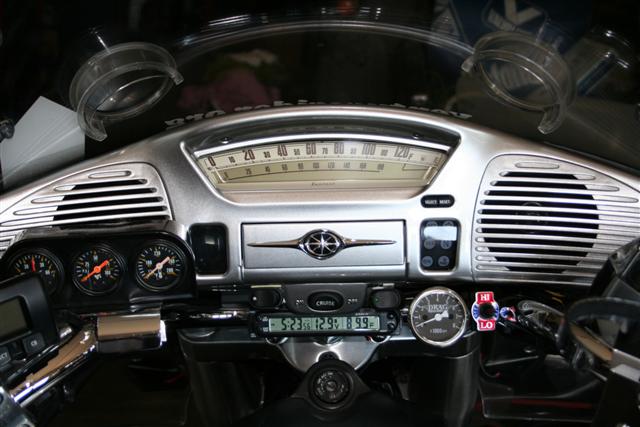
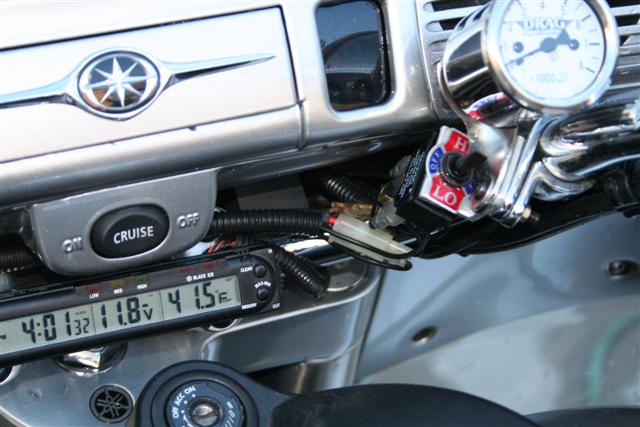
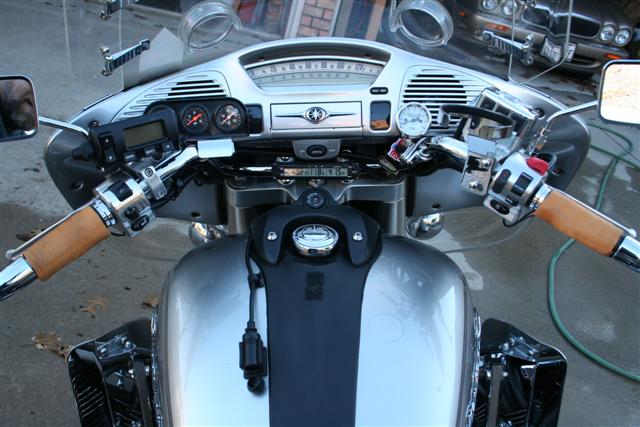
I have been riding year-'round since the late 60s, and I have never had grip heaters or used electric clothing. As I get older, however, I am finding that the painful fingers when the temperatures drop below 30 are less acceptable, so this year, I started experimenting with grip heaters on the RSV. I really like the stock grips on QuickSilver, so I didn't want to just replace them with heated grips; that left either wrap-around heater covers or the under-grip heat strips. I first ordered a set of Oxford HotHands wrap-arounds. These are specifically labeled for use ONLY on 1 7/8" bars, as they will make the grips too large when put over grips on 1" bars. I decided to ignore this and try them anyway since I have very large hands. Turns out, we are both right. The HotHands are quite thick, and when put over the RSV grips, they feel overly large. I was easily able to get used to them, but most people probably wouldn't. In addition, the HotHands only have one temperature - High! To modulate the heat, the only choice is to turn them off and on periodically. My next try was to order a heated grip kit designed to install underneath existing grips. These consist of self-stick mylar sheets with heating elements bonded to the surface. The ones I ordered use a dropping resistor and two position switch to provide low and high heat options. More on the resistor later. Before I tried installing the heater kit as it was designed, I wanted to try and make my own set of grip wraps that could be removed easily when not needed. First, I chose to use buckskin, since I had it available and I thought the deer skin grips would be comfortable and functional. Although the buckskin worked very nice, I think rubberized nylon or canvas would have been a better choice. With the leather, I am concerned about the long-term effects of water, and when washing the bike I have been either wrapping the grips in plastic or removing them. Here's a picture of the heat strips and Velcro on the buckskin: [ATTACH]5015[/ATTACH] [ATTACH]5016[/ATTACH] [ATTACH]5017[/ATTACH] Important: If you are going to make a set of wrap-around heaters like this, you need to be careful to get the kind of elements with the SAME amount of heat on BOTH. Many sets made for motorcycles have one that heats a lot more to compensate for the damping effect of the cold metal bar directly against it on the left side. The dropping resistor is a bit of a problem - these get HOT when the grips are on low, hot enough to burn your fingers. There is at least one other brand of grip heater kit available that uses two separate heating circuits instead of the resistor, and I would use those in the future instead of the more common type with the resistor. I used some plastic wire wrap to hold the excess wire and the resistor (it came all soldered together), and then just stuck the wire assembly down behind the throttle cables and the fairing. (note - after using these for a year, just having the resistor and wires stuffed between the throttle cables and the fairing as shown in the picture has worked perfectly - the heat from the resistor has not damaged anything.) [ATTACH]5018[/ATTACH] [ATTACH]5019[/ATTACH] Finally, I just wrapped the wires from the grips once around the existing bar wire bundle and routed the wires from the left grip and the power plug through more of the plastic wire wrap across the front of the handlebars. The tach mount made a convenient place to mount the switch. I am currently powering these from the power plug in the fairing, but will permanently wire the switch next time I split the fairing. [ATTACH]5020[/ATTACH] [ATTACH]5021[/ATTACH] [ATTACH]5022[/ATTACH] I am quite happy with this solution and think this is what I will stay with! Goose UPDATE - one year later: I have used these grip heaters for two winters now, and I love them. In November we took a weeks ride up to Pigeon Forge, Tennessee, and the weather for three days all the way there was low 30s and solid rain. Of course, the buckskin grip heaters got soaked, but that just made them work even better, as the water absorbed the heat and kept my hands "steamy" warm. Even when my winter gloves got so wet that just making a fist would cause water to stream out of them, these grip heaters were too warm to leave on Hi very long. After the grip heaters dried out, they are still in perfect shape. One of the things I like most about them is that I only have to have them on the grips when really needed. Here is an updated picture of the dash and location of the switch between the tach and the right handle bar. [ATTACH]14364[/ATTACH]
-
I read in another thread, I think started by Monty (Thanks!) about resistor plugs making eh scoot run bad, so, I checked and sure enough... I went to try and get some non resistor plugs, and man what a hassle. The parts guy said no place stocks non resistor type plugs anymore. He was kind enough to call several different places to find a set. So they will be here in the morning. Whew. In the midst of all this, I tried to remove the #4 plug, and it is seized in the head. I learned about this while wrenching cars, so, I can get it out ok, but now I need to find a thread chaser. I was all over town trying to find a 12mm thread chaser, and everyone tried to sell me a tap. After arguing with the 12th guy about the difference between a tap and a thread chaser, I gave up. Does anyone here know where to find a thread chaser for these bikes? Even a brand name or a website would help.
-
I PM'ed Condor about a spark related issue and I posed the question to him as to why it is necessary to have a resistor sparkplug cap and a resistor sparkplug. Answer me this question, aren't resistor plugs primarily used to supress electric pulses from interfering with a radio? Yes ,Ventures do have a radio, but isn't the primary reason for owning a motorcycle to ride it and not listen to the c@#p on a radio. Any comments, suggestions, and/or helpful advice? Condor mentioned that he thought that VGoose had posted on this subject at one time. Soooo..... Thanks all
-
Just wondering if I posted this subject in the wrong forum, since there have been no replies to it, so I will repost it in this section. I'm still interested if someone has the answer. I PM'ed Condor about a spark related issue and I posed the question to him as to why it is necessary to have a resistor sparkplug cap and a resistor sparkplug. Answer me this question, aren't resistor plugs primarily used to supress electric pulses from interfering with a radio? Yes ,Ventures do have a radio, but isn't the primary reason for owning a motorcycle to ride it and not listen to the c@#p on a radio. Any comments, suggestions, and/or helpful advice? Condor mentioned that he thought that VGoose had posted on this subject at one time. Soooo..... Thanks all
-
 I have installed all bulbs including the dash bulbs with LED's and I can say that it was worth every penny because the load on the battery has changed from 15 amps to around 2 amps with a inductive amp meter wrapped around the ground side to see the diff. Jumper the CMU for running and brake lights and installed a 50watt 6 ohm load resistor kit on the let and right side to trick the turn signal relay just enough to have it flash. Will post pictures tomorrow of what I did and if any body needs the info on what bulbs went where I can send that to you. The total cost was around $130.00 for every bulb and the two load resistor kits. Now on to the rest of the bike to finale finish her up and give it a ride..
 -
Replacing dash lights with LEDs
asigetic posted a topic in Computer, Lights, Horns, Other Electrical
I have installed all bulbs including the dash bulbs with LED's and I can say that it was worth every penny because the load on the battery has changed from 15 amps to around 2 amps with a inductive amp meter wrapped around the ground side to see the diff. Jumper the CMU for running and brake lights and installed a 50watt 6 ohm load resistor kit on the let and right side to trick the turn signal relay just enough to have it flash. Will post pictures tomorrow of what I did and if any body needs the info on what bulbs went where I can send that to you. The total cost was around $130.00 for every bulb and the two load resistor kits. Now on to the rest of the bike to finale finish her up and give it a ride.. -
I know I can replace incandescent turn signal bulbs with LED clusters or bulbs to reduce electrical consumption (draw?). But if I have to add a resistor in order for the "blinker" functionality to work, does the added draw from the resistor essentially cancel out the gain from going with LEDs? Or is there an added draw from the resistor but it's not enough to overcome the gain from the LED? And if so does anyone know what the numbers really are? (for example: incandescent bulb draws 5w, LED draws .2w, resistor draws 1w, so 5w - 1.2w still results in "recovering" 3.8w per bulb - and yeah, I just made up all the numbers.) As you can see I'm not an electrician. Thanks in advance.
-
Just put a trunk light on my 2006 Venture today and works great. I found as a suggestion on earlier forum to get from autozone a WE6-197 led strip brake light. I mounted right to bottom of trunk. It was suggested to use brackets. I had some super stick 3M foam double backed tape used for heavy mounting. It seems to hold excellent since light bar is light weight. If not I will use brackets later. Did the suggestion with two diodes, one with 330 ohm resistor in line for running light and direct from lower brake light. This conversion worked well and in my opinion looks good. At $25.00 for light, diodes and resistor and tube of solder and some shrink tubing, you can't go wrong if you are on a budget and want more visibility. I am going to try and find some chrome caps for the ends where the original plastic brackets were located to dress it up some. For the money I saved, I am now going to invest in a lowering kit as next project.
-
 Getting ready to put in a new Big Crank. Going to do the resistor mod as well to turn off the warning light. Went to Radio Shack to get the resistors and they had a choice of 1/4 watt and 1/2 watt in both 1k and 2.2k-Ohm. Does the voltage make any difference? Kevin
 -
Hi to all, I recently cheeped out and bought a battery from Advance Auto parts with a copon I got in the mail for my 87' VR. (total cost: $28.00) When I went to remove the old battery the resistor that goes to the plug for the battery fell apart in my hand! The plug into the battery is good and the wire to the resistor is still there. Now with the new battery I get the dredded "Battery Fluid Low" Icon on the dash. Lonestarmedic was kind enough to send me the post on removing the battery fluid low resistor out of the electrical system but I am thinking that since I still have a "wetcell" battery, the sensor would be a good thing. Does anyone know what size/value resistor goes in this circut so I can replace it? Or does anyone have the entire plug/ resistor line that they would like to sell? When Jean and I go for a ride, she keeps looking over my sholder and says... whats wrong with the battery, didn't you just replace it? (like 43 times!) Thanks in advance for any light anyone might be able to shed on this problem. Earl and Jean
-
I have been riding year-'round since the late 60s, and I have never had grip heaters or used electric clothing. As I get older, however, I am finding that the painful fingers when the temperatures drop below 30 are less acceptable, so this year, I started experimenting with grip heaters on the RSV. I really like the stock grips on QuickSilver, so I didn't want to just replace them with heated grips; that left either wrap-around heater covers or the under-grip heat strips. I first ordered a set of Oxford HotHands wrap-arounds. These are specifically labeled for use ONLY on 1 7/8" bars, as they will make the grips too large when put over grips on 1" bars. I decided to ignore this and try them anyway since I have very large hands. Turns out, we are both right. The HotHands are quite thick, and when put over the RSV grips, they feel overly large. I was easily able to get used to them, but most people probably wouldn't. In addition, the HotHands only have one temperature - High! To modulate the heat, the only choice is to turn them off and on periodically. My next try was to order a heated grip kit designed to install underneath existing grips. These consist of self-stick mylar sheets with heating elements bonded to the surface. The ones I ordered use a dropping resistor and two position switch to provide low and high heat options. More on the resistor later. Before I tried installing the heater kit as it was designed, I wanted to try and make my own set of grip wraps that could be removed easily when not needed. First, I chose to use buckskin, since I had it available and I thought the deer skin grips would be comfortable and functional. Although the buckskin worked very nice, I think rubberized nylon or canvas would have been a better choice. With the leather, I am concerned about the long-term effects of water, and when washing the bike I have been either wrapping the grips in plastic or removing them. Here's a picture of the heat strips and Velcro on the buckskin: Important: If you are going to make a set of wrap-around heaters like this, you need to be careful to get the kind of elements with the SAME amount of heat on BOTH. Many sets made for motorcycles have one that heats a lot more to compensate for the damping effect of the cold metal bar directly against it on the left side. The dropping resistor is a bit of a problem - these get HOT when the grips are on low, hot enough to burn your fingers. There is at least one other brand of grip heater kit available that uses two separate heating circuits instead of the resistor, and I would use those in the future instead of the more common type with the resistor. I used some plastic wire wrap to hold the excess wire and the resistor (it came all soldered together), and then just stuck the wire assembly down behind the throttle cables and the fairing. (note - after using these for a year, just having the resistor and wires stuffed between the throttle cables and the fairing as shown in the picture has worked perfectly - the heat from the resistor has not damaged anything.) Finally, I just wrapped the wires from the grips once around the existing bar wire bundle and routed the wires from the left grip and the power plug through more of the plastic wire wrap across the front of the handlebars. The tach mount made a convenient place to mount the switch. I am currently powering these from the power plug in the fairing, but will permanently wire the switch next time I split the fairing. I am quite happy with this solution and think this is what I will stay with! Goose UPDATE - one year later: I have used these grip heaters for two winters now, and I love them. In November we took a weeks ride up to Pigeon Forge, Tennessee, and the weather for three days all the way there was low 30s and solid rain. Of course, the buckskin grip heaters got soaked, but that just made them work even better, as the water absorbed the heat and kept my hands "steamy" warm. Even when my winter gloves got so wet that just making a fist would cause water to stream out of them, these grip heaters were too warm to leave on Hi very long. After the grip heaters dried out, they are still in perfect shape. One of the things I like most about them is that I only have to have them on the grips when really needed. Here is an updated picture of the dash and location of the switch between the tach and the right handle bar.