dingy
-
Posts
5,403 -
Joined
-
Last visited
Content Type
Profiles
Forums
Gallery
Events
Store
Everything posted by dingy
-
James, I know you put some money in the bike, but the plain reality of it is that is not going to make much difference. Anyone that has something like this, in a sense, a classic, knows they are basically a money pit. I will never get 25% of what I have in my bike, but it is a hobby to me. Kelly Blue book value for a 1200 Venture in good condition is $1200. http://www.kbb.com/motorcycle/trade-in/1984/yamaha/xvz12lr-r-venture/81845/ Curb appeal is a major factor in selling a bike in general. The faded paint won't help. Backrest being damaged is something a buyer is going to use to drive price down. Sure, it will help with good tires brakes and battery, but people won't consider that. They will look for any negative and use it as a wedge to get your price lower. Especially if you look like a motivated seller, which you are. Without having seen the bike and rode it, I would think that $750 will be a target. Sorry I couldn't be more positive with this. Gary
-
http://store.thundervalleypower.com/ Members ID is MiCarl. Plymouth Michigan. Gary
-

85 venture dies at 5200
dingy replied to 85 venture's topic in Venture and Venture Royale Tech Talk ('83 - '93)
Another check for the boost sensor is to disconnect hose from the L.F. carb intake. While it is running at a steady rpm's, apply vacuum to the hose that was disconnected. The RPMs should change some if it is working. You can use a mighty vac or do it the old fashioned way and suck on it, I mean this in a good way. I don't think a bad boost sensor will keep it from revving up though, it will certainly hurt overall performance, but not cripple it like this. Check all your cylinders & verify they are heating up at exhaust flange. These things will run decent on three cylinders, but you might be down to two. Since plug wires were replaced, check and verify they haven't been swapped. This would be at coil end, coils are positioned in same pattern as cylinders. Gary -
Gunky, How can you leave us after saving one of us. It ain't right. Actually, wanted keep Beth, but your a package deal. Good job !! Gary
-
1st to answer your question, I don't know of a specific list anyone has made. I like to use partshark.com to look up part numbers, but they may be sketchy as they don't list P/N if it is no longer available. Since you are buying an older (but the better one before they slowed them down) you are probably not extremely wealthy. You will need a lot of money if you are looking at new body panels. For example, $624 for a front side fairing. Ebay is sometimes a source for parts but the quality varies widely there. The best place to find all the part #'s is called the parts fiche. You could at one time download it at link below. If not send me your email and I will send it to you. About 1.3 meg in size. http://www.venturerider.org/forum/showthread.php?t=2482 Gary
-
I'm happy to be informed that they are illegal in Ohio. Now I know to be careful when I activate them. As far as the modulating headlight, if someone is courteous enough to pull over and get out of my way, bless them !! Gary
-
85 venture dies at 5200
dingy replied to 85 venture's topic in Venture and Venture Royale Tech Talk ('83 - '93)
A complete rebuild is around $600 for parts only in carbs. A minimum amount of around $140 which would consist of the 4 basic carb kits for about $100, 4 pilot jets about $20, 4 enrichment gaskets about $20. Chances are slim that the diaphragms are good in an 85, about $80. This is parts only, if you pulled carbs & took them to someone, at minimum, there has to be 4 hours labor, with someone that is good at this, may be more. Picture below shows what a disassembled set of carbs looks like, many parts. Gary -
Air Intake Question
dingy replied to elmicko's topic in Venture and Venture Royale Tech Talk ('83 - '93)
Don't think so, I'll take the lower gas mileage, 35 mpg is better than my 360 Dodge Ram gets. Gary -
Bad Ground or something else?
dingy replied to VentureBob's topic in Venture and Venture Royale Tech Talk ('83 - '93)
Bob, I helped it a little bit, its not perfect, but the segments are much more uniform than when I started. I reflowed all the solder joints on the top board & some of them on main board. Main board has much smaller gauge connectors and its harder to reflow the solder joints & not bridge them. I cleaned contact surfaces to indicator panel with rubbing alcohol. The battery indicator appears to be fubared though. I couldn't get it to turn off. 1st picture is on power up. 2nd is after it cycles through. The headlamp indicator is because I have rewired my headlights, it should be OK on yours. A couple of the segments are dimly lit, side stand & brake fluid. 3rd picture is of mine for comparison. What you can do to get rid of the flashing red indicator on left side due to battery indicator, is to put a little black paint over it. Gary -
1st Gen Windshield
dingy replied to Squidley's topic in Venture and Venture Royale Tech Talk ('83 - '93)
J.W., I got one two months or so ago from a seller on ebay for $55 + $16 shipping. Seller ID is midwestcycle item # was 110677877160 It was supposed to be a second, but my wife, who has worked in an optical lab her entire working career, could see nothing wrong with it. Gary -
85 venture dies at 5200
dingy replied to 85 venture's topic in Venture and Venture Royale Tech Talk ('83 - '93)
One other screen is in the fuel intake port on each carb, it is called a filter net. This should be blown out if the needle valve seat is not replaced. It should be blown from the inside out so dirt doesn't get forced into screen more. Gary -
Aftermarket TCI available!
dingy replied to tvking63's topic in Venture and Venture Royale Tech Talk ('83 - '93)
I tried to load mine yesterday with the new software as well. I have the same screen as Todd is getting. Old version 75 software is working as before, but the V80 version won't let me do anything. Also sent an email last night to them to see how to handle this. Gary -
Not sure what to do
dingy replied to slayerdriver's topic in Venture and Venture Royale Tech Talk ('83 - '93)
This is what I did to the stator wires, not pretty, I don't care. It shouldn't leak. The wires themselves on the stator leads are covered in black permatex then the connector was slid over the permatex. Red stuff is high temp RTV I use on a lot of items. Gary -
Not sure what to do
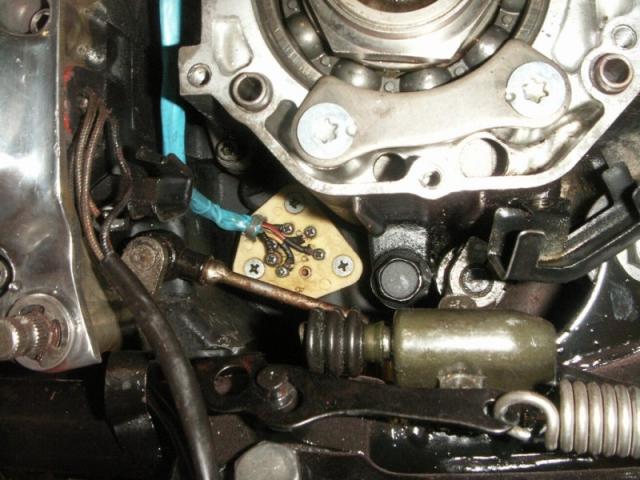
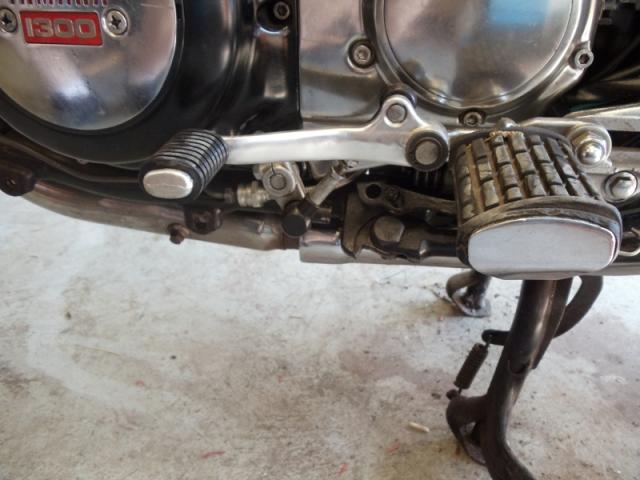
dingy replied to slayerdriver's topic in Venture and Venture Royale Tech Talk ('83 - '93)
Here are a couple of pictures showing the two shift linkages. Either one is easy to do wrong. I know. Gary
-
On my 1st gen prior to putting progressives in it raised front end at least an inch. Also made it ride firmer. Doesn't move at all when air goes in with progressives though, but I still keep about 7 lbs in it. Gary
-
A memorable one of Yammer from just last year. Gary http://i1007.photobucket.com/albums/af193/gdingy101/atv-1.jpg
-
You have never posted pictures ?? So then none of the stuff you have told us about really happened?? http://www.venturerider.org/forum/showthread.php?t=44037 Gary
-
http://www.venturerider.org/forum/showthread.php?t=58880
-
Air Intake Question
dingy replied to elmicko's topic in Venture and Venture Royale Tech Talk ('83 - '93)
These are the four primary, replaceable jets. For a set of 1200 carbs the jets are as follows. Mains 117.5 - located behind fuel bowl cover in jet block, lower angled jet PAJ1 #80 - Located at top of venturi PAJ2 # 180 - Located behind diaphragm rubber Pilot Jet #42.5 - located behind fuel bowl cover in jet block on right side For a set of 1300 carbs the jets are as follows. Mains 125 - located behind fuel bowl cover in jet block, lower angled jet PAJ1 #80 - Located at top of venturi PAJ2 # 170 - Located behind diaphragm rubber Pilot Jet #37.5 - located behind fuel bowl cover in jet block on right side Gary -
You ought to, It's your middle name !! Gary
-
How to outsmart the Yamaha folk?
dingy replied to Keemez's topic in Venture and Venture Royale Tech Talk ('83 - '93)
The reed switch acts as a speed sensor for both the cruise control and the turn signal self canceling unit. More than likely, hard coded inside the cruise control electronic module is some code that inhibits the system above 80 or below 30 mph. I don't think there is anything external to the module that could be done. The reed switch has to be in loop to sense speed, any variation of its output, such as 5 mph decrease, then shuts system down. If you do want to cruise at that speed, a throttle locker might be an easier alternative. Gary -
The parking lot idea would be OK after a little open road, get used to it riding. These things handle like a beached whale in a parking lot type enviroment, any little miscue would be harder to deal with. But on the other side of the coin, if something where to happen, the results would be less severe. Gary
-
Did they give you any indication as to why the torque curves are dipping around 2700 rpm? That dip is consistent on all 6 runs. Gary
-
Cruise Control Not Working
dingy replied to IdahoRon's topic in Royal Star Venture Tech Talk ('99 - '13)
Do you have the 4 light cluster for the cruise at the ignition switch bezel? Just so I am sure which system you have. I think all MKII's had this though. The control unit is behind headlight on upper right side, about the size of a pack of cigarettes. Black, 11 wires going into it. make sure this connector is clean. You also need to make sure clutch side switch is not actuated, this is located on clutch reservoir. Brake switches are easy to check, brake light lit if they are problem usually. Could be the engage switch needs cleaned. You can do an ohm meter check on the cable coming from the right side handle bar switch. The connector is behind head light unit. Below is a link to cleaning switch if it comes to that. Another problem is that the cruise cable from the actuator to the junction box has to much slack in it, should only be 1/16" at actuator total free play. http://www.venturerider.org/forum/showthread.php?t=42433 Here is a link to schematic for 1st gens. 1st one is full schematic. 2nd one is schematic without connectors shown, much easier to follow. http://www.venturerider.org/wiring/86-87%20Yamaha%20Venture%20DS%20Wiring%20Diagram%20Rev%20D.pdf http://www.venturerider.org/wiring/86-89%20Yamaha%20Venture%20Simplified%20Circuit%20Diagram%20Rev%20D.pdf Link to fixing E4 error. http://www.venturerider.org/forum/showthread.php?t=493 Gary -
I feel your pain on the losing a write up. I have been there done that. I now copy the longer ones I do once in a while to a text file and keep it on my desktop till I get done. It's annoying to try and do it over. Very nice job on this one. Gary