dingy
-
Posts
5,403 -
Joined
-
Last visited
Content Type
Profiles
Forums
Gallery
Events
Store
Everything posted by dingy
-
 By crush washer, do you mean copper washers on banjo bolt I assume? It's leaking at the lever side, not the banjo bolt side. Gary
 -
It is 4 mm x .75 mm thread x 10 mm long. Tip has threads removed. See attached picture. Gary
-
This is a follow up on the Jewelers Epoxy I used to install the watch crystals in my master cylinders. I was having brake fluid leaking out of the back of my clutch master so I pulled it off today. The leakage was not from around the crystal, but from the rear of the plunger. When I removed top from master, the fluid was not clear inside. It should have been due to master being rebuilt and new clutch flex lines installed. I found that the epoxy that had squeezed out from around the crystal on the liquid side had deteriorated. This squeezed out material was due to my using to much epoxy when I seated the crystal in the housing. There were a few firm but pliable pieces of the excess epoxy in the bottom of the reservoir. The crystal is still tight in the housing and I could not push it out with my finger. It has been in the Synthetic brake fluid for about 2 1/2 months now, so it seems this type of epoxy is not suitable. I am not sure if the deteriorated epoxy led to the master leaking or not. I have a double clutch spring in and there is a lot of pressure on the handle when clutch is depressed. I replaced the master with the another one I had and bled new fluid through the system. The only ingredient I can find listed on the hardener tube is called Mercaptan Hardener. The only ingredient I can find listed on the resin tube is Epoxy Resin. There is a picture in my first post of this product. Gary
-
Red Loctite needs to be heated before it will release. You don't want to use red on aluminum if you ever want to take it apart. Gary
-
The bottom of the bleeder screw hole has a tapered surface which matches the end of the bleeder screw. This surface must be very smooth in order to seal when the bleeder screw is tightened down against it. Gary
-
Below is the swing arm section from the RSV service manual that may help you see what you are dealing with. Gary
-
This same kit is on ebay for $216.99 + $12.00 ship Ebay item # 360193981068 Link is below, but ebay links usually don't work. http://cgi.ebay.com/ebaymotors/YAMAHA-1200-VENTURE-ATHENA-COMPLETE-GASKET-SET-83-85-/360193981068?cmd=ViewItem&pt=Motorcycles_Parts_Accessories&hash=item53dd3bfa8c I tried Condor's theory of buy as you need and ended up spending far more than this. Gary
-
Jim, I have a spare O-ring out of a caliper I can send you if you can't find a suitable replacement. Came out of an 83 rear caliper. Size is 14 MM O.D. x 9 mm I.D. x 2 mm thick. I.D. could vary smaller, it would still work O.K. Gary
-
I believe the rear muffler mount is different on 86-93 bikes. I put a set of running boards on my 83 bike that came off of a 88 bike and I had to use adapters to mount mufflers. Bongobobby helped me with this so you might PM him and pick his brain. Gary
-
86 - 91 CDI Box
dingy replied to MasterGuns's topic in Venture and Venture Royale Tech Talk ('83 - '93)
The TCI module will either fit an 84-89 bike or a 90-93 bike. In 1990 the pick-up coil design was changed from a two head unit to a single head unit. They are not interchangeable. The 1983 version had different circuitry due to the location of the vacuum pick-up on the carbs. The 83 unit will allow a 84-89 bike to run, though very poorly. The unit is acually a TCI unit wich differs from a CDI. The TCI units basically have the coils energized all the time, then remove the energy to create the collapsing field which generates the high voltage pulse. A CDI operates opposite this and energizes the coil to create the spark. Below is a link to a decent description of the differences in the units. http://www.jetav8r.com/Vision/IgnitionFAQ.html#a7p0 Gary -
A new really bad noise.
dingy replied to Flyinfool's topic in Venture and Venture Royale Tech Talk ('83 - '93)
Have you checked the torque on the rear disk to rim mounting bolts? And also caliper mounts. It's a long shot, but an idea. Gary -
front forks and class
dingy replied to curtis's topic in Venture and Venture Royale Tech Talk ('83 - '93)
Below is a link that details the class wiring system on an 88 bike. This is the detailed version showing all the connectors. CLASS system is on left side - center. 88-89 Yamaha Venture DU Wiring Diagram Rev D.pdf Below is the simplified version. Class system is in lower left corner. 86-89 Yamaha Venture Simplified Circuit Diagram Rev D.pdf Check your harness at the connector under the seat or to the left side, near the helmet locks, that goes to the tail lights. If it is a 14 pin (one blank) connector, the harness already has wires for the CLASS system. Putting in a new harness is a time consuming task. Especially in the head light and coils/TCI areas. Another option is not to locate the TCI control head on the dash. I currently have mine laying loose under the radio cover. When I need to reset it, I pop the radio insert out and lift head out. Not pretty, but functional. You could possibly locate CLASS head in trunk, if wiring harness does not have wires in it already for the system. It would shorten your wire runs up considerably. I have an extra tail light/CLASS harness that would give you the connectors to the air pump/valve assembly that I would part with. Gary -
Replacing seals
dingy replied to a1bummer's topic in Venture and Venture Royale Tech Talk ('83 - '93)
There are some pictures of neutral switch in the PDF file that is attached to the post linked below. Shows its location and how to get to it. http://www.venturerider.org/forum/showthread.php?t=40639 Gary -
There was an accident locally here a few years ago where a young man collided with a cager that had made a left turn in front of him. Biker was a teenager on a powerful crotch rocket. The cage suffered severe damage in the accident, enough to have even bent the drive shaft of the cage. The cage was spun around 180 degrees from the force of the impact. Speed limit in area was 25 mph. The biker was reported by witnesses to have been doing well in excess of seventy mph. The biker braked so hard that the rear wheel came off the ground at prior to impact. The cager was cited and did 6 months in jail for vehicular manslaughter. In this case I felt that the cager did nothing wrong, but was still held to blame for the apparent reckless operation by the biker. Had the biker been traveling at the speed limit, the cager would have had more than sufficient time to make the turn safely. It is very difficult as a driver to realize that someone coming at you is traveling at a high rate of speed when the decision is made to make a turn in front of an oncoming vehicle. I used to work for ConRail as the signal department. One of the requirements was that if there was a crossing accident at a protected crossing, I would have to go out immediately and run a series of tests on the crossing protection to check for proper operation. The area where I worked had a switching yard located there, so the speed of the train traffic varied depending on if the train was stopping in the area to do switching. Drivers would get inpatient waiting for the trains and often go around the gates. The majority of the incidents occurred at night. It is much harder to judge the speed of a vehicle coming at you when the oncoming vehicle only has one headlight as in the case of trains. The reason being as a vehicle gets closer, there is a perception of the distance between the headlights increasing. This helps the brain to judge closing speed. With a train and motorcycles only having one headlight, this visual clue is not present. Drivers would go around the gates in order to beat the train not realizing that the train was approaching the crossing at a higher than anticipated speed. Gary
-
I wasn't alone, I was with a group of Harley's and had to keep my speed down. Seriously. On other tanks previous to today when I have been out playing with the bike, MPG's have been around 35 MPG. Gary
-
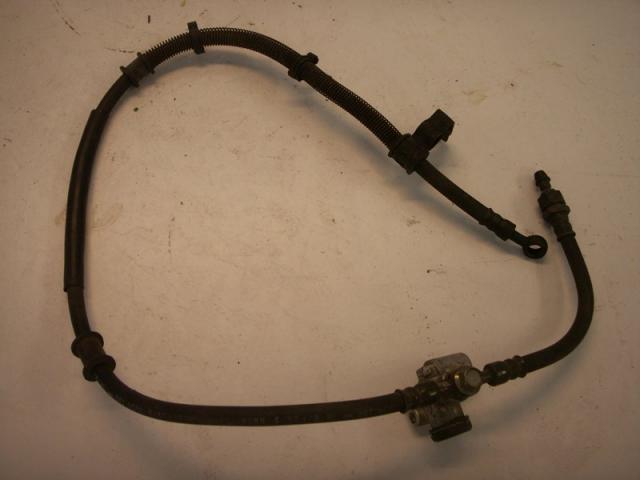
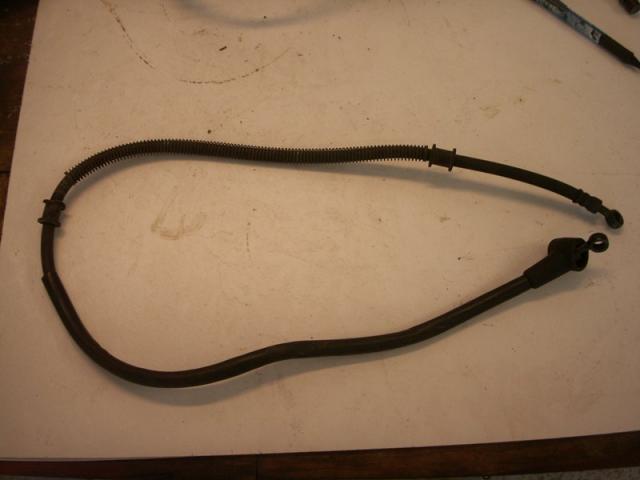
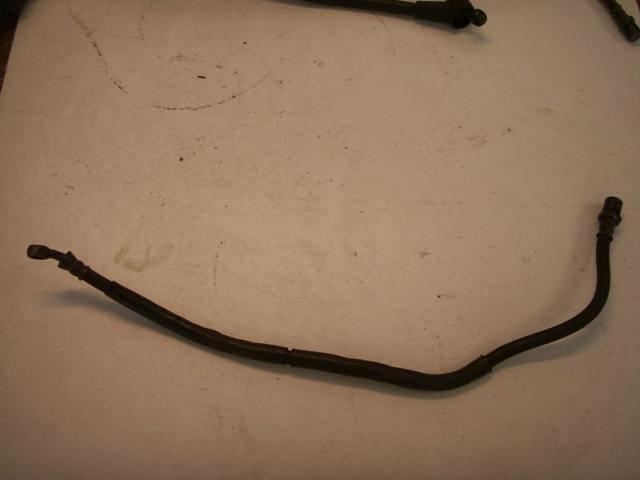
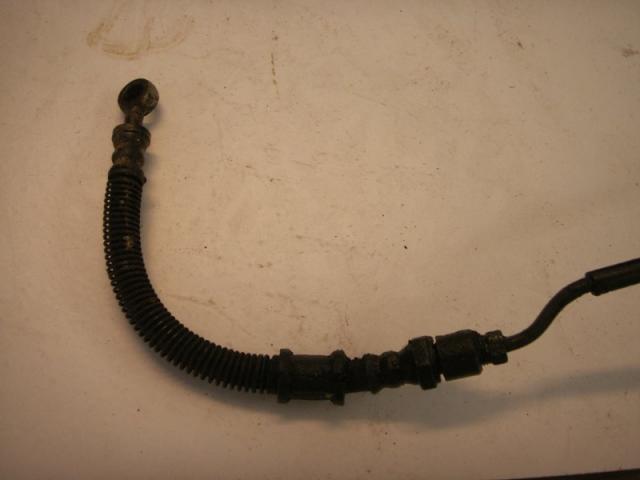
Brake hose description / list ?
dingy replied to 6m459's topic in Venture and Venture Royale Tech Talk ('83 - '93)
Here is a list of lines I have from my 1st gen 83. I would treat these numbers as reference only. I tried to get accurate measurements though. Rear Master to rear caliper. 18 3/8" from C/L to C/L of banjo fittings. One banjo fitting @ 15 deg. Both banjo fittings rotated @ 90 deg. to each other Rear Master to front steel line at rear master. 4 3/4" from face of 10mm fitting to C/L of banjo fitting. Banjo fitting @ 15 deg. Front metering valve to front caliper. (This line is from a 1988 bike with the upper bleeder port). 8 5/16" from face of 10mm fitting at top bleeder to C/L of double banjo fitting. This segment would be eliminated for 83-85 models without upper bleeder port if desired. 33 3/4" from C/L of double banjo fitting to C/L of banjo fitting at brake caliper. Banjo fitting at brake caliper @ 15 deg. Bottom banjo fitting is rotated @ 90 deg to double banjo fitting. Front master to brake caliper. 44 1/4" C/L to C/L of banjo fittings. Top banjo fitting @ 15 deg. Bottom banjo fitting @ 15 deg. Two banjo fittings are in line with a combined angle of 30 deg. Anti dive valve. (MKI only) 11 1/2" C/L to C/L of banjo fittings. Top clutch line 22 1/2" C/L of banjo fitting to face of 10 mm fitting. Banjo fitting @ 15 deg. Lower Clutch line 8 1/2" C/L of banjo fitting to face of 10 mm fitting.
-
I have had a few inquiries on my MPG since the bikes rebuild. Rode 158.7 miles between fillups today and used 3.705 gallons. Sunoco, 93 octane gas. 42.83 MPG. 1300 cc engine, Vmax heads, FJR rear end. No v-boost. Carbs are from original 1200 engine. Carb mains re-jetted to 140. Needle jets are now set at .102", increased from setting of .072" due to nasty hesitation around 6,500 RPM's. Ride was through rural areas with very moderately hilly terrain, number of small towns. Lot of curvy roads. Very gentle ride around 55 mph for most part with very minimal hard acceleration. Riding solo. I am very happy with this. Gary
-
broken bolt in linkage plese help
dingy replied to ransom's topic in Royal Star Venture Tech Talk ('99 - '13)
This is going to be a tough one. Gary -
A new really bad noise.
dingy replied to Flyinfool's topic in Venture and Venture Royale Tech Talk ('83 - '93)
While your in there change the rear end oil. There is a magnet on the drain plug so you can see if there is excessive metal shavings. Service manual says very small amount of shavings are normal. Also look at rear wheel bearings. By only making noise when engine braking & rotor braking the rear end has pressure exerted on both sides. Braking with one or the other exerts more pressure on one side or the other. So with the equal braking it could be the bearings having an issue. Not that lubing the shaft & splines is a bad idea, but I would think shaft especially would show noise all the time. Hub splines may be culprit, but I don't see that contact point generating a grinding noise. Gary -
I still have the box they came in, have my old ones in there. Any better than this and I would have to get them for you myself !! RS400 is model #. Gary
-
Cruise Control on First Gen
dingy replied to KenP's topic in Venture and Venture Royale Tech Talk ('83 - '93)
Also check clutch switch. The front, rear brakes & clutch switch will shut cruise down or not allow it to engage. Clutch switch has no adjustment, but front & rear brake do. Easiest way to check brake is to turn key on a wiggle levers & see if brake light comes on to easy. Clutch switch could have popped back out of retainer also. Does starter crank with bike in gear with clutch released & side stand up? If it does then clutch switch has issues. Gary -
4" speakers. Wal Mart has a decent set for under $30. Cones are waterproof. Speakers are 3 way's. Gary
-
Intro and a few newbie questions
dingy replied to saltcreep's topic in Venture and Venture Royale Tech Talk ('83 - '93)
They are still putting a cassette player in the RSV's last I heard. Gary -
mraf, You have a PM. Gary
-
It was a year and a half ago he posted this, C3PO didn't have the pygmies to help him then !! Gary