dingy
-
Posts
5,403 -
Joined
-
Last visited
Content Type
Profiles
Forums
Gallery
Events
Store
Everything posted by dingy
-
Still naked as a jay bird but got it running tonight. Started, ran & idled fairly good for what its been through. Stripped to frame, new engine, heads and a ton of other stuff. I so happy I could just poop. Gary http://i1007.photobucket.com/albums/af193/gdingy101/PICT5560s.jpg http://i1007.photobucket.com/albums/af193/gdingy101/PICT5561s.jpg http://i1007.photobucket.com/albums/af193/gdingy101/PICT5562s.jpg
-
 PM me when you get on. I have a spare. Gary
 -
Could you epoxy a spacer on end of the contact point on lever to lengthen it? Gary
-
Starter Switch
dingy replied to clint_1985's topic in Venture and Venture Royale Tech Talk ('83 - '93)
I have one listed in classifieds. http://www.venturerider.org/classifieds/showproduct.php/product/2675/cat/6 Gary -
Starter Switch
dingy replied to clint_1985's topic in Venture and Venture Royale Tech Talk ('83 - '93)
Below is a link to starting circuit schematics for first gen's http://www.venturerider.org/forum/showthread.php?t=42451&highlight=starting+circuit Clutch switch, side stand switch, neutral switch, engine stop switch, start switch and a couple of fuses are all involved. Gary -
The service manual shows Loctite being used in numerous places in conjunction with aluminum parts. One notable example is the attachment of the rotors to the rims. You can use Blue (nut locking) or Purple (screw locking) safely on aluminum. Do not use Red (stud locking) on any part that may be disassembled. It requires heat to break the bond which will then cause problems. If you try to remove fastener without heat you will either break fastener or pull out the threads. Anti seize is not something I would personally choose to use on a safety related fastener just by its nature. Its purpose is to prevent corrosion and seizing of metals. It often contains a lubricating carrier. This lubrication reduces friction between mating parts thus allowing vibration to cause part to more easily loosen. Gary
-
How do I remove the ring gear from the differential bearing housing? I need to adjust the backlash on the pinion gear. I have zero backlash as it is. This is an FJR rear end, but it is essentially the same as a 1st gen. There is a shim under ring gear I need to replace, as well as changing the thrust washer which is accessible. I have ring gear and bearing plate separated from main housing, does it need to be pressed out, or just lightly tapped out? Parts breakdown shows no retainer clips. Gary
-
He is close to Cincy, not staying in Oberlin. Gary
-
I reordered some more steering head wrenches if anyone is interested. I had a price increase from my vendor, the cost is now $23.00. Shipping included. There is an ad in classifieds, or the info is here to order. I have include a PDF cut from the 1st Gen & RSV service manuals relating to the procedure to set torque. Pay attention to text about setting torque wrench at a 90 degree angle to wrench. Not doing so will affect torque reading. Also listed below are the threads relating to this tool. Gary http://www.venturerider.org/forum/sh...ad.php?t=45046 http://www.venturerider.org/forum/sh...ad.php?t=44833 http://www.venturerider.org/forum/sh...ad.php?t=44719 http://www.venturerider.org/forum/sh...=steering+head http://i1007.photobucket.com/albums/af193/gdingy101/PICT5202.jpg The procedure for setting steering head torque is outlined in the service manuals beginning with the 1986 manual. This is under Periodic Inspection & Adjustment - Chassis - Steering Head Adjustment. Also, if you are the proud owner of the MKI (83-85) Ventures, you could use the procedure outlined in the 86-93 manual. If you need a copy of this procedure I can provide it for you. The tool will work on any year Venture. The same part number is shown in the part fiche from 1983 through the RSV's for the steering head bearing nut. The tool will also work on 1st gen VMaxs & FJR's 1996-1998 and 2005-2009 Yamaha Tour Deluxe The tool is laser cut from 1/4" thick, 304 stainless steel, Mill Finish. I can supply this tool at a cost of $23.00 including first class shipping to lower 48 US & Canada, first class shipping. If you would like to order one or more my paypal address is gary@dinges.com. I will see the paypal transaction in my email. I can also accept check or money orders. PM me for address. Please mark payment as a personal transaction. Paypal does not send your address to me when it is marked a gift. Please include shipping address & your screen name in Paypal transaction, comments field. Attached are pictures showing the finished tool. Socket extension and nut are not included. Gary
-
Bob & his wife stopped by this afternoon on his way to their bike conversion. Swapped some parts back and forth. Went and had dinner. They are on their way and will stop south of Columbus, Ohio to spend the evening. Gary
-
Stock 1300 pistons, and no V-Boost this year. Major improvements so far below. Vmax Heads 1997 FJR rear end 2004 1300 engine 1988 MKII front forks 1986 MKII brakes front & rear MKII brake master cylinders Rebuilt clutch master & slave cylinders Stainless steel clutch line set Stainless steel rear brake line Two diaphragm springs in clutch Delinked brakes Speed bleeders Electric Anti Dives Updated rear shock Grease zerts in shock linkage Passenger foot boards Royale instrument cluster New fork seals 8mm ignition wires Iridium spark plugs Polished case covers Powder coating K&N air filter Halogen Dual Headlights Cruise control Class system Gary
-
Renne, They will be in Saturday's mail. I got them in a small priority box, you should have them Tuesday or Wednesday. USPS tracking # 9101 7850 9140 1472 0666 69 Gary
-
Renne, I have an extra set of the side plates Thom mentioned if you want to see them. Chrome is in crappy condition, but as far as dimensionally, they are fine. Let me know if you want to use them. Pictures attached are of the two plates in question, not the crappy ones though. Gary
-
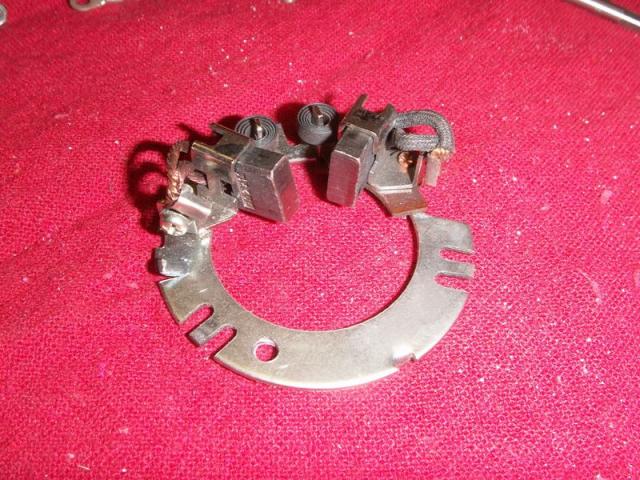
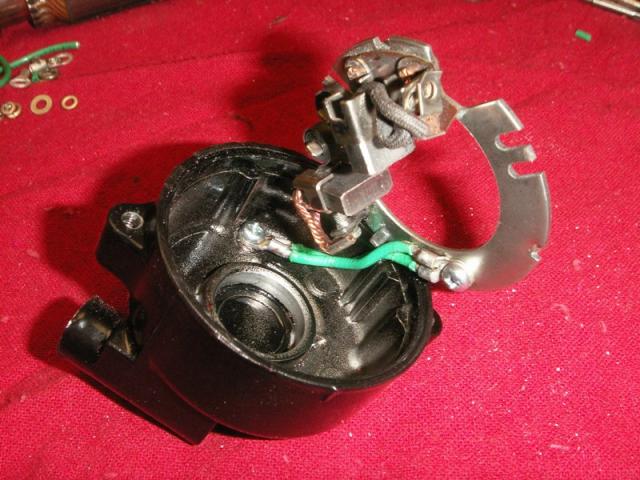
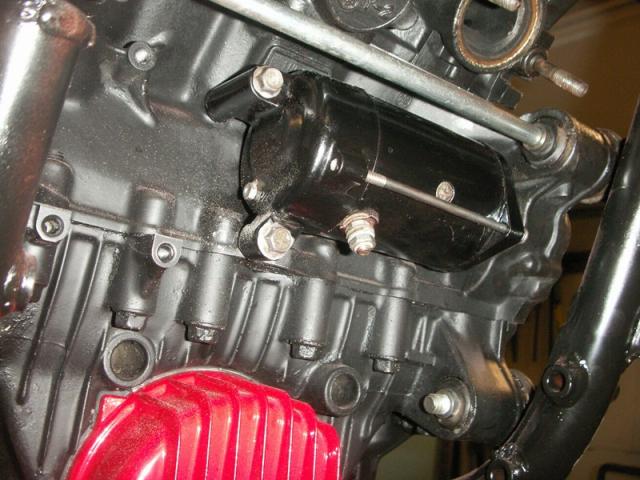
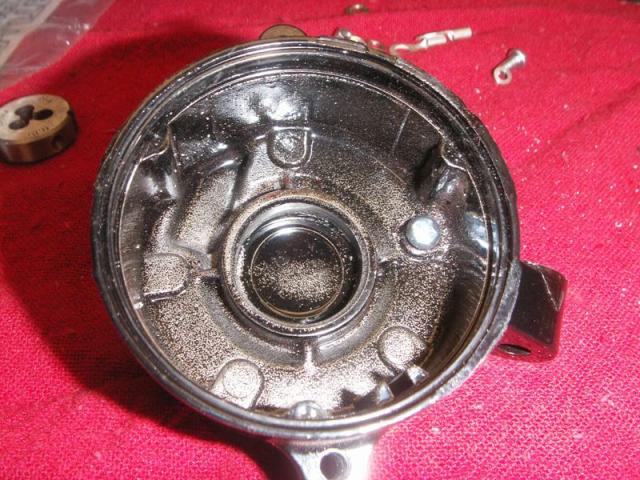
Attached are some pictures of the modification I made to the starter on my 83 1st gen. The purpose of this is to give a better path to ground for the brush plate. Stock version allows a path to ground through the tabs around the plate. Snaggletooth had posted about this mod several weeks ago, but I do not know of any pictures that are available to show it. Gary This shows the location of the drilled & tapped hole. I used a 4mm screw to attach wire with. Hole is at 2 o'clock position. This shows location of hole from outside of cover. The hole in the brush plate is shown at the 7 o'clock position. Picture of grounding wires. I used two 14 gauge wires. The terminals for 12 gauge and up had too large of a mounting lug for mounting screw size I wanted to use. Wires attached to end cover. Wires attached to brush plate. View of starter mounted on engine. I have since added an 8 gauge wire that runs from the bottom mounting bolt for the starter to the right side of the engine block. I attached wire to the block at the same point the main ground wire from the battery attaches.

-
Attached are some pictures of the modification I made to the starter on my 83 1st gen. The purpose of this is to give a better path to ground for the brush plate. Stock version allows a path to ground through the tabs around the plate. Snaggletooth had posted about this mod several weeks ago, but I do not know of any pictures that are available to show it. Gary This shows the location of the drilled & tapped hole. I used a 4mm screw to attach wire with. Hole is at 2 o'clock position. This shows location of hole from outside of cover. The hole in the brush plate is shown at the 7 o'clock position. Picture of grounding wires. I used two 14 gauge wires. The terminals for 12 gauge and up had too large of a mounting lug for mounting screw size I wanted to use. Wires attached to end cover. Wires attached to brush plate. View of starter mounted on engine. I have since added an 8 gauge wire that runs from the bottom mounting bolt for the starter to the right side of the engine block. I attached wire to the block at the same point the main ground wire from the battery attaches.
-
I'm just riding home for the night. 40 miles in the country. Gary
-
looks like a blown freeze plug - pics too
dingy replied to massey130's topic in Royal Star Venture Tech Talk ('99 - '13)
Part fiche calls it "PLUG,SPEC'L SHAPE". It's $4.30 from Partshark.com It's on the crankcase page, item #9. Gary -
25 mm Gary
-
Below is a link to an excel spreadsheet I made to help in picking shims. http://www.venturerider.org/forum/showthread.php?t=43410 Gary
-
I have been having the same thing happen. I have been also putting the Ebay item number in post, then that can be used to find referenced item. Gary
-
Need measurement from MKII driveshaft
dingy replied to dingy's topic in Venture and Venture Royale Tech Talk ('83 - '93)
An overall length. The length of the splines on each end. Within an 1/8" will be close enough. Shaft will have to be out of bike to measure. Thank You, Gary http://i1007.photobucket.com/albums/af193/gdingy101/PICT5464m.jpg -
Does anyone have an MKII driveshaft that they could get me a length measurement from ? I am having an issue with my MKI shaft and the FJR rear end Gary
-
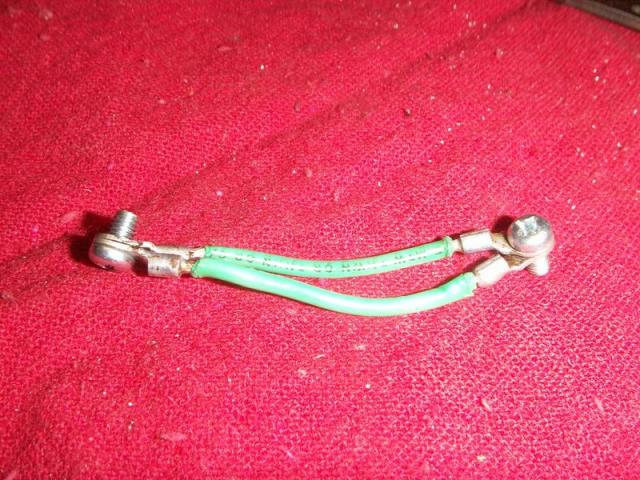
First plug might be power lead for radio (total guess on this one) The second plug is possibly for the California smog device, not needed. The third plug is probably the connection to the smoothing capacitor. You don't need this. It's purpose is to reduce radio & CB static. Gary
-
Where to go for possible Motor overhaul??
dingy replied to mellco's topic in Royal Star and Royal Star Tour Deluxe Tech Talk
It won't be rings or the wet reading would have come up significantly. That is reason for putting oil in for second check. Why is compression reading this high for this engine? It is same bore and stroke as a 1st gen MKII which is shown at 10.5:1 compression ratio. Compression for this engine is shown as 171 PSI in service manual. This engine is shown as a 10.0:1 compression ratio, yet shows 216 PSI in service manual. Gary -
Where to go for possible Motor overhaul??
dingy replied to mellco's topic in Royal Star and Royal Star Tour Deluxe Tech Talk
Get SkyDoc17 a PM. He will probably work on it. Gary