Search the Community
Showing results for tags 'msk'.
Found 15 results
-
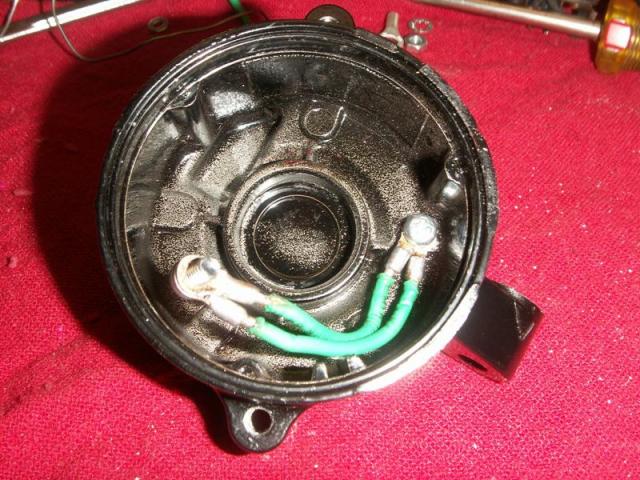
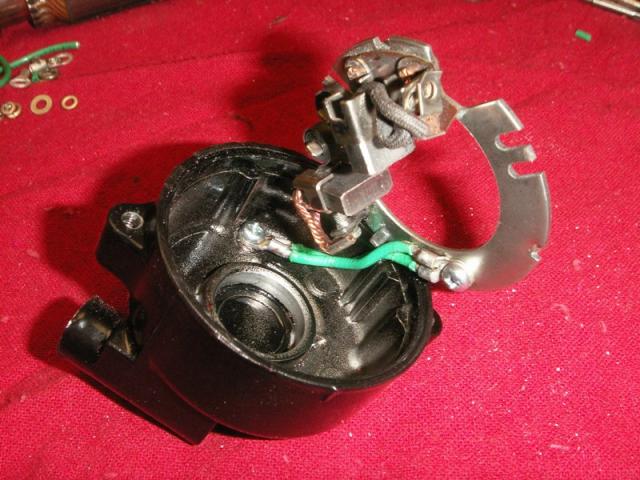
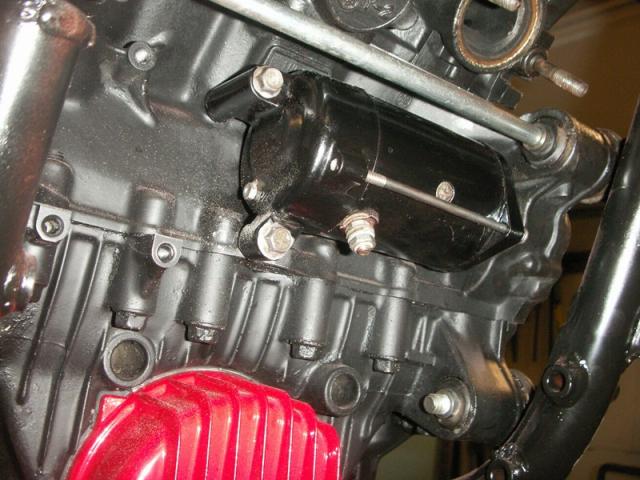
Attached are some pictures of the modification I made to the starter on my 83 1st gen. The purpose of this is to give a better path to ground for the brush plate. Stock version allows a path to ground through the tabs around the plate. Snaggletooth had posted about this mod several weeks ago, but I do not know of any pictures that are available to show it. Gary This shows the location of the drilled & tapped hole. I used a 4mm screw to attach wire with. Hole is at 2 o'clock position. This shows location of hole from outside of cover. The hole in the brush plate is shown at the 7 o'clock position. Picture of grounding wires. I used two 14 gauge wires. The terminals for 12 gauge and up had too large of a mounting lug for mounting screw size I wanted to use. Wires attached to end cover. Wires attached to brush plate. View of starter mounted on engine. I have since added an 8 gauge wire that runs from the bottom mounting bolt for the starter to the right side of the engine block. I attached wire to the block at the same point the main ground wire from the battery attaches.

-
 Finally got the headlight mod finished tonight! As the weather is taking a turn for the wet side I was stuck in the garage and only got a short ride around the block but it is an awesome improvement. I didn't get a chance to do any before shots on a dark road before I did this but I will post some later when I can get out with new setup. I did some pics in the garage to show a little bit of the difference between the SilverStar H4 I had and the Hella H9 Modules. A little side by side comparision........... Now this is only is a dark garage at about 10 ft. but you can see the pattern difference.
 -
And you're in a pinch....... This should get you by for a while. I've done this a few times to help others out, including the ones in my carbs that were done before we knew about the availability from SCI. It works and has held up well for about 20,000 miles on my '84. But here is what got me started again today. I've known I was pushing my luck on the treated diaphragms I did on mine several years ago. I ordered a set of SD1 x4 diaphragms a couple weeks ago from SCI but they were out of stock with a 4 to 6 week wait before they came in. It was running ok but getting hard to start again so I figured I'd change the plugs before I take off on another road trip. So I got the plugs in and it started fine like it does with fresh fire. But..... it felt a little off. Not quite right. So as long as I had the plastic off I pulled the diaphragm covers to take a look. Dang! Not cool. I found two diaphrams with holes in them. Not biggies but enough to cause problems. First pics show what I found. I'm not fixing that. I had spare sliders and diaphragms from another set of carbs. They were set aside long ago as they did have some tiny pinholes in a couple and I didn't need to mess with them at the time. So, here is what I have done, again, until the SCI SD1's come in. Cut down the top of a milk bottle so the hole is large enough to drop in the slider to protect it and the needle from any over spray from the Plasti Dip Spray. Tape off the plastic ring on the outside of the slider. It don't need to be sprayed. Wash the diaphragms down with alcohol to clean them up and let it dry. Give them a light coat of Plasti Dip Spray and let them sit for about a half hour and give them another light coat. They say it needs 4 hours to dry but I'd give them more than that. I didn't want to let it get too heavy as they still need to be flexible. They actually seem to soak up the spray and feel more flexible than they did in the beginning. But they cured and back into the carbs they went. Fired right up and idled fine and a quick sync brought them right on line. I'd done a sync this spring so apparently the rips were recent. But like I said, it's a fix. A pretty durable fix from the miles I've put on the bike since the first time I did this put if you need to get by.... for the cost of a can of Plasti Dip, it's a good one. I might try the Liquid Electrical Tape on the rips and a coat of of Plasti Dip to see if that holds up. Never hurts to know you can at least get home when you're in a bind. Still looking forward to the new ones. Got to be a bigger improvement over the repair. So there ya go. Mike
-
This site is very informative and worthwhile! Which ever diseases you click-on it gives you a video explanation! Interactive Sites For Medical Information The tutorials listed below are interactive health education resources from the Patient Education Institute. Using animated graphics each tutorial explains a procedure or condition in easy-to-read language. You can also listen to the tutorial. JUST CLICK ON A SPECIFIC AILMENT NOTE: These tutorials require a special Flash plug-in, version 6 or Above... If you do not have Flash, you will be prompted to obtain a free download of the software before you start the tutorial. Diseases and Conditions Abdominal Aortic Aneurysm Acne AIDS Allergies to Dust Mites Alopecia Amyotrophic Lateral Sclerosis Angina Anthrax Arrhythmias Arthritis Asthma Atrial Fibrillation Avian Influenza Back Pain - How to Prevent Bell's Palsy Brain Cancer Breast Cancer Burns Cataracts Cerebral Palsy Cold Sores (Herpes) Colon Cancer Congestive Heart Failure COPD (Chronic Obstructive Pulmonary Disease) Crohn's Disease Cystic Fibrosis Depression Diabetes - Eye Complications Diabetes - Foot Care Diabetes - Introduction Diabetes - Meal Planning Diverticulosis Endometriosis Epstein Barr (Mononucleosis) Erectile Dysfunction Fibromyalgia Flashes and Floaters Fractures and Sprains Ganglion Cysts Gastroesophageal Reflux Disease (GERD) Glaucoma Gout Hearing Loss Heart Attack Hepatitis B Hepatitis C Hypertension (High Blood Pressure) Hypoglycemia Incisional Hernia Influenza Inguinal Hernia Irritable Bowel Syndrome Kidney Failure Kidney Stones Leishmaniasis Leukemia Low Testosterone Lung Cancer Lupus Lyme Disease Macular Degeneration Malaria Melanoma Meningitis Menopause Migraine Headache Mitral Valve Prolapse Multiple Myeloma Multiple Sclerosis Myasthenia Gravis Osteoarthritis Osteoporosis Otitis Media Ovarian Cancer Ovarian Cysts Pancreatitis Parkinson's Disease Pneumonia Prostate Cancer - What is it? Psoriasis Retinal Tear and Detachment Rheumatoid Arthritis Rotator Cuff Injuries Sarcoidosis Scabies Seizures and Epilepsy Sexually Transmitted Diseases Shingles Skin Cancer Sleep Disorders Smallpox Spinal Cord Injury Temporomandibular Joint Disorders (TMJ) Tennis Elbow Tinnitus Trigeminal Neuralgia Tuberculosis Ulcerative Colitis Umbilical Hernia Uterine Fibroids Varicose Veins Vasculitis Warts Tests and Diagnostic Procedures Amniocentesis Barium Enema Bone Densitometry Breast Lumps - Biopsy Bronchoscopy Colonoscopy Colposcopy Coronary Angiogram and Angioplasty CT Scan (CAT Scan) Cystoscopy - Female Cystoscopy - Male Echocardiogram Echocardiography Stress Test IVP (Intra Venous Pyelogram) Knee Arthroscopy Laparoscopy Mammogram MRI Myelogram Newborn Screening Pap Smear Shoulder Arthroscopy Sigmoidoscopy Ultrasound Upper GI Endoscopy Surgery and reatment Procedures Aorto-Bifemoral Bypass Cardiac Rehabilitation Carotid Endarterectomy Carpal Tunnel Syndrome Chemotherapy Cholecystectomy - Open Laparoscopic (Gallbladder Removal Surgery) Clinical Trials Colon Cancer Surgery Colostomy Coronary Artery Bypass Graft (CABG) C-Section Dilation and Curettage (D & C) General Anesthesia Heart Valve Replacement Hemorrhoid Surgery Hip Replacement Hip Replacement - Physical Therapy Hysterectomy Knee Replacement LASIK Massage Therapy Neurosurgery - What is it? Open Heart Surgery - What to Expect? Pacemakers Preparing for Surgery Prostate Cancer - Radiation Therapy Shoulder Replacement Sinus Surgery Stroke Rehabilitation Thyroid Surgery Tonsillectomy and Adenoidectomy TURP (Prostate Surgery) Vaginal Birth Vasectomy Prevention and Wellness Back Exercises Coumadin - Introduction
-
I've been playing with this for a while and finally got it worked out. We old Maytag 1st genners are seriously short of handlebar space for mounting all those lil dodads and gizmos. Got that handled without drilling into the bodywork or fabbing up something to bolt onto the bike. I had to farm out a bit of work to our friend Dano to get the holes drilled square into the round stock as I had no luck with the hand tools I had available so, thanks again Dan. I first got the idea from Dingy when he welded up a nut to go on there to make his GPS mount. Pretty simple idea. Remove the nut recessed into the risers that retains the hand controls and remove it. Replace it with the stud extension to add the space needed. Roll an o-ring into the recess to keep out the grit and water and it's done except to mount on the handlebar clamps for the needed mounts. So from this day forward these shall be called "Snagglestuds". I made a pair for both sides so now to buy more stuff to mount......... Mike
-
 Attached are PDF scans of a 1987 Venture Service Handbook for Technical Training. I got a copy of this on Ebay a while back and got around to scanning & posting it today. It covers Ventures from 83 to 87. There are quite a few interesting tidbits in the information contained in this material. I don't think this is all the service bulletins up to this point. In the Front End Noise, I found a reference to a bulletin M83-015 which I don't have, relating to Instrument panel noise, but this is not listed in the contents section. I broke the scans up by sections so I could get them uploaded. Gary Files moved to tech library here: http://www.venturerider.org/forum/showthread.php?t=71406
 -
 Does the same Spin-On-Oil Filter adaptor fit both the 89 and 91 VR. Are there any special tools needed? Are there any special instruction tips? Are there any thing to be carefull of?
 -
ok, so i got a 42s fuel pump. it comes with a screw-in filter. should i leave this filter on as well as the inline filter i already have?? or should i just go to ACE and get a fitting, and leave my stock filter? thanks.
-
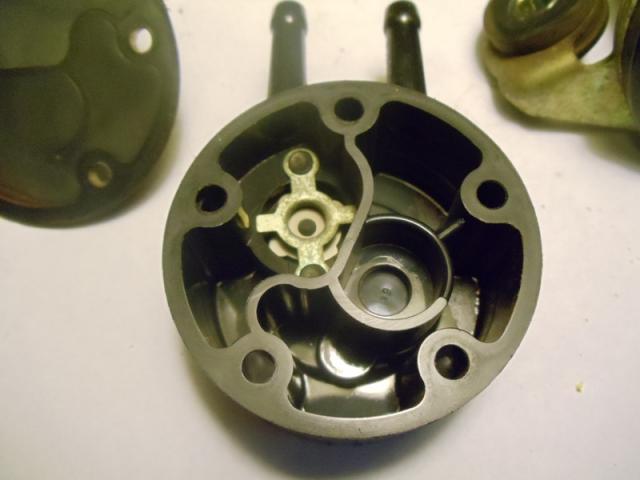
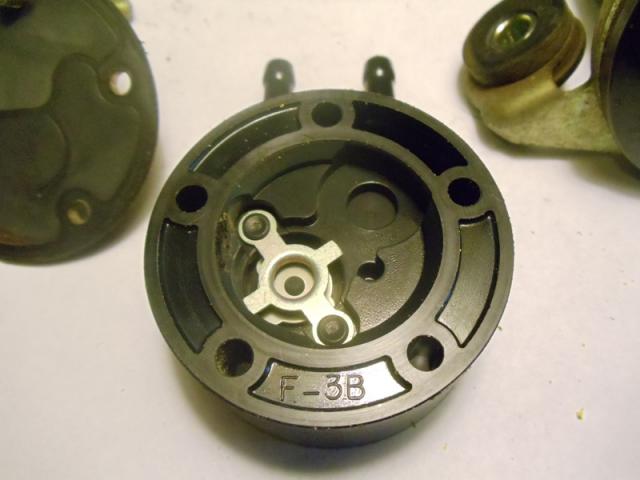
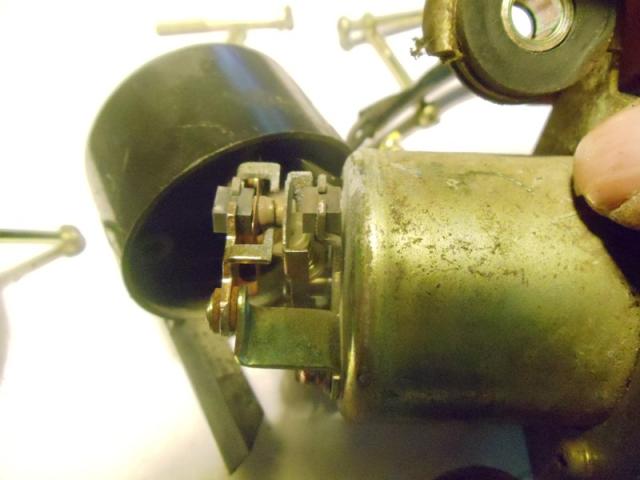
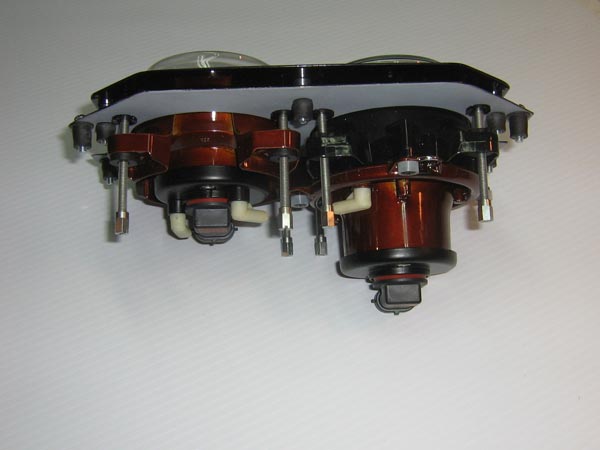
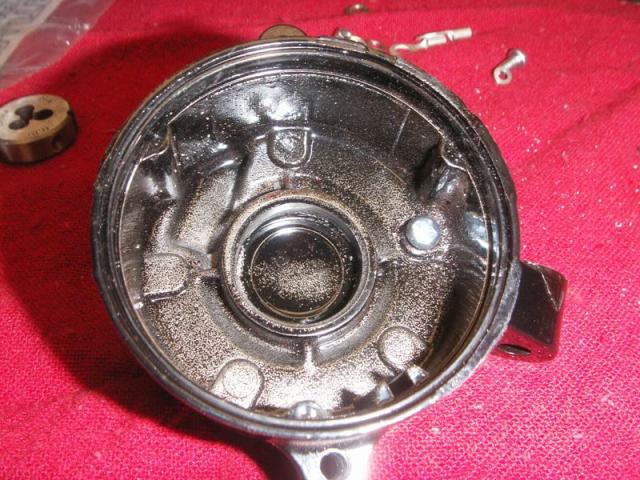
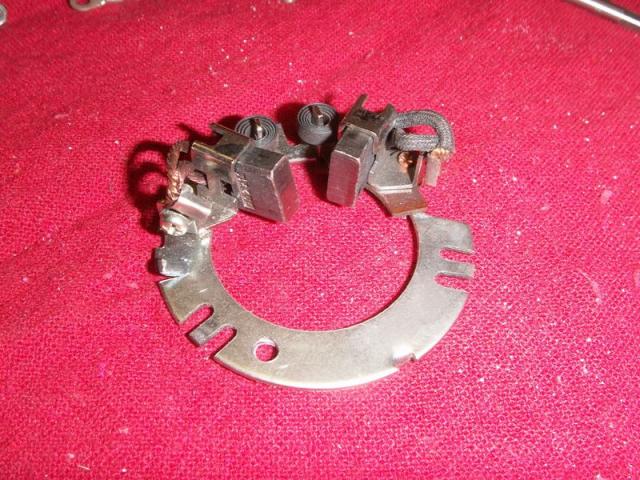
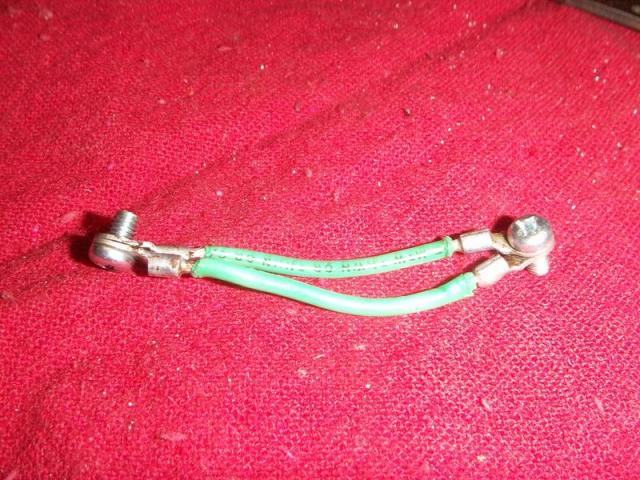
I was going to post this in reply to a members fuel problems, but decided to start a new thread so it could be located later for reference. Here is a bunch of pictures I took of a 1st gen fuel pump a week ago just for S&G's. The RSV is probably similar, but I don't know. Just offering this as maybe some help in understanding the mysterious fuel pump. It is not a really technical description below, but the basic operation. In a nutshell, the pump operates by energizing a coil and pulling the plunger towards the contact end. This pushes in the contact assembly on the other end, breaking the current path to the coil. The plunger returns to rest position, contact closes & cycle repeats. When the plunger pulls towards the contact, it pulls gas in from the tank into the pump cavity via a one way valve. On the Return stroke the fuel is pushed out another valve towards the carbs. This happens until 1 of 2 things occur, first is pump builds up pressure in line and and the plunger does not return forward to complete pump stroke. 2nd is the fuel pump circuit times out after 4 seconds of not sensing motor running and cuts off current to pump. On pump end there are two diaphragm type valves, one allows fuel to be pulled in to pump cavity, but not pushed back out. Other allows fuel to be pushed out towards carbs, but not flow back into carbs. Not my best tech write up. Gary
-
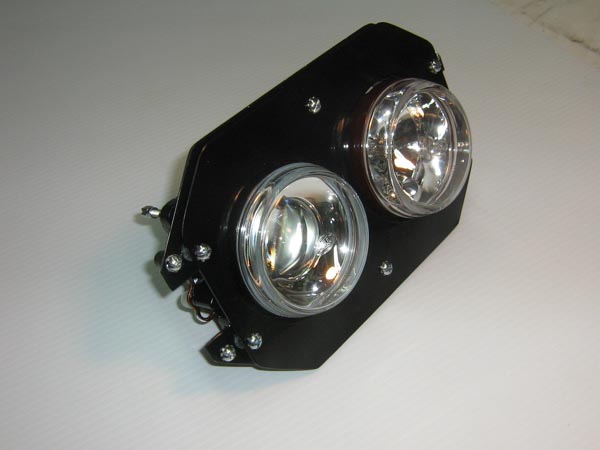
Well things are coming together. I bought a kit with the hardware and adaptor plates from Dingy a while back and been locating the proper lights and power plugs to fit. Got the lights the other day and the plugs should be here next week. The stock headlight bucket has been drilled and the plate fitted and I assembled the whole thing yesterday. Hella 90mm H9 Projectors high and low. Mean looking lil bugger ain't it? These should toast the fur on Bambis butt. So much for overdriving the headlights now. More info and pics as it comes together. Mike
-
One of my winter projects was to convert all my running and marker lights to LED. I've got my front fender marker and then four double sets in the rear light bar and then four mini Barons on top of the light bar. That's fourteen 194 bulbs alone. I can see the drop on the volt meter when I turn them on. Wanted to get that down a bit. I stopped at about every truckstop and and independent bike shop I came across looking for housings and light assemblies and never really found anything that would make a clean mount or look like it belonged there. Then I found these guys a while back. www.superbrightleds.com Right out of Missouri, USA! I bought a few LEd bulbs with the 194 type wedge base to try and liked what they did. In fact, I had one out of the first batch that was a bit intermitant and I shot them an e-mail and they sent a replacement the next day. No problem at all with their customer service people. These LEDs have voltage range from 5-14.5 volts depending on the LED type and a full selection to cover about any application. You can select the beam pattern, how wide, on most of the styles and luminous intensity for your application also on most. So I ordered everything I needed to do the markers and will get to the dash lights later on. For under $45.00 I got enough to do everything and that included shipping. A whole $5.00 for that. But I took a pic of the rear bar with only two LEDs in the Barons. Should be able to pick them out easy enough. Brought the red back out instead of that orangish color. Betting that my volt meter won't even flinch when I kick all these puppies on. I paid about .96 cents each for the stock 194 bulbs and $1.99 each for the 5 bulb LEDs that went into the Baron. Just read the spec sheets on the LEDs before ordering. The LEDs are bit bigger depending on the application. I ordered three different types for mine to get them to fit. Now if that ain't a poor man fix......what is? Mike
-
Some of you have seen the thread on the upgraded starter enage clutch that was the brain child of Squeeze and assembled by Dano. If you have had problems with your engage slipping, chattering or banging this is the answer. I installed mine today and it works great. My bike has not been started since the second week of December and suffered through a lot of subzero temps sitting in the garage. The first crank was solid and no chattering or slipping. The second crank she was turning over like she has never done before. The third try I gave it half choke and it was instant on. Everytime I shut her down and hit the button it was instant on. No hesitation at all. This is my third engage since I bought the bike. And I do think it is going to be the last one the bike will ever need. This thing is a monster!! Pics tell the story. Thanks to Squeeze and Dano for sharing this project. Mike
-
Well .......when I shut the bike down for the season I removed all the plastic and took it into my little basement shop with the intentions of repairing minor cracks and fabbing up some new tabs that were broken. Got that done. Now with all the winter weather we have been having I've been staring at pieces of my bike for a few weeks now. I hate that! So with some spare hours and some serious self pep talks I took on a new project. Lining the trunk and saddlebags with trunk liner. So today I finished the lower trunk body. Pretty happy with the results so far. Now onto the trunk lid and the major challenge......the saddlebags. Like they couldn't add a few more curves to these things! Geesh. Got to go find a Sunday paper. Need to make more patterns. Mike
-
Ok....I've been around here for a couple of years now. Been reading and asking questions and talking to a lot of you folks by way of these forums. When I trailered my '84 home she didn't run and was in need of some TLC and this site helped me provide that for the bike. Information and an odd part here and there has come to me when I needed it. Some of you have gone way out of your way to provide items for the members in group buys. Thank you for that. Thanks to everybody that has offered advice and information on my projects. You are the reason this club is so different from others. This is a family. And Freebird.....you do one hell of a job keeping all this in running order. So the first pic is when I first finished the bike after bringing her home and got her cleaned up and running. I thought it turned out pretty well. Ahhh... but the second pic is of the bike today. I finally rolled her out of the garage after a long winter and spring of reworking the bike. Again. LOL! So it was the first ride of the year for me and I know how much ya'll love pics. So here are some shots of the changes that I have made and the things that have been added or upgraded. It's been a learning experience for sure. From RickH's upgrade stator and SS lines and Condors "Battle of the MAC" exhaust and CondorBrace to odd eBay finds to items that were DIY stuff. Thanks again to all for helping me pull all this together. Mike
-
One of things that I have wanted to add to my '84 was more switches to control extra lighting and power for other toys. As you all know the 1st gen is lacking in any flat panel spaces to really do a clean and accessable install in the cockpit area. I'd seen the Kuryakyn Master Cylinder switch panel and I thought there had to be a way to install something without obstructing anything on the controls. So I went digging in my odds and ends and after a quick trip to Radio Shack and a stop at the hardware store this is what I came up with. No mods to the bike, controls, panels or handle bars. This will mount by changing one bolt. Parts needed: (1) Radio Shack Project box. I used a 4x2x1 model. Part # 270-1802 (1) 10mm x 1.25 pitch x 2" stainless bolt. (2) 3/8 washers (an extra couple for spacing if you like) (3) On/Off switches / your choice, just watch that they are not too big. (1) Steel spacer / 1" long x 3/8 I.D. Just needs for the bolt to go through it. (1) 1/2 I.D. rubber grommet. (3 ft) Plastic wiire loom casing or wrap. (4) Small self tapping machine screws. Of course wire, terminals, sealant, and a few zip ties. And maybe a beer. Tools: A drill with a bit the size of the switch studs. All my holes were 3/8. A Dremel is great but a small file or Exacto knife will do fine. And either wire crimpers or a soldering gun. First things first and I'll try to keep the pics in the right order to follow along. Open up the project box and remove the metal top panel and lid. The metal panel is meant to be the top plate for the box. I mounted it on the bottom to reinforce that where the bolt will go through. It will fit over the bumps on the bottom of the box so just drill small holes in the center of the bumps and attach it with the self tapping machine screws. Set up how you want your switches to lay. Mark your holes and carefully (my box is ABS) and drill the proper size holes for the switch studs. Now drill a 3/8 hole in the bottom of the case (and metal plate) for the mounting bolt. Check your placement on the bike but about dead center is good. Don't install the switches yet. There will be some ridges inside the box. You will need to grind or file them down so the switch retaining nuts will seat flat. Again, check your postion on the bike and decide where you want the wires to exit the box. Drill a hole and install a rubber grommet. It needs to be large enough to slip the wiring loom casing though it. Ok, slip the 10mm bolt through the hole from the inside before you install the switches. Check for clearence at the terminal studs to prevent shorting them on the bolt head. Slip a washer over the bolt, then the 1" spacer and another washer. Ok, now where to mount it? Look at the clutch master cylinder and see where the mute button in bolted on. The Royales should all have that, the standards may not. Which ever model you have there will be a blind 10mm hole in the body of the master. Remove the bolt and install the assembly with the new bolt there. Use washers to adjust the height so it clears the mute control. It will be above the master clyinder cover so you can open that to added fluid without removing the new panel. Adjust the position to your liking an tighten the bolts. I'm using star lock washers to hold it in place. Now you can install the switches and wiring. Before replacing the plastic cover make sure you have room for the inner lip to clear the nuts on the switches. I had to do a little grinding. A little sealant around the cover and were the wires drop out should keep the inside dry. I drilled a very small weep hole in the lowest corner of mine. So that is pretty much it. Don't look to bad, in a good location for the left hand, it don't interfer with anything else and should hold up real well. Paint or finish it to your needs. I had most the stuff laying around so cost was under $12.00 for what I had to pick up. If you had to buy it all maybe under $30.00. Maybe this will solve some problems for a few folks. Just a DIY day around here. Good luck. (An added note: I bought another project box and took the metal plate from it and polished it to a high gloss to go on the top of my finished panel. Looked real nice. Rode for about half and hour and went home and painted it flat black. Worse than a chrome gas cap.) Mike


.thumb.jpg.9dfefb49018580a1813c8128f131546e.jpg)