Search the Community
Showing results for tags 'projector'.
Found 5 results
-
 Finally got the headlight mod finished tonight! As the weather is taking a turn for the wet side I was stuck in the garage and only got a short ride around the block but it is an awesome improvement. I didn't get a chance to do any before shots on a dark road before I did this but I will post some later when I can get out with new setup. I did some pics in the garage to show a little bit of the difference between the SilverStar H4 I had and the Hella H9 Modules. A little side by side comparision........... Now this is only is a dark garage at about 10 ft. but you can see the pattern difference.
 -
 Some time ago I added an HID Bi-Xenon kit to my 1986 Venture Royale. As kits go it has done a decent job and for $60 who could complain. It was a massive improvement over stock, but as with all of these kits, it was not coming close to the true potential of HID headlights. The light output was compromised by two main factors, the poor stock reflector and the fact that the bulb moves to create High and Low beams. Whichever way you cut it, in one of those positions (and probably both), it was not at the true focal point of the reflector. So it was time to do the job properly, and install a projector. First problem is the glass lens on the stock headlamp. It is cut for halogen bulbs. Projectors need a clear glass cover if they are to work well, and the '86 doesn't have one. However, the earlier bikes do, so first up was a trip to ebay for the front cover, rubber boot and glass from an '85. How hard could it be to make that fit over the '86 headlight bucket with the original headlight glass left off? Harder than it appears is the answer, but not so hard that you shouldn't try it if you are so inclined. It was open to me to do a full retrofit of the earlier headlight, and this may be a better way to go but I don't know how the earlier headlight mounts, and what additional parts might be needed. So ... This is what I started with: http://i1092.photobucket.com/albums/i418/twigg2324/1986%20Yamaha%20Venture%20Royale/Headlight%20Conversion/DSCN0292.jpg Nothing wrong with it, it's just not good enough for the amount of night riding I sometimes have to do. First up was the HID kit. I bought the Stage III Superbike Kit ($150) from theretrofitsource.com The kit comes with literally everything you need except a man to fit it all for you. The components appeared to be of high quality although there was some excess flashing on the Shroud that needed removing. No complaints. The kit also came with a Left Hand Drive Projector, more of that later. This is what was in the quickly delivered box: http://i1092.photobucket.com/albums/i418/twigg2324/1986%20Yamaha%20Venture%20Royale/Headlight%20Conversion/DSCN0290.jpg And the parts laid out: http://i1092.photobucket.com/albums/i418/twigg2324/1986%20Yamaha%20Venture%20Royale/Headlight%20Conversion/DSCN0291.jpg First job was to split the headlight. Ten minutes in the oven at 265F, and it came apart with no real effort at all: http://i1092.photobucket.com/albums/i418/twigg2324/1986%20Yamaha%20Venture%20Royale/Headlight%20Conversion/DSCN0317.jpg Then the whole of the inside of the bucket got two coats of grey primer and three coats of black paint. It looks good in black, but also serves to prevent any excess light from straying into unwanted places: http://i1092.photobucket.com/albums/i418/twigg2324/1986%20Yamaha%20Venture%20Royale/Headlight%20Conversion/DSCN0324.jpg Note ... There are two tabs in the hole where the original bulb fitted. They need removing and a file made short work of that. Also, the solenoid wiring has to emerge somewhere so I drilled a 1/4" hole in the reflector just below the projector. This will be covered by the shroud and not seen. Then we can mount the Projector, Bulb and Shroud in the housing. The projector is the smallest available at 2 1/2". The shroud appears massive, and doesn't fit at first as the diameter is too big. A few minutes with a hacksaw and it fitted just fine. The shroud is simply glued to the projector with a fitting ring and some silicone. http://i1092.photobucket.com/albums/i418/twigg2324/1986%20Yamaha%20Venture%20Royale/Headlight%20Conversion/DSCN0329.jpg And the rear .... http://i1092.photobucket.com/albums/i418/twigg2324/1986%20Yamaha%20Venture%20Royale/Headlight%20Conversion/DSCN0325.jpg I have covered the thin wires with a couple of layers of heat shrink, and they are now siliconed in place and have wire protector round them. Having stripped out most of the wiring for the old kit, all that is left is the ground from the switch I fitted above the brake master cylinder. This interrupts the ground to the lights and I use it as a manual On/Off switch. I leave this in place as I plan on re-using it. Next up is fitting the new wiring harness. There isn't much room. I found a place to install the two included relays. They are bolted to the center inner fairing behind the relays and below the instrument panel. The ballast has it's own bracket which bolted handily to the frame, just above and behind the headlight adjuster. I fitted the supplied plug to the solenoid wires (for High/Low beam) and plugged it into the harness. Connect the ground and run the hot back to the place on the Auxiliary fuse panel that was powering the original kit. All the wires in the harness are very well protected, they just need clipping in place ... cable ties rule! Now the difficult bit .... The rubber boot for the '85 was not designed to fit the larger shell of the '86. Surgery was needed to cut away quite a lot of rubber. Another problem is that the top of the front frame will not clear the two protruding brackets on the VR frame, so it had to be cut away leaving the whole part less strong. It will be okay because it is firmly held in place, but care is needed. So ... Now I have a clear front glass that will fit, but there is another problem ... Isn't there always! There is no way that the new arrangement is going to keep water out of the projector. The light is well enough protected at the sides and from below, but any water running down the screen is going to run straight under the trim and through the butchered rubber boot. Something has to be done. I decided that if I could seal the gap between the windshield and the front of the fairing all would be well. What I needed was a seal that would effectively cover the whole of the area behind the chrome front trim. What I had is an old inner tube, and I vaguely remember that rubber is waterproof This is the result: http://i1092.photobucket.com/albums/i418/twigg2324/1986%20Yamaha%20Venture%20Royale/Headlight%20Conversion/DSCN0330.jpg The rubber is completely sealed onto the windshield with silicone. Once mounted it was very easy to cut the lower edge to match the profile of the trim, and the whole lot is invisible. Any water running down cannot now get into the front of the fairing, or the light. It should be good enough. And the final reveal .... This is what it looks like now: http://i1092.photobucket.com/albums/i418/twigg2324/1986%20Yamaha%20Venture%20Royale/Headlight%20Conversion/DSCN0332.jpg That crack at the bottom has been repaired, and it needs painting to match the bike, but the bike will be painted so it can wait. The gold doesn't look too bad. I couldn't get video of the original, halogen light output on video simply because it didn't put out enough for a decent picture. I got a blurry still pic to give you an idea: http://i1092.photobucket.com/albums/i418/twigg2324/1986%20Yamaha%20Venture%20Royale/Headlight%20Conversion/DSCN0306.jpg I did get video of the resulting output. The video id decent, but it doesn't give the full impression ... It is shot 25 feet from the garage door. You will immediately spot that the beam is dipping the wrong way. That is the incorrect projector. I called the supplier and explained. They were a very apologetic and said it had the wrong solenoid shield fitted. A new one was on it's way withing a couple of hours and I'm told it's a very easy part to swap out. I have been impressed with these folk: This light, and the pictures do not do it justice, almost turns night into day. The improvement over stock is phenomenal, and the improvement over the previous HID kit has to be seen to be believed. At some point I will add a couple of HID Driving Lights ... One Spot beam and one Eurobeam, but for now I can see
 -
I was chatting with the venture owner Janne jurvelin and he had a pic of his Mk2 scoot with 2 projector bulbs where the original square oem headlight would go, i asked him about it and he directed me to this site that offers the projector light pods and universal mounting plates for what I thought was a pretty reasonable price. the result looks quite similar to Snaggletooth's hella light conversion, but I think it would end up a bit cheaper, and they supply the mounting plate, probably eliminating some fabrication work. high beam- http://www.louis.de/_20100191f9ec6203dfd4ca1147ce400239/index.php?topic=search&searchterm=10033667&cmd.x=9&cmd.y=4 low beam- http://www.louis.de/_20100191f9ec6203dfd4ca1147ce400239/index.php?topic=search&searchterm=10033666&cmd.x=3&cmd.y=7 universal mounting plate- http://www.louis.de/_20100191f9ec6203dfd4ca1147ce400239/index.php?topic=search&searchterm=10020904&cmd.x=7&cmd.y=10 I have never dealt with this company and havnt done this install I am just posting this info as most of us G1 owners are always looking for better ways to see the road. so please dont ask me how to do it as I havnt done it myself. brian [Janne Jurvelin info- Parts from www.louis.de Part no.10033667, 10033666 and 10020904. Installation takes 30 minutes.]
-
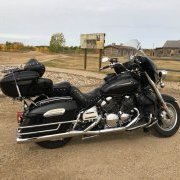
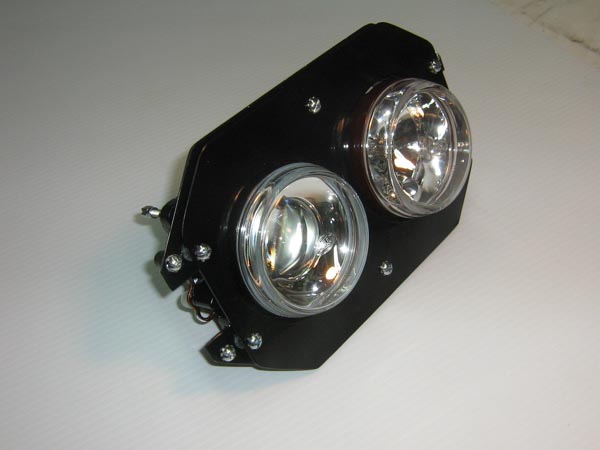
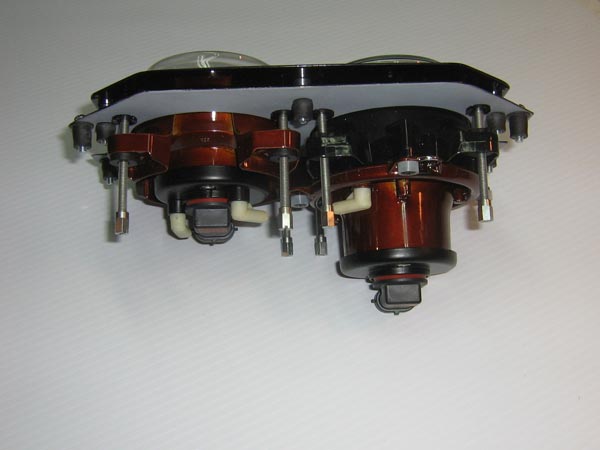
Well things are coming together. I bought a kit with the hardware and adaptor plates from Dingy a while back and been locating the proper lights and power plugs to fit. Got the lights the other day and the plugs should be here next week. The stock headlight bucket has been drilled and the plate fitted and I assembled the whole thing yesterday. Hella 90mm H9 Projectors high and low. Mean looking lil bugger ain't it? These should toast the fur on Bambis butt. So much for overdriving the headlights now. More info and pics as it comes together. Mike

-
Hi fellow RSTD riders! There's a projector on the bottom of the stock seat that should slip into a slot on the frame. This stabilizes the back of the seat. I have had the darndest time getting the projector into the slot. Its almost impossible. Its so hard to see whats going on, but just wondered if anyone else had a problem like this and what might be done about it. Thanks, Jim:confused24: