Search the Community
Showing results for tags 'diaphragm'.
-
 taking my carbs apart to clean the bowls and pilot circuit. I have at least one diaphragm that will rotate on the slider. I read somewhere that a dab of silicone will cure this but just read from a diaphragm seller that super glue should be used. Anyone try something that worked. what glue and where and how?.. BTW, the center plastic screws are tight. I also read somewhere that the diaphragm is anchored to the needle which is keyed to the slider.. but I haven't tried to take the needles out the slider. to secure one of the really freely rotating diaphragms, I held the slider and tapped the center of the slider with a hammer so as to sock the plastic ring up against the diaphragm.. not sure if it held.
 -
Ok folks, I got a response from Japan this evening. The company does not currently offer the diaphragm by itself. The SD1 and SD2 sets are not exactly the right size according to the manufacturer. However, based upon my request they are going to look into adding them to the line-up. I offered to purchase 100 sets of course based upon end pricing. I figure we can easily use those up if the quality is good. Now, I need a bit of research help from owners of other Yamahas. 1) Do all 1983-1993 Ventures use the same diaphragm? (I think yes except maybe the 1983) 2) What years of V-Max will these fit? I suspect 1985- almost current) 3) Is the base diaphragm the same on the 2nd Generation? 4) I see the eBay guy lists the 535 as also using these - what else may use them? For our folks in Canada and Europe - what useage would you have? If I can keep the price down to $100.00 U.S. delivered to the 48 states would it fly? I will need some numbers from y'all to make this happen. No promises here JB
-
 Hello All, First I have searched to no avail for Gen II carb diaphragm replacement vendors or fixes. Found the thread to spray on rubber stuff:think: for a temp fix. While taking apart carbs on my 99 RSV to clean today, I may have put the carb slider cap on a TAD wrong, to say the diaphragm was pinched and a small hole is now in the material at the bend where it seats on carb body. It may have already been there, not for sure.... ANYWAY I need one. Help? Man those carbs were dirty..... Thank you in advance...Looking for new one. Directions? Also, the fuel mixture screws are obviously not set the same. Inside the throat of the carb body where the screw (or hole) is present, One is thru enough to cut yourself on, while the others are barely or not at all... I am not a carb expert. Directions to setting these properly? Thanks, James:bowdown:
 -
I am considering a diaphragm to coil spring conversion to try to minimize slippage during hard acceleration. Before I do, I would like to get some feedback from anyone who has done it. Was it worth it. I don't want to do something I will just regret later. Why did Yamaha change to the diaphragm clutch spring? My 84 had coil springs. Now I have a 99 RSV and I'm back to the same problem I had with th 84 until I installed the heavy duty springs.
-
And you're in a pinch....... This should get you by for a while. I've done this a few times to help others out, including the ones in my carbs that were done before we knew about the availability from SCI. It works and has held up well for about 20,000 miles on my '84. But here is what got me started again today. I've known I was pushing my luck on the treated diaphragms I did on mine several years ago. I ordered a set of SD1 x4 diaphragms a couple weeks ago from SCI but they were out of stock with a 4 to 6 week wait before they came in. It was running ok but getting hard to start again so I figured I'd change the plugs before I take off on another road trip. So I got the plugs in and it started fine like it does with fresh fire. But..... it felt a little off. Not quite right. So as long as I had the plastic off I pulled the diaphragm covers to take a look. Dang! Not cool. I found two diaphrams with holes in them. Not biggies but enough to cause problems. First pics show what I found. I'm not fixing that. I had spare sliders and diaphragms from another set of carbs. They were set aside long ago as they did have some tiny pinholes in a couple and I didn't need to mess with them at the time. So, here is what I have done, again, until the SCI SD1's come in. Cut down the top of a milk bottle so the hole is large enough to drop in the slider to protect it and the needle from any over spray from the Plasti Dip Spray. Tape off the plastic ring on the outside of the slider. It don't need to be sprayed. Wash the diaphragms down with alcohol to clean them up and let it dry. Give them a light coat of Plasti Dip Spray and let them sit for about a half hour and give them another light coat. They say it needs 4 hours to dry but I'd give them more than that. I didn't want to let it get too heavy as they still need to be flexible. They actually seem to soak up the spray and feel more flexible than they did in the beginning. But they cured and back into the carbs they went. Fired right up and idled fine and a quick sync brought them right on line. I'd done a sync this spring so apparently the rips were recent. But like I said, it's a fix. A pretty durable fix from the miles I've put on the bike since the first time I did this put if you need to get by.... for the cost of a can of Plasti Dip, it's a good one. I might try the Liquid Electrical Tape on the rips and a coat of of Plasti Dip to see if that holds up. Never hurts to know you can at least get home when you're in a bind. Still looking forward to the new ones. Got to be a bigger improvement over the repair. So there ya go. Mike
-
I was installing my JBM carb diaphragms, and I got a little to energetic getting the metal ring out and a carb slide broke apart. Anybody have one that I can buy? The condition of the diaphragm isn't important, I've got the new one to install. It's for a 1st Gen, MK II (89). Thanks, Frank D.
-
 Hi, I just aquired a 85 Venture and the bike is running pretty rough. Will only run and idle with the choke on and will not rev over 3000rpm. If you throttle it quickly the bike will sputter and stall, if you slowly feather the throttle the bikes RPM will climb. I'm 99% certain that there are 2 issues. 1) Carb is dirty. I have taken the airbox off, and sprayed the carbs down and also ran a tank of seafoam with premium fuel through the bike. This seemed to have helped alot but it still won't run over 3000RPM. 2) After reading alot of posts on here I think I have a bad diaphragm. I say this because one of the sliders has no vacuum and slides back and forth with 0 effort as the other 3 have vacuum and you can hear it as you slide the slide. A couple questions... Is there anyone is Winnipeg that would be willing to help me clean these carbs and replace the diaphragm (I would definitely pay you for your time), and if not, are my assumptions correct with the carb diaphragm being shot seeing that the slide moves with 0 effort? Thanks in advance! Ben Also will sell this bike for $1975.00 OBO
 -
after changing the plugs, changing the oil, i decided to install skydocs shim kit before i synced the carbs using the carbtune pro i got from zane. thanks again zane. 3 carbs, no problem. last carb, DOH! i must have put the nylon nut ever so slightly wrong, and SNAP! broke a diaphragm housing. lack of patience i suppose. only had about a good 2 hours of clear weather before the rain came this weekend. i found some new ones on ebay. so i bought 2, 1 for a backup. and i got 2 needle kits, just for spares.
-
I have been searching tech posts and goggling for just the carb diaphragm boots without the slides and can't find them for my 86, all the older posts with links that sell them are no longer any good can someone tell me if I can still buy them. Tom
-
I did remove all 4 throttles on my -84 yesterday. Two of them had cracks near the end where the diaphragm is fitted. One seems to be glued together but the other one seems to be held together by the fitting for the diaphragm. Is this a common problem? I have searched the forum but did not fina any threads about his. Is the cracks from the plastic getting old or what could have happened? Anyhow; do any of you know where to by new throttles that are not oem? Or perhaps the oem part is affordable?
-
I've had the 86VR for a few weeks and after some tinkering, I got it running pretty good...some popping at idle but that's about it. I decided to check the back right diaphragm, just to see its condition. As it turns out, it was in pretty good shape...a couple of pinholes but that's it. I reinstalled and decided to see how the slides work looking down the air filter hole. To my surprise, three were pulsing freely but #3 was not moving at all. I took the diaphragm out and it came out in sections. The metal piece which holds the diaphragm and plastic washers together had separated from the sleeve. I reassembled the unit at what a difference. All of a sudden, I had a 4 banger. I saw a cheapo carb sync tool somewhere consisting of clear fuel line in two loops and ball bearings. I made one of these and after a 5 minute carb synch, (#3 was way out), it goes like a scalded cat.
-
Hey Everyone, I will be traveling to Don's Maint. Day by car this year due to my recent back surgery, and I will have replacement Clutch Diaphragm Springs for anyone that purchased a Clutch Spring Upgrade Kit over the past few months. I will also have complete kits with the new spring for First and Second Gen. bikes as well as a Clutch Spring Upgrade Kit for the MKI VR, which uses a set of 6 compression springs instead of one Diaphragm Spring. Because of my present physical condition, I WILL NOT BE WORKING ON MOTORCYCLES! But I will have many of the Items I have listed in the Classifieds with me for sale. I will mail a new spring to anyone that I miss at Maint. Day or anyone that doesn't attend. Thanks for your patience and understanding, it will be a pleasure to see everyone at Maint. Day again this year. Also, thanks for the kind words and prayers from everyone while I was down, and most of all, thanks to the people that helped Jean while I was down, she was very grateful, as was I. Earl and Jean
-
hi I'm new here I have a 1986 venture Royale. I need to replace the diaphragms, any help on how to go about doing it would be appreciated. Thanx .
-
I just received word that the vendor will accept the old, defective clutch diaphragm springs back for a credit and will replace every spring with a new one! If you have purchased a Clutch Diaphragm Spring Kit from me and received it, PLEASE send the Spring ONLY, back to me! My address is: Earl Harrell 115 Colony Court Duncansville, Pa. 16635 I will be shipping the defective springs back to the vendor and will receive a new, proper thickness spring for every one I turn in. I will be shipping these springs on Friday April 30, 2010 so if you get your clutch spring to me by that time, you will be in the first group to receive your new, proper thickness replacement spring. Not to worry, if you miss the first shipping, I will be sending a second batch for replacement and there would be a slight delay in receiving your replacement clutch spring. PLEASE remove the clutch diaphragm spring from the plastic package and ONLY send the spring in a mailer envelope. ( a 6X6" bubble wrap mailer will be fine) Thank you one and all for bearing with me thru this, I will repost the Ads for the First Gen, and Second Gen. Clutch Spring Upgrade Kits as soon as the proper springs start to arrive. For those of you that have ordered the kit and not received it, Your kit will be shipped with the first batch of the correct springs! Thanks again for your patience, Earl
-
Hey All, I have been in contact with EBC and they have admitted that they have shipped me Sub-Standard Diaphragm Clutch Springs that I used in my Clutch Spring Upgrade Kits. It seems we ordered so many springs in such a short time that the were forced to activate a second supplier, and that supplier used the wrong thickness of material for the Diaphragm Clutch Spring. EBC is going to replace EVERY defective Spring. Here are the two options I can offer you at this point: Option one is to Double up you old Clutch Diaphragm Spring and the new one that came with the kit and this will solve the clutch slippage problem once and for all. If this makes the "pull" on the clutch lever too heavy for you to handle, I understand that completely! I would suggest you use option two. Option two would be for you to mail the Clutch Diaphragm Spring ONLY, (remove it from the plastic package and put it in a mailer envelope) back to me, here is my address: Earl Harrell 115 Colony Court Duncansville, Pa. 16635 Here is the "rub" with option two, EVERY Diaphragm Spring that EBC has in stock right now is Sub-Standard, Which means that they will need to make another production run of NEW springs with the proper thickness of material. This is not going to happen overnight! So if your bike is down, you may want to double up on the spring for now, and when the new, correct springs start to arrive, I will post again, and you can swap out the doubled spring for the new, proper thickness spring. Any one that has paid and not received a kit will receive their kit with the new, proper thickness Clutch Diaphragm Spring as soon as the new springs arrive. I am very sorry for this problem, I don't make these springs myself and while I verified the part number for all of the springs I shipped, I didn't measure EVERY spring I sold. I can assure you, I will be measuring EVERY ONE from now on! When the Quality level of the Diaphragm Springs has returned, I will repost the Ads in the Classifieds for the MKII VR and Second Gen. RSV and RSTD kits again. The MKI kit uses a set of 6 compression springs instead of a single Diaphragm spring and there is nothing wrong with the MKI kit. Thanks for your patience, and Again, I apologize for this hassle. Earl
-
Restore is going slowly but surely. I'm ready to do the carbs but a dire warning in the service manual says not to separate them! How do you overhaul a carb w/o separating and what the heck does a carb assembly plate look like? I did take off the diaphragm housing on 1 carb and a bunch of parts fell out. The diaphragm was wrinkled but had no holes. Does the diaphragm come as a separate part or an assembly as the parts list shows? It seems to me that the diaphragm should be part of the piston if it is to move the piston. The brass collar that goes inside of the piston was just loose when I took it apart. Any advice on these items would be very much appreciated b4 I get myself in a heap of trouble. Thanks
-
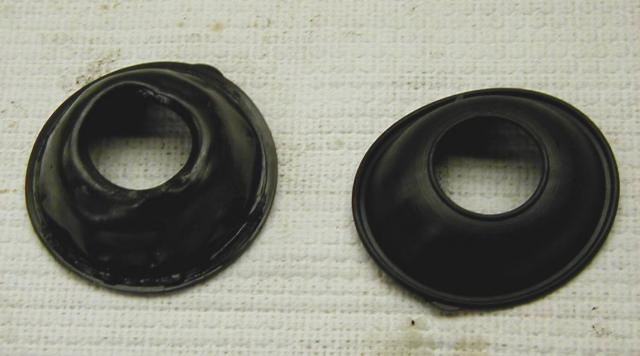
 Not being the kinda' guy that likes to do things the easy way,But always looking to save a few bucks I purchased a set of Carb. Diaphragms off of Ebay a while back. ($86.00 with shipping) I thought I would give you a run down on how that went. After removing the False Tank cover and both side covers as well as the lower fairing legs on both sides I was able to get to all 4 Carbs. easily. To remove the Carb. covers I used 3 tools, a 1/4 inch drive ratchet with a special Torx bit on it for the 4 odd screws, an impact driver with a Phillips bit in it and finally a pair of Vise Grips for 2 of those Phillips head screws that just wouldn't come out. I took out the Torx head screws first on all 4 carbs. because when you remove the last Phillips head screw, you better have your catcher's mit on, that Carb. cover is coming off...FAST! I had set up 4 shop towels on my bench and kept all of the Carb. parts separated. I held each slider assembly up to a good light to inspect them and sure enough all 4 diaphragms had holes in them. I removed the old Carb. diaphragms by gripping the slider and "rolling" the old diaphragm out from between the two flanges on the slider. Two of the old diaphragms came off in pretty bad shape. I then cleaned all of the reusable parts with Carb. cleaner , but I must say that overall everything looked pretty clean. All 4 of the sliders were nice and smooth as were the Carb. bodies on the engine. I used a clean cloth and Carb. cleaner to clean out the Carb. body bores. (I don't use paper towels for this as I would not want a shard of paper ending up in the intake or the Carb. body) With everything clean I moved on to the reassembly. The Ebay diaphragms were not made of the same material as the stock Yamaha ones, but were very pliable, and had the tab for alignment in the Carb. body. After lubing the diaphragm with aerosol spray silicone I inserted the slider into the bore of the diaphragm. When I got to the flange, I stretched the diaphragm bore over the bottom flange. Now the spacing on the two flanges of the slider seemed a bit "slim" and I panicked for a moment but realized that by using my thumb nail I could wedge the diaphragm bore between the two flanges with no problem. When all was said and done you couldn't tell that the diaphragms and the sliders were not mated at the factory. I had the slider needles out for another project I will discuss later and at this point I reinstalled them. I put the slider assemblies back in the Carb. bodies aligning the tabs, put the caps on with the Stainless Steel Allen Head Cap Screw set I have listed in the classifieds and reinstalled all of the body parts and that as they say was that! Oh yea, I accidentally spilled some paint on the Carb. caps...Oops! I have attached some pics below and am willing to chat with anyone that is interested in this rebuild. Feel free to PM me. Sorry this got a bit "windy" Earl
 -
 Was installing new diaphragms/sliders tonight. When I pulled #2, there was so much oil inside the cover that it even dripped out when I removed the final allen head. That was the only one like that. What in the world could cause excessive oil build up in the diaphragm. There is a minimal amount of oil that had accumulated in the airbox being brought up through the crankcase vent but nothing alarming. Even if oil we to accumulate in excess in the airbox, I doubt it could find its way to the diaphragm. It was running fairly well before and since I have had four new sliders/diaphragms I figured I go ahead and get them installed. Any ideas about the oil? Thanks all!
 -
.thumb.jpg.5bc608c29d230c44c77c79acb0510cd8.jpg)
Still wrenchin' on the '91
Condor posted a topic in Venture and Venture Royale Tech Talk ('83 - '93)
Pulled the covers off the '91 to get to the #4 carb and it's non--reactive diaphragm assembly to see why it's not working. Sad to say I pulled out what looked to be a brand new diaphragm, and whoever installed the thing didn't make sure the lip bead was seated in the groove properly and crushed the bead when they screwed down the cover, and then left it that way. It's been sitting in there for lord knows how long and the lip has been deformed to the point where it will no longer seal. I did pull out a used one that had a half dozen micro holes in it, gave it a shot of Plasti--Dip, and got the slide to start working, but not good enough to match the movement of the other 3. So, I trying to get this bike preped for Cody in two weeks, and I need one good assembly with no holes....fast. Anyone have a good used spare I could buy and they could priority mail it to me?? -
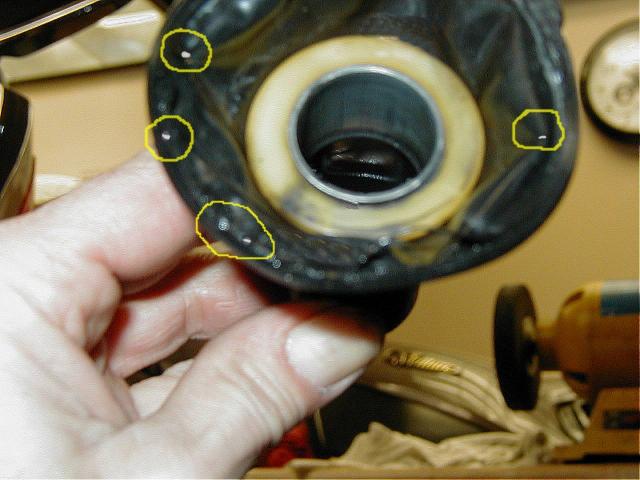
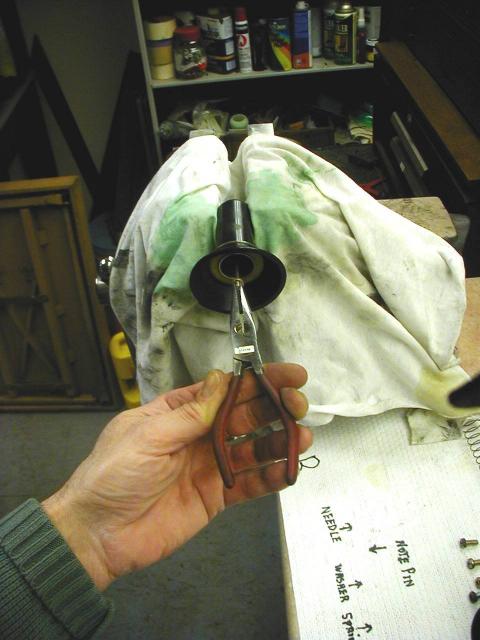
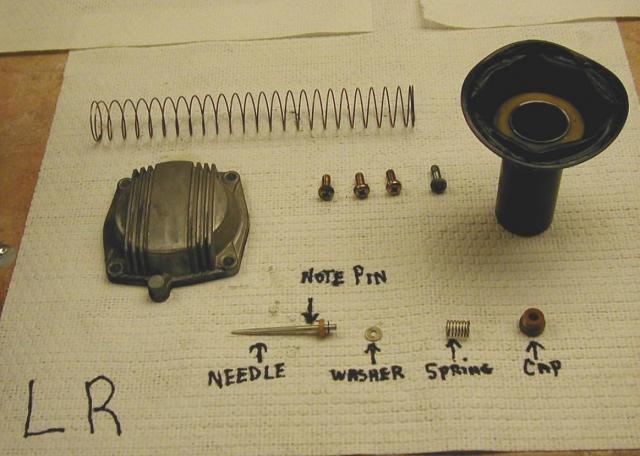
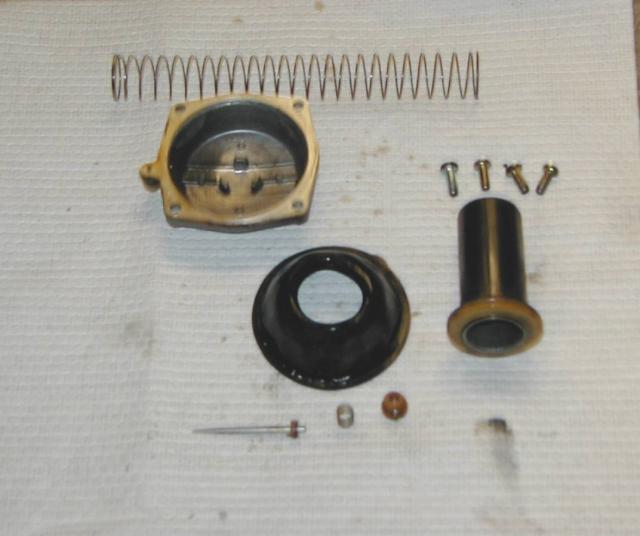
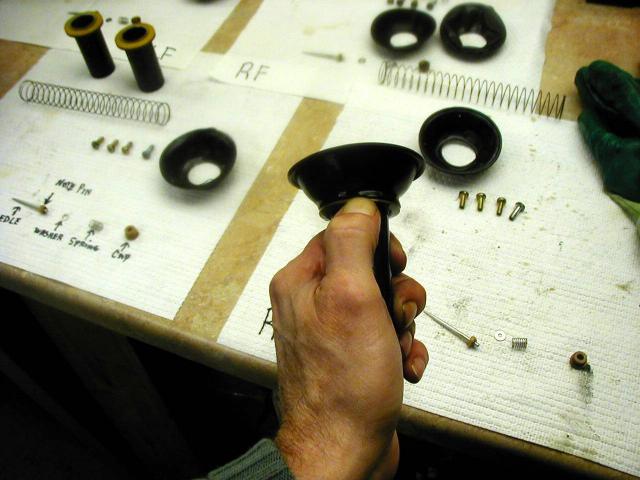
 Just to add to the knowledge base here on the subject of carb diaphragms -- 1. I was able to get the original screws off the side carb cover. I sprayed each screw with PB Blaster. This was based on information that these screws get frozen at the juncture of the head and carb cover plate (and the threads inside the carb body are fine). I had to use a impact driver on all and I also used a T-25 Torx security bit to get the "special" screw off. All screws came off in one piece and were later reinstalled. 2. After removing each cover, each (and I mean all four of mine) carb slide was in pieces. If you look at the first picture, all the pieces shown were in this disassembled state when the cover came off. The center metal keeper was loose and the old diaphragm was off the slide, Somewhere mentioned that parts on the carb slide "come apart" (I believe it was Condor who said he had experienced this a few times). I know the previous owner of this one owner bike, and it never had carb work done since new. It must be the nature of the beast that these slides parts came apart. 3. For the first two carbs, I followed the recommended procedure to disassemble everything including the carb needle/holder assembly. I found that reinserting the plastic screw that holds the small spring and carb needle to be a slightly tricky task. Since I wasn't replacing the white spacer (as some have for "improved" fuel mileage), I omitted this step for Carb 3 and 4. This omission saves considerable time. (5-10 minutes each) 4. I cleaned all the parts with carb cleaner and installed the parts together. I used the SD-1 diaphragms from Sirus. In photo 2, you can see the white plastic washer on the keeper part. (You don't need a screw driver like in the photo, it just made taking the photo easier). 5. The next part installed was the diaphragm itself, there is no need to stretch it over the slide in this assembly scenario. The gray washer goes on next and the groove side goes against the diaphragm. See photo 3. 6. Slide the reassembled keeper part into the black plastic slide assembly. See photo 4. 7. Lastly, there have been many questions about the orientation slide to the tabbed portion of the diaphragm. If you look into the slide, there appears to be a vent hole or something at the bottom. In my four, one was at 1 o' clock (or pointing at the tab portion in the upper right corner), one was at 4 o'clock, one was at 6 o' clock, and the last was 9 o'clock. As you push the keepers into the slides in step #6 above, you can rotate the diaphragm to get it into the position you want. As far as I can tell, there is no standard position. Does anyone know the answer? So the conclusion is, if your slide/diaphragm unit is "split, this is the way to assemble it. This may end up being the preferred way to install new diaphragms. If the keeper can be removed from your slides -- it allows for a thorough cleaning of pieces and avoids the possibility of ripping the diaphragm when you slip them into place (and use the fingernail method like skydoc17 does). This is probably more critical for people who reuse and recoat old diaphragms where they could easily be damaged by stretching. There is no need to take the carb needle out if you are just replacing the diaphragms. Seriously! The SD-1 diaphragms fit well. We will see if they stand up to the test of time. Incidentially, my old diaphragms showed wear (and fabric) along the outer edges but I couldn't spot any pin hole leaks elsewhere.
 -
 Pulled my Air Box (again) to remove the defective ignition Module and relocater it, and decided to see how well my sliders were moving. Well, found the right front would only open halfway and seem to hit a stop. Took it apart this evening and found that the entire diaphragm and piston assembly had come apart!! It honestly looks like someone tried to replace a diaphragm and used packing tape to hold the washer for the rubber in place after prying it apart!! Found the tape on the spring! Luckily, I had a brand new diaphragm and puiston assembly I bought off ebay a couple of yearsw ago to have on hand. Also, not a single torx screw to be found on any of the carbs. Hmmm, wonder if it was the same brain child that wired my chin lights directly to the accessory line before the fuse...
 -
 My front left/back brake was locking up after about 25 miles of riding. This morning I decided to do cowpuc's brake master cleaning. Everything went pretty good till I checked the reservoir level. Popped out the filler bolt and all I see is the rubber diaphragm. Don't see any fluid at all. I just picked up this bike (86) and would really like to get this fixed. Will I need to remove the reservoir completely and if so how bad is that job? It looks pretty tight just to get the top cover off. Thanks
 -
There is a distributor here where I live in Kitchener and I am looking into what price we could get for diaphragm sets if we buy a large quantity. I realize it's hard to say yes when you don't know what the price is, and I'm not looking for a definite hold-you-to-it commitment but Don has started a poll in the 1st Gen Tech Talk section. Could anyone interested please respond to the poll so we can get some idea of how much interest there might be, so I can talk some numbers with these guys. If there isn't enough interest, obvious I won't bother but if there is I will pursue this.
-
Not being the kinda' guy that likes to do things the easy way,But always looking to save a few bucks I purchased a set of Carb. Diaphragms off of Ebay a while back. ($86.00 with shipping) I thought I would give you a run down on how that went. After removing the False Tank cover and both side covers as well as the lower fairing legs on both sides I was able to get to all 4 Carbs. easily. To remove the Carb. covers I used 3 tools, a 1/4 inch drive ratchet with a special Torx bit on it for the 4 odd screws, an impact driver with a Phillips bit in it and finally a pair of Vise Grips for 2 of those Phillips head screws that just wouldn't come out. I took out the Torx head screws first on all 4 carbs. because when you remove the last Phillips head screw, you better have your catcher's mit on, that Carb. cover is coming off...FAST! I had set up 4 shop towels on my bench and kept all of the Carb. parts separated. I held each slider assembly up to a good light to inspect them and sure enough all 4 diaphragms had holes in them. I removed the old Carb. diaphragms by gripping the slider and "rolling" the old diaphragm out from between the two flanges on the slider. Two of the old diaphragms came off in pretty bad shape. I then cleaned all of the reusable parts with Carb. cleaner , but I must say that overall everything looked pretty clean. All 4 of the sliders were nice and smooth as were the Carb. bodies on the engine. I used a clean cloth and Carb. cleaner to clean out the Carb. body bores. (I don't use paper towels for this as I would not want a shard of paper ending up in the intake or the Carb. body) With everything clean I moved on to the reassembly. The Ebay diaphragms were not made of the same material as the stock Yamaha ones, but were very pliable, and had the tab for alignment in the Carb. body. After lubing the diaphragm with aerosol spray silicone I inserted the slider into the bore of the diaphragm. When I got to the flange, I stretched the diaphragm bore over the bottom flange. Now the spacing on the two flanges of the slider seemed a bit "slim" and I panicked for a moment but realized that by using my thumb nail I could wedge the diaphragm bore between the two flanges with no problem. When all was said and done you couldn't tell that the diaphragms and the sliders were not mated at the factory. I had the slider needles out for another project I will discuss later and at this point I reinstalled them. I put the slider assemblies back in the Carb. bodies aligning the tabs, put the caps on with the Stainless Steel Allen Head Cap Screw set I have listed in the classifieds and reinstalled all of the body parts and that as they say was that! Oh yea, I accidentally spilled some paint on the Carb. caps...Oops! I have attached some pics below and am willing to chat with anyone that is interested in this rebuild. Feel free to PM me. Sorry this got a bit "windy" Earl

-
Here's one I hope someone's run into, just got 4 new carb diaphragms for the 83, changed over the needles and low and behold the diaphragm springs will not go to the bottom of the plastic barrel, goes in fine about an inch, then hits a lip. Waiting for Zanotti to call back to see if they have any insight, can't believe this is right as the springs fit fine in the originals, part # is 41r-14940-00-00.


.thumb.jpg.9dfefb49018580a1813c8128f131546e.jpg)