dingy
-
Posts
5,403 -
Joined
-
Last visited
Content Type
Profiles
Forums
Gallery
Events
Store
Everything posted by dingy
-
An update to my surgery. It has been postponed. I developed a blood clot in my lower leg, due to the way I had been sitting with my legs sorta crossed in order to help relief pain in my back.Dr. had to put me on blood thinners to break up the clot. Won't know how soon I can get surgery for a while yet. Foot swelling will have to go down first. Then they can take me off the long acting thinner (cumidon) and put me on a shot type of thinner which is only good for about 24 hours. After several days cumidon will be out of my system then they can stop shots for a day or two and do the surgery. Other than that I am still able to work. I can sit fairly pain free, once I find a comfy position. The work I do is 99% desk, sitting at a PC designing stuff in CAD. My employer has been very understanding through this. I am still a contract employee, so they could dump me if they wanted, but there is no sign of that. This gettin' old sucks, but it's better than not gettin' old at all. Gary
-

Inputs for hard start condition
dingy replied to MikeZ06Allen's topic in Venture and Venture Royale Tech Talk ('83 - '93)
Here is something you can take into consideration. The VMax guy's call it a 'Shotgun'. This is one of the things they talk about a lot on the Vmaxforum.net . Not quite as much as we do about seafoam, but that's mostly Yammer trying to push his stock value up. It is a procedure to try and clear up the idle circuits on the same carbs as our Ventures use. The link below isn't from the VMax site I mentioned above, but there is a decent write up on it. You gotta skip over the parts that are directly related to a VMax like removing the side scoops, but deal with it. These guys really are a great source of info about getting the power out of these V4 engines. One word of caution, or encouragement depending on your point of view. If you log on to the Vmaxforum site, they are not PG rated, even the avatars can be, shall we say, revealing. You may encounter 4 letter words that are discouraged here. For the vast majority of them though they are not a flame throwing bunch, just a little rougher around the edges. It is a free site to join. Not as many members as here, but they have been really helpful to me, with where I am going with my bike. Any way the link to the carb idle circuit procedure is at: http://vmax.lvlhead.com/tips/shotgun.htm Gary -
Aftermarket TCI available!
dingy replied to tvking63's topic in Venture and Venture Royale Tech Talk ('83 - '93)
Andrew, The advance that you are seeing on your laptop display is due to the RPM's increasing. If you don't see the TPS setting changing, then you have no vacuum advance working. You need the vacuum advance hooked up and functioning to get into the power band of the motor. Gary -
Aftermarket TCI available!
dingy replied to tvking63's topic in Venture and Venture Royale Tech Talk ('83 - '93)
Sent you an email with my last ign file in it. Gary -
I think he was looking at Kitty Porn. Gary
-
In my opinion, I would get the new one from Ignitech. Under $200 shipped. You will want to make sure they ship some extra wiring harness pins when purchased. This is to add vacuum sensor. It takes a little work to get it set up, but you are getting a new piece of equipment. Whatever you get from Ebay or any where else might fail the next day. Here is the main thread dealing with this unit. http://www.venturerider.org/forum/showthread.php?t=40414 There are probably 10 or more of us that have this unit, and I know of no major problem. The wiring for the most part is done with an adapter they supply. Other main thing that needs added is a vacuum sensor. Not real hard to do. A PC (laptop) is needed that can be hooked up to the module once installed. It has a 9 pin serial port connector. If PC doesn't have a serial port, Radio Shack sells a USB to serial adapter for $25 or so. Gary
-
Goose/Don Plan B is not going to work. I was going to mail you the bearings tonight and was getting them ready. They looked small to me, so I went out and checked them against a spare lower triple tree I have and they are the wrong bearings. Apparently Yamaha also has a set of tapered bearings 93332-00080 & 93332-00010 instead of 93332-00008 & 93332-00001. Never checked them close till now, looked like tapered roller bearings to me. I don't know for sure if I will be able to get this straightened out by MD. I ordered them from partshark so it will take a while. I was going to mail them to you cause I found out today my surgery is going to be delayed due to a blood clot they found in my leg. Not sure if I can make it. I may still drop in Thursday night, and try for Friday night. But an all day thing may not be good. Back hurts like heck. Gary
-
WD40 isn't the greatest but it will do. I use something called 'Nuts Off'. Others may suggest other brand names. Gary
-
Goose/Don, As a plan B, I will bring along a new set of upper and lower bearings for the steering head. You probably won't need them, but I have a set here waiting to go in my bike when I get back in shape. These are Yamaha bearings, same P/N as your RSV. Gary
-
It wouldn't hurt to shoot some penetrating oil in the bags release locks if you haven't had them off. Not the lock sets where you open lid, there is another lock set on each bag, same key fits it. It is below lid lock on trunk and below helmet locks on side bags. Gary
-
On a 1st gen MKI, it is a piece of cake to do. Removable saddle bags make it easier. I would suggest you put penetrating oil on muffler connections to the collector. This is probably hardest part, removing the mufflers. Tool wise metric socket & wrenches. Couple of screwdrivers. Mid to large crescent wrench. Tube of the Honda moly grease. Quart of rear end gear oil. Roll of paper towels. New cotter pin for rear axle. Gary
-
Moving TCI to airbox
dingy replied to PEIslander's topic in Venture and Venture Royale Tech Talk ('83 - '93)
Did pretty much the same thing that Randy did. Wrapped it in a static bag since it was close to the after market radio. Heard this may cut down on static. Screwed it into the inner fairing. Even this one is no longer there, now that Ignitech unit is in place. http://i1007.photobucket.com/albums/af193/gdingy101/DSC01128.jpg Gary -
My humble opinion about these bearings is they take the vast majority of their abuse at exactly the same rotational point. Grease isn't going to hurt them, but after a few hundred miles they have reseated at a metal to metal contact point. They don't heat up at all, so there is no reduction in the grease viscosity to even get it to flow around the rollers. Every bump the front end encounters is transmitted to almost the exact same contact point on that upper bearing. Not saying pumping them full would hurt, but I have also heard you can put a large tube of grease in there with room to spare. The 88 parts bike I got had ribbing around the upper bearing race and it only had around 30K on it. There is no grease made that would have prevented that kind of wear under these design conditions. Gary
-
soldering LCD display
dingy replied to camos's topic in Venture and Venture Royale Tech Talk ('83 - '93)
Resoldering is not as bad as it sounds. On the CMU, all that is needed is to heat the solder pad till it melts and add just a bit of new solder. The TCI unit, for example, is a totally different resolder experience. The solder has to be removed in order to free up components for removal. Get a low wattage soldering iron at radio shack, or maybe auto parts store. Something around 20-35 watts is plenty. Also get some thin rosin core solder. Do not use acid core solder as it will eat up components. Also a soldering gun is not an ideal tool for this as they usually have too big a tip and are higher wattage. A gun has a trigger to heat it up when needed, an iron is heated whenever it is plugged in. Let soldering iron heat up, you can tell when it is ready by touching a piece of the new solder to tip and it melts. It helps to secure board somehow so both hands are free. Touch tip of iron to solder connection. Within about 3-5 seconds the solder will melt and change to a shiner color. If there is enough solder on connection, it is not necessary to add more. Try to touch the tip to the wire or lead being soldered so it heats up enough to have solder fuse to it. Do not add so much solder that it could bridge out to an adjacent component. Have a small wet sponge or a folded up paper towel that has been thoroughly soaked with water. Every 2 or three solder joints, wipe the tip of the iron on sponge to clean it off. Just quickly drag it across sponge on both sides. This removes build up from tip and lets it conduct heat better. There is an attached picture of a Class board I think, with some bad joints on it. If any joints are very dull in color or have ridges around them or cracking they are suspect. Gary -
Missing 4th and 5th Gear
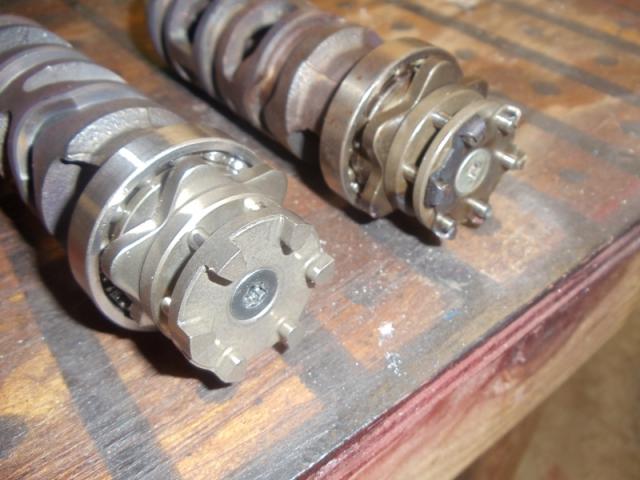
dingy replied to uthpda's topic in Venture and Venture Royale Tech Talk ('83 - '93)
When it was on its side, one of the pins in the shift cam segment probably fell out. Only fix is to open it up and fix. 1st picture attached is of the new and old style segments. You most likely have the one on the right. One or more of the tabs has straightened out and allowed pin to fall out. 2nd picture is what it looks like with clutch removed. 3rd is what it looks like with clutch still in. 4th is another view of old & new segments. 5th is with shifter linkages installed. Also, http://www.venturerider.org/forum/showthread.php?t=58880 Gary
-
We have 85 signed up at this point. Signing up for this is totally optional, if you don't sign up you can still go, and if you do sign up, there is no problem not going. It just gives me an idea on how many are going to be there so I can keep the restaurant informed. There is a calender event at the following link. http://www.venturerider.org/forum/ca...y=2011-6-3&c=1 Gary
-
Front or rear? If it is the front, you need the whole unit, they are ultrasonically welded together. Rear is available separate, if you can find one. Gary
-
I may have relief coming to my acute lower back pain. I saw a nuero surgeon today and he said my only really viable option is to have a Lumbar Discectomy. This has been scheduled for this coming Friday morning. He said physical therapy and epidural shots would not be effective. This is the third doctor I have seen for this, first surgeon. 1st was a chiropractor that wanted to do a modern form of traction that he said had a chance to fix it, insurance wouldn't cover. Didn't like his sales pitch, but he did get an MRI ordered which showed extent of problem. My family doctor said surgery was likely the only option and referred me to this surgeon. He was a very likable doctor, not uppity like some can be. He went over all the required talk about risks and potential problems and said he had to wait at least a week to do surgery because I am taking a high dosage of motrin with percocets and the motrin cause blood thinning. Have to let that clear up first. For the last 8 weeks I have had rapidly increasing lower back pain and numbness in my lower left leg. This is a life changing type pain. I am on 8 percocets a day and the pain is still as bad as kidney stone I had several years back. The disc between my L4-L5 vertebra has herniated and is pushing against my back & leg nerves. The MRI report said there was a10 x 13mm extrusion nearly filling the spinal canal. Doctor said the surgery would be about 2 hours and be 1 or 2 incisions about 2" long. I will be able to go home the same day. I should have immediate releif from the pain if surgery is successful. They said I would be able to walk around and was encouraged to get mild exercise starting the next day. I may still make MD in Oberlin, but it won't be on the bike. Won't know till a few days after surgery. If I can't make it I will need a volunteer to follow up with the dinner Friday night at Quaker Steak & Lube so I don't dump this on Don. Isn't much, just getting a rough head count and calling restaurant. Wish me luck, I'm going in. This is a surgery I am looking forward to getting, it's that painful. Gary
-
Moving TCI to airbox
dingy replied to PEIslander's topic in Venture and Venture Royale Tech Talk ('83 - '93)
Here are a few pictures of what you got to deal with. 1st - looking in from right side, all fairings and plastic removed. Bolt in mid- upper left is one that holds bracket under battery box. Two bolts lower mid center are what holds coil bracket on. (2 each side). TCI bolted under this bracket. 2nd is looking from air box area forward. Battery removed, bracket in foreground is one battery box sets on. Gary -
Aftermarket TCI available!
dingy replied to tvking63's topic in Venture and Venture Royale Tech Talk ('83 - '93)
In one of the threads in this post, I recall that someone had asked people at Ignitech about using stock boost sensor and they thought it would work OK. We were concerned about the 12v input to the stock sensor and its output to the Ignitech unit. Do you have a part number for the Bosch sensor you got? If your V-boost is working with the stock setup, it should cycle the butterflies on the crossover intake when you first turn the key on. This is part of a self check. Looks like your VMax has been modified a bunch. It appears to have a mono rear shock like the Ventures. Nice shape for an 88. What kind of oil is in it that is that red? Gary -
Here is a link on how to post pictures on this site. http://www.venturerider.org/forum/sh...ad.php?t=44037 Gotta have them for something like this !! Gary
-
Also loosen the upper triple tree clamps. Someone posted on here that that made a difference on loosening the fork caps. Gary
-
Aftermarket TCI available!
dingy replied to tvking63's topic in Venture and Venture Royale Tech Talk ('83 - '93)
Here is a link on how to post pictures on this site. http://www.venturerider.org/forum/showthread.php?t=44037 The wiring harness you got from ignitech probably has two empty spaces on the 8 pin connector if it is the same as what they sent for the ventures. This is where the stock boost sensor hooks up to. On the ventures they did not use the stock TCI. They left it up to us to figure it out. Look at picture #1 in post #234 above. Center plug has the right two pins blank, this is where stock boost would have been. You will not use two boost/MAP sensors. One or the other. For the most part I think all of us have used a automobile style map sensor. Does your Bosch sensor have an A, B & C molded into case? Do you have any electrical info on it? On Ignitech module, following pins are used to hook up MAP sensor. Pin 17 is 5V ref output from TCI Pin 6 is MAP output Pin 7 is MAP ground You don't have to use the Ignitech unit to control your V-boost, you probably won't gain much. I am interested in using it since I don't have a stock V-boost controller on the bike. Ventures don't have them. This is the first I have heard of the Vboost only having 5 positions. Though that would probably be enough if it is accurate. Any more and the vboost would constantly be adjusting. Gary -
Look at post #22 in this thread. The 4 brush starter was a little more crowded on the brush plate. But it needs the extra ground path just as much as the 2 brush starter does. The way I found to tell the 4 brush from the 2 brush starter on the outside is the 2 brush starter has 4 screws around the center line of the starter that go into the coil to fasten each of them to the starter body. In the picture attached below, the top starter is a 2 brush, the bottom one (not complete in picture) is a 4 brush. The screw to the lower right of the 12volt cable post is the one I am referring to. Gary
-
fork rebuilding on my 83 Venture Royale
dingy replied to bike nut's topic in Venture and Venture Royale Tech Talk ('83 - '93)
As far as the tubes go, the outer diameter between the 83-85 (MKI) inner tubes and the 86-93 (MKII) inner tubes is the same. The bottom of the tubes is interchangeable, where the bolt goes up into tube. What I am not sure about is the length. But even if there is a slight (1/4" or less) difference between the MKI & MKII, as long as you use a matched pair that should not make a significant difference. They are probably the same. Not sure what you are talking about with the broke washer. A picture might help here. As long as you haven't broke the outer tube casting, I may have an extra part (washer) laying around I will give you. Gary