
Search the Community
Showing results for tags 'screws'.
-
I just got my V Star back from servicing at the stealer, didnt make out too bad, but thats not what this post is about, I took the bags off of the V Star when I took it in, so I figured I would check with Rick Butler about his saddle bag screws for the RSV. He said they would fit and its was a wise investment, it was a snap putting the bags back on without any tools, they come from the factory with allen screws and its a pain to take them off and reinstall them, not now. I recommend anyone who owns a V Star 1300 Tour get these, you wont regret it. Thanks again to Rick Butler for another fine product by one of our talented members..............
-
 Thanks to everyone for the help. All the problems I was having before are fixed for the time being and the bike is starting easily and running good. So here I go with the next problem. I have no pressure on the foot brake. I plan on bleeding the brakes tomorrow sometime to try to fix it. So if I have researched correctly, I need to bleed the rear brake caliper first, and then the left front caliper, correct? Then the right front. The only other thing I need some info about is the master cylinder lid on the front brake master cylinder. There are 2 phillips head screws holding the lid on. One of the screws is completely stripped and I can't get it out. What do you all think is the best way to get this thing out? Thanks everyone!
 -
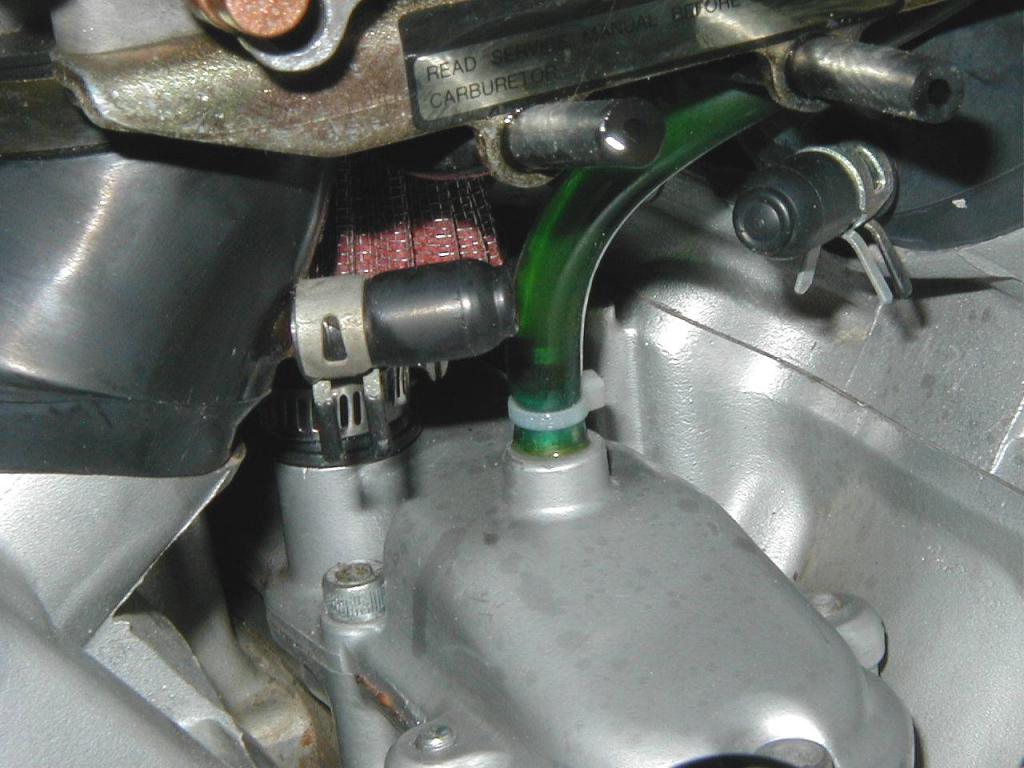
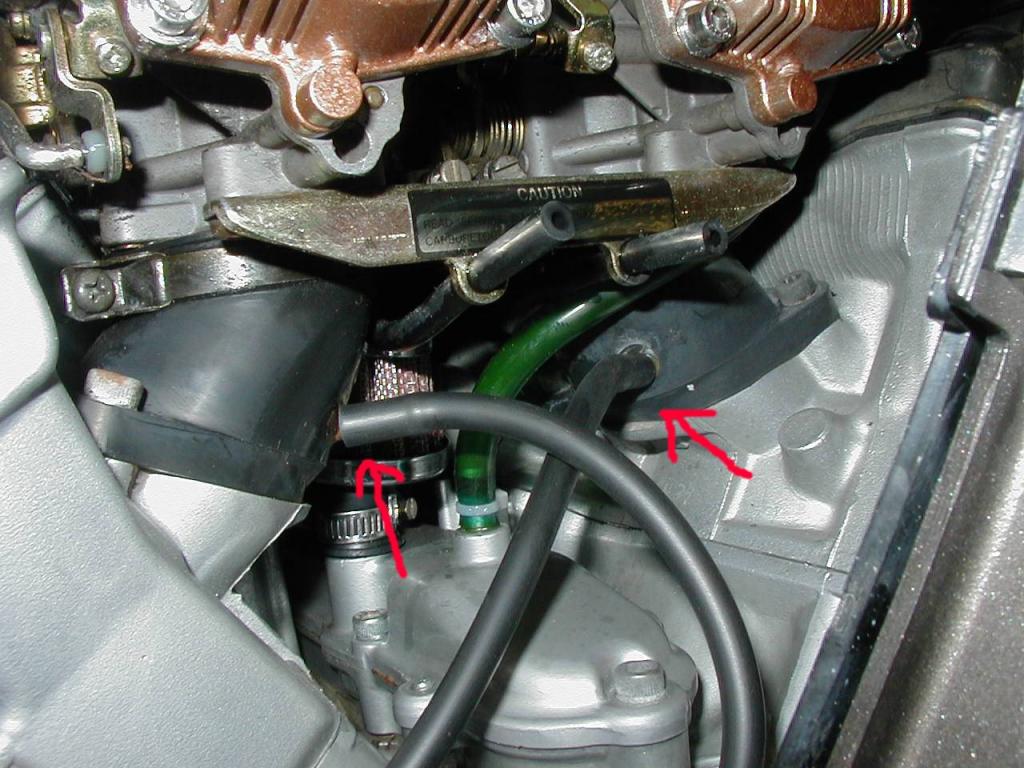
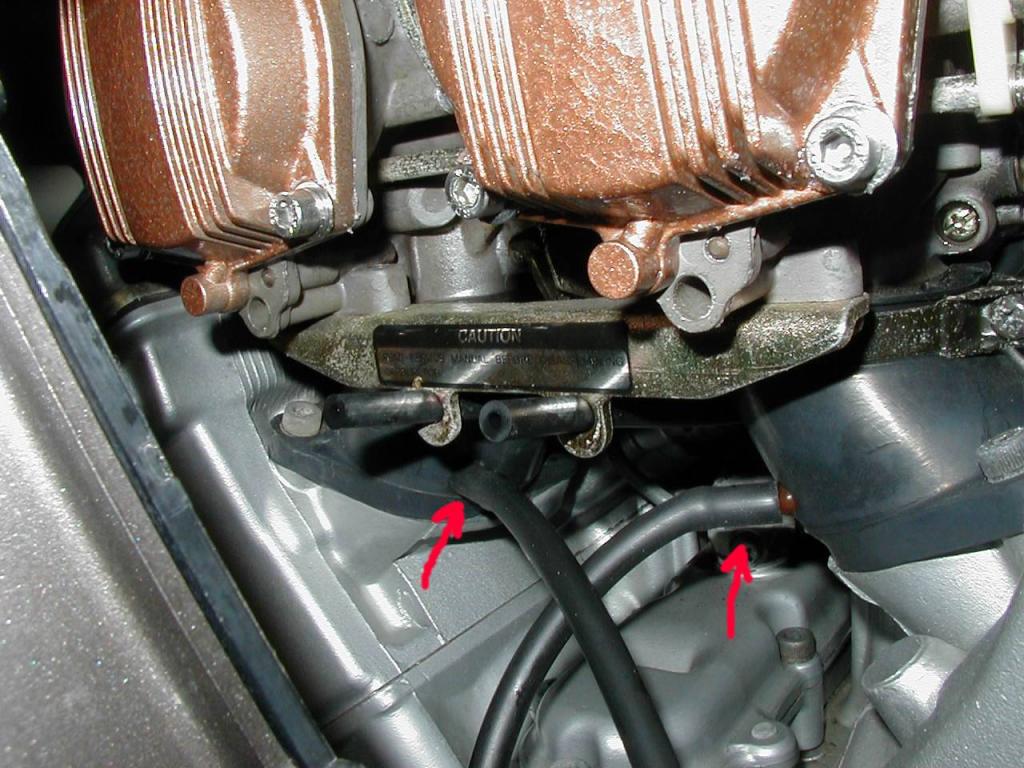
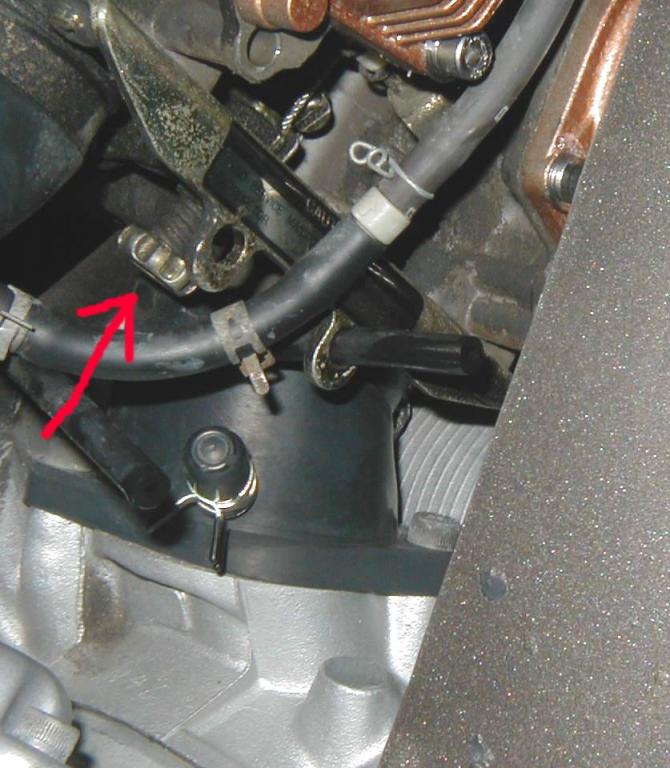
I am getting my 96 Royal Star ready for spring and want to sync the carbs. I have read the article in the 2nd generation RSV and Royal Stars but it appears that the location of the adjusting screws are different on the Royal Star than on the bike in the photos. I can see one screw on the left side near the choke knob that I assume is one and two on the right side that are side-by-side. Could someone who is familiar with the Royal Stars confirm whether these are the right screws, I have synced all my other bikes and am familiar with the procedure but would like to confirm that these are the right adjusters. Any information would be appreciated. Doug
-
I have a 1996 Royal Star and am getting some popping on deceleration. I want to set the mixture screws and have been reading some posts on the site. I read the write up by Goose and the 3 methods he knows. I am familiar with the "drop idle method" but I think it requires a tachometer that can read in 50 rpm increments, which I don't have. My question is... Has anybody tried setting the mixture screws using a vacuum guage and adjusting for maximum vacuum like we used to do on automobile carburators ? Also, do I sync the carbs and then adjust mixture or adjust and then sync ? Enjoying the site, lots of good information and knowledgable people. Thanks Doug
-
On the way home from work the other day, I started hearing an unusual sound coming from somewhere behind the side cover, it sounded like a vacuum hose leak, but I couldnt find it, I forgot about it till today, I took the bike to work and heard it again, but this time I noticed that the power was down and it didnt kick in till about 3500 RPM, then it ran like usual. So when I got home today I started taking plastic off, I am pretty good at this now......,first the side covers, started engine, couldnt find it, then pulled tank cover, air breather box all the way down to the carbs, still couldnt find it. So I found me a piece of hose and put it to my ear and started searching............BINGO!! found it real quick, I was very lucky, it was the choke mechanism, it was hanging by the clip that engages the carbs all three screws had vibrated out..............I couldnt believe it didnt fall off, and the gasket was still there too, because it came off very easily in my hand. Now, next trick find some screws that fit, cause I couldnt find the ones that came out, just happened to have some allen head screws that fit, but it was very tight getting them in there, took me about an hour to tighten the screws about 1/8 turn at a time........Oh, did I mention the engine was still HOT!!! By the way, this is on my 1st Gen. All is well now, she runs better that before, hope nothing else crops up, I want to ride it, not keep working on it.............
-
Went to the Neurosurgeon today to find out the results of the tests that was done. Need more surgery due to the degenerative bone disease and now scoliosis. He has to take out the screws and rods that's in my back now and replace them with longer rods, new screws, and spacers. Has to go up 3 more vertebra. 6 hour operation and 4-7 days in Hospital. Have to check Abigail's school schedule and make arrangements for someone to take care of her and get her to school for up to 7 days. Just hope it helps as good as it did in 2005, lost weight, felt great, and got around real good for 2 years.
-
Just an update on the continuing saga of replacing the broken trunk bottom on my ride. I was able to secure a matching bottom from e-bay (with the help of FreezyRider). It was listed for $400.00, I offered $100.00 and purchased for $200.00. Ordered the kit for the new bottom which is just a metal plate for the top and a rubber one for the bottom. I JB Welded the metal plates to the inside and went about removing the old trunk. Lesson # 1, remove all screws and bolts that you can see first. We ended up taking the speakers apart becasuse we did not realize the screws holding the brackes for the inside net pocket also held the trunk to the backrest. I must say I am very disapointed in the quality (or lack therof) for the plates welded to the frame that the anchor screws going through the bottom to hold the trunk to the frame. It's not metal and not plastic but breaks like plastic and we had to cut off the right side plate and are trying to frabricate something to replace it with. This is for sure a two person job, just getting the hinges from the top fastened to the bottom ( you have to have the lid partly closed to get it to aline but partly open to line up the screws coming from the outside). Will keep you informed as to progress. Just want to say I would not have known where to start without all the great help from this web site, you guys are the best support group since Woddy Allen in Everything You Wanted to Know about Sex but were Afraid to Ask (for all us old timers who remember the movie)!!!!
-
My dealer is close today and I can't call them.. After I did a walk around and all they gave me a owners manual and the paper work.. I was excited and ready to hit the road.. Also a Ign. key in a small bag with 2 small set screws and a allen wrench ..This is driving me crazy.. So where does this go? Please don't tell me this what holds the bike together...
-
Recently I sealed a fuel leak on one carb. During testing I noticed one carb slide was lagging behind the others (bad diaphragm). For the moment I have repaired the diaphragm with silicone. The bike was running rough after the repair, leading me to believe the synch was probably off. My home-made synch tool verified that the carbs were off and I made adjustments. The bike did not seem to properly respond to these adjustments. I decided to pull the pilot screws caps and check the settings. It has been said that a general setting for the pilot screws would be 2.25 turns out. I found mine to be between 3.25 and 3.75! My thinking is that after 24 years and 63,000+ miles, these screws must have backed out on their own. I adjusted all of them to 2.5 turns out and took my wife to dinner (45 mile round-trip). The bike is running much smoother below 4k and seems to have better torque. Comments from the gallery?
-
what screws do we turn out a 1\4 turn on our carbs. and what dose it do for the bikes? I guess I'm dumber than a mud puddle.:confused24:
-
On my '07 Midnight Venture, one of the screws, which attaches the Audio Head unit (which is mounted on the handlebars) has fallen out and is lost. The other screw is still there, so the audio control unit sort of pivots now. But, I figure that it would be best to have both of them where they belong. I believe that there are just the two screws which secure that unit from below. Does anyone know what that part number is please? I might as well have the shop replace it under warranty when I have the bike in there this next week for service. Thanks guys! Pete.
-
Help: Can someone please me to the mixter screws on the four carbs on my 08 RSV so I can turn the screws out a 1/4 turn. I looked on tech page but can not find them. Thank you for your help in advance.
-
I seem to remember a post about pulling off the black adhesive strips on the rear armrests to get to the screws that hold the rear pods together. Is this the way to get to the speakers or do I start by removing the screws in the trunk to remove the pods? Thanks in advance,
-
So, I have my newly aquired 83 Venture running and stopping fairly well thanks to all the threads in the first gen library. Thanks to all. However, I am little confused about carb adjustments. I seem to be getting poor gas milage and my plugs are black and wet. I saw the thread about replacing the plastic spacers on the jets, but I also see lots of references to set screws at 2-3 turns. Does my bike have fuel/air set screws and if so where are they? The bike starts and runs well. I have not ran it enough to get an accurate MPG, mostly because I have the speedo disconnected due to the darn noise (I guess that is my next project).
-
I just put on the '87 fork legs on my '83. But one is leaking oil out the little drain screw. [The bike isn't even off the stands yet!] Are these screws supposed to have any little gasket washers on them? Thanks, Mark Koontz '83 Venture Wichita, KS
-
First, apologies upfront if this has already been discussed. I've typed in a few variables in the search part and couldn't find anything close so here goes....... Most of my buddies ride Harleys. What I've always admired about their bikes is that they have low cut (4" or taller) tinted windshields which are easily removable in order to change back to a larger shield for long distance riding. (Ahhhh, to have that wind-in-the-face feeling again!) So this got me to thinking about my own Venture and how I'd love to be able to switch back and forth from my huge shield to a tiny one for local rides and real hot summer days. The big problem with our bikes is removing the chrome trim on the fairing because of the design of the damn thing (those little plastic tabs! Aaaargh!). I get nervous as hell trying to remove it just to get inside to do some wiring on occasion, never mind having to remove it on a more regular basis to switch a windshield. So I began thinking up ways to come up with a 'quick' release system for the fairing. My first thought was to find some real shiny chrome screws and drill into the trim and fasten it to the fairing so that way I'd only have maybe 5 screws to remove (2 in the back, 3 upfront) in a fairly reasonable time with an electric screwdriver, then remove the screws for the windshield and make the switch. Voila! Done! But having a discussion one evening with Draegerman, we came up with a better idea. The chrome trim already utilizes 2 screws to make certain it stays put so instead of drilling holes in the trim, why not use magnets? Apparently there are some pretty heavy duty magnets available on the market nowadays that would do the job very well. Mounting them in the right place would surely hold the chrome trim in a perfect position. This way, all you have to do is remove the 2 screws and then pull out the chrome trim and not worry about those plastic tabs anymore! Now you have fast access to the windshield mounting screws and they can be removed just as quickly and switched with another shield. Sure it may take 5, maybe 10 minutes, but to have a shorter screen up front would sure be nice at times. Anybody want to add to this? Anybody come up with any other way to remove a windshield quick? I'd love to hear other ideas if anyone has one before I go and give this particular idea a try. Any input would be greatly appreciated. Bluez
-
This was a question about finding various adjustment screws for synching carbs but I got it sorted out.. Thanks
-
Does anybody have any extra brake resevoir screws?
-
 I had a frikin mouse chew a hole in my air filter without realizing it. Ran the bike about 1000 miles or so before I got to seeing it and my carbs paid the price with lots of dirt in them. Funny thing is the bike ran great the whole time, no issues. My problem is now, after I had to disassemble all the carbs and clean them out, blew them out and double checked my work. Everything seems to work ok and no leaks, or damage except for 2 of the diaphrams that fell apart (inner sleeve thing) which I just reglued. The bike starts, chokes good, and idles fine, but will immediately bog down and bacfire through the carbs when I give it quick gas. A slower throttle gets the rms up, but still gives me blowback through the carbs. BTW, valves are set good also. I tried resetting the adjust screws back down to 2 turns and it got worse. When I originally took things apart, most screws were at 3.5 to 4 turns already, is that too much already? Does anybody know if I should mess with the slide needle at all? I do have a colortune coming so I can try a better A/F mix setting, but wonder what the factory setting is for the slide needle. Sorry for the long winded post, just trying to think of anything.
 -
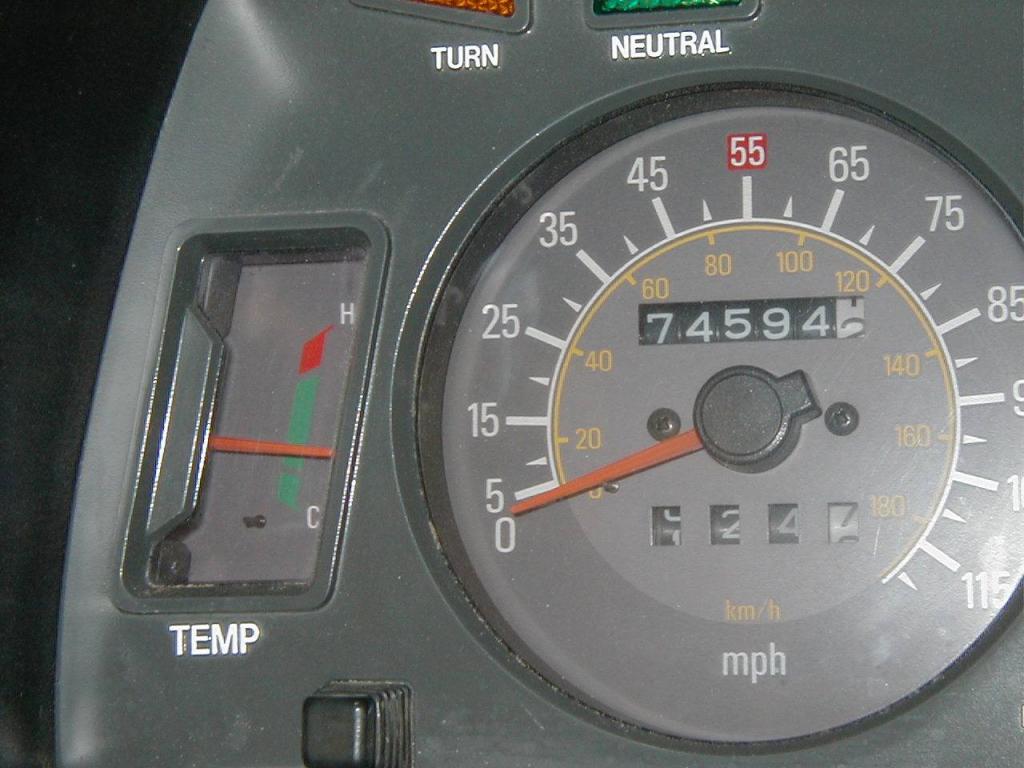
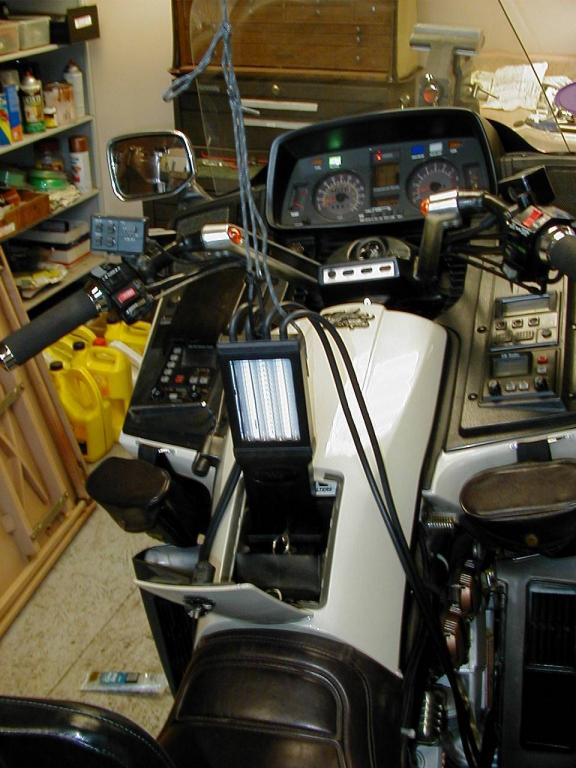
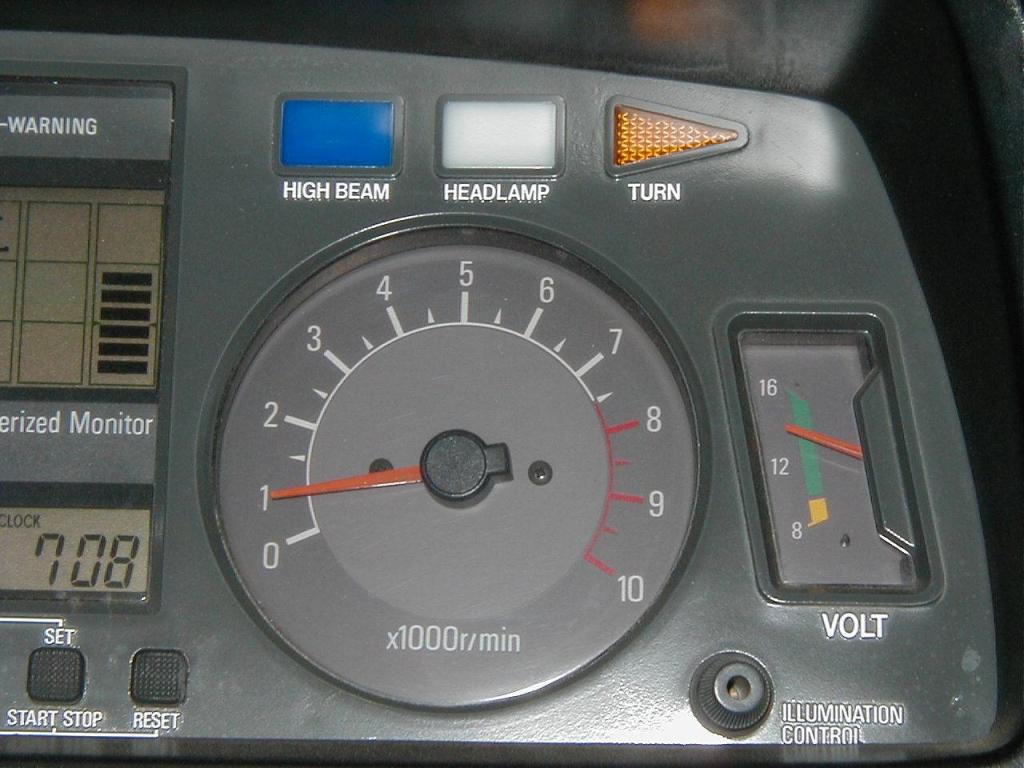
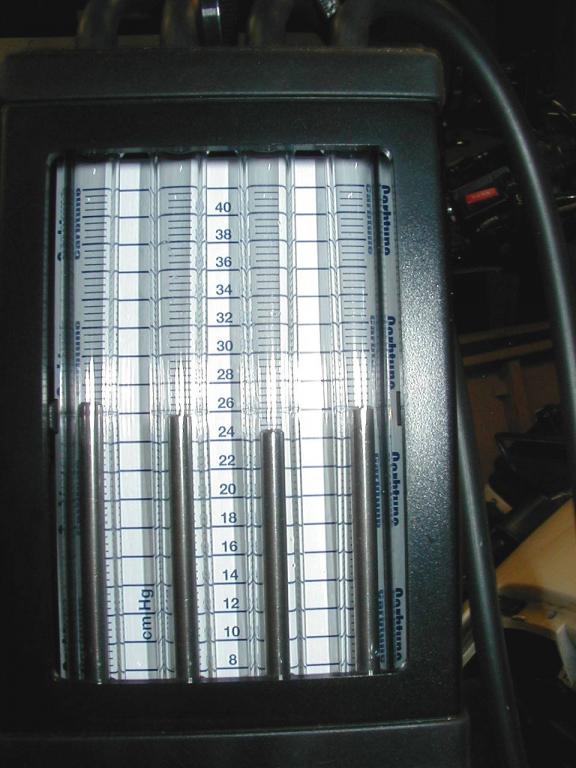
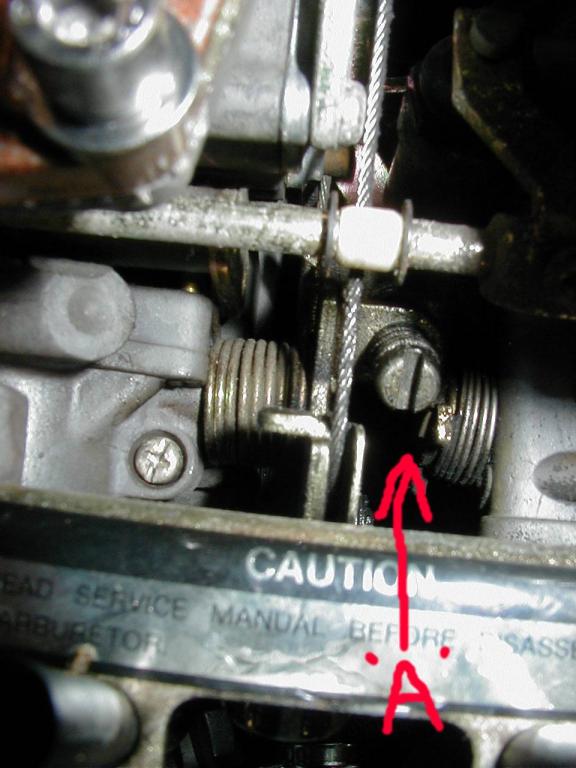
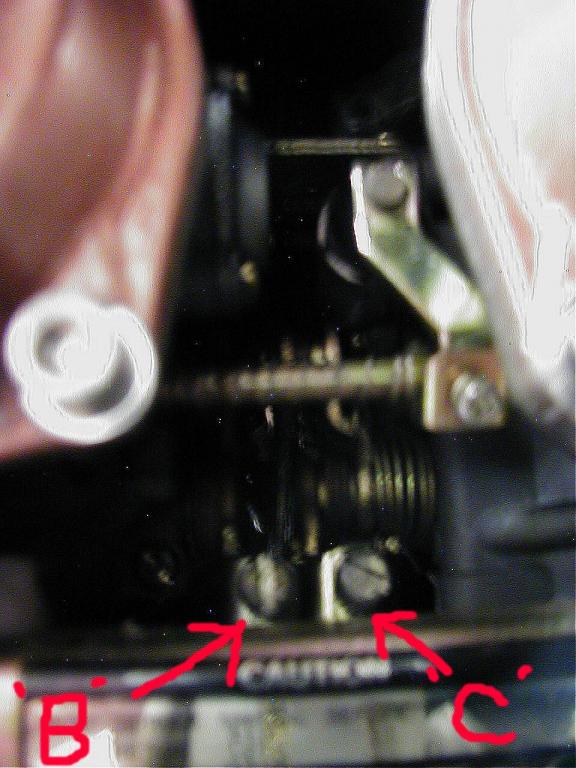
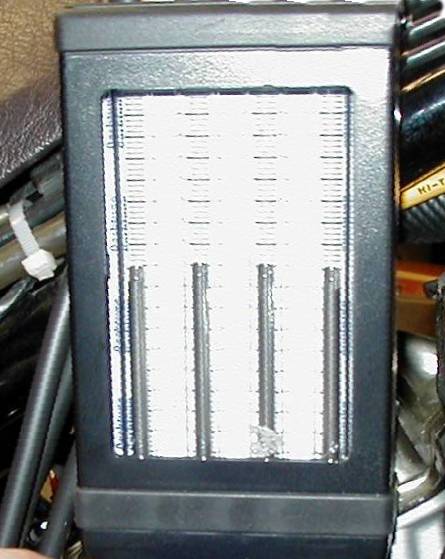
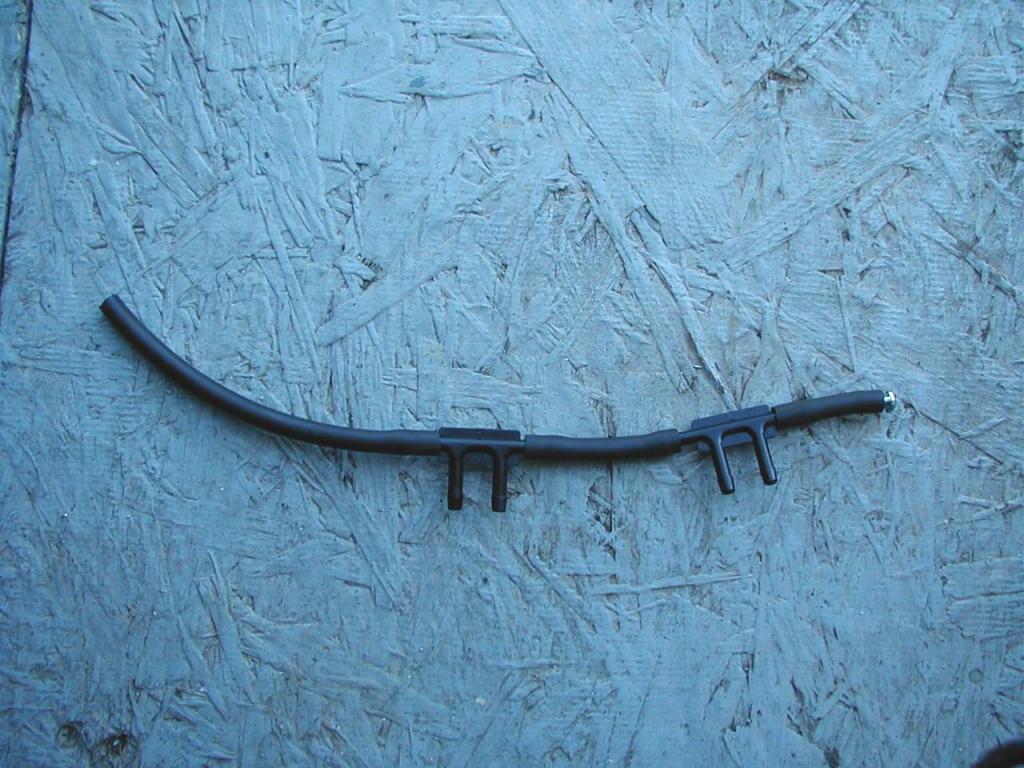
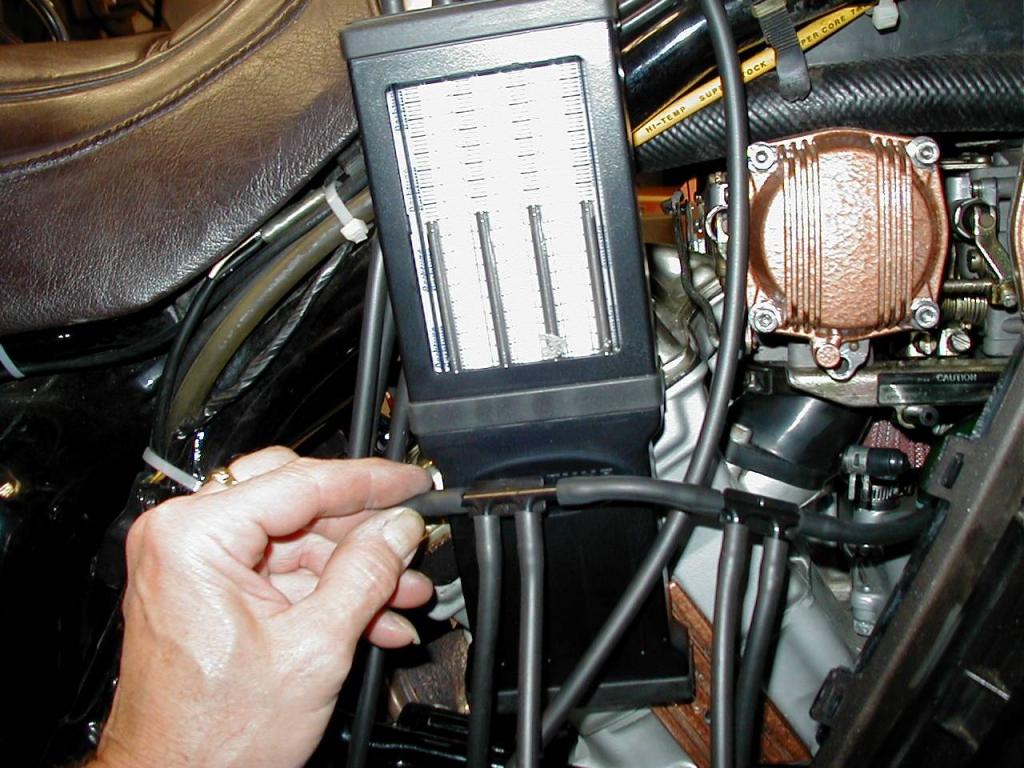
 There have been so many people asking about Syncing. the Carbs on their First Gens. that I thought I would take a few pics of the way I do it so that other members would have a general Idea how to go about it. (Disclaimer: My way is not the "do all, be all", just the way I do it. Take what you need and leave the rest.) I start by removing the screw in the false tank cover and unhooking the front of the cover, It does not need to come off. I then remove both side covers. I then remove both of the Radiator side panels to expose the 2 screws that will allow the lower fairing legs to be pulled away from the Carb. Bodies. (NOTE: if your lower fairing legs are in bad shape, you may want to remove the lower cowling which will expose the screws that will allow you to completely remove the lower fairing legs, Mine are still pretty flexible so I don't take them completely off. (Do what you feel "warm and fuzzy" about.) With the plastic off, I start the bike and let it run up to "operating temperature". Pic #1 shows the temp. gage about 1/3 the way up. Depending how "hot blooded" you bike is, this may take a minute or two. While the bike is warming up. Pic #2 shows how I suspend my Carbtune from the ceiling in my shop with a long shoe string and center it right above the gas cap. This allows the Carbtune to remain vertical and also allows me to work both sides of the bike with out moving the Carbtune . At this time, I shut the bike off. Pic #3 shows the location of the Vacuum ports on the right side of the bike, I remove them and plug in the Carbtune on that side. Pic #4 shows the lines installed on the right side. I then move to the left side of the bike, Pic #5 shows the one Vacuum port Cap and the "Boost Sensor" Vacuum line that is connected to Cylinder #2. (NOTE: These pics were taken of an 1987 VR MKII, I don't know if the MKI is the same because I don't own one!) I remove the Vacuum port cap from the #1 cylinder and the Boost Sensor line from the #2 cylinder and Pic #6 shows the two lines from the Carbtune connected. I am now ready to restart the bike. Pic #7 shows how I position a fan at the front of the bike to keep the engine temp. from going too high. I like to take my time when I'm adjusting the Carbs. on a bike and this gives me the extra time. With the bike running and at temp. Pic #8 shows the location of the Idle adjustment screw. (NOTE: I moved the #2 cylinder Carb. Bowl Drain Tube out of the way for the pic. This screw is hard to find unless you are squatting down... and use a flashlight!) Pic #9 shows the Tachometer at 1000 RPMS (By the book 950-1050 RPMS) Pic #10 shows the Carbs. are in fact out of adjustment. I have the left two channels of the Carbtune connected to the left side of the bike, (cylinders #1 and #2.) and the right two channels of the Carbtune connected to the right side of the bike, (Cylinders #3 and #4). Starting on the left side of the bike Pic #11 shows the location of Carb. Sync. screw "A". (NOTE: This is another screw that is hard to see at first, and it is at a downward angle so it will be hard to get a screwdriver on it properly, be patient!) The object here is to rotate "Screw A" until you get the left two channels balanced. Make an adjustment, then "Blip" the throttle and let the bike return to Idle. If needed, adjust again. With the left bank of Carbs. adjusted, I move to the right side of the bike for the rest of the adjustments. Pic #12 shows the location of the "B" and "C" screws. Screw "B" is used to adjust the right two channels of the Carbtune, and Screw "C" is used to adjust the left bank of two Carbs. (Cylinders #1 and #2) to the right bank of Carbs. (Cylinders #3 and #4) Using screw "B" I adjust the right two channels, "blip" the throttle and readjust if necessary. Then I use screw "C" to adjust the left bank to the right, "Blip" the throttle and readjust. Pic #13 shows all four Carbs. on the Carbtune adjusted pretty darn close. Basically, you are done at this point. I wanted to add a few personal suggestions that I use to "enhance" the Carb. Sync. experience to make the bike run even better for me. After I am done with the Carb. Sync. at Idle, I Rev the bike to the 1800 to 2000 RPM range and hold it there, if all four of the Carbs. aren't holding the same vacuum at 2000 RPMS I make slight adjustments (split the difference) between Idle and 2000 RPMS. The reason I do this is because when I am stopped, and start to take off, I increase the RPMS of the bike into the 1800 to 2000 RPMS range as I am slipping the clutch to engagement. I don't want one or more Cylinders "cutting out" or "cutting on" as I am trying to look cool pulling away from a light, especially with Jean on the back! The next issue I would like to address is the "Reliability" of the Carbtune Manometer. Here is a list of Items I purchased to build a simple "Manometer Tester" Manifold. Pic #14 shows the "Manifold". and Pic #15 shows how I test my Carbtune BEFORE I use it. I got these Items from NAPA Auto Supply: Part# 2-616 (2 needed) Vacuum Connector $1.49 each $2.98 Part# H-459 (1 foot needed) 5/32 Vacuum Tubing $.99 1 qty. 1/4-20 screw Free from toolbox 6% Tax (Pa.) $.24 -------- $4.21 Total I hooked all 4 Carbtune lines to the manifold and hooked the Manifold line to one of the carbs. on my 87'VR. My Carbtune checked out OK. If you have any questions, PLEASE feel free to ask. Earl
-
Hello everyone, I made the mistake of having a friend adjust my carbs a few months ago. I have an '03 MRSV, running with K&Ns and all the pollution stuff plugged and rolled up. I also have the four tits stemming from the carbs plugged. I checked the spark plugs today and the bike is running extremely lean. My buddy does not remember where the mixture screws were at when he started turning them out a few months ago. I have been getting popping on decel too. So I turned out the mixture screws a complete 360 turn and the popping persists. I need to ride it for a while and check the plugs again. Can anyone tell me a good setting, for these screws, FROM BEING BOTTOMED OUT, while running with K&Ns and with the all the air polution stuff plugged? Many thanks in advance - Ponz
-
When taking the cover off the left side of 83' ,I dont know and cant find info on the proper removal instructions, I took off the smaller plate that is heald on with the 2 screws, then there is a bolt that connects to the crank, my question is does that nut need to come off to remove the cover or do I need to just work harder at pulling the cover off, THANX!!!!
-
Sorry how is this> Here are the instructions and pictures I took of this. I have a 83 Venture standard and was having the false warnings, dim headlight, and my fuel gauge would go to empty right after filling then back full again. This caused the fuel warning to come on, then go off. http://www.venturers.org/Tech_Library/attachments/cms1.jpg First remove the windshield trim. (4 screws). http://www.venturers.org/Tech_Library/attachments/cms2.jpg Remove the windshield. (4 screws). http://www.venturers.org/Tech_Library/attachments/cms3.jpg There are four screws holding the hood in place. I loosened the front ones. http://www.venturers.org/Tech_Library/attachments/cms4.jpg Then I removed the rear ones. http://www.venturers.org/Tech_Library/attachments/cms5.jpg Then removed the hood. http://www.venturers.org/Tech_Library/attachments/cms6.jpg Then using a 10mm wrench and a socket, I removed the 4 nuts and washers holding the instrument cluster. http://www.venturers.org/Tech_Library/attachments/cms7.jpg I then unhooked the large connector and 3 smaller wires that connect to the instrument cluster. http://www.venturers.org/Tech_Library/attachments/cms8.jpg I then disconnected the speedometer cable. I did this last as I could pull up a little on the cluster and get more room to unscrew the cable. http://www.venturers.org/Tech_Library/attachments/cms9.jpg I then removed the cluster from the bike. Here is the removed cluster with all the tools I used to remove it. http://www.venturers.org/Tech_Library/attachments/cms10.jpg Now to remove the CMS from the instrument cluster. I first removed the 4 ourter screws, then the four inner screws. http://www.venturers.org/Tech_Library/attachments/cms11.jpg Then you remove the mounting plate. http://www.venturers.org/Tech_Library/attachments/cms12.jpg I had to work mine out of there one side at a time. Part of the problem was the wires that connect the two pieces together, and a piece of clear plastic which is to light up the LCD at night. Here is the rear view of the removed unit. http://www.venturers.org/Tech_Library/attachments/cms13.jpg And the front view. http://www.venturers.org/Tech_Library/attachments/cms14.jpg All you need to do to split this is, remove 4 screws on the back and disconnect the wire between the two units. I used a pencil type soldering iron heated very hot. http://www.venturers.org/Tech_Library/attachments/cms15.jpg I soldered both rows where the connector is soldered to the board. The iron is pointing at one row. http://www.venturers.org/Tech_Library/attachments/cms16.jpg And here it is pointing at the other row. http://www.venturers.org/Tech_Library/attachments/cms17.jpg Once completed, just reverse the sequence to put it all back together. Some of the mounting bolts are buried and hard to get to, but if a little patience is used, you can get to them. There are three connectors that I didn't show, and I found those hard to put back together, but again a little patience and they should be fine. Now that I had it all back together, I had to try it out to make sure I had not created a error or problem. http://www.venturers.org/Tech_Library/attachments/cms18.jpg It took me about 30 minutes to take the instrument cluster out fo the bike. Removing the CMS from the cluster and soldering took about an hour for me. Putting the cluster back together took about 15 minutes, and returning the cluster to the bike and finishing up took about another 20 minutes. Remember I was taking pictures and taking great care.
-
I had my 08 carbs worked on as they were leaking, and since then it idles very slow and has died on me a few times. Do I have to tear a bunch of stuff down to get to the idle screws and when I do this do they need synch again? and not ever seeing the carbs on one of these what ones am I looking for? thanks:crying:
-
 Well, back from Iraq and ready to hit the road.... well almost. In my Brigade, we're required to go through the MSF course everytime we return from a deployment... so..... I buy a battery, go get my tags renewed and drive up to the class. Here I am sitting next to 5 Harley Davidsons on my 84 XVZ1200 with no side plastics. (a note.... when you leave for 15 months, leave the tupperware on the bike... one of my wife's friends backed over all my right pannier and all my side plastic except the left side engine cover piece) Anyway, I digress.... So I'm sitting there with the Harley (all under 2k on the odometer by the way) and the instructors start thier safety inspection..... guess who needs new tires? I drive away.... denied. On the way home I have several problems I have previously posted here. Well, since it will be another payday before I can get new rubber... I undertake the dreaded thorough carb cleaning. I got the carbs off the bike and so far I have checked the left side diaphrams, rubber is good, just very dirty. I'll be off to buy carb cleaner tomorrow. I dread splitting the carbs, I wish I could get to the bowls without disassembling any further , but I'll just have to have at it. While I'm in there, I plan on replacing all screws with hex head screws as suggested here. I looked a a couple of assorted metric o-ring packs at auto zone, and am not sure if I should go that route or Just clean the ones I have as well as possible. Also, as my diaphrams seem good, when I put the covers back on, should I use a thin coat of sealant around the edges or do the old diaphrams seal well enough.... I mean, the things are probably over 20 years. probably never been changed as the cover screws were all stripped out. Anyway, the long winded reasons for this post: 1) I originally had rags stuffed into the inlet holes after removing the carbs, but It seems my dog had nothing better to do today than remove them from the bike..... all four of them. I have since put heavy duty freezer bags over them and secured them with the hose clamps. I am somewhat concerned about what might have gotten in, as Colorado is extremely windy this time of year. Does anyone have any suggestions as to any precautions I should take before reinstalling the carbs? should I stick a vacuum hose in there before I put the carbs on? 2) Right now, the carbs are off, the front fairing is still in place and the seat is awaiting an ebay replacement. I'll hopefully be taking the wheels off soon, so I can take them up to have the tires changed (not allowed to drive the bike up to the local deal... sometimes the army sucks). Is there any maintenance that has probably been neglected that should be done while the bike is this far apart. I'm already planning on greasing the splines and changing final drive fluids, and would welcome any suggestions. Thanks for all the help you guys always provide. Mark PS: I don't suppose anyone has an Idea where I can get most of the 1st gen plastic for cheap? I was able to glue one lower fairing (L shaped piece), and the other is only missing about 2" of the end that attaches to the front plastic "crossmember" I can probably fiberglass something up for that one, but no luck at all on all the rest.


.thumb.JPG.bfcefdc0995aabc77d6b4e8cf9125c91.JPG)


.thumb.jpg.0def0cd11f551e85e5aebca6947d2cdb.jpg)
