Search the Community
Showing results for tags 'remove'.
-
 I need to replace the front u-joint, mine is a trike so I have two. After reading the tech talk it sounds like after removing the driveshaft you then remove the entire u-joint yoke from the bike, is that correct? Looks like the front part of the yoke is bolted to a transmission output shaft, do you remove that shaft and if so how? I also read that there may be other U-joints that will work as well as the OEM, any thoughts? As ususal all the advice is good and thanks.
 -
What is the best way to remove a decal from a windshield?
-
This works on all motorcycles with carbs. I've slightly revised this for better clarification. And I posted to this section for 2nd Gen's to read. Easy 1-2 Hour job 1. Remove the carb cap, 4 screws. If 1 screw is a security screw used vise grips to turn. 2. Remove the spring. 3. Remove carb slide and diaphram, it's black with a needle hanging out the back. 4. Remove the jet needle, there's a large screw inside the middle of the carb slide holding it in. Pay attention to the order the parts come out. 5. There is a white spacer under a circle clip. Remove it. 6. Replace the white spacer with any small washers about 1/2 the thickness of the white spacer under the circle clip. 7. Ignore the fact that the white spacer has a small tit on one side. 8. You can add 1-2 washers on top of the circle clip to take up the space. (I didn't on my Venture and friends) 9. Put it all back together in the same order it came apart. New washers, jet needle with circle clip tight (check it), 1 or more washers on top of circle clip, small spring, plastic screw, in that order. 10. Carefully reinstall slide and diaphram. Notice diaphram has a tab. 11. Do only one carb at a time. (Can use others as reference) 12. Go for a ride checking gas mileage and performance. My friends 87 Std. went from 37 to 45 mpg. 13. Clean and check spark plugs before and after. Correct color is gray, tan or clean depending on type of gas used. Slightly white electrodes is Ok if the plug base near threads is darker. white base and tip is too lean; black is too rich. 14. SO: Add washers under circle clip to richen, remove washers to lean. 15. My bike is faster now lean (hotter combustion) 16. I set pilot jet screws to 1 3/4 turns out 17. All 4 Ventures were way out of synch before I did them. Much smoother now. Questions? Send me a PM or email: chuckfrench48@gmail.com (mention VR)
-
So who out there can help me find a pump to adjust the air in my shocks? I read somewhere that it needs to be a certain type to be able to add and remove the PSI Thanks
-
i am working with an eBay seller (axe63) who makes very affordable backrests for various model Yamahas - however he does NOT make one for the RSTD. i told him i would post here, asking for someone on this forum to take a ride to him for him to take some measurements (would need to remove seat). if anyone is interested and can help please let me know and i'll get more details...thanks to all ! :-) Buz
-
Hi, I recently developed an afterfire on my 84. Upon further inspection, I have one fair sized crak near the very rear of my collector.. I imagine there may be more.. Time to fix I suppose...How much effort and job to remove this and weld....I think the baffles are okay. Any tip or trick to speed removal or make it easier? Thanks Clay
-
I need to pick the brains of the membership here. I am in the process of installing an LED brake/running light on my 84. I have removed the trunck, trunk mounting bracket, and the plastic cover under that. I discovered that some time in the past, someone wired in a trailer conector. The trouble I have is that they used the Scotch lock connectors. What would be a good way to remove these? When I get them removed, would a good spray of contact cleaner and then a covering of liquid tape be appropriate? I have used these connectors in the past, always with less that good results. Thanks to all, Dave
-
I am in the process of changing all my blinker to clear linses and new amber bulbs and I can't get the old bulbs out. The first one twisted off in my hand leaving the base in the socket. I am assuming I have to push the bulb in and turn counterclockwise like the manual states. Mine is '99 RSV and I doubt the bulbs have ever been changed. I have never seen a socket quite like this one. It has a metal strip across the base. Should I remove that strip before trying to remove the bulb? I tried this but when I rotated the bulb the whole socket moved. Someone please set me straight on this. I have one rear bulb broken and do not want to try another one until I am clear as what to do.
-
To loosen the handlebar bolts, there are chrome caps over each one. Does anyone have a special method to remove these caps, so as to get at these 4 bolts? Thanks.
-
 I have a question for those who have totally removed the AIS system on their RSV....after removing the valve by the rear shock, did you also remove the box or valve that is at the front of the engine by the oil filter? If so, I'm assuming that is a remove the radiator job too? Thanks, Joe
 -
 I have a 1987 Venture Royale. My crossover pipe has a large crack in it. I want to remove it and have it welded. I took the mufflers off. How do I take the crossover pipe off without taking the whole exhaust off?
 -
 I haven't changed my air filters. The dealer did it the last time so I looked around on the bike yesterday to see about removing them and didn't find an easy way to get them off. Do you have to remove the lower fairings in order to get the filters off? Thanks, Dennis
 -
 I've been meaning to remove the YICS chamber on my 83 before it becomes a problem. I bought some caps to plug the ports with, but got reined-in very quickly when I tried to get a good look at the inner YICS cylinder ports : the outer hoses are no issue, but I can't even see the inner ones. So my question is this : is it possible to remove the YICS hoses & cap off the ports without having to pull the whole carb rack ? It looks way too tight in there for my hands. I do have a 4-yr old, but she isn't all that handy with a pair of pliers (yet). Just wondering...
 -
Recent findings 1. They will make noise at low rpm and high electrical loads. Lights, radio, aux's "On" 2. Stators may appear to be ok visably but still bad. 3. If they are black on 1/3 to 2/3rds of the coils they are probably burnt out or going out. 4. The ohm reading (2.4) maybe OK as stated in the service manual but they still will not generated electricity. 5. The regulator/rectifier is probably more reliable than the stator. It has cooling fins and is in cooling air. 6. Make sure you reinstall the starter gears correctly, watch how they came out. 7. Have an extra stator cover gasket in case yours gets torn. Silicone RTV is not needed. 8. Make sure the gear selector arm is in the up position behind the cover before reinstalling. Use both washers, don't loose the circle clip. 9. You must remove the middle gear cover to get the stator cover off. 10. Look for leaks at the gear selector electrical switch, the clutch push rod and gear selector shaft seal while your in there. 11. Make sure all wires are covered, taped and will not get pinched when either cover is reinstalled. 12.At idle the voltmeter should not drop down to 12.0 volts unless the fan is on. It does have high current draw. Yes I've done it all wrong and had remove the stator cover 6-8 times now!!
-
First, apologies upfront if this has already been discussed. I've typed in a few variables in the search part and couldn't find anything close so here goes....... Most of my buddies ride Harleys. What I've always admired about their bikes is that they have low cut (4" or taller) tinted windshields which are easily removable in order to change back to a larger shield for long distance riding. (Ahhhh, to have that wind-in-the-face feeling again!) So this got me to thinking about my own Venture and how I'd love to be able to switch back and forth from my huge shield to a tiny one for local rides and real hot summer days. The big problem with our bikes is removing the chrome trim on the fairing because of the design of the damn thing (those little plastic tabs! Aaaargh!). I get nervous as hell trying to remove it just to get inside to do some wiring on occasion, never mind having to remove it on a more regular basis to switch a windshield. So I began thinking up ways to come up with a 'quick' release system for the fairing. My first thought was to find some real shiny chrome screws and drill into the trim and fasten it to the fairing so that way I'd only have maybe 5 screws to remove (2 in the back, 3 upfront) in a fairly reasonable time with an electric screwdriver, then remove the screws for the windshield and make the switch. Voila! Done! But having a discussion one evening with Draegerman, we came up with a better idea. The chrome trim already utilizes 2 screws to make certain it stays put so instead of drilling holes in the trim, why not use magnets? Apparently there are some pretty heavy duty magnets available on the market nowadays that would do the job very well. Mounting them in the right place would surely hold the chrome trim in a perfect position. This way, all you have to do is remove the 2 screws and then pull out the chrome trim and not worry about those plastic tabs anymore! Now you have fast access to the windshield mounting screws and they can be removed just as quickly and switched with another shield. Sure it may take 5, maybe 10 minutes, but to have a shorter screen up front would sure be nice at times. Anybody want to add to this? Anybody come up with any other way to remove a windshield quick? I'd love to hear other ideas if anyone has one before I go and give this particular idea a try. Any input would be greatly appreciated. Bluez
-
Well I just got my new Barron slip on mufflers yesterday. I was wondering if there is anything I need to watch out for or is it very straight forward. Oh yeah, do I need to remove the saddle bags or can they be installed with them on. Thanks Rich
-
 I'm tearing apart my forks on my '83 VR. Concerning the anti-dive units on the lower front forks, do I remove the unit from the forks or do I remove the brake line at the banjo bolt and leave the anti-dive unit attached to the forks? Thanks
 -
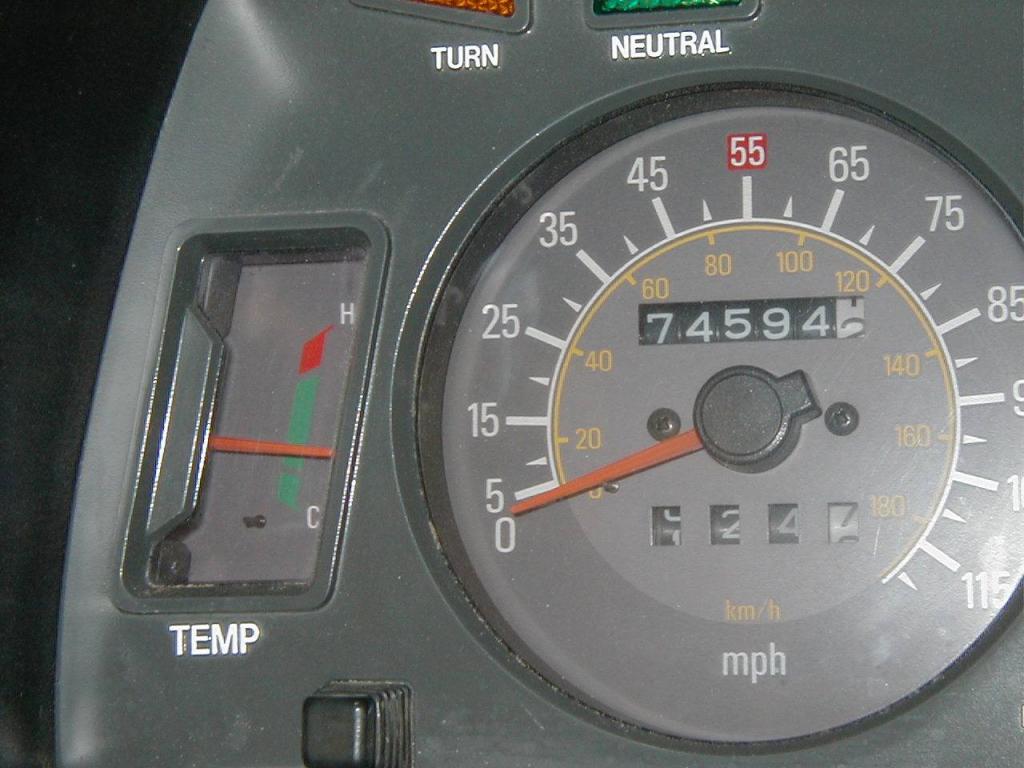
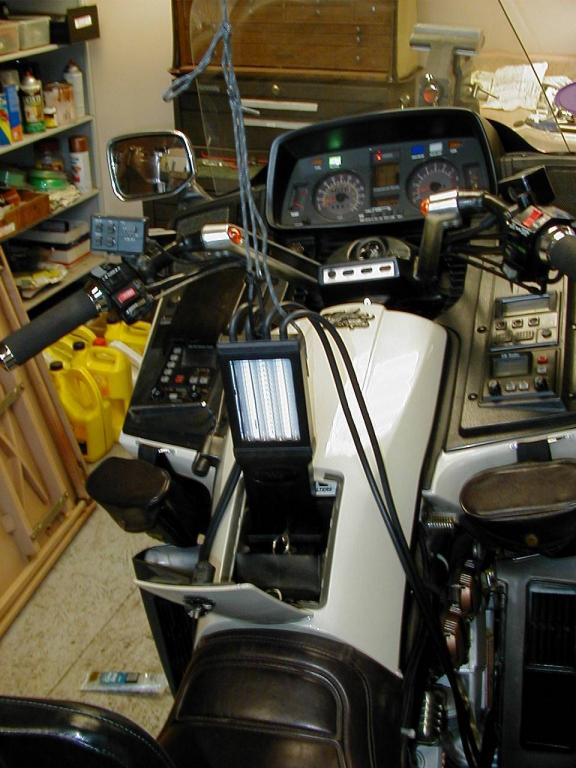
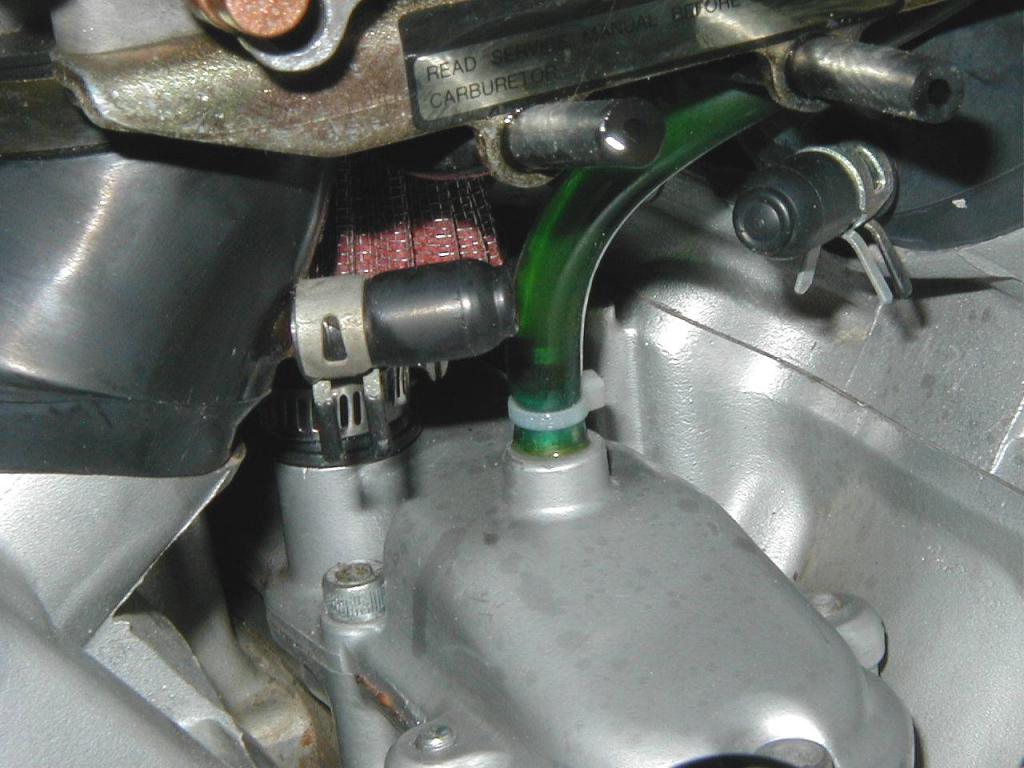
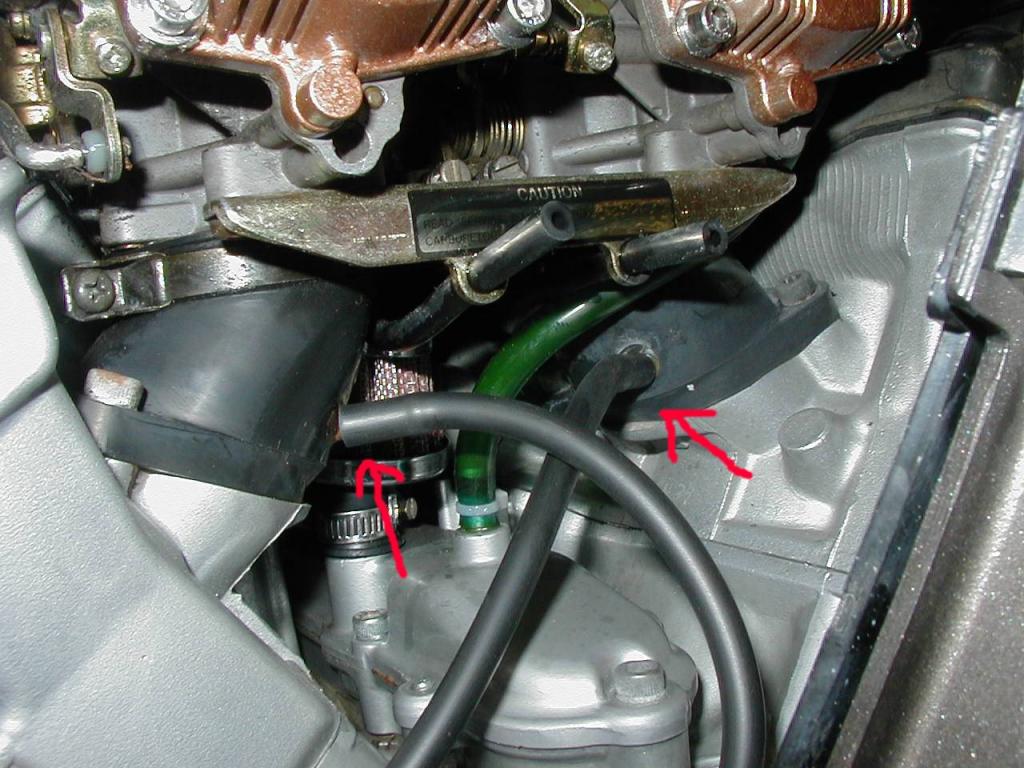
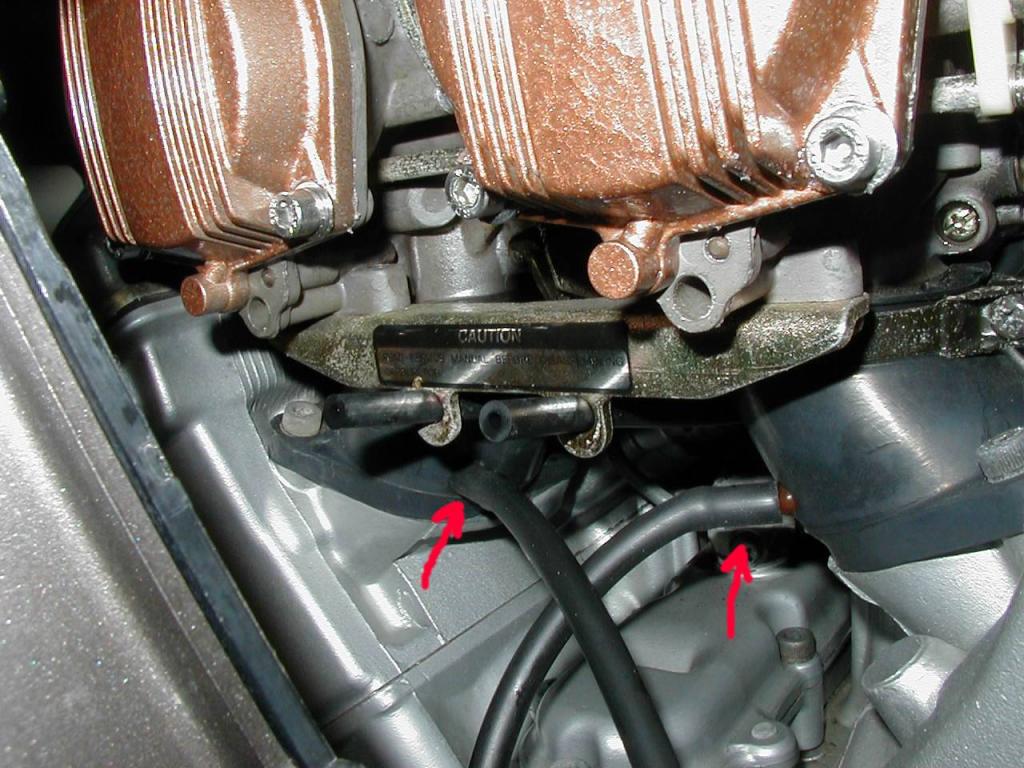
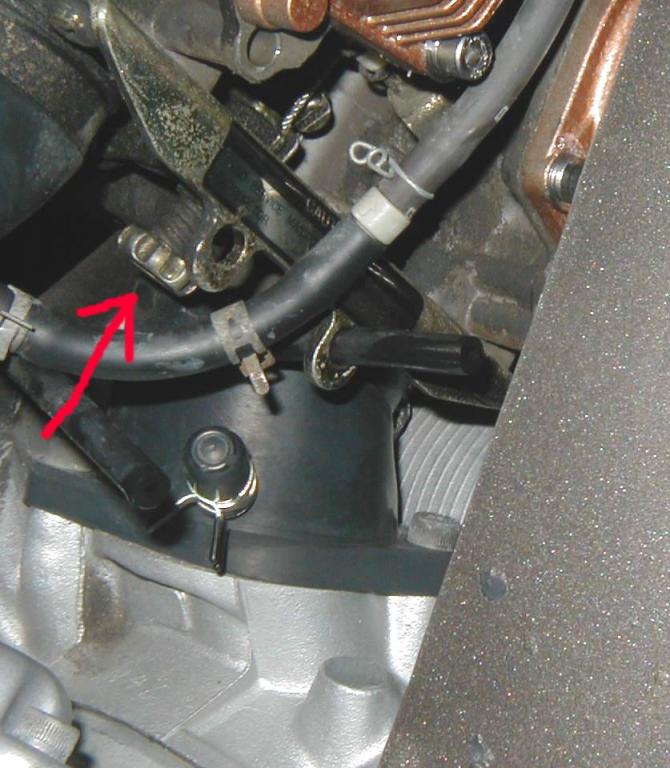
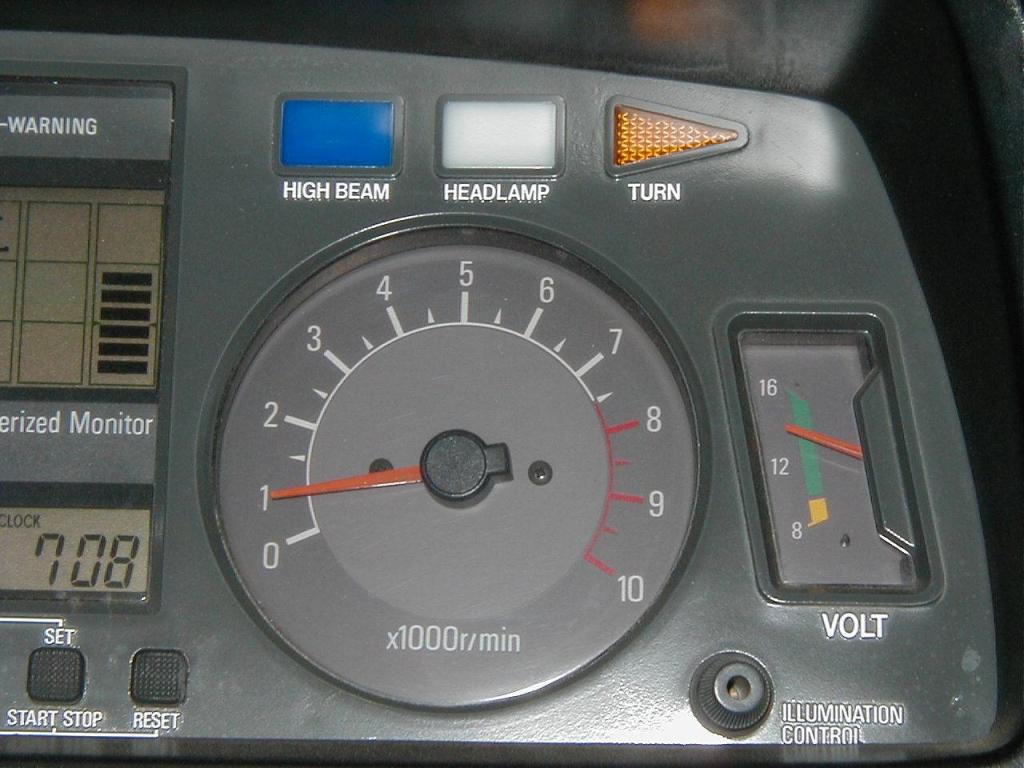
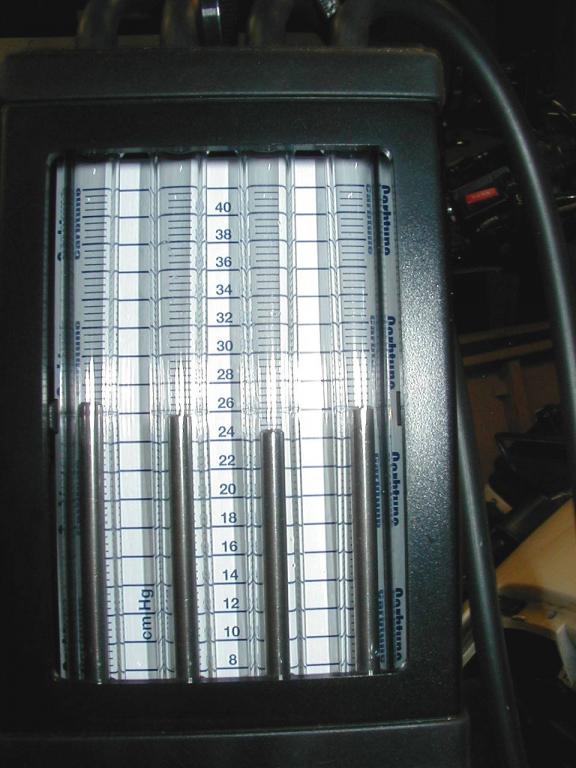
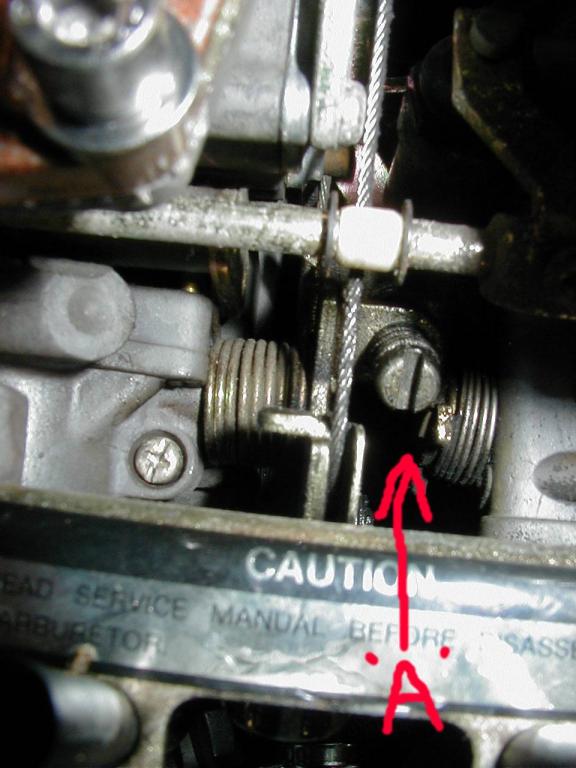
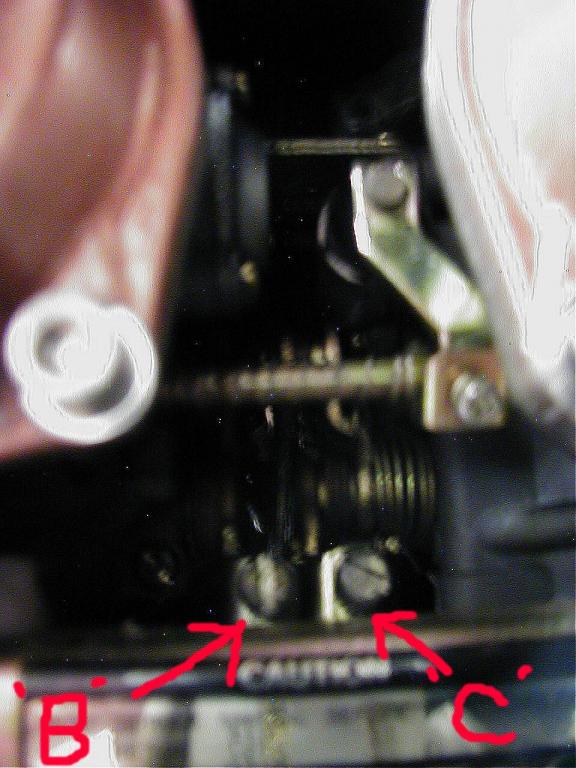
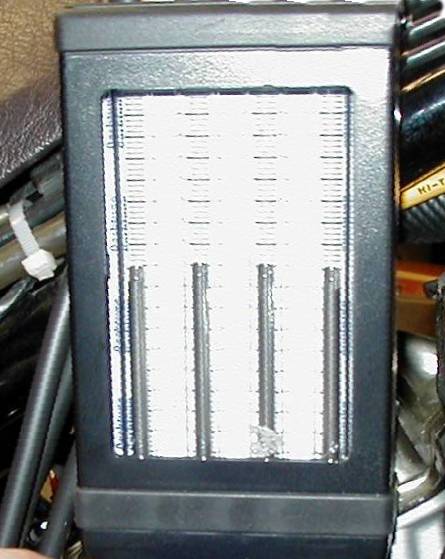
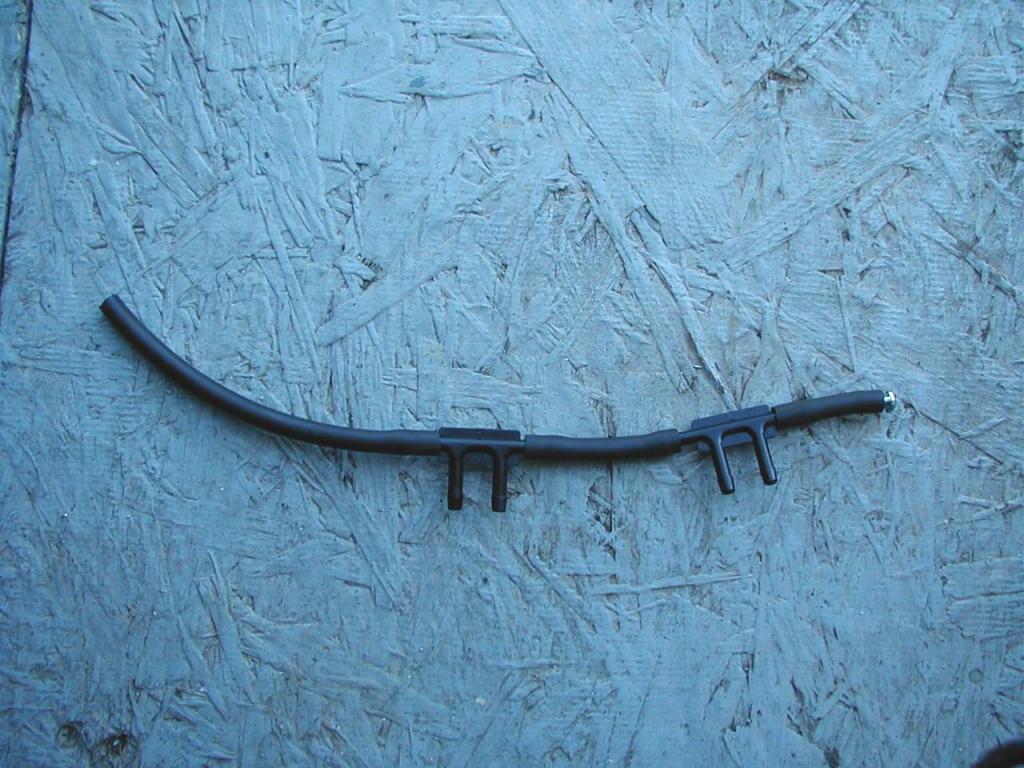
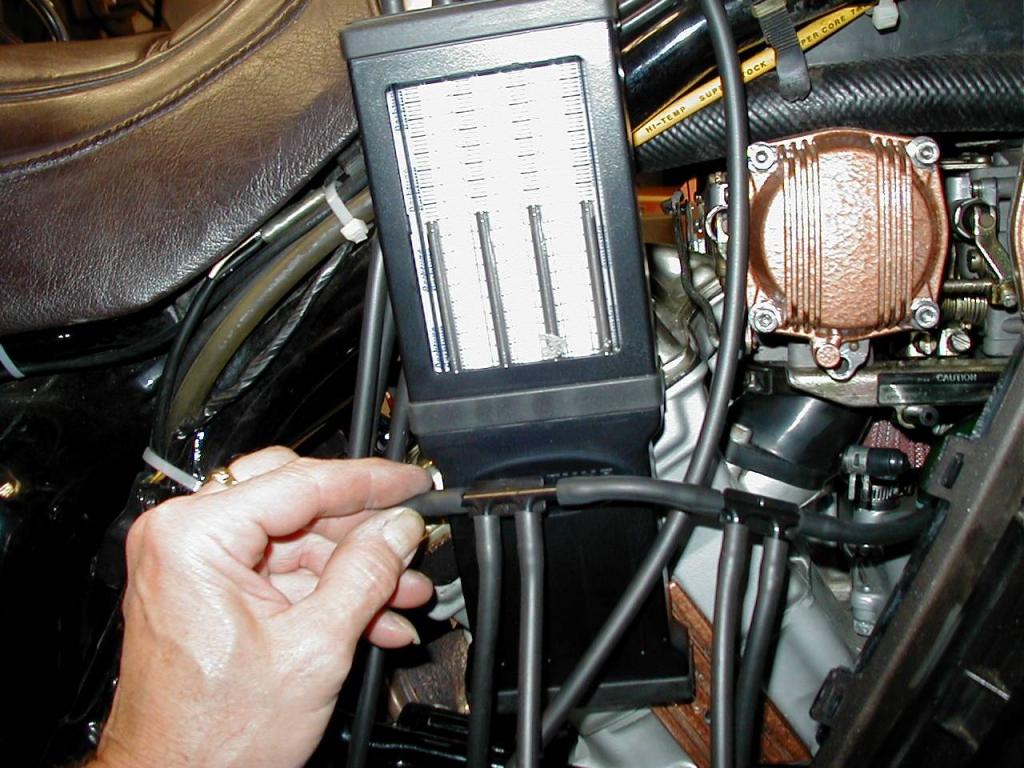
 There have been so many people asking about Syncing. the Carbs on their First Gens. that I thought I would take a few pics of the way I do it so that other members would have a general Idea how to go about it. (Disclaimer: My way is not the "do all, be all", just the way I do it. Take what you need and leave the rest.) I start by removing the screw in the false tank cover and unhooking the front of the cover, It does not need to come off. I then remove both side covers. I then remove both of the Radiator side panels to expose the 2 screws that will allow the lower fairing legs to be pulled away from the Carb. Bodies. (NOTE: if your lower fairing legs are in bad shape, you may want to remove the lower cowling which will expose the screws that will allow you to completely remove the lower fairing legs, Mine are still pretty flexible so I don't take them completely off. (Do what you feel "warm and fuzzy" about.) With the plastic off, I start the bike and let it run up to "operating temperature". Pic #1 shows the temp. gage about 1/3 the way up. Depending how "hot blooded" you bike is, this may take a minute or two. While the bike is warming up. Pic #2 shows how I suspend my Carbtune from the ceiling in my shop with a long shoe string and center it right above the gas cap. This allows the Carbtune to remain vertical and also allows me to work both sides of the bike with out moving the Carbtune . At this time, I shut the bike off. Pic #3 shows the location of the Vacuum ports on the right side of the bike, I remove them and plug in the Carbtune on that side. Pic #4 shows the lines installed on the right side. I then move to the left side of the bike, Pic #5 shows the one Vacuum port Cap and the "Boost Sensor" Vacuum line that is connected to Cylinder #2. (NOTE: These pics were taken of an 1987 VR MKII, I don't know if the MKI is the same because I don't own one!) I remove the Vacuum port cap from the #1 cylinder and the Boost Sensor line from the #2 cylinder and Pic #6 shows the two lines from the Carbtune connected. I am now ready to restart the bike. Pic #7 shows how I position a fan at the front of the bike to keep the engine temp. from going too high. I like to take my time when I'm adjusting the Carbs. on a bike and this gives me the extra time. With the bike running and at temp. Pic #8 shows the location of the Idle adjustment screw. (NOTE: I moved the #2 cylinder Carb. Bowl Drain Tube out of the way for the pic. This screw is hard to find unless you are squatting down... and use a flashlight!) Pic #9 shows the Tachometer at 1000 RPMS (By the book 950-1050 RPMS) Pic #10 shows the Carbs. are in fact out of adjustment. I have the left two channels of the Carbtune connected to the left side of the bike, (cylinders #1 and #2.) and the right two channels of the Carbtune connected to the right side of the bike, (Cylinders #3 and #4). Starting on the left side of the bike Pic #11 shows the location of Carb. Sync. screw "A". (NOTE: This is another screw that is hard to see at first, and it is at a downward angle so it will be hard to get a screwdriver on it properly, be patient!) The object here is to rotate "Screw A" until you get the left two channels balanced. Make an adjustment, then "Blip" the throttle and let the bike return to Idle. If needed, adjust again. With the left bank of Carbs. adjusted, I move to the right side of the bike for the rest of the adjustments. Pic #12 shows the location of the "B" and "C" screws. Screw "B" is used to adjust the right two channels of the Carbtune, and Screw "C" is used to adjust the left bank of two Carbs. (Cylinders #1 and #2) to the right bank of Carbs. (Cylinders #3 and #4) Using screw "B" I adjust the right two channels, "blip" the throttle and readjust if necessary. Then I use screw "C" to adjust the left bank to the right, "Blip" the throttle and readjust. Pic #13 shows all four Carbs. on the Carbtune adjusted pretty darn close. Basically, you are done at this point. I wanted to add a few personal suggestions that I use to "enhance" the Carb. Sync. experience to make the bike run even better for me. After I am done with the Carb. Sync. at Idle, I Rev the bike to the 1800 to 2000 RPM range and hold it there, if all four of the Carbs. aren't holding the same vacuum at 2000 RPMS I make slight adjustments (split the difference) between Idle and 2000 RPMS. The reason I do this is because when I am stopped, and start to take off, I increase the RPMS of the bike into the 1800 to 2000 RPMS range as I am slipping the clutch to engagement. I don't want one or more Cylinders "cutting out" or "cutting on" as I am trying to look cool pulling away from a light, especially with Jean on the back! The next issue I would like to address is the "Reliability" of the Carbtune Manometer. Here is a list of Items I purchased to build a simple "Manometer Tester" Manifold. Pic #14 shows the "Manifold". and Pic #15 shows how I test my Carbtune BEFORE I use it. I got these Items from NAPA Auto Supply: Part# 2-616 (2 needed) Vacuum Connector $1.49 each $2.98 Part# H-459 (1 foot needed) 5/32 Vacuum Tubing $.99 1 qty. 1/4-20 screw Free from toolbox 6% Tax (Pa.) $.24 -------- $4.21 Total I hooked all 4 Carbtune lines to the manifold and hooked the Manifold line to one of the carbs. on my 87'VR. My Carbtune checked out OK. If you have any questions, PLEASE feel free to ask. Earl
-
Hello all, I have a friend that has a 2005 RSTD. I have been trying to get him on to this site but he has a busy schedule. He was wondering what kind of mufflers he can run with out hurting the engine. He wants to remove the bags and doesn't like the way the bubs stick out there toward the rear tire. He wants something shorter.Any advice will be much appreciated. Thanks in advance
-
This thread over on the other board says to remove the RH header pipe in order to get the starter out. Is this correct? Because this one says nothing about it.
-
Here's an inexpensive "Carbon Fibre" treatment I used to dress up my electrics side covers. Total cost about $35 and 1 hr of time. Purchase roll of TrimBrite "Carbon Fibre" film and a roll of 1/8 inch "Custom Chrome" accent striping. I got mine at Canadian Tire. You'll need a small spray can of some color...I chose silver (because the bike is black) ... the Carbon Fibre film shows the underlying color and with black, nobody would see it. Mask off the area you want for the Carbon Fibre. Scuff it up a bit with a scuff pad and clean it good with some paint thinner (or other de-waxer, de-greaser) Apply the under color....let it dry good...remove the masking tape. Take a strip of the Carbon Fibre and remove the backing paper. Lay it down slowly and evenly... make sure you don't get any bubbles. If you do, just poke them with a razor knife and work the air out. Trim off the excess with the razor knife. Apply the chrome trim to the edges.
-
OK one more question popped to mind. What else do I need to remove from the wheel to get a new tire on it? and get it balanced? Do I need to remove the Disk and any other stuff from the drive side or the brake side of the wheel to get this done? Does the wheel need to be bare of all that is not and integral part of it? Thanks for all the help on this.
-
 I'm wanting to replace the fluid, and check things out in the front forks of my 83 Venture. The first thing I need to do is figure out how to remove the plastic piece where the key and air valve are. I don't want to force something and end up braking it, but I can't find how to remove it in the service manual.
 -
Just picked up my 86 last week and it would appear I have an issue already. I've put about 500km's on her since I picked her up and every now and then I get a wiff of antifreeze. This morning I spotted two 2" dia wet spots under the engine. Antifreeze. It's coming from the drain valve. I dried everything off and found a couple of interesting things. First according to the manuals there is a screw that holds the plug in place = not on mine. It appears as if the head has snapped off the screw. How does one get the plug out to inspect it? Second, if I turn the plug it simply goes all around as opposed to stopping in either the open or closed position. Is this normal...does this plug simply turn 360 degrees?? The manual says to align it with a mark either open or closed for purposes of draining the rad.....I can't seem to find a mark on the housing only a hole top dead centre...is that it? For the time being I have the plug turned so that it appears closed (same as the picture in the manual) and the leak has apparently stopped. Questions I suppose I'll have to drain everything and drill out the screw in order to remove the plug and probably replace the gasket which I suspect is the cause for the leak....am I on the right track here?? Any suggestions?? How big of a PITA is this going to be. Another totally unrelated question for anyone who responds....how do you remove the fuel filter?? There is some sort of bracket or something holding it in place. How do you get in there? Any help here would be good. Thanks Ed
-
 Ok so, I have a first gen ('84) front wheel that is damaged, the rim is bent. Before I throw it away I'd like to salvage the wheel bearings for the spare parts box. How do I remove them? Can it be done without trashing them? Do I need any special tools? Thanks, Brian H. Uxbridge Ont