Search the Community
Showing results for tags 'screw'.
-
 I'm taking down the fairing on my 1st gen. MkI to do some much needed electrical work. I got stuck at the headlight adjuster knob. I can't see any type of set screw or anything holding it on. I tried prying up from underneath, but didn't want to try too hard. Anyone with a word of wisdom?
 -
I have posted on this in the past, but thought I would update the info with a fresh post since I just revisited the settings on QuickSilver. Factory settings on the mixture screws seem to always be extra lean - somewhere around 2.5 - 3 turns out, if I remember correctly (I always check this and write it down for the carbs I work on, but then I give the notes to the owner and do not keep them myself for reference!). This lean setting is not too surprising with the current state of emission regulations, but I do find it strange that Yamaha's published spec for CO on this engine is MUCH richer than they come set from the factory. I have a tendancy to believe that a manufacturer should actually set up the machine to match their own published specs, but Yamahaha both sets their floats WAY higher than the spec and the mixture leaner than the spec. Although I do have an exhaust gas CO analyzer, I rarely use it because it is tedious and a PIA. I have found that I can get excellent results by simply tuning each carb for max RPM. I have also tried the Colortune, but I find that tool a sad joke. The published CO% for this engine is: #1 & #3 = 2.5-3.5% #2 & #4 = 3.5-4.5% For reference, here are the settings I have found on my RSV - Using the max RPM method, I still end up with settings that are slightly too lean, especially for the front cylinders. Typically this method leaves the screw about 3.5 turns out, and that is what I would recommend as a starting point for someone looking for that info. Using the CO analyzer, I get about 3% with the screws set somewhere between 4 and 5 turns out, and pushing the front cylinders all the way up to 4% CO requires a full SIX turns out! Six turns out seems like a huge amount, but I have used the analyzer on this bike twice (two years apart), and the settings I ended up with are the same today as they were back at the beginning of 2009, so I am getting consistent results. Although the bike has been running perfectly for the past two years at the midpoint CO settings, I think I'll probably reset the front two jugs for the minimum of 3.5%, just so I'll feel better about the screws not being so danged far out! But for the majority of carb setup and tuning for 2nd gens, I think I will continue just setting for max RPM + 1/4 turn on each carb. Even without a tach on every bike, I find it pretty simple to do it by ear. I used to actually leave the screws a tad more IN from max, but in light of the settings required to reach the published CO numbers, I've decided to set them 1/4 turn richer. If you feel the need to adjust your carbs for any reason, here is the process I think will produce good results for just about anyone. First, sync the carbs and make sure the idle RPM is set properly. If you do not have a tach, just realize the idle spec of 1,000 RPM is probably a little faster than the idle sound you prefer. Just leave the sync gauges connected while you do the mixture screws, since you will want to double check the sync setting when you get done. I'd start with each mixture screw about 3.5 out, then the first thing is to start turning it IN to verify you get a drop in RPM (which proves your idle jets and circuit in that carb are actually working) - no point in trying to tune a carb that already has problems with plugged idle jets, right? Now slowly turn the screw out to the point where the RPM no longer increase. Select the final setting by turning the screw back in to just where you first detect any drop in RPM, then back out 1/4 turn. Repeat that with each carb, then verify the sync is good, and you are done. If you have problems getting a good setting on any specific cylinder, I'd start looking for other carb issues there, such as plugged jets, bad o-rings on the mixture screw, diaphragm holes, etc. Goose
-
trying to bleed the brakes - starting at rear - i cannot remove the reservoir lid due to a molded plastic piece in the way - i do see an allen screw which appears to hold it in place - must i remove that screw to access the reservoir lid?? see pic...............
-
I bought a FireStik antenna for my bike because I read a few posts that said it was an easy swap. Apparently, I'm not that bright when it comes to CB's. The antenna has a male end on it and so does the cable on the bike mount, so it won't just screw on. I've found replacement cables, but they all have the wrong connector at the radio end (and they're all 18'). So how do I get a cable on this thing??? I'm completely lost. Thanks guys.
-
I purchase a Carbtune Plus and it arrived today. I decided to give it a whirl. I took the laptop with me to follow Freebirds directions and headed to the garage. First of all a ride a 96 Royal Star Tour Classic and it has no tach so I really don't know if the idle is correct. I followed the Carbtune directions for setup then went to Freebirds post. I hooked up the Carbtune and the readings were way off. All went well while doing step #1 and I got the first side to measure pretty closely.( How close do I need to be to be close?) It was when I went to step #2 that I ran into a problem. The adjustment screw was not where the directions said it would be. I happen to have a second set of carbs so I took them off the shelf for a look; It seemed to me that I would need to access the adjustment screw for side 2 from the left side of the bike, There were two adjustment screws side by side so I really wasn't sure which was which. I tried trial and error and was able to get side 2 pretty close( once again how close do I need to be?) I then tried the second adjustment screw and got all 4 to be pretty close.(????). I put the rubber plugs back on and took the bike for a ride. The" old boy" seemed to run a little better and I seemed to notice less back firing on deceleration. Now my questions....Can anyone tell me if I did the sync correctly? How close is close enough and is it necessary to have the idle RPM"s perfect before I started the procedure...Thanks
-
First, I am an idiot when it comes to mechanical things or comfusers, er , computers. My headlight burnt out on my 02 and I am trying to figure out how to get the headlight out. When I take out the screw at the botom of the headlight ring I still can't get the ring off. What is the secret? Once I can get at the headlight it is no problem.
-
this happened to oldgoat today rub it in on him. today he went outside to tighten some things down on the bike. he went looking for a screw he knew was in the trunk? when he got a sharp pain in his thigh.yep found the screw was in his pocket. while putting in the screw his cell phone rang. so he put the screwdriver in his front pocket and rippppppppp put a hole in his pocket change fell to the ground. he bent over to pick it up ripppppppppppppp he felt a nice wind and pepole could see his butt . said the heck with it time to pour a cold one down. well he went to the fridge to find his beer and other refreshments where warm? seems he left the extension cord outside last night and we got a late night shower. so it blew the fuse to the fridge. so he fixed the fuse. drank a warm beer. placed the rest of the beer and soda in the freezer of the fridge. i didnt say nothing. he then drank a warm beer. sat down and feel asleep for about 2 hours.. got up and went for a beer and opened the freezer and boom he now has beer popsickles all over the freezer.
-
 I'm wondering if anyone else has had this problem. On my right saddlebag the screws that hold the hinge mount plate to the bottom of the bag (see attached pics) are failing. The screws screw into the molded plastic and the plastic is disintegrating. To me it looks like they were overtightened at the factory. I just notice this a few monthes back. The left bag has no issues. I have been very careful not to overload or overpack the bags. I will be talking to my dealer about warranty and want to make sure I have as much info as possible. Comments appreciated. Thanks JR
 -
 I have a 98 RSTC and purchased a set of 98 RK pipes last week, new take-offs and a set of V-twin chrome clamps. I will make some brackets to hold the new pipes in-place. My question is, where do I actually make the cut to remove the stock pipes? Is there a thread or post that shows the place. I don't want to screw this part up. What type of cutting device did you guys use? lesrub@aol.com Thanks Les
 -
 Ok what I kneed is the size of the retainer screw that holds in the draincock plug. I had a leak that turned out to be a hose at the overflow bottle. In the process I noticed that the draincock was turned wrong at the dealors during the last repair work so I went to losen the screw so I could turn it to the prpoer positionand thats when I noticed no screw. So I need to know the thread size and length. Any help would be apreciated. . I intend on ordering the upgrade kit from skydoc but would like to get something so I can ride till then. Be as Earl is temperarily down. Tahnks in advance. DAvid
 -
 Someone asked me how I converted my Tape Deck to a MP3 Player. The best info I have is here: http://www.venturerider.org/forum/showthread.php?t=41100 I used Scotty's and Frankd's schematics to come up with one that works between the two. Here is a simplified color diagram I created. http://i19.photobucket.com/albums/b160/warthogcrewchief/SimpliedInstructionsforMP3Input.jpg Here is where I located my 3PDT switch. http://i19.photobucket.com/albums/b160/warthogcrewchief/100_0955.jpg Here is the "tray" I made out of (aprox.) 1/4" thick clear acrylic plastic. I cut it out using a dremel and razor blades and then glued them using plastic glue. I got some simple hinges and drilled holes and screwed in screws (put plastic glue on threads). http://i19.photobucket.com/albums/b160/warthogcrewchief/100_0956.jpg I then cut off the rest of the screw that protruded through the plastic (cut slowly because it heats up fast!). After that, I placed a drop of glue over the rest of screw in hopes of it staying in place. After it's all dry and the holes are cut, I painted it with flat black paint on the inside and the blue paint to match the outside. Oh, almost forgot the magnetic latch assembly I installed as well... It was a pain to cut the plastic out and get it to fit...lots of glue to fill the voids. I also had to cut into the plastic face to make it fit. Notice the screws I used to hold it in place so that it doesn't shift. That may be required to keep it in place. Once again, cut off the excess protruding screw and cover it with either RTV or glue to prevent any scratching of items placed in there and backing out of screw. http://i19.photobucket.com/albums/b160/warthogcrewchief/100_1056.jpg I found a "marine" grade 12V outlet. In installed it and then made one wire connect to a ground on the frame. The other wire connects to the right side of my accessory fuse spade and then the left side of the accessory fuse connects to the positive battery terminal. NOTE: I'm using the fuse box made by Skydoc_17 that mounts in place of the factory fuse box. *Something not mentioned in my schematic is that the common (ground) wire inside the 3.5mm headset wire is usually unshielded wire wrapped around each (Left and Right stereo) wire. You'll have to unravel the bare wire and twist the two together to make a common ground that connects to the black wire from the bike's cassette harness. EDIT: Here is where I found the "Marine Grade" 12v Outlet at Amazon.com [ame=http://www.amazon.com/Marine-Grade-Cigarette-Lighter-Socket/dp/B0002KRC5Y/ref=sr_1_2?ie=UTF8&s=automotive&qid=1274422515&sr=8-2]Amazon.com: Marine Grade Cigarette Lighter Socket 12 VDC: Automotive@@AMEPARAM@@http://ecx.images-amazon.com/images/I/31BRN43V71L.@@AMEPARAM@@31BRN43V71L[/ame]
 -
83 xvz12 idle ~1100 #1 balanced at about 4-6 in mercury #3 balanced at about 18-20 in mercury idle screw maxed out up When trying to bring #3/4 down to match #2, can't keep it running, drops idle Needs #1/2 brought up with idle screw, but already max up-screw limit Carbs torn apart and cleaned, new gaskets,orings- but missed main fuel needles at the time, recently found it after removing pressed in needle caps, screws were factory? set under caps a mix from 1/2 to 2-1/2 from bottom, reset all a 2 turns #2 cylinder has less compression than other 3, 150 psi vs 180 psi also carb#3 leaking small drip from top overfill drain Suspect I need to pull carbs again due to #3 fuel leak, and re-adjust float, and clean out needle ports I missed, but not sure that this will let me lower idle screw, while raising #2 vacum? Open up #2 needle for more fuel? Disreguard #2 and match other 3 due to lower compression on #2?? Suggestions???
-
 Still working on this thing, yes thing. I have lost that lovin' feeling for the time being. I cannot get the idle screw to touch the linkage even with it screwed all the way in. Does the "A" sync screw have anything to do with this? Is there an adjustment on the top cable that controls this. I can get it to touch the idle screw if I push down on the linkage. I have the cables disconnected at the round thing where all 5 cables meet. I have also sprayed deep creep in there but that does nothing.
 -
Is the screw that holds the blinker lens in something different than a regular phillips head? I was trying to use a standard phillips screwdriver and did not have any success. I am trying to figure if mine are wallowed out phillips head or something different as far as the head goes.
-
I'm replacing my stock CB/Radio antenna on the VR with a Firestik . I looked at the new antenna and of course it has a male end. So I want to replace with all new from the antenna to the CB. I see that I will need different parts to hook this up. One end of the old coax has the plug in type of connector (like on a car radio antenna wire)at the CB and the other end has the old mounting unit built right on it. Where can I get coax with the plug on one end and the screw on connector at the other end by the new mounting stud? OR ----- can I cut the old original mounting end off and put on a new screw on connector for the mounting stud end for the new antenna?
-
I need to remove the headlight assemblies on my 2009 Silverado. I found the 2 screws on top but don't know if there's a hidden screw or a slip socket. The bottom outside corner seems to have something holding it - too expensive to start ripping too hard. thanks - - - -
-
Ever since I bought my 99 venture the choke knob will not stay out keeps pulling back. I have to hold the choke knob, not sure if I need to tighten a screw but had the tank off and everything looks ok. Screaming Red:nanner:
-
I have placed an ad in the 1st Gen Classified section for plastic covers that will fit in the Pilot screw holes in the carbs. Plugs I will ship are black, not the silver shown in the second picture below. Keeps dust and dirt out of pilot screw hole. These can be removed and replaced. Set of 4 covers for $5.00 including first class shipping. Gary
-
.thumb.jpg.176b2ebbe9863175975d94710375c414.jpg)
Pilot Air Screw Factory Settings ?
Cougar posted a topic in Royal Star Venture Tech Talk ('99 - '13)
I can not for the life of me find any place including the factory manual what the Pilot Air Screw Factory Settings are,. I hear so many different story's that there different on each carb. so what were they originally before everybody set them to 2.5 turns out? So does anybody remember or have there note's on each carb number what there settings used to be? Thanks, Jeff -
The part that holds the lid up is loose, The top screw you can get to but how do you get to the bottom screw
-
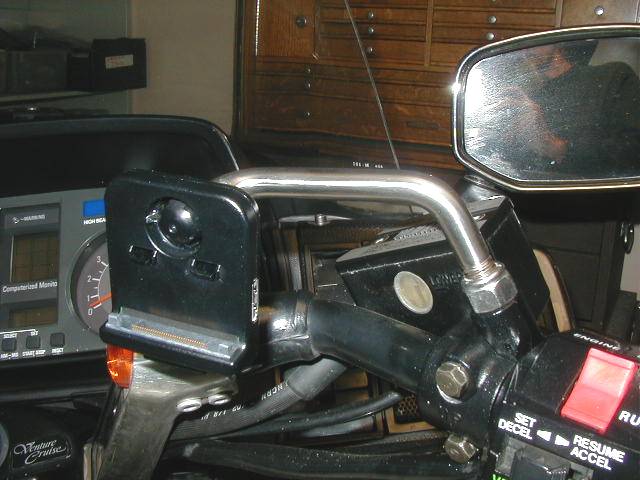
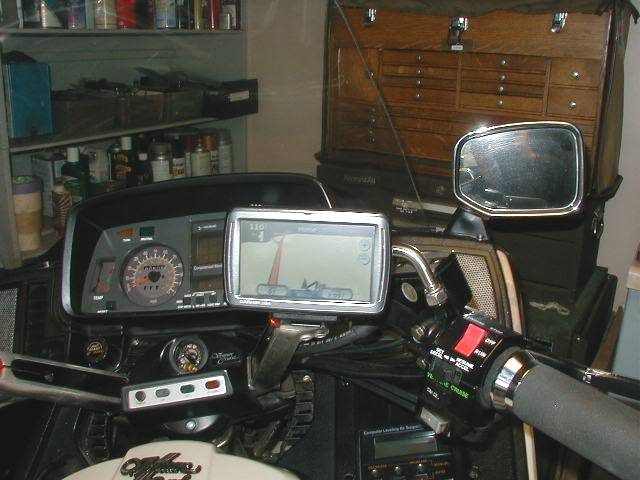
In the past I have been one of those riders that gets on his bike and just rides! With that being said, Jean surprised me big time and got a Garmin Nuvi 855 as my birthday present over the weekend. (Bless her heart!) Well needless to say I spent the better part of Sunday shopping around for a mount for the thing. By the time I was finished, I felt old. There were so many choices and they looked so complicated to install and operate I said, "the heck with it" and made my own. I went to the hardware store, bought a 7/16-14 Stainless Steel bolt, a nylon inserted lock nut, a 10-32 set screw and went to the shop. As you can see in the pics, It went pretty quick. I heated the bolt with my little torch, put a couple bends in it, machined off the bolt head, drilled and tapped it for the 10-32 set screw, machined a Delrin ball for the mount, drilled and tapped it for the 10-32 set screw. On my 87'VR there was a hole plugged for what looked like a mirror, I drilled and tapped this mirror stem hole to 7/16-14 and screwed the mount together. After a test ride, the mount worked perfectly but I think I am going to add a strip of Velcro to the back of the GPS, just for safety's sake. Comments, questions are always welcome, Thanks for letting me share, and thanks Jean for a great birthday gift! Earl

-
I lost my camera because the thumb screw came loose so I emailed the company and explained what happened and tried to get them to warranty it but they wouldn't because they said it was because the thumb screw came loose and that is not covered under the warranty. I kind of figured that but said hey it wouldn't hurt to try. They offered me a new camera for $84 and my pick of any accessory.
-
 I have a 2006 RSTD. The front right screw that holds on the tank cover "chrome" is not coming out. It turns, but is not coming out. I can feel behind it, and something rubbery feeling is turning with the screw. What is this? Any idea on how to get the screw out? It was at the dealer, who performed the 26.6K valve clearance service, and they took off the tank. I was going to call Tuesday (closed tomorrow), because they left off the black plastic screw caps from the gas tank bolts. Now I see that they lost three of the little plastic washers from the ignition cover. And this screw looks to be overtightened or something. What is it with dealer service? *sigh* Dave
 -
I bought visors for each of the lights on my '03 RSMV then put the visors on the front passing lamps and turn signals. I postponed the Headlight visor until today since I would need to split the fairing, but decided to put the rear turn signal and HD license plate light visors on last night. Someone had been there before me on the turn signals added LED light rings inside, but they do not work. Anyway, as part of their operation they had stripped the heads on the screws so I had purchased replacements. I drilled out the heads and the lens came off, no sweat on the left side. The housing was filled with water and the lower screw was rusty. When I put the vice grips on the screws to back them out the top removed easily, but the lower snapped right off! Has anyone experienced this or do you have any suggestions how to get this fairly tiny screw out now? :confused24:I hate to have to replace the entire assembly... Now after days and days of rain, the sun is shining and I am sitting here looking at that stinking broken off screw. Crap!
-
 Can someone please tell me where to find instructions on removing the instrument cluster on an 83 venture? My speedo cable came undone and I don't want to break something pulling the cluster to screw it back in. Thanks!