
Search the Community
Showing results for tags 'box'.
-
This is all new to me,I just bought my 85 three months ago.I really like riding it but now have a problem with one of the clips that holds the head light fuse.It has broken! Iam not to sure what to do with this problem.I have just started to read post from other members about a fuse box up grade.Maybe this is what I should be doing?Were should I look for this ,is there a member that has done this that maybe can help me with some writen directions?............Thanks..........Stan
-
As I posted earlier, we took this week as vacation and planned to leave out Tuesday. But Sunday night, by breaker box in my house decided to short out. We called the insurance and they said to get an electrician to fix it. That worked out well with us getting a new box and a outside disconnect that was needed, but I was going to have to pay a $500 deductible. With all that was done, we did not have the inspection sign off and official power until about Friday noon. When the city inspector came over to sign it off, he took a good look at the box as he wanted to see if he could figure out what caused the meltdown. The main breaker was already off, but as he was pulling the rest of the breakers off, when he came to the one to the A/C-Heat pump, it was burned underneath, even though the outside looked fine. At that time I told him I had the system replaced 14 months ago due to a lighting strike. He then told me that they should have replaced my breaker box also as that was what actually caused the rest to finally meltdown. He also told me I should advise the insurance company of that and he would tell them that it should have been part of the original claim and the original deductible. I gave them, Farm Bureau, a call and they also think it should have been part of the 1st claim, so I may have saved the $500. With all this done, Laura and I decided to take off yesterday down into the mountains of South Carolina and do some riding and spend the night. So, it comes down to getting about a two day vacation, but we had a great time and rode some roads that made the Dragon look like an interstate, they were so curvy. Given there were some times we were in some very desolate areas and I have encountered some electrical glitches on my bike lately, the thought was there, but the bike ran absolutely perfect for over 400 miles and about a million curves. I have attached a couple if pics of the box and some waterfalls. RandyA That 1st waterfall has got a drop of 411 feet by the time it gets to the bottom. I did not try to hike down to get a better picture of the whole thing. The 2nd waterfall is actually two falls coming from seperate directions and meeting up together, part way down.
-
 I am in need of the reflector that wraps around the rear box.
 -
 I finally found an easy way to get the breather hose from the crankcase back onto the air box. Just reached in and slipped it on! No hassle! Tooks seconds! No 11" pliers! Really! All you have to do is remove the rear subframe and fuel tank and there it is! And no, I haven't been into the beer.......yet.
 -
 Bike: 1988 1st Gen Class System Done: Resoldered pins swapped for the working unit in my '86 There doesn't seem to any electric power to the unit at all. I started doing the electric troubleshooting as listed in the repair manual 7-91. No readings above .001VDC. The book indicates that there is a fuse going to the unit. Does anyone know which fuse box and which fuse within. I did check the ACC fuse in the box on top of the battery and it is working correctly. I really appreciate any direction available. Dave
 -
Would like to know if anyone has a couple of front rims off a dirtbike? Would like to stay with a 16 to 19 in. rim. Spoke or mag would work. Already have the box just looking for the wheels.
-
 I didn't really know how to title this but hopefully I can get some advice here. ** I have indicated with the asterisks where the point you can jump to in order to get the jest of what I am looking for, but if you care to read about what happened, begin here. I am planning a trip (~3500 to maybe 5000 miles) in a week so I decided to make a test run today with some new gear that I picked up and some of the fine tuning of the bike to get an idea of what I may need to adjust, etc. Well, I get about 150 miles East of Lubbock, Texas and the dash lights get real bright for about 5 seconds and there is all sorts of crazy static and what literally sounded like microphone feedback (a positive feedback loop) coming out of the radio and the headsets. So first thing I do is turn off the CB, then the radio and the noise stops. The bike seems to be running fine through all of this, so I pull over to check the lights (I figured a bulb blew out on me given the change of brightness of the dash lights) and I guess as a creature of habit I turn the bike off as I put it on the side stand. About a half-second after I turned the key to the off position I closed my eyes and muttered a few choice words to my self as I realized that could have been a really bad choice. The g/f and I dismount and I flip the key on as I walk to the front of the bike and I see what I had expected; no low-beam (high-beam, passing lamps, turn signals, tail lamp(s) and the brake lights) are all work fine. So, I think to my self, no biggie - I'll just run with the bights on (as I usually do anyways). So we saddle up, dash looks normal, so I push the ol reliable starter button and the dash dies, let go and it comes back. I pop the side-stand up, pull the clutch in and double check the kill switch to ensure that all those safety deals are in proper position and again push the starter button and no dice. Dash goes blank and does not come back this time. Check lights again, no lights but I had the radio. So I had thought that it was the ignition switch. Before removing the tank and wiring up a bypass I decide to check fuses just to make sure; box next to the driver's seat, fuse box in cowling, and the main fuse that is located just behind the fuse box next to the driver's seat are all good. "Well shucks" is exactly what I said. At this point the only person to have passed was the county sheriff who happened to turn around and ask if everything was alright. (I had chuckled to myself and thought 'yup, everything is fine, that's why I'm laying next to my bike on the asphalt in 100+ degree heat & the lovely Texas sunshine admiring how hot the pavement actually gets... Here's your sign'). I stood up and politely explained that the bike is not running. We chatted a bit while I started to pull the tank to go ahead and bypass the ignition so I could get back on the road. Just before I snipped the first ignition wire he had pulled a jumper box out of his car and asked if I wanted to try that before I did anything else... I thought, I can try that but I am pretty sure it will be a waste. So we hooked the jumper box up, I turned the key and who would have guessed that I'd have the dash lights back. Well, to make things even better everything lit up (except the low-beam bulb that was out -- I had high beams and passing lamps still) So, pushed the ol starter button and it started right up, first crank like it always does! My jaw literally dropped as I stood there staring at it not believing what had just happened. So, we pulled off the jump box right away and the bike didn't skip a beat; sitting there purring away. So now, I decided I didn't want it running while I put the tank back on and whatnot so I shut it off, put it all back together went to start it up with the jump box again, hooked it up, turned the key, hit the starter button and I got nothing. Unfortunately the jump box was dead and we resorted to jumper cables; jumped the bike, the G/F and I saddled up, I thanked the deputy and we were both on our way. Now, my next challenge was getting fuel since I had 100 miles on the tank already and was 150 miles away from home... Fortunately, as I was closing the garage door (before I left) I checked the pockets and I did not have the spare key that I usually carry... I decided at the last minute that I ought to run back in and grab it since I have it. This saved my butt since I was able to fill up without killing the engine (I know this is dangerous but I was not happy with my alternative choices) and finding some way to start it (I have push started plenty of vehicles, but I am pretty sure that the RSV is one that I would have a hard time push starting since it is pretty flat around here and it is hard to paddle run your-self fast enough to get the thing started). Well, I ended up making it home safely; pulled it in the garage and shut it off. To summarize: While cruising along, dash lights got extra bright (for about 5 seconds) accompanied by loud noises on the radio and through the headsets (which I presumed occurred when the low-beam blew out) followed by no action from the battery (no power what-so-ever). Stopped the bike [stupidly] shut it off and it would not start without jumping the bike. Once bike was running, High-beam burned out within a few minutes of running with it on (Had similar dash light behavior, ie. get real bright for about 5 seconds then dim down to their normal level again; Passing lamps still functioning properly) At this point I did not have the radio, CB or cruise on at risk of doing damage to other electrical components. When I got home I looked at the battery, checked the terminal voltage with a multi-meter and read off 12.88V (no load) and with the key in the on position, no passing lamps on I got a reading that started at 1.34V and steadily dropped 0.03 V per second (in 0.01V increments). OBVIOUSLY there is something wrong with the battery. I had noticed right when I had gotten the bike that on the top of the battery there were the caps that 'seal' one of the filler holes for the H2SO4, one cap was broken and the top was covered with electrical tape. I had pulled the battery out (it was dated 05 I believe... yea yea yea, I know I should have replaced it but it seemed to be functioning fine) and inspected it and I had no reason to believe that it was in bad shape. There did not seem to be any malfunctions while riding, the bike NEVER cranked slow or struggled at idle (although I did notice that if I sat at an intersection for a while with a turn signal on the dash lights would dim slightly when the turn signal was on, and then return to their 'normal' brightness when the turn signal was off) I didn't think much of this as everything seemed to be functioning fine. So I had some extra caps laying around from other batteries so I put a cap on it, sealed it and then re-installed the battery (This was 8 weeks and 2,000 miles ago) I noticed today that the cap that I had replaced was no longer there so the hole was exposed again. The only modifications that have been made on the bike are: 1) Passing lamps that I believe are tapped into the headlight circuit (unfortunately) via a relay to come on ONLY when the high-beams are on AND the push-button switch is depressed 2) Stebel air horn powered directly from the battery (via a relay and through the fuse of course) with the relay triggered by the horn button -- wired as many others have wired these on their bikes 3) LED Tail light (one of those Radientz 32 LED Plug into the 1157 bulb socket deals) 4) 15 Bulb LED light bar on the rear (tapped into the tail light circuit via the wires behind the license plate) setup to have 3 LEDs on as running lights and all light up when brake lights are activated. *** The Questions **** So, what I have come here to look for, after sharing this novel with everyone are a few things: 1) When your bike is at idle and you have a turn signal on do your lights (either the dash lights or indicator lights (ie. neutral, or whatever) flash a little or at all? 2) Obviously I am replacing the battery and the light bulbs that I have managed to blow out BUT my question is this: Is it possible that when the battery is under load there is an internal short that does not allow the battery to draw its normal charge current (whether it is by corrosion of the electrodes, bad cell or what have you) which would have caused some of the current that should have been delivered to the battery (from the generator/alternator/stator -- whatever the proper term for those puppies are) and ended up being delivered through the electrical system casing the of the headlamps (which would be similar to starting a vehicle then unplugging the battery from the vehicle while it is still running) and also possibly the odd behavior with the radio (I have not tried the radio while plugged into a different power source yet) I know a thing or two about physics and classic cars and bikes but what I do not know much about is the way these newer bikes are wired. I know for sure on an older car with relatively simple electrical systems, this IS the case. 3) (The important one) What, if anything, could have caused this behavior with the battery IF the battery was NOT the SOURCE of the problem to begin with. Or, stated differently, is there anything that would have caused the battery to do this to me (basically die) that I should be checking before I put a new battery in and damage the new battery? (I assume the generator works fine since when I got the silly thing started it drove me home) I am so frustrated and flustered right now that I just cannot really think straight so any thoughts on this would be GREATLY appreciated. This just ruined my day... although there are PLENTY of things that went good today too. The sheriff’s deputy stopping, me being on a test run instead of being further away from home or anywhere in the middle of a trip or on a hard deadline to return, I had dry weather while monkeying with the bike on the side of the road (It started thunder storming a few hours after I got home), my g/f was actually cool with everything while I was working on it and asked that I take her out for another ride when I get it fixed since she got gyped on this one, and I could go on but I won't because I've written enough to get me booted from the site for hogging bandwidth. Thank you so much for taking the time to read this and thank you in advance for any thoughts that you have on this issue. Oh to top it all off I hit a bird on the way home... the stupid thing flew right into the shield, scratched the crap out of the side of it, spatter and feathers all over the place (I had spent a few hours this morning washing, waxing and polishing the bike... It looked fantastic), and in all of that I was lucky enough to have it miss both me and the g/f... After that, she hit me and asked me wtf I did that... sheesh. END for real. - Rick M. :bawling:but :bowdown::bowdown::bowdown: that I made it home in 1 piece AND have some folks, much smarter than me that will hopefully contribute to my de-confusion of these occurrences
 -
I took a few guys on a ride today and the sky opened up. We made it home just in time before it rained. For the next two hours I had the nicest garage in town. The bikes are warm and dry and the people are out in the rain. The next best thing to riding is eating. I think the boss (wife in the second pic) is wondering if she can get her car in. My money is on................... no. My son woke up and looked in the garage and thought be died and went to haven.
-
I need a few things for my new laptop running Vista home edition 32 bit. 1. A good USB serial cable adapter with drivers. 2. A terminal emulator program like hyper terminal or something else. 3. Will dos box run older programs? I'm trying to get the new laptop doing all I can. Tired of carrying two laptops just to maintain communications gear in the field. Now I got three computers on the truck.
-
I've had a Clarion CD player in the box for almost a year. I've heard good thinks and bad things about having a CD player in the trunk or side bag. It looks like a pain in the butt to install and i'm wondering if I should just do the I-pod thing throught the tape deck and be done with it. Does anyone use a CD player and if so is it worth the labor to install it? I want to avoid tearing half the bike apart only to have this thing skip all the time. I'd rather sell it while its still in the box and wrapped up nice. Thanks for your thoughts Frank
-
Anyone have a long box dodge dakota, first series, that would like a roll-up box cover? Have one in good shape, let you have it for shipping. Daryl
-
 Hey everyone, I am relocating the TCI on top of the Air Box. My ride an 89 Venture. I rerouted the wires to allow for enough clearance, but I cannot get enough clearance to comfortably put the false tank back on without real stressing the false tank. The best fit I have gotten so far is the TCI sitting atop the airbox, ear touching the battery ( I have a little extra room in the batter box because I installed the Odesy), connectors facing the left side fairing (The AM-FM Side). If I cut the ears off the box, I think I will have it. However, I am reluctant to do this, unless I am going to be successful in my relocation. HELP anyone who has done this.
 -
Hey All, This is Utadventure's son again. Lately I have been working on a project and now that it's done I thought you all would like to see it. I have a bike that did not have a cb installed so I bought an aftermarket one off the internet. After a while I realized that while it was nice to have a cb I would also like to be able to listen to my iPod while on the road. At first I just spliced a headphone cable into a 5pin din plug so I could do this. This didn't last long cause while I could listen to my ipod or my cb I couldn't listen to both cause they interferred with each other and i didn't want to ruin one with the sound coming from the other. What I wanted was a box that I could plug both my ipod and cb into that would swap between the two depending on wich was putting out sound. I checked at WingDing and searched the internet but couldn't find one that was sold seperately. I got together with a neighbor of mine and showed him what it was I was looking to do and together we came up with some plans. The box I built cost me about $35 and a few hours of soldering the components together. The box has 2 inputs and 1 output. Now the inputs could've been anything i wanted but i have a 3.5mm jack and a 5pin din. the 3.5mm jack is normally closed so even if the box is off it will still go through to the output. The 5pin din input is the cb, any time sound comes from the cb it cuts the primary input (ipod). The sensitivity to trip the switch can be changed so that it isn't tripped until the cb is loud enough. I'll be posting pictures with this post. The top has an on/off button, a power indicator light, and a swich indicator light to tell when the secondary input is overriding the primary. I've tested it in the garage, bike running and all, now I just need to take it out on the road.
-
Pulled the air filters, they are brand new (few months old now) and they are still clean. So whatever is causing this is after the air box. It is affecting just the left side of the carbs. You can see the metal bands on the left side have all sorts of crud around them. The right side are clean. Also there is a round box for the throttle cables. Directly below it is the dog bone that bolts from the frame to the engine. Behind the bolt closest to the fairing it is sticky w/ something. You can see part of the harness is wet. You can also see that the throttle box is wet too. Last picture you can barely see it but on the right side it has one of those clips to hold the tubing in place. The left side does not. Doubt it has any bearing on this issue, but just putting all the info. I can out there just in case. And lastly I noticed the choke was partially out. I have a habit of checking it repeatedly to make sure it is pushed in all the way. So what would happen to a bike leaning on it's kickstand for a day w/ the choke partially out. That's oil on the outside of the carbs and I can't smell gas so I again don't think this has any bearing on the issue, but throwing it out there. Thanks for any suggestions. http://i215.photobucket.com/albums/cc121/lylejt/Bike%20Pics/Venture/Leak%20052009/P1010002.jpg http://i215.photobucket.com/albums/cc121/lylejt/Bike%20Pics/Venture/Leak%20052009/P1010003.jpg http://i215.photobucket.com/albums/cc121/lylejt/Bike%20Pics/Venture/Leak%20052009/P1010007.jpg http://i215.photobucket.com/albums/cc121/lylejt/Bike%20Pics/Venture/Leak%20052009/P1010010.jpg http://i215.photobucket.com/albums/cc121/lylejt/Bike%20Pics/Venture/Leak%20052009/P1010015.jpg http://i215.photobucket.com/albums/cc121/lylejt/Bike%20Pics/Venture/Leak%20052009/P1010016.jpg http://i215.photobucket.com/albums/cc121/lylejt/Bike%20Pics/Venture/Leak%20052009/P1010017.jpg http://i215.photobucket.com/albums/cc121/lylejt/Bike%20Pics/Venture/Leak%20052009/P1010019.jpg
-
I went to www.rammounts.com and was redirected to www.gpszone.com. after speaking to a representative to confirm which parts matched this is what I was sent. Holder needed was "Medium" 4" x 6" x 1.75" (This was base on my GPS Unit dimensions, yours might be larger or smaller). ZRMHOLAQ6 Medium Aqua Box, $42.07 Mount needed was for a 1" Handel Bar ZRMB149Z-202, $28.82 Shipping was UPS 3 days $10.42 The Medium Aqua Box came with 3 self adhesive anti vibration foam pads for different thicknesses that can be added or eliminated depending on the thickness differences of Holder Aqua Box and your GPS. I then used the "Clear Rubber" face cover that allowed user to use the "Touch Screen" of the gps. I had to drill a hole in the bottom to get the power cord into the Holder Aqua Box to power the GPS. I suspected the "Clear Rubber" face cover would be less than ideal so off I went on a test ride. Yes I was right the Clear Rubber face cover was a cleaver idea but the distortion was so bad I had to spent WAY TOO MUCH TIME NOT WATCHING THE ROAD!!! Secondly th GPS was bouncing off the bottom of the Aqua Box Holder (NOT GOOD)!!! This is where the MODIFICATIONS come in. 1). Added Velcro (hooks) to the anti vibration foam pad. 2). Expoxy Velcro (loops) the the back of GPS Unit (make sure not to cover the speaker). 3). Replaced the Clear Rubber face cover with a PLEXIGLAS cut out and used a small bead of silicon to seal it in place. Now I can quickly glance at the screen and get a VERY CLEAR PICTURE from GPS Screen and the VELCRO keeps the GPS Unit suspended and not bouncing around. YES I realize I gave up the ability to use the Soft Clear Rubber Face Cover but when I think about it I always SET the GPS then drive and never would try to make GPS changes while driving anyways. Here are the Pics: http://i90.photobucket.com/albums/k249/frogmaster_2006/venture_gps_ram_mod004.jpg http://i90.photobucket.com/albums/k249/frogmaster_2006/venture_gps_ram_mod003.jpg http://i90.photobucket.com/albums/k249/frogmaster_2006/venture_gps_ram_mod002.jpg http://i90.photobucket.com/albums/k249/frogmaster_2006/venture_gps_ram_mod005.jpg http://i90.photobucket.com/albums/k249/frogmaster_2006/venture_gps_ram_mod006.jpg http://i90.photobucket.com/albums/k249/frogmaster_2006/venture_gps_ram_mod001.jpg I would call this water resistant and NOT water proof. Enjoy
-
Hey Jeff! On the way to Ellijay this weekend, we passed by a Jack in the Box and I had to take a picture of it for you! I thought you might want to frame it, take it with you and put it in a place where you will see it everyday! Then you will want to hurry back to the good ole USA for some good eating!
-
I'm sending my stock seat and passenger seat to Rick for his mod. Can anyone who has done this let me know what size box you need and the weight or any other things I need to know. Thanks
-
I will be able to do Maint day,The Skid in and Ashville but as of right this moment I will be leaving for Iraq on the 15th of July. Sledgehammer has agreed to let me store 3 of the bikes in his barn and ADC is going to come by the house and ride the SS bike for me.Mini may or may not be good on the web site. I am going to say I am sorry for all the pot stirring she is going to do while I am gone for the year. I will miss everyone while I am gone but ya gotta do what you gotta do so I am going over to work on as they are saying at the moment H60s for the Army and Airforce. I will check in as often as possible while I am over in the sand box. I will have Mini keep everone informed of my status while I am away and I am sure that she will set up a meet and eat for when I get home. Dont worry she will still make it to some of the meet and eats while I am gone she already started making arangments to get some riding in with a few of our members. Jeff
-
One of things that I have wanted to add to my '84 was more switches to control extra lighting and power for other toys. As you all know the 1st gen is lacking in any flat panel spaces to really do a clean and accessable install in the cockpit area. I'd seen the Kuryakyn Master Cylinder switch panel and I thought there had to be a way to install something without obstructing anything on the controls. So I went digging in my odds and ends and after a quick trip to Radio Shack and a stop at the hardware store this is what I came up with. No mods to the bike, controls, panels or handle bars. This will mount by changing one bolt. Parts needed: (1) Radio Shack Project box. I used a 4x2x1 model. Part # 270-1802 (1) 10mm x 1.25 pitch x 2" stainless bolt. (2) 3/8 washers (an extra couple for spacing if you like) (3) On/Off switches / your choice, just watch that they are not too big. (1) Steel spacer / 1" long x 3/8 I.D. Just needs for the bolt to go through it. (1) 1/2 I.D. rubber grommet. (3 ft) Plastic wiire loom casing or wrap. (4) Small self tapping machine screws. Of course wire, terminals, sealant, and a few zip ties. And maybe a beer. Tools: A drill with a bit the size of the switch studs. All my holes were 3/8. A Dremel is great but a small file or Exacto knife will do fine. And either wire crimpers or a soldering gun. First things first and I'll try to keep the pics in the right order to follow along. Open up the project box and remove the metal top panel and lid. The metal panel is meant to be the top plate for the box. I mounted it on the bottom to reinforce that where the bolt will go through. It will fit over the bumps on the bottom of the box so just drill small holes in the center of the bumps and attach it with the self tapping machine screws. Set up how you want your switches to lay. Mark your holes and carefully (my box is ABS) and drill the proper size holes for the switch studs. Now drill a 3/8 hole in the bottom of the case (and metal plate) for the mounting bolt. Check your placement on the bike but about dead center is good. Don't install the switches yet. There will be some ridges inside the box. You will need to grind or file them down so the switch retaining nuts will seat flat. Again, check your postion on the bike and decide where you want the wires to exit the box. Drill a hole and install a rubber grommet. It needs to be large enough to slip the wiring loom casing though it. Ok, slip the 10mm bolt through the hole from the inside before you install the switches. Check for clearence at the terminal studs to prevent shorting them on the bolt head. Slip a washer over the bolt, then the 1" spacer and another washer. Ok, now where to mount it? Look at the clutch master cylinder and see where the mute button in bolted on. The Royales should all have that, the standards may not. Which ever model you have there will be a blind 10mm hole in the body of the master. Remove the bolt and install the assembly with the new bolt there. Use washers to adjust the height so it clears the mute control. It will be above the master clyinder cover so you can open that to added fluid without removing the new panel. Adjust the position to your liking an tighten the bolts. I'm using star lock washers to hold it in place. Now you can install the switches and wiring. Before replacing the plastic cover make sure you have room for the inner lip to clear the nuts on the switches. I had to do a little grinding. A little sealant around the cover and were the wires drop out should keep the inside dry. I drilled a very small weep hole in the lowest corner of mine. So that is pretty much it. Don't look to bad, in a good location for the left hand, it don't interfer with anything else and should hold up real well. Paint or finish it to your needs. I had most the stuff laying around so cost was under $12.00 for what I had to pick up. If you had to buy it all maybe under $30.00. Maybe this will solve some problems for a few folks. Just a DIY day around here. Good luck. (An added note: I bought another project box and took the metal plate from it and polished it to a high gloss to go on the top of my finished panel. Looked real nice. Rode for about half and hour and went home and painted it flat black. Worse than a chrome gas cap.) Mike
-
Thought I would post a photo of the stick on chrome I put on the air box last night. What do you guys think? Go ahead I can take it! I chose this stick on cause it looks like a screen for an actual air intake. I had to move it a little forward (off center) because of the two little tabby's that stick off of the back of it.
-
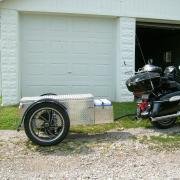
well i made me a trailer and came out a whole lot cheaper.. bought me a hf trailer and found me a used luggage box... decided to make it into a space ship so this is how it came out .. wish you could have seen the box before i started .. but think about it ,, all you want to do is to haul what you want on your ride right.. and i think that i did a great job on this one.. think i have about 500.00 tied up into this one .. [ATTACH]29115[/ATTACH][ATTACH]29116[/ATTACH][ATTACH]29117[/ATTACH]
-
I don't have a 1 1/16" socket, but will a box end wrench work for removing the nut on the top on the triple tree. I haven't began the job of lowering the front on my '99 RSV yet, but I'm first lining up the proper tools. And also, I have a dumb question. Will a regular motorcycle jack work by itself or do I really need the adapter? Thank You! Owen
-
HAPPY EASTER EVERYONE. I recently lost my cb antenna and Owen was kind enough to give me his. However, his antenna seems to have a different mount and I need to change the whole antenna instead of just the top half. I looked under the trunk and I can see the cable going into the cb box but how do I go about unplugging the cable as it seems to be up inside the box.? DO i need to uninstall the trunk or is there a way to lower the cb unit easily ETC? Thanks for assistance in advance. jb BTW I met Jesus yesterday in Houston Jesus the new Venture Rider in Houston that is. Seems he is a lurker here. He just got a new 2007 Venture in Janurary. Says he will start posting here this week. He is looking for a slightly shorter windshield for his 2007. He has a sweet ride.
-
 Well, finished up a great deal of carb cleaning today, and wanted to get everything installed in order to keep the dirt out. Getting the carbs back in the bike was much easier than removing them in the first place, with two notable issues... 1) I broke the fitting on the number one carb that attaches from the bottom inside front to a hose that runs out the side to the stick out of the piece with the service manual warning. I need to dig through the service manual to find out exactly what that hose does in order to determine how stressed out I should be about it. Is that fitting replaceable? 2) I was able to reconnect the choke cable and the throttle cable that is pulled when twisting the handgrip to accelerate, but cannot for the life of me figure out how to reconnect the other one. It's smack dab between the carbs and I just can't see or reach well enough to reconnect it. Is there a trick to hooking that one back up? I went ahead and put on the air box to keep dirt out in the meantime. While I had everything mostly hooked up, I cycled the key several times and cranked it over to see if it would run. Fired up with only a few cranks but wants to idle at 4k. I'm hoping the Idle is running so high due to the other cable being disconnected. Seems to be running much smoother and needed no choke to start for a change. I will need to replace 2 diaphrams (1 pinhole in each on the right side and #3 wasn't seated correctly by the PO so about a quarter of the edge is just smooshed. Filled up the tank with some heet to absorb what water was in the tank. Will continue that for the next few tanks then change the fuel filter. Will also start a "seafoam regimen". Next big job is tires. I'm debating wether to pull the wheels and take them up to be changed which will keep me off the bike till probably next week or to just drive the bike up and have them do it all, which will get me on the road as soon as I get the carbs sorted... hopefully tomorrow. Guess I should call and get some estimates. Next big project... the broken plastic. I was able to glue one lower side fairing back together... ugly but smooth and strong. Good excuse for custom paint. I'll have to fiberglass/rebuild the front 2 inches of the left side. I thought I had lost the front "crossmember" that holds the two peices together, but found it in a box in the barn today.. woohoo! The upper fairing has cracks around most of the bolt holes and the "glove box" doors are all looking pretty sad. (my bike doesn't have radio, cruise, cb, class, or any of the other cool guy stuff) I figure I need to go over and "glue/fiberglass" the cracks in the upper fairing and I might as well do some customizing there too. I'm thinking about filling out/rounding off the inset section below the turnsignals. that will allow me to increase the cargo space in the fairing quite a bit and I may inset some driving lights into the front of it. I'll probably scrap the "doors" and install some gadgets in the panels. I am certainly open to any suggestions and welcome any advice. I appreciate the help, once again. Thanks, Mark
 -
Seems like I used to be able to adjust the intercom volume with the knob on the audio control box, but last time we road 2-up I couldn't turn the intercom up or down. I know there's an IC setting on the audio box, but isn't the intercom volume adjustable with the volume knob too? My wife can adjust how loud she hears me with her volume control on the passenger's seat, but for some reason I can't adjust mine. I'm running a Zumo GPS with MP3 and can adjust the volume to it and the radio fine. Also, all of the connectors under the fairing have already been pulled and dielectric applied. David


.thumb.JPG.86d9722f4ac86bdebadb2b456a9ec8b6.JPG)
