Search the Community
Showing results for tags 'tabs'.
Found 23 results
-
Looking for a Voltage gauge for RSV. Wanting something that mounts clean and looks good. Added heated jackets for me and the wife and want to keep tabs on the charging system while using them. Anybody have one on their bike that they love?
-
Just found this drop of antifreeze while i was trying to route aux cable for Ipod suppose to leave on the 14th and I know there is no way the dealer can get to it. Going to try an post pics.Its on the left side of motor between the cyclinders. IMG_0355.jpg IMG_0356.jpgIMG_0354.jpg Also any suggestion on fixing these tabs Last pic I installed two bolts here are they suppose to be there had a zip tie in one hole. IMG_0362.JPGIMG_0363.JPGIMG_0364.JPG
-
OK, I've got the fairing almost all put back together, but...that chrome molding I was warned about isn't behaving...I think. When I get it in, the ends and bottom are flush against the fairing, but the top is about an eighth of an inch away from the windshield. Well actually the center is about a sixteenth but the part between the center and the ends is about an eighth away. I've checked as I have installed it and I can see the tabs going into their slots, but the molding still doesn't sit flush against the windshield. Anyone know what I may doing wrong? According to the write up in another thread there should be no gap between the molding and the windshield. If the tabs are going where they should, what is messing up? Anyone? Andy
-
trying to upload she did not like the burgandy so went brown i will leave it till next year then i will touch it up i made a promise that she can paint all the plastic i will let her do the fairings as well when i get to removing them and fixing the tabs and cracks she needs more exp on tapeing the stuff LOL but for a 13 year old girl shes learning
-
Broke fairing open and ended up snapping one of the mount tabs on the chrome windshield trim - but it is the tab on the end with the screw hole in it. Saw the post for fixing the tabs on the inside part of the trim...Will that also work for the end tabs, or do I have to buy a new one? Appreciate any help I can get. MnM
-
but I didn't realize they were still caught up inside the right lower. As some know the PO fell down and skinned up the the whole right side of my bike before I bought it. I knew this going in, so no big deal. Not sure what happened to the left lower, but the front two button head bolts are all that is holding both lowers on. Yesterday I decided to install my new wind deflectors that mount on the crash bars. Well the PO had just straightened the right one even though the top mounting hole was torn. The deflector did not look right, so I decided to install the new (to me) crash bar that has been on my shelf for too long. When I pulled the lower, the two broken mounting tabs fell out, Yay!!! The PO had tried to glue them back on with some type of hard white stuff. It didn't "weld" to the ABS. As the tabs edges would not sit flat down on the mating surface I didn't think the ABS glue would hold them, so I decided on reinforcement, ABS glue and epoxy. Not the prettiest repair, cause there are screw heads showing, but I suspect the tabs will not come off anytime soon! I found some sheet metal screws(they don't all match, but they don't show either) and installed them at 90 degree angles, then filled the cavities with (two part) epoxy. The epoxy may/may not stick to the ABS, but it WILL stick to the metal screws!
-
I sold my '07 RSV today and promptly bought another Valkyrie. I guess the Royal Stars just aren't my cup of tea. I'll still be in and out of the forum to keep tabs on all of you.
-
I mentioned this in another post, but I thought I would post again and ask another way. The fairing tabs that hold the windshield are a known problem with the Venture. In fact, many of you have said that EVEN NEW VENTURES could very well have the tabs already cracked or broken. I had asked if it was important to have the fairing replaced, and a couple of you said yes, get it fixed or it would get worse. I have two issues with getting fixed...first, because I have done some wiring under the fairing I am afraid they will hassle me about the tabs and accuse me (like others have been accused) of breaking them myself. The OTHER issue I have is that I did my wiring the way I wanted it done and I don't want them messing with it. OK, so no my other point about not getting the tabs fixed...if someone owned a Venture and did NONE of their own work, and based on those statements that the tabs were of poor design and cracked on their own, isn't it possible for this breakage to go for a LONG period of time and MANY miles without knowing anything was wrong? What do you think? Wally
-
I split the fairing yesterday for the first time to install Mic Mutes. When I went to remove the windshield I found three of the six tabs on the outer fairing were broken. Does anyone have a fix for that?
-
Last weekend I had to pull my gas tank off, the first time I had done that. In the process I lost the two gray tabs that hold the rear fender in place not knowing they were there. Well, I found the tabs and am in the process of putting them back in but I'm not sure exactly where they are placed since I didn't remove them myself, they just fell out. I thought they would go in the little metal tabs welded on the back of the gas tank, but then they are too wide to go through the slots in the fender, so now I'm not sure how they go ?
-
I am looking for the rubber pull tabs to keep the side covers secure for my 84 VR I looked at bike bandit and other bike places but cannot find those pull tabs anyone have any Idea's. TOM
-
 This afternoon, my wife and I were riding at approximately 50 mph in the Ocala, FL National Forest when I saw the windshield of my '01 RSV quickly leaving the bike. I was able to tuck my chin and the windshield struck my shoulders and helmet driving my head into my wife's face. Thankfully, she has a full face shield that doesn't flip up. I grabbed for her leg as if I was going to keep her from falling (lol) and we pulled over. After confirming we were OK, we turned around and found the destroyed windshield. The attachment points looked OK. We returned home and I got on this site and found that many bikes have had cracking on the attachment tabs. Thinking that was it, I took off the chrome piece and the tabs look brand new. I guess the 6 screws could have been loose. I bought this bike used last year and have put on about 3,000 miles and the fairing has not been apart that I know of. Any thoughts on how this could have happened and where to buy a replacement w/s, Thanks in advance.
 -
Took my bike to Tallahassee Powersports for the 48,000 mile service. Before taking bike to dealer I read the post about cracked tabs in the fairing that hold the windshield on. I have two cracked tabs. I printed the post on here about the cracked tabs and took it with me to the dealer. Dealer just called and said yamaha is going to replace my fairing under warranty but don't know how long it will take to get fairing as it is on back order. Even though it is backordered I am happy. I just knew they were going to call and tell me yamaha wouldn't replace the fairing. I have read many times where dealers and yamaha wouldn't replace items under warranty but I have to say, yamaha has always been good to me. My warranty expires in september so I better get everything I need before then.
-
I'm a relatively new member and Venture owner, and I just wanted to say thanks to everyone here. Over the past week I did some winter projects on the Venture that include: passing lamp install using Freebird's wiring diagram for the relay and Tony Dathan's spacer, an auxillary fuse panel behind the battery like several members suggested, Goose's carb heater switch, Goose's fix for the broken windshield bracket tabs (yes, broken tabs with only 3400 miles), and CarbonOne's bracing for the front crash guards. All of your postings on these issues saved me lots and lots of time and money, and for this I am thankful. In addition ... I am thankful that today I got to ride for a couple of hours! It was mostly sunny, upper 30s, 5-10 mph wind ... awesome!! Art Thomas, aka "sallys dad":thumbsup2::thumbsup2:
-
Hello All, I got all of the parts painted, not a pro, but they look pretty good. I put the trunk and the bags on today, worked pretty well. I am kinda dreading putting the fairing halves on, alot of the tabs are gone, and I am going to have to make do with the pieces I have, also the fairing lowers have alot of the tabs gone. Any suggestions or tricks to making the pieces stay on and look good? I will post pics when I get it done. D
-
First let me say that I am not the originator of this information. While at Don's maintenance day, one of our members was running around with a pair of needle-nose pliers adjusting the carb linkage tabs on various bikes. I am very sorry that I do not remember who this was, as I was concentrating very hard on syncing carbs and trying to keep from wilting in the heat! I did hear enough about it while he was working on a bike next to me that I remembered to check my own bikes when I got home. Glad I did. So let's get the real person identified here so he gets proper credit! Background: Our chokes are really just an enriching circuit that makes the bike run rich while the knob is pulled out. If you look under the tank at the choke knob, you can easily see the linkage and how it moves. In this first picture you can see that linkage on the left side of the bike, and just above the throttle spring you can see the tab the goes up to engage a brass plunger: [ATTACH]18696[/ATTACH] Here is a closeup of just that tab and plunger. You can clearly see how the metal tab is touching the inside shoulder of the plunger, forcing it all the way closed when the choke knob is pushed in. This is the correct position for the tab when the choke is closed: [ATTACH]18697[/ATTACH] As you begin to pull out the choke knob, those tabs move through that notch and begin to push against the head of the plungers to pull it out of the carb, activating the enriching circuit and making the engine run better when it is cold. The free play afforded by the notch probably just makes the bike less sensitive to slight position changes of the choke knob. Those pictures were from my 07 RSV, and all four choke tabs looked fine. Now here is a picture of what I found on 3 of the four carbs on my 05 RSV: [ATTACH]18695[/ATTACH] Besides the fact that it is dirty and nasty, notice how the tab is touching the head of the plunger while the choke is supposed to be off. At the very least this is not ensuring the plunger is all the way in, and worse, it is probably actually preventing it from closing. In that case, the result could be poor fuel mileage, rough idling in the heat, fouled plugs, etc. Those tabs are very soft metal, so if any of yours do not look right, just use a pair of needle-nose pliers to slightly bend the tab to rest up against the inside shoulder of the brass plunger when the choke knob is all the way in. If you have the Yamaha chrome carb covers on your bike, you will need to remove them to see all four tabs. I do not yet know how this fix has affected my fuel mileage, but I will report back after I have had a chance to run a tank or two through it on the open road. Goose
-

fairing and plastics help?
woz111 posted a topic in Venture and Venture Royale Tech Talk ('83 - '93)
I've finally repaired most of the fairing and side plastics, they were in a hell of a state, some were snapped into 3 parts and one side had no tabs left to screw the sides onto. I managed to sort this out with a product called Plastex if anyone's interested. I bought it from here:- http://www.repairproducts.co.uk/page20.htm in the UK. I'm now trying to buy the screws and support clips (the metal clips that push onto the 3 fairing tabs each side) Anyone know where I can buy these from in the UK? I've looked in a few places but no luck yet, or will I have to buy them from Yamaha?file:///C:/Users/Warren/Desktop/04052008047.jpg -
OK I need some advice. I went to my local dealer today to have two warranty problems addressed. From what I read on here they are both common problems. The first being the tabs on the inner fairing that break and allow your windshield to shake. The other problem is on the pipes where the two pipes become one. There is an exhaust leak there on both sides of the bike. First I'm told that pipes, even the stock ones I have, are accessories and only covered under warranty for 1 year. Then I'm told that the tabs may not be covered because I may have to return to the dealer that built the bike. Supposedly Yamaha says that those tabs break due to the guy building the bike breaking the tab. Doesn't make sense since the bikes a 2006 and only started to notice the rattle last week. In fact when I first read on this forum about a month ago about this problem I looked and they seemed fine. He stated he would call Yamaha but that he did not expect them to cover either problem. Any advice? How full of crap is he?
-
 Here are a couple of pics of my pain. At first i thought i might get away with only having to replace the right side fairing, but after closer inspection of the left there was a huge chunk of plastic missing, as well as the mounting tabs. The worst part came after removing all of the broken fairing, noticed that ,i'm not sure what they are called but the whole upper metal cage? is bent and twisted. and in need of replacement as well.
 -
Well,I finally got some of the other bugs worked out,the only major one left is the terrible shifting. It upshifts most of the time if you give it a HARD upshift.Sometimes you need to give it a tap down before it will go up.Downshifting is worse,you almost always have to move the lever up between shifts down.2nd and 1st are the worst.Sometimes it skips 2nd and goes straight to neutral.The bike has 140,000 km(~88000 miles).It almost acts like the spring on the ratchet mechanism is weak.It used to shift better cold than hot but now it seems to be the same all the time.So far I have; --Bled clutch twice so completely new fluid there. --Made sure the master cylinder was only half full in case the vent was blocked. (incidentally it doesnt shift worth a darn even without the clutch...every other bike I've had would) --shimmed up the sloppy linkage at the shift lever and down at the engine case --Changed the oil (tried seafoam for a few miles in the oil before it was changed --made sure all the pins were present behind their tabs in the starwheel (behind clutch basket)and made sure all the tabs were bent over tight. I guess I should pull the clutch basket and start looking for stuff to replace?Maybe order a new shift drum assembly? I'm kinda getting sick of spending money on it though,I've put about 500km on it and spent about $1400 on it since I got it...Would have been more without DonB's help (Thanks!) It runs great now though (new carb diaphragms,valve adjust,carb sync) Still not as much power as I was expecting but maybe my GS1100gk spoiled me:confused24:. Any suggestions? Thanks Steve
-
 a word of caution ,to anyone taking the fairing apart on an old bike. mine had two broken tabs, on the right side, so i decided to repair them today. in the screw removal process, i managed to break two more tabs. it seems that the screws have never been removed before. when i turned the screws, the tab turned with it and broke/shattered. i suggest ,if you are gonna split your fairing, spray all the screws with a good penetrating oil and let them sit overnight. now i have a bunch of tabs to build! just jt
 -
On my 93, there are tabs on the front outside corners of the bag guards. Does anybody know what they designed for? Thanks, DJ
-
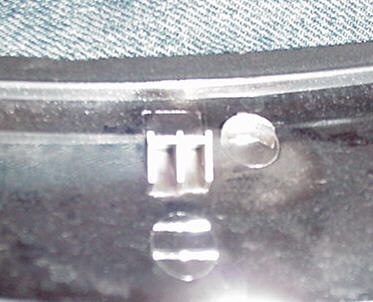
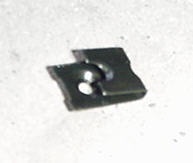
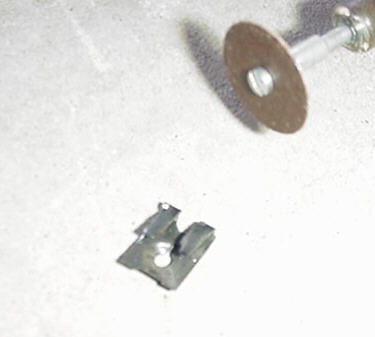
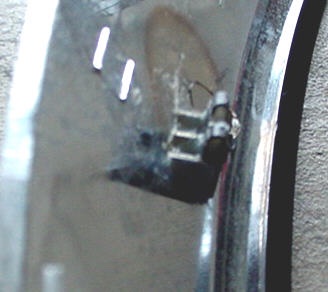
Repairing Broken Windshield Trim Tabs The great things about this forum is the fantastic ideas that we get from each other. This one is so good and so easy that I sure would like to take credit for it but the fact is, the idea came from expanding on a post made by SteveO where he used these type clips to take the slack out of the holes that the tabs actually snap into. His post gave me an idea for repairing the tabs that were actually already broken. The tabs on the back of the plastic chrome windshield trip break very easily. Most people who have ever had the piece off, have broken at least one of them. The following is an easy way to repair them to better than new condition. I had a couple of them broken off and this is so much better and stronger, I actually broke the other two off and did this on all of them. Here is a picture of one of the broken tabs. At most auto parts stores, you will find these clips. They were called "Speed Nuts" at Autozone and I believe these were size 14. It was the smallest ones that they had. Here is what they look like when you take them out of the package. Now...as the top picture shows, there is a center "bar" or "Support" in the center of what is left of the broken tab. In order to slide the "speed nut" over the broken support, you will need to cut the center out of the back of the clip. Also, because the clip is just slightly too wide, you'll have to shave just a bit off each side of the back side of the clip that you just cut the center out of. I used a Dremel tool with a thin cutting disk to do both. Here is what you end up with. Now, simply slide the clip over the broken support and you have a brand new clip that fits right into the slot where it should. It fits pretty tight but just to be sure, I filled the grooves with two part epoxy. They aren't going anywhere.


.thumb.jpg.e030d8724ef3f2eadc94ab840d0f3801.jpg)