Search the Community
Showing results for tags 'wires'.
-
I got caught in the rain last night on the way home. Had ridden the bike for about 25 miles in the dry, then stopped and did some shopping. When I came back out about an hour later, it was raining consistently, but not too hard, for the rest of the15 miles or so journey home. The bike started up great, but one cylinder was not firing reliably at first. Presumeably this was due to effects of wetness on the high voltage components, coils, plug wires etc. I got underway on 3 sometimes 4. Once she warmed up again, after a few miles, this went away but I am thinking I should probably address this issue ASAP 'cause it will only get worse on its own. As far as I know all my HV components are OEM originals and now are of course, 24 - 25 years old. Not bad lifespan but time to act, I think! So, whats out there and whats possible? What do replacement OEM coils cost? Any aftermarket stuff I should know about? Are the plug wires changeable by themselves, or are they integral parts of the coil assemblies ? Of course the cheapo side of me says AHH just coat everything with silicone grease and go for another 25 years of service. Whats the group's experience here ? Any one got a bike running like this with the old coils coated in silicone grease or similar ? Thanks, I am looking forward to reading your always sage advice. Brian H. Uxbridge Ont
-
Well this morning I got everything ready for my 60 mile commute to work, fired the bike up everything fine. Rolled it back out of the garage and as I turned the front wheel to the left to get around the wife's SUV the lights ALL went out. No headlight, running lights or dash lights. Engine still running, radio playing too. My first thought is a blown fuse due to a short caused by a crimp in the lighting wires from when I put the driving light spacer in before I left for Don's. Everything worked great all weekend, but I'm thinking it must have cut through the wires because of the hard crank to the left to get it out this morning. Does this sound like a reasonable place to start? Any other ideas? Thanks, Jay
-
Installing a Barons Tachometer on a Royal Star Venture Thanks to Tartan Terror for this excellent article. Installing a Barons tach on a RSV is actually not as difficult as I had anticipated. I did before I started call Barons tech line so that I could clear up any questions I had before I started. I was very glad I did. http://www.venturerider.org/tach/tach_files/image002.jpg I used the Barons Subsonic Mini tach but hook up on all of them are the same. For this model you get a tach, control unit and color change button. I decide to also get the Master Cylinder mount for a clean mount. You can mount yours anywhere you want. http://www.venturerider.org/tach/tach_files/image004.jpg One thing you will have to do is to extend the wiring from the tach if you mount it up on the handlebars. The cable down to the 4 pin connector is too short (Actually tells you this in the directions too) . I added about 8 inches by cutting the connector off and extending the wires. Im a stickler for clean connections for I soldered and covered the connections with heat shrink tubing. I also covered the wires with a wire loom type cover. http://www.venturerider.org/tach/tach_files/image006.jpg Remove the seat and tank as you will need to connect one of the ignition coils. Run the wires neatly to the ignition coil you will see on the right side of the bike just above the dog bone. http://www.venturerider.org/tach/tach_files/image008.jpg Remove the two bolts holding the ignition coil and pull the coil gently out to where you can get to it. In the Tach kit you will see two dividers to put two spade connectors on the coil. Next you will plug in the 4 pin connector. Connect the red wire from the control box to the red wire from the tach (the one in the 3 wire bundle not the 4 pin connector) by crimping them into a single spade connector. Slide this on the extra blade on the Red and Black wire on the coil. Next crimp a blade connector onto the green wire and slide this on the extra blade on the white wire side of the coil. Note: Check connecters before fitting it all together. Make sure the blades slide together. You may need to do a little filing for a good fit. Connect the black wire from the control box and black wire from tach (3 wire bundle). I soldered a short wire extention to these wires and then crimped on a loop connector. This is your ground. I connected this to the rear bolt on the coil holding it to the frame on reinstallation of the coil. http://www.venturerider.org/tach/tach_files/image010.jpg I installed the control box on top of the from with double sided tape. Choose the location for your control button and connect the wires from the button to the wire on the control box. I installed my button on the bars up near the right side controls. http://www.venturerider.org/tach/tach_files/image012.jpg Tuck all the wires out of the way and Reinstall tank and seat. Start bike and test. http://www.venturerider.org/tach/tach_files/image014.jpg Your done now go out and ride it like you stole it.
-
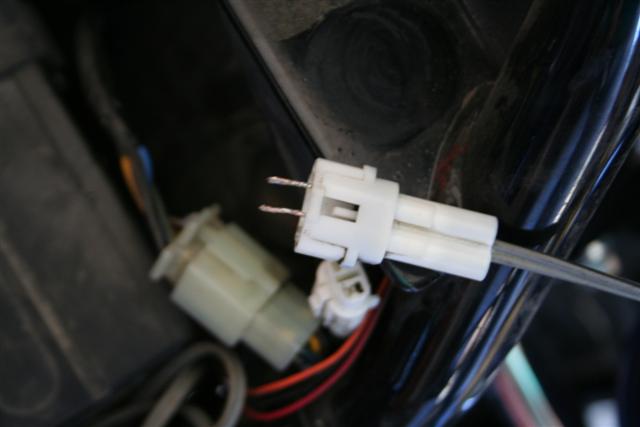
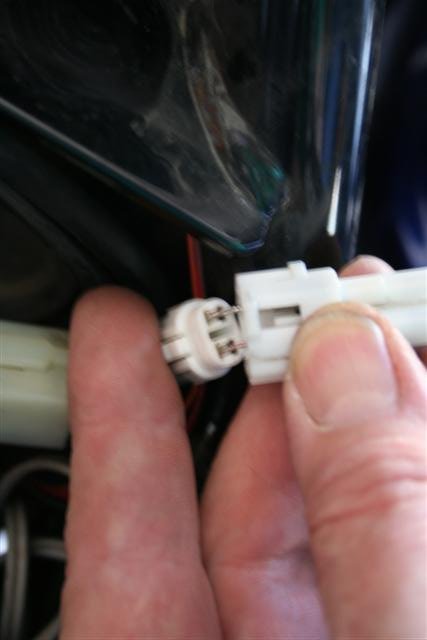
This is about the worst electrics problem I've ever seen. No lights, signals, gas guage, speedo..........NOTHING on my 2003 Midnight Venture. Any ideas where to start looking? The manual (the cheapy little user one, not the shop jobby) refers to three fuse boxes: the "main" one, number 1.....and number 2. Are there really 3? Should I be checking fuses......or go straight to looking for burned/disconnected wires? The previous owners DID do a fair bit of fooling around: passing lights...LED's...alarm.....etc. Any thoughts GREATLY appreciated! Mike
-
Hi All, A newbie to this site, by the way, looks as if its a great site !!! have a 2000 RSTD and just installed a trailer hitch and need help with the wiring, can I just hook the plug (trailer plug) wires to the wires behind the lic. plate or should I install an Isolator ?? any help will be greately appreaciated as wiring and I just don't work well together Hee Hee !! Anyone riding around in so. cal. north of san Diego give me a yell,I know most all the backroads east of temecula. Cowboy701
-
I have an 87 1st gen. I am trying to wire my bike for a trailer which is a 4 wire trailer. By the battery is my fuse box with brown, blue, red/white > wires. then there is another bundle of wiring that is all grouped > together very tightly. In this group there is white, yellow, pink, blue, brown with a > red line and a couple double colored wires. They are sort of tight > together. Are these the wires I need to splice into for this?--I am trying to wire in a modulite power module. Is there an easier place to splice into near the battery area where there is more room? Thanks for any and all help
-
Hi, Going to order then change the plug wires on my 83 VR... I could order them from the local dealer, but thought I'd first check if anybody here had any recommendations on brand, or good place online to order them from... Any quick tidbits of advice for making the job quick and easy? Thanks, Clay
-
I have recently acquired a 1989 Venture. I replaced plugs and wires, and replace battery cables as per this web site. I 'thought' I remember that after doing that, my bike would indicate around 14 volts during highway cruising and drop to around 12 in town or idling. Yesterday, my battery seemed a little sluggish on startup and I noticed only 12 volts during highway speeds, dropping to around 10 v in city. During starting, the voltage would indicate 8 volts or less. I suspected a stator problem and looked up the testing alternator by GeorgeS in 1st gen library and I quote: "At the Large White Plug, with the 3 #14 wires comeing from the Alternator: Do the following: Measure the AC voltage on each wire. You can stick the meter probs into the end of the White Plug. ( located just behind left rear cylinder, White connector, with 3 white wires thru it ) With Engine running, you should Read 9 to 15 volts AC, ( thats AC, not DC ) on each wire. If the voltage on " one" wire is substantially , Lower then the other two, then your Alternator is failing. " I am a little confused about the measuring method but here is what I did. I took apart the plug with 3 white wires running into it. I then measured across the matching wires to the 2 plug halves ie wire #1 from female plug to #1 tab in male plug. This was done while the bike was running. I got 17 volts AC across 2 of these matching wires and nothing or very little on the third...I assume indicating my stator is going or gone. Here is the funny thing though. If I reversed the leads on my meter then I only indicated 7 volts AC on the same two wires and nil on the third set. Why would that happen? I mean, what difference if I measure left to right or right to left on AC current? Weird. So, any suggestions? I assume I have to either buy a new stator or is there such a thing as rebuilt stators? How about trade ins? Anybody know? Are there any more tests or things to check to confirm stator is fubared? Thanks.
-
 Doing the amp for cassette mod and ran into something I'd rather avoid. My right rear speaker wires come out of the pod so I can see the color for them to split up at the radio. However, the left rear speaker pod has 4 wires going into it. Apparently when I swapped speakers I connected them inside the pod. I don't know what color is (+)/(-) or for that matter what two of the four is the speaker. Anyone have a diagram that tells? Haven't found it so far. Thanks.
 -
i've got an 07 venture that i tried to install the tri-star brake/running light module on. i found a harness under the seat that had 5 wires in it, blue,yellow, brown,dk. green and black......when testing these wires they corresponded to the tailight (blue), ...brake light (yellow),.... LT. turn (brown), ....Rt. turn (Dk. green) .....and ground ( black).....i made all the connections, tried it, everything worked.....turned the bike off...key off........and the rear turn signals were on, not blinking...just on...............is this the right harness......anyone have any experience with this module.........i spent all day on this...even went down to yamaha, got yamaha connectors so i could wire the module and plug it in....(i know how to disconnect the wires from the plug)........so i'm gett'in frustrated.....i have the yamaha service manual, and, i gotta say, it's on of the worse service manuals i ever seen when it comes to the wiring diagrams..........
-
 Greetings. Just finished a kind of a neat "Fender Trim Rail" modification on my Royal Star and wanted to share it with you. I had bought a "Mascot", the "Chrome Fender Tip" as well as the "Fender Trim Rail" even though the dealer told me that the "Rail and the Tip" would not look good together - the fender would look overdressed and the Trim Rail would hide/shade the fender tip so there was no logic in putting both on the bike. Me being a stubborn eskimo demanded all items and said that I would at least have an option of what to put on. To cut a long story short I saw when trying these on that the dealer was right - with both items the front fender looked overdressed and the Chrome Fender Tip was barely visible since the trim Rail hid it almost completely. But have a look at the pictures. I think I came up with quite a nice looking solution for putting all items on with a little modification to the trim Rail. How to do this is easy or as follows: Cut off the lower tubing of the Trim Rail. Have a workshop with a lathe make an insert that goes into the tubing but has the same diameter as the outside of the tubing at the end. Have them drill through the center and make threads. On the end of the Fender Trim Rail (the end that attaches to the fork/fender) drill a 4 mm hole so you can run wires through the tubing. Buy some LED lights at www.fortech-online.com/ (they have all kinds of neat vintage looking lights) and luckily the bottom radius of the lights chrome housing is exactly the same as the outside radius of the Trim Rail tubing. Open up the headlight and connect your wires to the blue wires inside the housing (there are two blue wires connected to one blue wire - the only ones with that color in the housing). Connecting this way makes the lights stay on constantly when bike is running regardless of high or low beam. They can of cause also be connected to the blink wire of the turn signal but that way they will only come on when you put the turn signal on. I am sure there are many other options in connecting these but I am not very clever when it comes to electricity so I leave other suggestions to those who have knowledge. The pictures show before and after to show the difference of these two different setups. Enjoy !
 -
My question for the know it all'rs, is why do our scoots use copper core high tension wires instead of carbon core. I have a lot of static in my radio coming from the ignition, it's still there when I unplug the stator. I put in new wires last year and new plugs. It's new plugs every spring for me. This year I tried non resistor type plugs but that was not a direction to go, runs great but the noise is deafening. So back to resistor plugs, but how about carbon core wires. Went through all the grounding issues, shielded cables etc.etc. can't seem to solve this problem.
-
I just purchased the Genisis Flat LED (Custom Dynamics) turn signals for both front and back on my 05 RSV, as well as their 4 amp. load equalizer. I am assuming that the wiring harness from the rear turn signals goes under the seat. What colors are the wires for both the left and right rear turn signals? I am adding a load equalizer to this set up and need to know what wires to tap for both the rear turn signals. Any help will be greatly appriciated. I can do most things on the bike however I need a little help from time to time, and this is one of those times. Sponge Bob Tucson AZ It's a dry heat:confused24:
-
 My new plug wires arrived today...nice and yellow! However, my old plug wires have at least 1 to 3 layers of protective corraggated(sp?) plastic over them. Similar to trailer or truck wiring. It is usually split lengthwise, but this is not. Is this necessary or even original? If I use this again, there was no use in ordering yellow wires because they will all be covered up. Hope somebody replies soon so I can get back to installing wires LOL. Thanks.
 -
.thumb.jpg.4e1b3809c4633f365ba67afc212f21df.jpg) Hey y'all, I found an easy way to use that white aux power plug located just behind the battery on the left side. Even though the cap does not have the necessary pins in it to make a connection, the pin retaining clips work somewhat like wire clamps. I just stripped the ends from some 18 gauge zip cord and tinned it, then used hemostats (or small needle nose pliers) to insert the wire into the contacts in the bottom plug - they fit very snugly after tinning. Here are a couple of pictures - not the best, but you should be able to see what I am talking about: Just make sure you insert the wires into the metal contacts in the plug, not the empty spot next to them where the retaining clips are (I think that the second picture actually shows me holding the wires in the wrong hole)! The way the plug cap is designed, the wires are protected from accidentally touching once the cap is put back in place. Also, remember that this plug is only on a 5 amp fuse (located behind the right front cowling). Good luck, Goose
Hey y'all, I found an easy way to use that white aux power plug located just behind the battery on the left side. Even though the cap does not have the necessary pins in it to make a connection, the pin retaining clips work somewhat like wire clamps. I just stripped the ends from some 18 gauge zip cord and tinned it, then used hemostats (or small needle nose pliers) to insert the wire into the contacts in the bottom plug - they fit very snugly after tinning. Here are a couple of pictures - not the best, but you should be able to see what I am talking about: Just make sure you insert the wires into the metal contacts in the plug, not the empty spot next to them where the retaining clips are (I think that the second picture actually shows me holding the wires in the wrong hole)! The way the plug cap is designed, the wires are protected from accidentally touching once the cap is put back in place. Also, remember that this plug is only on a 5 amp fuse (located behind the right front cowling). Good luck, Goose
-
Hey everyone, I just bought an 83 venture royale and I was told the main wiring harness was bad when I bought it. Finally today I got around to stripping down this beast and getting to the wires only to find that I am in way over my head! there are more wires on this thing than my truck! On top of that I cannot nearly call myself a mechanic of an electrician. I need help, and I was wondering if anyone knew where I could get some help or if there was another member somewhere that could help me fix the wiring! I am willing to pay! please send help! thanks guys. -Charles.
-
Hey everyone new to the Venture's, site and really motorcycles altogether. I've had smaller bikes like shadows ext., but never anything this big and now I don't ride anything but this bike. I still have two Vtwins but this is the bike I ride. Anyway, I think I have about 18,000 miles on my 06 RSV and it seems to run ok but I had a used 99 RSV before this (my first and the start of a new love) anyway that bike seemed to have a lot more power maybe it was just me. This 06 is bone stock other than chrome. Is it time to change the wires, how often and how many miles? ALso, on my 99 I cut the D in the air box and put hot plugs, wires, K&N and cleaned the Carbs like crazy. And that bike just seemed to be a horse compaired to this one. So should I do the cut out, K&N ext. the dealer said it's not worth it? :bobby:Thanks Scott
-
Does anyone know the speaker wiring info. for the front and rear speakers,what colors are for positive and negitive wires .
-
As I was working on Mocha last night I came across a couple of leak points. It seems that the right front spark plug wire was mis-routed. It was laying against the radiator fan in such a way that the fan wore through the loom, casing, and into the wire!!!!! This caused all the magic zappy stuff to occasionally leak out! I was putting new wires on anyway so I just had to get a new piece of loom. The front shocks have leaked several times. Seems that the hose between the legs was spliced. The splice fell apart causing all the puffy air stuff to leak out! Installed a good used hose (and correct fittings) now the air stays inside the shocks. The best news is that all of this only cost me about $7.00. The loom came from a set of coils and wires I got off E-bay for about $4.00. The hose and fittings were gotten the same way. Also bought 12 lbs. of hardware and found all the little screws and chrome bolt caps I needed. Got the plug wires from E-bay also. Waiting on valve cover grommets and I should be on the road. Fixing plastic items tonight. Pics attached of the wire and hose. Notice that the hose has 2 ridgid male ends. It needed a swivel end and a fitting. Must have been made from 2 hoses. Took them with my cell phone so sorry about the quality. JB
-
I should get an award honoring the level of stupidity I have managed to attain without the help or influence from any outside source. I went out to the shop this morning to finish putting plugs and plug wires on my bike. (I had done one yesterday.) I was hoping to get it done in time to go to afternoon church service at 2:00. So anyway, having removed the side covers, top cover, battery, tie wiring back all the wires that were in the way, the battery box, the 2 little chrome covers behind the horns, and the horns and having wrestled the solenoid away from the battery box, I changed the plugs and plug wires. Put everything back together and hit the starter. Nothing....nothing. OK, what did I not hook up. So I take it all apart again and retrace my steps to see if I had left something off. Everything looked fine. Got the multimeter and checked everywhere I could think and could see that I had voltage on the battery side of the solenoid but not the starter side. I checked the ignition wires where they go together prior to the solenoid and discovered I was getting .5v when I hit the button. Sumpin serious wrong here. I cleaned all the connections I could find and put it back together. Nothing....nothing. OK, took it back apart and checked all the fuses, more wires, everything I could think of. (again) After a couple of hours I said the H*** with this. I buttoned everything back up and decided to call it quits for the time being. I was standing there staring vacantly at the bike and thinking nasty thoughts about this bike and was starting to dredge up visions of myself throwing gas on it, followed by a match, and then riding off on a new bike, when all of a sudden my vision snapped into focus on the kill switch. WHAT?? WHAT!! I don't believe this!! I walked over, flipped the switch and hit the starter and it fired right up!!! Since I never use the kill switch, I must have accidentally hit it while I was working. How could I have not checked that to begin with? How stupid!! and before you say: "that ain't so bad, could of happened to anyone." I will tell you that this isn't the first time this has happened to me. I should KNOW to check it first.....man....I need a drink!!!
-
 My '84 Venture tends to not start after I have washed it. I suspect that the 23 year old ignition wires could be at least part of the problem, and I intend to replace them. My question is, what's the best way to access the coil end of the wires? Do I need to remove fairing parts or perhaps the battery compartment? Puzzled in MI... Skooter
 -
ok i used all the info you guys helped me with and did the deed removing the fairing (which has several biggy cracks in it i discovered - anyone have one for sale?) and got it all apart but first switched the left front and rear coil wires and the spark plug wires to the cylinders. when i could easily reach them.. put the battery in and.... drum rollzzz!!! it worked fine.... before i decided to do this the spark faded within 5 seconds on the rear left cylinder.... fully expecting that to happen but this time with the front one because of switching the wires around it ran fine... still removed the tci and remounted it to the air box.. i'm taking her for a test run tomorrow if it doesnt snow too much... idled smooth ran great but still had to be put all back together.... so i fixed it by touching it i guess but had you guys not freely offered advice and helped me i would have gotten frusterated and used some elbow grease and a match thank you all again now i know someones gonna say that it was a wire but i know it was my touch
-
I like my J & M headsets on my full face Arai helmet with one bothersome exception. It seems the upper cord keeps going kaput. have to replace it more than once. Anybody have an idea of h ow to keep the wires from breaking where the cable joins in at the headset? Those daggone things are expensive.
-
Well, couldn't find a specific drain on the electrical system. Ordered a new fuseblock and will start there. Grounds look good and clean. Stator will get checked next. Haven't ruled out the possiblity of a "bad" new battery. Also replacing the stock main fuse with one of the new style maxi-fuses. I plan on extending the stock wires in order to mount the block on the air filter housing. I will probably make new battery cables at the same time. Next will be pulling the starter and cleaning the dust out and checking the armature and brushes. Results from draw test: Key off, between batt. and ground 0.8mA Key off, between batt. and positive 0.8mA Pulled the b.up 5 amp fuse and dropped 0.4mA In acc pos. draw was 187mA I have one fuse to chase yet. It is 20 amp in a rubber holder forward of the battery. Has about an 8ga. wire feeding a 12ga. wire. Both are red and it is configured in a loop. Final jobs before puting the plastic on: Plugs, wires, plug caps, and valve cover gaskets and grommets. Glad I enjoy tinkering with stuff. Weather is a bit chilly at 45 and raining, so I hope to be done in a couple weeks. Had a good experience with Kent Powersports here in San Antonio. They gave me 20% off on parts and ordered all the items not in stock today. They also offered to work prices on other items and parts. Very pleasant to work with. So, I will get most of my stuff local. Except for the plugs, caps and wires. I will order those elsewhere. Kent only offered Yamaha parts here. J.B.
-
going to have to change mine out here soon and was wondering if anyone has used aftermarket wires like Accels instead of the factory sets?