
Search the Community
Showing results for tags 'screw'.
-
 Does anyone know where the idel screw is on my 87 VR. I have looked for it and I am having trouble finding it. Is it a thumb screw like in the manual or a slotted screw? Also ,how would I be sure all 4 cylenders are firing? Will it run on 3 cylinders without notice except loss of power? The reason I ask is the scoot sat up for 6 years before I woke it up and seams to run smooth but I dont know if all cylinders are fireing and idels so low it cuts off when throttle grip is at idel position. Any help would be great. Thanks!!
 -

Need some spark plug boot help
Guest posted a topic in Venture and Venture Royale Tech Talk ('83 - '93)
All - had a cylinder (#4) that wasn't getting any spark, after getting good tests at the TCI for ignition and pickup coils, I thought the culprit might be the spark plug wire/boot. I pulled the retaining screw out of the boot and cleaned it, the spring, and the thrust plate. The 10k resistor measures 9.3k, within 10% tolerance. What's troubling me is I am not getting any connection between the pin on one end of the boot that slides into the spark plug wire and the retaining screw. Even when I strip all the pieces out and probe deep into the boot to make a connection with the pin, no luck. Thinking to test my theory of a bad boot out on another boot, I stripped one that I knew was good. Once again, no connection between the retaining screw and the pin. Does this make sense? Also, as I reassemble the boot, I believe the parts go in: 1) spring 2) thrust washer 3) resistor 4) screw Appreciate any help - thanks! -
 Greetings... This started happening about 1 month ago. It has gotten progressively worse - to this point: Facts: #1 & #2 carbs were out of sync because I played with the Sync screw thinking it was the idle speed screw. Finally Synced them, and played with the idle speed screw. A week Ago - It WOULD Idle at 1000 rpm when warm. It hasn't been run since last friday - It's now Wednesday. Over the summer - The cotten-wood trees have deposited a hideous amount of Fuzz that has been a real pain. It gets everywhere... It rained 2 days ago, and the bike was outside, uncovered. - Today was a rather nice day - I went out to go for a ride this morning, and basicly spent the entire day attempting to actualy get the bike (89 VR) running... Symptoms: It will now - NOT idle at anything less than 1500 rpm. At Idle (like at a light) there is an audible 'click' Where the tach will drop to 0 rpm, the bike will chug slower and slower - then eventualy, (if the throttle isn't blipped) Die... When it is running - It runs well! There is NO problem at any speed above Idle. The Tach will NOT register anything less than about 1500rpm. In other words - I have to keep the idle set a bit high, because it will just die - the tach just drops to 0 if I set it to less than that. What can cause this? Today I tore off the entire fairing, and checked all the wiring, all vacume tubes, spark plugs, etc... I synced the carbs - and finally got it running. It ran well - a lot more pep than it was doing a week ago - but every time I came to a light - it would idle at 1500, then - an audible click - and it would suddenly drop to 0 on the tach and a few seconds later - it would sputter out and die. It starts, as long as I REV it when it catches... But it won't idle correctly. I can play with the idle screw all I want - but If I adjust it down to normal idle - all the above is guarenteed to happen. So what can cause this?
 -
 Where is the "Idle Adjustment Screw" on a 86 VR located. If somebody has a good picture of where it is located, I would appreciate the opportunity to look at it. I have a Yamaha Service Manual; however, I think the author needs to take the pictures again. Most of the pictures in my manual are cloudy and dark. Really hard to tell anything using the pictures. Anyway from what I have read on this website, the Idle Adjustment Screw is on the "left side of the bike as you are sitting on it. It is plastic and does not have a slot or is not designed to use a screwdriver. It must be turned by hand." Is this correct? Does the Idle Screw face outward, towards the front or back of the bike, up, or down? Any help or instructions as to the location would be greatly appreciated. Thank you, Allen Dallas, Texas
 -
Ride On Tire Puncture Sealant Test Did an experiment today with Ride-On. The Ride-On was introduced into the tire from day one of tire replacement. Before replacing the rear Avon Venom @ 20,000 Km I decided to find out if Ride-On actually worked. Since I’ve been using Ride-On from Day 1 of purchasing my 05 Midnight, 90,000 Km and 5 tire changes later I’ve never experienced a flat or puncture. Was the $14.00 a bottle peace of mind justified? I decided to find out. The experiment was conducted at my dealership where I get my tires replaced. The dealership owner and I conducted the experiment. Ride-On introduced into new tire. Rode the tire for approximately 20,000 Km with Ride-On in it Tire pressure was 41 lbs @ start of test With bike on center stand a roofing nail was hammered into a groove on the contact patch. With a chalk line around the nail insertion site, the nail was removed Slightly audible hissing sound could be heard by both of us and you could feel air escaping. Started the engine and spun the tire for 5 Km. as per instructions from Ride-On. Shut the bike off and checked the tire. We could no longer hear any hissing or feel any air escaping. The nail hole seemed to have sealed up. Tire pressure was holding at slightly less than 41 lbs Still holding after 10 min So we tried hammering in a ¼ in. sheet metal screw with a hammer but could not get it to insert. We then used an impact gun to drive in the metal screw No air loss Used the impact gun to reverse the screw out of the tire (as per Ride-On instructions) As the screw was reversing out of the tire we noticed a shot of spray from the hole left by the removed screw which stopped almost immediately. Rolled the tire so the puncture was at the lowest point. Did not have to spin the tire as the leak had already sealed itself. Total loss was less than one lbs. of air After sitting for an hour the tire was still holding air pressure at 40 lbs before tire was removed for replacement. Observation: with Ride–On in the tires I had not added any air to both front and rear tires since I stored the bike last fall in an unheated garage, then rode it up till now 15,000 Km later. After the test the dealer was so impressed that he asked to keep the nail and screw to show his customers. Conclusion: Ride-On does what it proclaims to do. Now if only I could figure out a test to see if Deer whistles really work :whistling:
-
I got too rough with the carb sync screw for #3 and stripped it out. I was looking at the parts fiche on Flatout but can't seem to identify the screw I need. Anyone know the part number or the screw size I need? Thanks. Carl
-
Easy air screw tool
Numb Knuckles posted a topic in Venture and Venture Royale Tech Talk ('83 - '93)
I made a quick carb air screw tool by flattening the end of a pc. of 5/32" x 4" welding rod and bending it in the middle to 90 degrees so that now I can adjust the front carb screws without having to remove all of the blasted plastic. Gary:farmer: -
 I have read all of the headlight adjustment post but none tell you which adjustment screw is "up and down" or "right to left". I'm refering to the small recessed screws on the outside (left and right side) of the headlight housing. I was orginally going to change the bulb (to a super white) and adjust the light but I can't get the screws out that hold the headlight ring into the housing. I'm almost to the point of stripping the screw heads. So, I thought I would just adjust the headlight. Thus far I'm landing lear jets on low beam and 747s on high beam. Any help would be appreciated. http://www.yamahamotorcycleforum.com/forum/images/wow/misc/progress.gif
 -
Can anyone tell me where the clutch bleeder screw is on a first generation? My friend has one that needs worked on. Thanks a bunch
-
The screw that attaches the left side Saddle Bag Guard Rail to the crash bar broke. I need the end cap and screw if anyone knows where I can get one I would appreciate the help. I am attaching a couple of pictures so you can see what I am talking about.
-
Ok, got my colortune and test tuned a honda. Easy enough. But reading through the manual, I am having problems finding the Mixture Set Screw. Is it the "Pilot" screw? It is the little hole in the middle under the Diaphram housing on the carbs. Any Ideas? I tried to put in a pic but I amn't dat smarts. I did attach a pic. There is a little white arrow where I think it is. IS THIS IT????????????????? Thanks Merlin
-
Bought mirrors from Drag Specialties that are sold for H.D. fairings called Pork Chop # 0640-0191. They will mount using the screw above the speakers and drilling another hole using a bolt and nut. A pair list for $90.
-
I have a oil filter with part number Yamaha 3FV-13440-10 and the one I took off my RSV 03 is a 5GH-13440-00 can I use the 3FV one on my RSV? I dont want to screw things up. The differance I can see is one is a little longer and the filter ribs inside are a little differant. Joe
-
 Well, I finally finished my driving lights. I used the brackets from here, the Optronics lights from Wal-Mart and stuff from the electrical box. I replaced the light hardware with stainless steel 1/4" allen bolts. The cross bolt is 1 1/4" and the vertical bolt is 3/4". I used S/S washers and acorn nuts. The hardware was about $8.00. The 1/4" bolts actually thread into the metric holes. It is tight but they run in with a wrench. Gives them a safety retainer feature. I retained the light bezel with a #4 S/S screw and some blue locktite on the screw. The switch operates the ground side of the relay. The 12VDC side of the relay coil is supplied by the accessory fuse. The main power comes from the battery via a 15amp fuse. This shuts the lights off when the bike is turned off, preventing accidental battery drain. The relay is mounted on the bolt that retains the noise filter. As set, each light is drawing 4.3 amps. The system seems to be doing ok. Voltage is remaining above 13.5 at idle. Runs up to about 13.8 at 2K. Without lights on I am showing about 14.1 at idle and 14.6 at 2K. The MR16 bulbs are 55 watt and appear to be a narrow flood pattern. I may change to a narrow spot later. Initial impression is good. A lot of light and the roadside is illuminated well. Total cost for the job including lights is about $45.00. This is figuring in a mil-spec waterproof switch with rubber toggle boot. Pictures attached showing screw, hardware, and finished product. JB
 -
if you turn the idle air screw 1/4 turn COUNTER CLOCKWISE, are you A: increasing the amount of air flow into the carb? or B: are you increasing the amount of fuel, into the carb? i never have had a good explanation, as to what i was really increasing/decreasing. i figured , now is a good time to find out BEFORE i start monkeying around with them. thanks in advance. :confused24: just jt
-
I am looking for a missing screw on my carburetor. It is off a 1984 Venture Royale, in the service manual the screw is called the drain screw it faces to the outside of the bike lower right hand corner. Please if anybody has an old junk carb or extra screws around I am willing to buy. Itching to ride. Thanks Dave
-
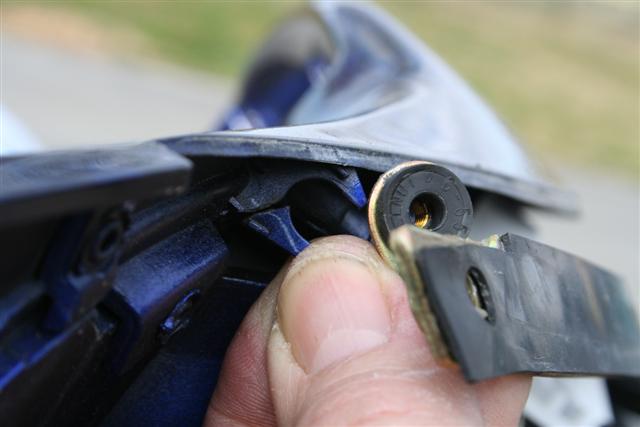
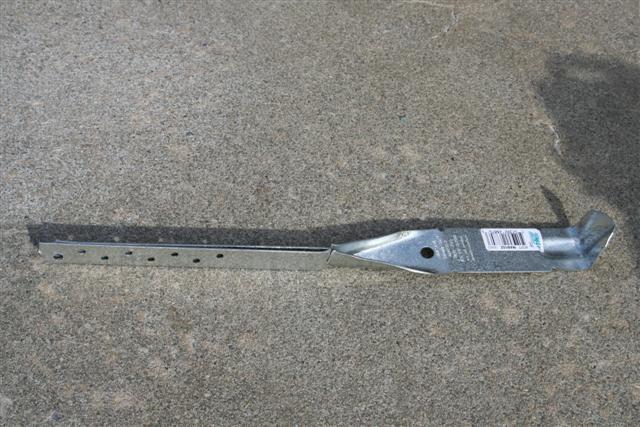
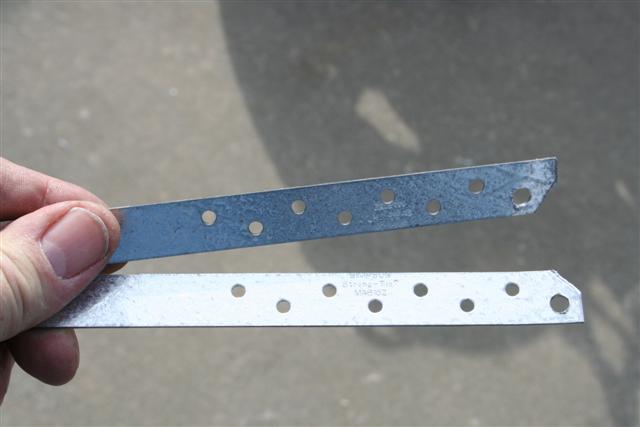
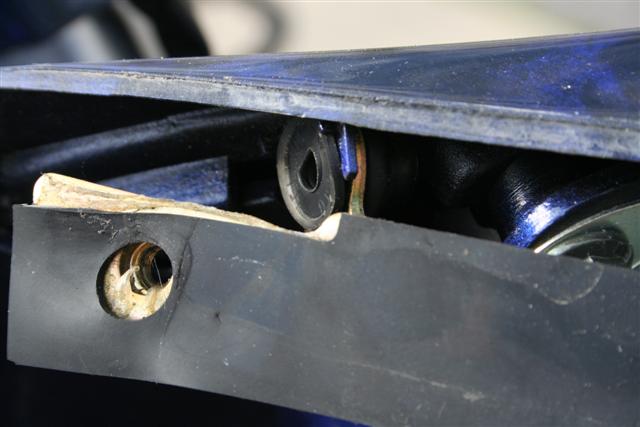
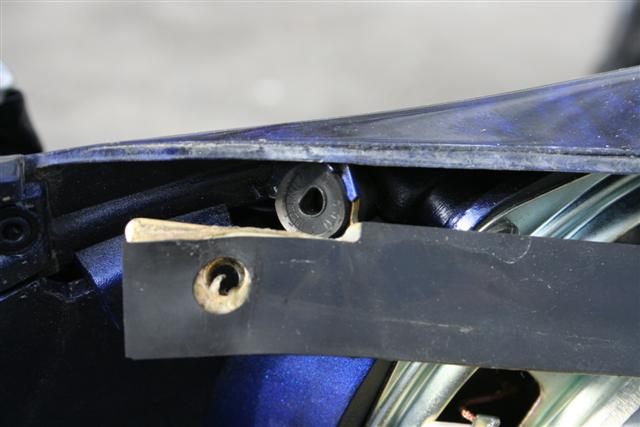
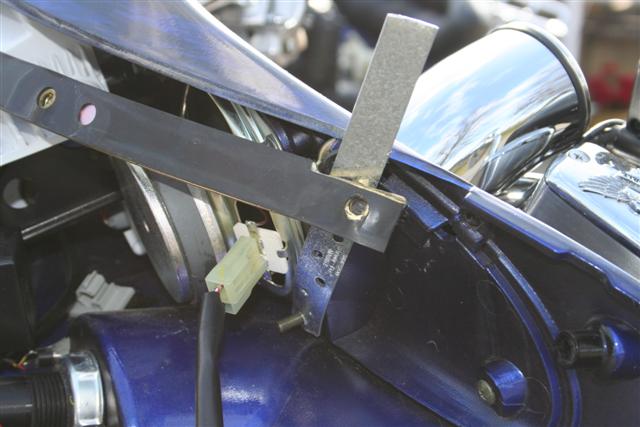
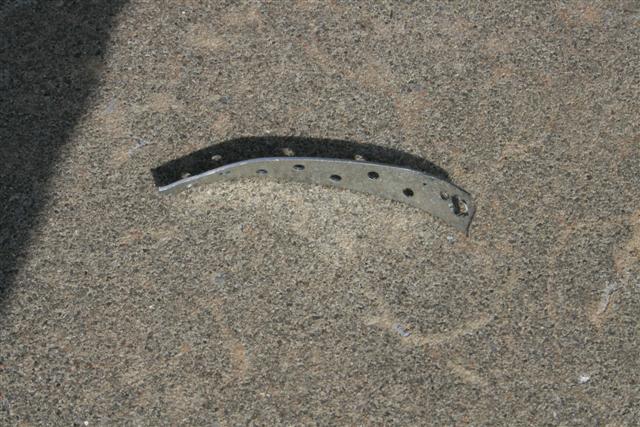
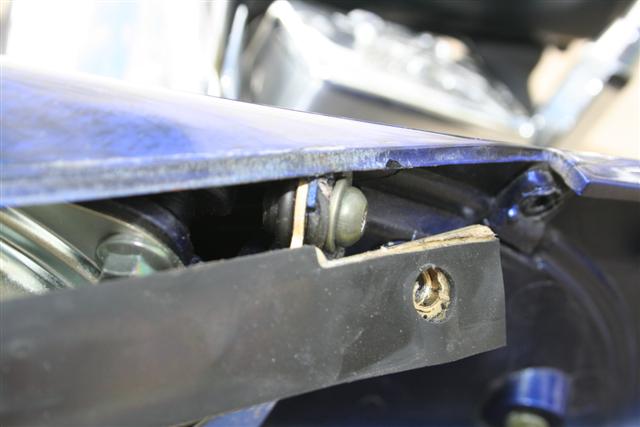
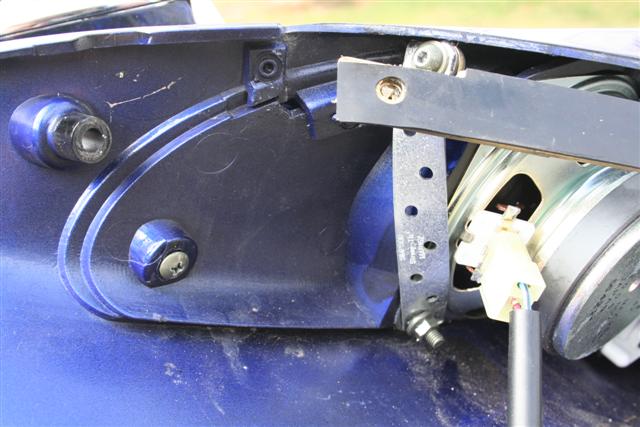
.thumb.jpg.4e1b3809c4633f365ba67afc212f21df.jpg) Trust me, if you have a 2nd Gen, you DO have broken tabs on the inner fairing where the ends of the windshield bracket SHOULD be attached! Even if your bike is quite new, they are broken. Here is a picture of what the tabs should look like - I'm holding the broken back piece to show how it would look if it was actually there: I'm sure Yamahaha would replace the inner fairing under warranty for this, but frankly, I don't want them to rip my bike apart to do it when the new ones will just break in the first week anyway. The relatively easy solution is to make a brace that will run from the bottom screw on the speaker to the screw in the windshield bracket. When positioned correctly, this will clamp the windshield bracket against the tiny bit of the tab that remains and stop all motion. To start with, you will need a couple of metal straps - they cannot be too thick, but must be more sturdy than hardware tape. I found this bracket in the framing section of the hardware store and just cut the two pieces off: Put one end on the speaker screw and then cut the bracket to the exact length that will just fit under the top lip of the inner fairing. You will have to use a pair of pliers to twist and curve the strap to fit flush against the rubber grommet that holds the nut. The correct position for the windshield bracket is to have the metal piece behind the fairing tabs, and the front lip of the rubber grommet on the outside of the tab. Here are a couple of pictures of how it should be positioned: In other words, if the tab was still in one piece, it would slide over the groove in the rubber grommet on the outside of the metal windshield bracket. You will need to make sure the windshield bracket is properly positioned on the remaining piece of the tab before you can mark the correct position for the screw hole in the new brace. Here are pictures of the brace before I cut it to length, the finished brace before mounting, and then a couple of different shots of the brace all fastened in place. Once you have those new braces in place they work like clamps and everything is rock solid.
Trust me, if you have a 2nd Gen, you DO have broken tabs on the inner fairing where the ends of the windshield bracket SHOULD be attached! Even if your bike is quite new, they are broken. Here is a picture of what the tabs should look like - I'm holding the broken back piece to show how it would look if it was actually there: I'm sure Yamahaha would replace the inner fairing under warranty for this, but frankly, I don't want them to rip my bike apart to do it when the new ones will just break in the first week anyway. The relatively easy solution is to make a brace that will run from the bottom screw on the speaker to the screw in the windshield bracket. When positioned correctly, this will clamp the windshield bracket against the tiny bit of the tab that remains and stop all motion. To start with, you will need a couple of metal straps - they cannot be too thick, but must be more sturdy than hardware tape. I found this bracket in the framing section of the hardware store and just cut the two pieces off: Put one end on the speaker screw and then cut the bracket to the exact length that will just fit under the top lip of the inner fairing. You will have to use a pair of pliers to twist and curve the strap to fit flush against the rubber grommet that holds the nut. The correct position for the windshield bracket is to have the metal piece behind the fairing tabs, and the front lip of the rubber grommet on the outside of the tab. Here are a couple of pictures of how it should be positioned: In other words, if the tab was still in one piece, it would slide over the groove in the rubber grommet on the outside of the metal windshield bracket. You will need to make sure the windshield bracket is properly positioned on the remaining piece of the tab before you can mark the correct position for the screw hole in the new brace. Here are pictures of the brace before I cut it to length, the finished brace before mounting, and then a couple of different shots of the brace all fastened in place. Once you have those new braces in place they work like clamps and everything is rock solid.
-
what is the best starting point for the pilot screws? ie 2 turns from bottom?
-
I have an oil leak somewhere one the left side around kickstand.Any guesses? Could it be the o-ring around the clutch slave cyclinder?Also cant seem to stop a leak around the bottom allen screw around the middle bearing cover.Any ideas will be greatly appreciated. Thanks Mark
-
I sync'd my own carbs today. The Carbtune worked great and the information on this site is spot on!!! The left side was in sync with each other and so was the right. However the left was not in sync with the right.not far off but enough so as you would notice. Adjusted the screw and had even bars all of the way across. BIKE RUNS MUCH BETTER---EVEN GREAT. I LUV YOU GUYS!!!!!!!! If I can help anyone sync their carbs I will be glad to help.
-
Used my Carbtune-Pro for the first time today. What a great tool!!! It is rare these days when something actually performs as well as advertised. But this thing sure does! The only thing that could have made the procedure easier would have been if Yamaha hadn't allowed a typo in the service manual flipping the naming of the screw #s (1&3) in the procedure! Which brings to mind this question: If the British are able to make such good tools, not inexpensive-but very good, then why in the world are they incapable to make a good car????!!!!
-
Ok, I know this has been explained here before. I put a kit in the clutch master cylinder on my 89VR thursday. I couldnt get it to bleed so I tried gravity bleed thursday night.-No such luck. I cannot get the thing to bleed. I filled line by removing bleed screw then filled until no bubbles just air comes out of hole. put screw back. When I pull handle with no line on it and my finger over the hole, I have very little pressure. It actually seems to have more when I release the handle as it gets pretty good suction. Anyways, when I hook it all together and pump the handle, when I hold in handle and open screw, I get about an inch and a half of fluid into bleeder line. Close screw, pumphandle some, open screw, I get about a quarter inch of fluid in line. close bleeder. Release handle and pump again, this time I get nothing. Am I not holding my mouth right here or what.
-
Is there an air/ fuel mixture srew, I heard you turn this screw 2 turns out, where is this screw located? Thank You, David M:confused07:
-
From a former article & thread; someone needs to properly claim the work, as I didn't save any names. Sorry. EDB I thought I'd share the Carb Synch Tool that I made for about $15.00. It uses 3/16 inch ID Vinyl tubing mounted to a board with coaxial antenna lead fasteners and is held upright by a tamping tool. It is charged with Transmission Fluid so that both lines are level with each other. Works just fine and is CHEAP to build. Those are two separate pieces of 3/16 inch ID vinyl tubing that I bought at a hardware store. I made the loops at the bottom as gentle as I could to prevent pinching. The ends of one hose connects to Carbs 1 & 2 and the other hose connects to carbs 3 & 4. I synch carb 1 to 2 while reading that hose, then 4 to 3 while reading the other hose, then carb 2 to 3 while reading those hoses. There is minimal pulsation (bounce). it is about 4 feet tall. The first time I tried it I used it on my Virago and the Synch was so far off that I had to keep killing the engine before the fluid was sucked into the carbs. I was finally able to get the Synch screw adjusted enough so that I could let the bike keep running while I finished the Synching. if a pair of carbs are so out of balance to each other, that one of them could initially try to suck the fluid out, so you would have to quickly kill the engine and make an adjustment, and then restart the engine to see if the adjustment helped or worsened the condition. The start-kill-adjust sequence may have to be repeated several times before you can let the engine stay running while you fine-tune the balance. Boilerman said that the hose he used for one loop was about 20'. After using 8' (4' x 2) for the board, that leaves 12' (6' on each end) to connect to the bike. About 2 1/2' gets it from the top of the board down to the carb level, then another 1 1/2' to the carb on the other side of the bike. I was happy to see your design for the carb synch tool! I work for a hospital. On my area of the hospital, they throw away oxygen hose all the time. A lot of it is 25 feet long. I took a walking stick I have, taped up the oxygen hose, which to my delight is 3/16 ID and filled about two feet of the hose with motor oil. It took a while to get all the bubbles out, but I had a slow pulling fluid that was easy to work with. I synched 1 and 2, then had a shock to see that 3 and 4 were so out compared to 2. I am slow, so it took me over an hour to get it all synched. Now the bike starts quickly and doesn't sound like a Cushman Scooter! THANK YOU for the picture example so I could copy the method. I will be reverting my walking stick back to it's original use! The money I saved helps me to afford the reason I bought the bike. I figure I have saved myself over 500 dollars with everything I have gleaned from this site in only 2 weeks. Okay I know I where glasses but these are for seeing distance and I do not wear bifocals. But where is the last screw for syncing cylinders 2 to 3. I found the others two but not this one. Do you have to lift the tank to get at it. ? I tried taking the rubber hoses off the other night to start this job but they are stuck on big time, so I would assume this has not been done in a while or at all. (looking forward to seeing the readings). Watched Don sync a 2nd Gen last year at Vogel and you don't have to remove anything. Screw is a little hard to locate. The left rear carb is # 1 Left front is #2 Right rear is #3 Right front is#4 as you are sitting on bike. Between 1 and 2 there is only one screw. You adjust these two first and then adjust 3 and 4 to them. So there are only three screws. I think it is kind of up under the edge of the tank. You have to bend over quite a bit to see it. I assume you found the one on the left side near the choke knob. The other two ore accessed from the right side. One is easy to get at between the two right side carbs (approximately the same location as the one on the left side). The last one is between the left two carbs, but points to the right. You need a LONG Phillips screwdriver to reach it from the right side. You will probably need to poke the screwdriver through the carb linkages just under the tank edge to get the right angle. The screw for 1 & 2 you need a long phillips screwdriver and acess from right side. 3 & 4 is also a phillips and is right between the carbs on right side of bike. The screw to sync left carbs to right carbs is just above the choke on left side and is a Slotted screw. Not an ice pick, but a flat blade screwdriver with a very thin head. Get the screwdriver between the end of the hose and the carb, and PUSH the hose. Which screw can't you find? Did you find the one that you get to from the left side, up above the choke knob? It has a hex head, with a slot for a flat blade screwdriver. The head is pointed down slightly, so you have to get your head below the level of the choke knob and look up. It's the only slotted hex head screw in that area. It syncs the left side to the right side. Or if you like, it syncs #1 and #2, to #3 and #4.
-
With all the good info I have read on this site I thought i would chime in with a tip. First of all the fuel filter is difficult but not impossible to remove but i didnt want to repeat that madness everytime i needed to change it. First of all to remove the filter i used needle nosed pliers,a flat blade screwdriver, phillips screw driver, 1/4 drive ratchet, a phillips bit (from my cordless drill)and a socket to hold the bit. You will also need to visit NAPA and get 3 zip ties and a NAPA 3011 fuel filter, It costs around 3.50 and it is a paper element so it will stop all the bad stuff and it is encased in clear plastic so you wont be guessing if there is any crud in the filter. I removed the sidecovers and shut off the fuel valve and freed the fuel line from the metal strap that holds it in place under the fuel tank. On the other side where the filter is i used the 1/4 ratchet with the bit and i was able to loosen and remove the screw that holds the filter in place. It wasnt easy but with a little dexterity i was able to fit the ratchet between the swingarm and frame with my right hand and hold the head of the ratchet with my left hand to maintain pressure on the screw till it was off. I removed the screw that holds the filter bracket to the frame and removed the bracket and now the bracket has a home in a drawer. Use the needle nose pliers to squeeze the clamps and slide them back on the hose. Use a flatblade screwdriver to pry the fuel line from the filter on both sides and toss that milky colored filter.The beauty of this whole post is a napa 3011 fuel filter will work and is shorter and easily fits in that tight spot and it will not collapse when you are at full throttle. Just clip off the smaller diameter ends of the filter tube and attatch to the fuel lines. Slide the clamps back over and now you have a nice clear filter but the whole thing kind of flops around. Put a zip tie through the hole where the filter clamp screw was and wrap it around the fuel filter. Now you can use the other zip ties to secure the fuel line. I just tied them to the frame and did it so the fuel filter is nice and level. You can put some electrical tape on the fuel line before you zip tie it if you think the zip tie might rub a hole in the fuel line. Dont forget to hook the line back into the metal strap on the other side. Now you can change the filter next time quicker than the guys changing tires on a racecar at a nascar race. Just use a pair of snips to cut the ties, loosen the clamps,replace the filter and reassemble. Put on 3 ties and you are DONE. This filter is close to the diameter of the stock filter so you purists out there can put it back in the clamp if you want. It is not as long as the stock filter but hey i can replace it once a year for 3.50 versus not replacing the filter this year because the stealer wants 20.00 bucks. Good Luck:sun:


.thumb.jpg.4242842914ac7b922022dafee8bac02d.jpg)


