Search the Community
Showing results for tags 'zip'.
Found 8 results
-
 I saw this and will have to try it I know it will not deform the tire but whoever thought of this was thinking outside the box.
 -
Incase someone gets lost,not gonna mention any names tho. What is adsdress and zip to MD PARTY? :whistling::rotf: Joe
-
I bought a water proof case for my GPS to mount on my handlebar studs (Snagglestuds! Shameless I know). Clamp mount works good, case fits fine, BUT the slip connection is not a lock type that snaps on, just friction. Now I'm not a fan of grabbing at things as they come loose. So some sort of lanyard was going to be needed to be fashioned in case, just in case that puppy popped off. I was at the store today and I passed one of those bargin bins that had a bunch of those stretchy straps with the slider that slip over the ends of the ear pieces of your glasses to hang them around your neck for .50 cents. Well the light popped on. Back at the house it took all of ten mintues for fix it up is it's easy on - easy off. The slip connection don't work loose anymore. A stretchy strap A couple of small key rings A couple of zip tie stick-on zip tie mounts and it was done. Under a couple bucks for a little extra secuity for the toys you paid good money for. Mike
-
With all the good info I have read on this site I thought i would chime in with a tip. First of all the fuel filter is difficult but not impossible to remove but i didnt want to repeat that madness everytime i needed to change it. First of all to remove the filter i used needle nosed pliers,a flat blade screwdriver, phillips screw driver, 1/4 drive ratchet, a phillips bit (from my cordless drill)and a socket to hold the bit. You will also need to visit NAPA and get 3 zip ties and a NAPA 3011 fuel filter, It costs around 3.50 and it is a paper element so it will stop all the bad stuff and it is encased in clear plastic so you wont be guessing if there is any crud in the filter. I removed the sidecovers and shut off the fuel valve and freed the fuel line from the metal strap that holds it in place under the fuel tank. On the other side where the filter is i used the 1/4 ratchet with the bit and i was able to loosen and remove the screw that holds the filter in place. It wasnt easy but with a little dexterity i was able to fit the ratchet between the swingarm and frame with my right hand and hold the head of the ratchet with my left hand to maintain pressure on the screw till it was off. I removed the screw that holds the filter bracket to the frame and removed the bracket and now the bracket has a home in a drawer. Use the needle nose pliers to squeeze the clamps and slide them back on the hose. Use a flatblade screwdriver to pry the fuel line from the filter on both sides and toss that milky colored filter.The beauty of this whole post is a napa 3011 fuel filter will work and is shorter and easily fits in that tight spot and it will not collapse when you are at full throttle. Just clip off the smaller diameter ends of the filter tube and attatch to the fuel lines. Slide the clamps back over and now you have a nice clear filter but the whole thing kind of flops around. Put a zip tie through the hole where the filter clamp screw was and wrap it around the fuel filter. Now you can use the other zip ties to secure the fuel line. I just tied them to the frame and did it so the fuel filter is nice and level. You can put some electrical tape on the fuel line before you zip tie it if you think the zip tie might rub a hole in the fuel line. Dont forget to hook the line back into the metal strap on the other side. Now you can change the filter next time quicker than the guys changing tires on a racecar at a nascar race. Just use a pair of snips to cut the ties, loosen the clamps,replace the filter and reassemble. Put on 3 ties and you are DONE. This filter is close to the diameter of the stock filter so you purists out there can put it back in the clamp if you want. It is not as long as the stock filter but hey i can replace it once a year for 3.50 versus not replacing the filter this year because the stealer wants 20.00 bucks. Good Luck:sun:
-
Found these at MC Sports for about $75.00 each. Smaller than 2 Liter Bottle of pop / soda and 1.0 Lb & 7 oz. This Model is good to 4c or 40f. If taller than six foot look for the XL. Best part is the zip together (Ensure you purchase a RIGHT Zip and the other is a LEFT Zip) Here are the Pics: http://i90.photobucket.com/albums/k249/frogmaster_2006/2FEB09001.jpg http://i90.photobucket.com/albums/k249/frogmaster_2006/2FEB09004.jpg http://i90.photobucket.com/albums/k249/frogmaster_2006/2FEB09005.jpg
-
 I want to get rid of these brake rotors. They were for the front of my 83 Venture. One is pretty good, the other is not so good but usable till you find something better. Just cover the shipping. First come first serve guys. I am in zip code 46319. Box is 12 x 12 x 5. about 3 pounds. Or just call it $10.00 and I will have them off to you. Email me at 73rallye@gmail.com
 -
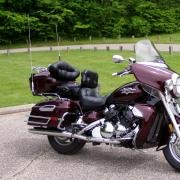
The wife and I were riding around yesterday when at a reststop she told me it looked like my trunk was bouncing when I hit sizable bumps in the road. (She was riding her V-Star 1100). I immediately found that 2 bolts were missing on the left side from the support bars. Also one on the other side was turned about 1/2 way out. Fortunately I had a bunch of zip ties with me and proceeded to attach them for temp. support. I had just gone over the bike a week earlier with a very good eye when I was spit shining it for a PGR Mission. They were there then, and tight. (I figured they were tight as no space between head of bolt and attachment bar). Anyone ever have these come loose on their own? I will be getting with my dealer in the morning to express ship me a couple of these. I am riding back to work a week from today, (Sunday, July 27th), 1200 miles one way and would prefer bolts over zip ties. I have a bit of luggage, but don't put that much in the trunk. Usually a couple bags on the pilion seat.
-
With all the good info I have read on this site I thought i would chime in with a tip. First of all the fuel filter is difficult but not impossible to remove but i didnt want to repeat that madness everytime i needed to change it. First of all to remove the filter i used needle nosed pliers,a flat blade screwdriver, phillips screw driver, 1/4 drive ratchet, a phillips bit (from my cordless drill)and a socket to hold the bit. You will also need to visit NAPA and get 3 zip ties and a NAPA 3011 fuel filter, It costs around 3.50 and it is a paper element so it will stop all the bad stuff and it is encased in clear plastic so you wont be guessing if there is any crud in the filter. I removed the sidecovers and shut off the fuel valve and freed the fuel line from the metal strap that holds it in place under the fuel tank. On the other side where the filter is i used the 1/4 ratchet with the bit and i was able to loosen and remove the screw that holds the filter in place. It wasnt easy but with a little dexterity i was able to fit the ratchet between the swingarm and frame with my right hand and hold the head of the ratchet with my left hand to maintain pressure on the screw till it was off. I removed the screw that holds the filter bracket to the frame and removed the bracket and now the bracket has a home in a drawer. Use the needle nose pliers to squeeze the clamps and slide them back on the hose. Use a flatblade screwdriver to pry the fuel line from the filter on both sides and toss that milky colored filter.The beauty of this whole post is a napa 3011 fuel filter will work and is shorter and easily fits in that tight spot and it will not collapse when you are at full throttle. Just clip off the smaller diameter ends of the filter tube and attatch to the fuel lines. Slide the clamps back over and now you have a nice clear filter but the whole thing kind of flops around. Put a zip tie through the hole where the filter clamp screw was and wrap it around the fuel filter. Now you can use the other zip ties to secure the fuel line. I just tied them to the frame and did it so the fuel filter is nice and level. You can put some electrical tape on the fuel line before you zip tie it if you think the zip tie might rub a hole in the fuel line. Dont forget to hook the line back into the metal strap on the other side. Now you can change the filter next time quicker than the guys changing tires on a racecar at a nascar race. Just use a pair of snips to cut the ties, loosen the clamps,replace the filter and reassemble. Put on 3 ties and you are DONE. This filter is close to the diameter of the stock filter so you purists out there can put it back in the clamp if you want. It is not as long as the stock filter but hey i can replace it once a year for 3.50 versus not replacing the filter this year because the stealer wants 20.00 bucks. Good Luck:sun: