
Search the Community
Showing results for tags 'rear'.
-
Well, dropped off my 07 venture at 1700 miles to have the rear splines greased and the carbs to be checked( I think they need to be resynced). The dealer told me the neither one of these is covered under warranty. I thought the rear spline thing was a factory issue. Should I call yamaha to find out? I also left them the service bulletin for the "I" basket.
-
I posted this in another thread but decided it would be best served in a thread of its own. As some here have stated before, and I agree 100%, the rear brakes on these bikes are WAY to sensitive. Some have argued that if you truly get to know your bike that it's not a problem but many have reported locking the rear brake in a panic situation. I know that I have done so a couple of times. The rear brakes just lock up way to easily and that is NOT a good thing. I've known Rick for a long time and though I don't profess to be a Venture expert, much of what I've learned about both the first and second gen Venture, I learned from Rick. He has been riding these bikes since they came out in '83 and I do consider him to be an expert on them. Rick has built SS Ventures and come up with a lot of good ideas where the Ventures are concerned. Rick realized early on that the rear brakes left a lot to be desired. I'll let him tell how he came to that conclusion in his own mind but after doing so, he set out to improve the system. He started out trying to link the front and rear as the first gen Ventures were. That turned out to not be the best solution though. He then came up with a system that incorporates a proportioning valve inline to the rear caliper and said that the rear braking is drastically improved. He send me one to test and evaluate on my own bike and it came while I was in Fort Collins. It will be an easy install and I'll get it done next weekend and try it out. I will then report my feelings about it here. If I'm as impressed with it as Rick is, then he plans to put it together as a kit and sell it to anybody who wants it. It is Rick's opinion that the system is good enough that it could actually save somebodies life. I know Rick well enough that if he is that confident with it, then I certainly want it on my bike.
-
Removed voyager kit and changed rear tire today. Greased splines,drive shaft,and rear axle. The brakes are new she should be ready to go. A test ride tomorrow. Plenty of bossing from mamamo see the pictures.
-
Replacement plastic,saddlebags,cowling,rear trunk,front fender to name a few. Mamamo is very proud of her 99 and is planning a winter paint job. But before it is painted some major cosmetics need replaced. The cowling is cracked and scared,front fender has a dent, tank a slight dent,rear trunk cracked and broken underneath, The right rear saddlebag latch is broken and a hole in the lower unit. I removed the voyager kit this evening and will be pulling the rear for a tire replacement tomorrow. grease lube splines,carb sync,oil change,etc. We will be bringing it to vogel for our first long haul mechanical endurance test. The scoot runs good and has several performance upgrades but is lacking in close up cosmetic apperance. It looks decent in the photos but even the headlight ring is bent. The cassette player works but the handle bar audio control switch is bad so we can't use the intercome or CB. I'll be looking for pieces that can be repainted and picking them up a little at a time. Be sure to check it out at vogel so you will know what were looking for. Now if I can get a title and licensee for the 05 trailer. The previous owner has a certificate of title from mfg. A bill of sale from dealer and a bill of sale to me but he never had it titled. Our DMV says no you need to get a State of Maine title first then change that over. Don't make sense to me.
-
 Okay, if your on the road and your brakes stick on what do you do? I just finished solving this on my 1st Gen (83) and this may help you!! I am going to try and include pics with this!! I replaced my pads for a 10 day cross country ride coming up and ended up with a sticky Rear/front brake system.. If something like this happens to you here are some suggestions.. 1. If your bike feels like its lost power, is hard to push back and forth or if you just plain smell hot brakes - STOP and check them! 2. With a damp fingertip (spit works great) carefully touch the surface of your rotors (like testing a hot clothes iron). 3. If both left front and rear rotors are hot - its the rear system. If its just the right front its the front brake.. I am only dealing with the rear system at this time.. 4. If its the rear system, take an 8mm box end or a socket and open the bleeder on the front left caliper - have a rag hany cause if it is a stuck system your gonna get fluid out and you dont want it on your rotor.. 5. Push the bike back and forth or put it up on the center stand and see if the she rolls easy now.. If it does and the problem had effected both front and rear brake rotors (remember - your back brake pedal is activating both front left and rear calipers) check these items.. 6. Look at your master cylinder - at the bottom of it is a rod sticking out and an attachent for the pedal. Gently hold that rod between your thumb and finger and see if it has movement back and forth and a small amount up and down.. If it doesnt, you may need to clean the pivot for you pedal and/or adjust the freeplay screw to get play in it.. Now try your brakes - if still stickin go on to 7. 7. Pump your pedal HARD!! ALthough it is BEST to remove the rear brake master cylinder to do the following, so you can take it all apart and clean it thouroughly, I am going to give you some info for "on the road" fixen!! It also may be worth just doing this first BEFORE doing a complete take down - always start with lesser surgery first - I learned that from my NeuroSurgeon! 8. Expose the rear master. 9. Notice where the hose from the Fluid Resivore attaches to the Master. It is attached with a small phillips screw. Remove this screw. 10. Take a pair of pliers and squeeze the rubber line about 3/8th inch above the little plasic elbow that you just removed the screw from.. ITs best to have an extra set of hands there to do this as youwill want this line held closed during surgery. 11. Gently turn the hose back and forth to move the plastic "L" in its holder. Pull out while doing so.. The "L" is held in by an O-ring. 12. Make sure you dont loose the O-Ring when the L coomes out of the master - maintain squeeze on the hose (by the way, I carry a small set of surgical forcept pliers in my tool kit - VERY handy for all kinds of this stuff!) 13. Look at the pics I have attached - If you look closely you can see the little wire I have protruding from the return bleed hole back into the fluid res hose. This little hole is the hole that is on top of the cup that recieves the "L". 14. You WILL need a small wire to unplug this hole. I am using a bristle off a wire brush - someone who responded to my original thread about all this suggested this and it works GREAT!! I also use wire brush bristles for carb jet cleaning!! On the road I wouldnt be afraid to take a strand of wire from piece of wire (ya'll carry a little spool or wiring in your bag dont cha?).. 15. Push the wire into the top orfice and be prepared to get a SQUIRT! WHen I did this on my 83 it SQUIRTED out like a high pressure squirtgun!! 16. Work the wire in and out to clean out the orfice real good. 17. Wipe the insideof the cup where the L goes out real good. 18. Clean the surface of the "L" and the o-ring real good. 19. Relax the squeeze onthe hose and let a little fluid out. FLuid should RUSH out!! 20. If the fluid barely trickles. 21. Squeeze the hose again, point the opening of the L that goes into the Master down toward the ground. 22. Squeeze the hose above the pliers with your fingers. 23. Let go of the pliers a little so the fluid is forced out - you may be shocked what you get out of the hose - I WAS!! Re-Squeeze with the pliers as soon as it bleeds a shot!! 24. Replace the end of the L into the cup on the Master. 25. Release the pliers and squeeze the hose so fluid is gushing out around the L while pushing it in. 26. Replace the phillips screw!! 27. Pump your brakes and they should release and the wheels roll free. 28.. Put her back together and RIDE!!!!!!!!!!!! Oh yea, you might want to check your Brake Fluid first chance you get!! Special thanks to ALL who responded to my other thread about this!! Lots of GREAT info there folks!! "puc
-
 I am looking to replace front and rear tires on my 84 Standard. Currently running Dunlop D404's. I think they handle fine, but I am wondering if anyone else has anything great to say about another brand. Looking for mileage and decent price. American motorcycle tire will deliver a front and rear D404 to my house for $134.
 -
Thinking about putting a Progressive rear shock on the ride. I already have changed the front springs to Progressive, what a difference!!!! How hard is removing the rear shock?? The front end was cake, is the back as easy??:confused24:
-
I have Metzeler ME880 Marathon tires on the front and the rear of my 1984 VR. These tires are not very old and have alot of tread left on them. I have owned the bike for a year and know that the tires may be 3 years old based on info from the previous owner. Now to my question. I noticed on the rear tire about half way up the sidewall a wavy thin crack extending about 4 to 6 inches aong the tire. This pattern continues around the tire in the form of a black line for maybe 20 inches. I am do not know the construction of these tires. Do I need to be worried about this tire blowing out on me while riding? I would appreciate some advice as I do not want this tire to cause any problems while riding.
-
Hello People, I'm new to this site and have lots of questions. I just bought a 92 Venture form a guy at work. He pretty much wheels and deals with bikes. This one has 70K miles on it. It needed some TLC, so I got a deal(I Think). So far I have replaced the vacuum lines on the cruise, replaced the carb boots which mount the carbs to the head, replaired several electrical connections including the E4 error for the suspension controller. Now I need to replace fork seals and brakes. My main question is on the rear rotor, which bikes have rotors that are interchangeable with this bike? Are any compatable front to rear? I have been looking on ebay and have seen some. I am on a limited budget and would like to have enough to spread around to other areas that need work also. Thanks for any input:cool10:
-
Hello all, I'm new to this site and lookin for some information. I just bought a fixer upper from a friend of mine. Ot's a 92 Venture, so far I have replaced the vacuum lines to the cruise, carb boots which connect the carbs to the heads, repair the connections to the suspension controller(E4 error). Next on my list is to replace the rear brake rotor. It seems to be warped. When applying the brakes there is a definite shudder and the front rotors look fine. My question is what other bikes use the same rotor, are some of the front rotors the same as the rears? I have been searching ebay and there are a few out there. I am on a limited budget and looking for a deal.
-
Hello to all!!! I have noticed a front end wobble on my bike. I put on the cruise control and took my hands off the bars a couple inches and within seconds it started to wobble. I have never had a bike do that:no-no-no:. I read up on this in another section and how many foot lbs of torque do i have to put on the bearings after i repack them? This site is awesome:happy65:. So far i have read up on how to bleed the rear brakes on my bike and how to repair the suspension computer. I need to put seals in the forks so that will be my next project minus the stealer mechanics bill:rotf:
-
I would like to extend the rear brake pedal forward on my '86 as my legs are long and when I need to press on brake I have to lift my leg to get to it. Any extension kits? Has anyone else had this problem?
-
Ok so here is my issue (the only thing keeping my venture royale from going down the road) My bike runs mint now bled all the hydralic systems fresh oil change and rearend oil but the clutch wont letgo. I start the bike on the center stand to test everything out, press on the front brake and clutch and kick it into gear, bike starts clunking around a bit and spinning the rear wheel even with the clutch all the way in. if i press on the rear brake it will stall out the engine. any ideas of what needs to be done? I've orderd new clutch springs as I dont realy want to mess with replaceing the whole clutch right now. I'm still new at working on bikes. I do know if I replace one spring at a time I wont end up dissassembling the clutch and it should be a realativly easy job. and just see if that does the trick. Could it be from not enough oil? I put 3 quarts in but not 100% that was enough. I'm working blind as I dont have a manual. bike did sit for 6 years could it fix itself if I just kept running it (clutch sticking from nonuse for so long?)
-
1Gen rear axle collar, any one has one they could part with. I ordered one from local dealer may take 7 days to get it can't ride my 1Gen. Thanks, Dale
-
Yesterday as first time on the second year I have the bike, I noticed that there was some oily cover on the area of the rear fender close to the plate holder. Is the rubber hose that is on the area comming from the engine or some other part? I never noticed that before, but is this a meaning the the engine is sending oil out? or this is normal for the bikes? Thanks for any opinions, :detective:
-
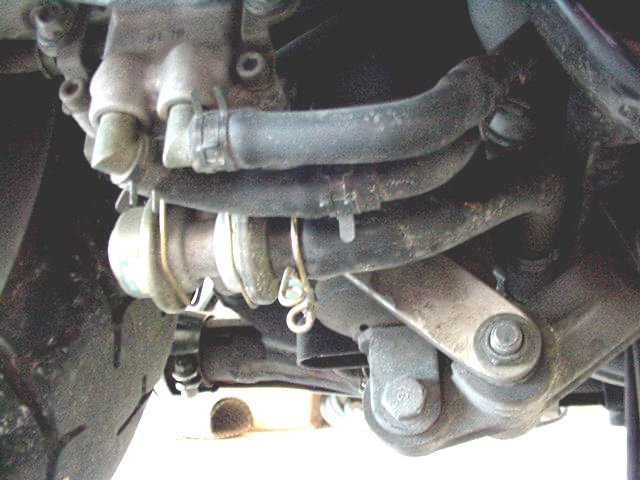
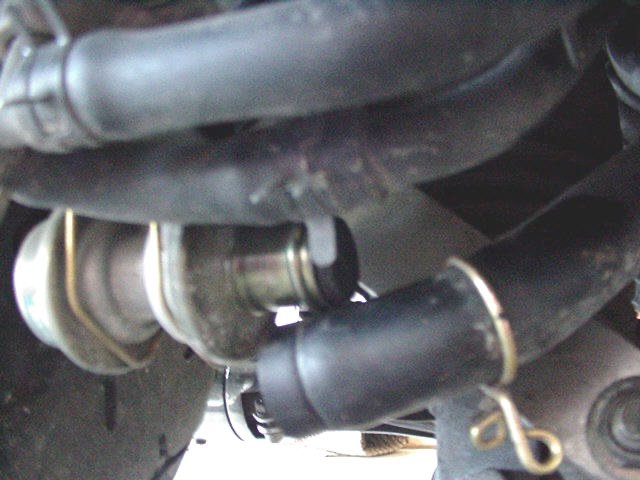
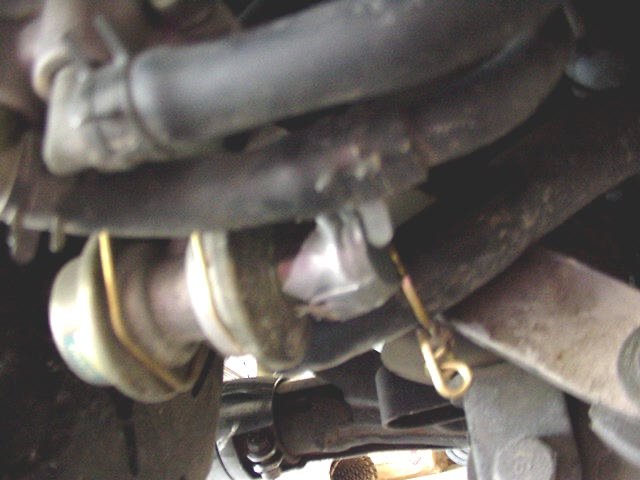
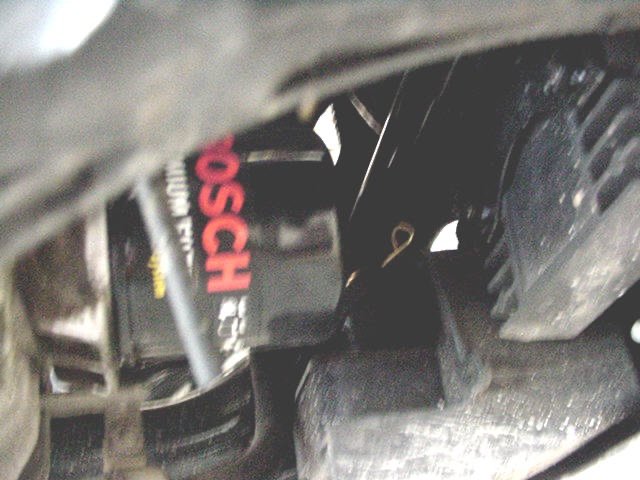
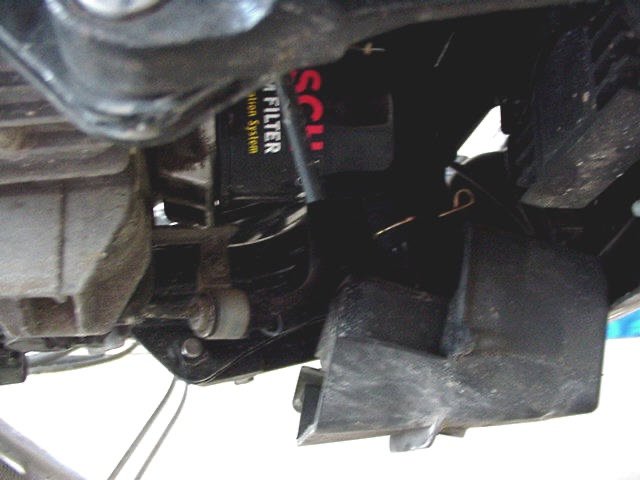
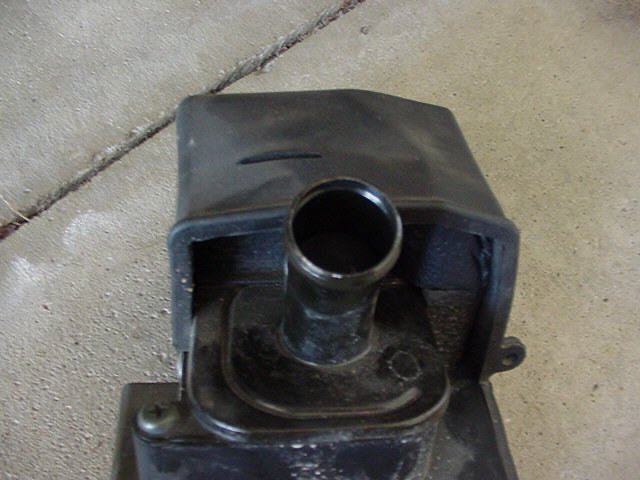
Plugging the AIS System The AIS is an emissions system which introduces oxygen-bearing air into the exhaust ports on the exhaust stroke. This induces further combustion of hydrocarbons in the exhaust pipe and greatly reduces emissions. It is driven by intake vacuum pulses. The only purpose of this system is to help satisfy our good old EPA requirements. Though good in theory, it's bad in that under certain conditions it can cause a HUGE backfire on deceleration that actually sounds like a shotgun going off. The first time this happened to me, I thought we were being shot at and my wife almost jumped off the bike. Disabling the AIS is a simple process and one that will not affect the performance of your bike in any way. The following is one way of doing so. There are two assemblies that you have to deal with. One on the rear and one on the front. We'll start with the rear and it is very easy. On the right side of the bike, just below the rear shock, you will find the first one. You'll want to disconnect the large hose with the gold clamp. Now..you can use most anything to plug the hose. I used rubber stoppers that I had picked up at a local Home Depot store. You can find these in the hardware department but a wooden dowel rod or most anything of the proper size will work fine. Look carefully and you can see that I have stuck the rubber stopper into the inlet on the AIS valve. Now in this next picture, I've simply stuck a piece of duct tape over the end of the valve and stopper. You can probably skip this step if you want but being born and raised in Texas...it's just part of my upbringing. Any job worth doing is worth using a bit of duct tape on. Besides...it keeps the plug where I want it and not up in the hose somewhere. Now you put the hose back on and you are done with the rear. That wasn't so bad was it? Don't worry...though essentially the same process, the front will give you plenty of grief simply because it's harder to get to. Now the front AIS valve is located just in front of the oil filter. The attached blurry picture is a bit hard to see but you can see the gold clamp that secures the hose you'll need to remove. Now....there are two ways to do this to make it a bit easier. The first way would be to do it when you do an oil change. With the filter removed, you can pretty much forget the rest of this write-up. Simply disconnect the hose as you did on the rear, insert the rubber plug, add the duct tape, reconnect the hose and you are done. If you are ready to do this and you are not ready for an oil change, here is a tip that will make it easier. Just below the drivers floorboard on the left side of the bike (shifter side), you will see two allen bolts. These are the bolts that secure the AIS assembly in place. Remove those two bolts and the assembly will be free, held only by the hose that you will disconnect. You can now pull down on the assembly enough to get to the clamp without skinning your knuckles. Once the hose is off, the assembly just drops out. Now...just plug this hole in the assembly as you did on the rear. Put it all back together and you are done. Not a difficult job at all. Figure about 30 to 45 minutes total.
-
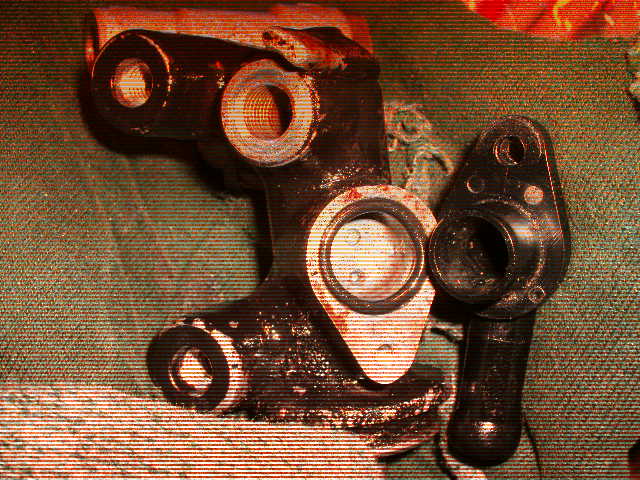
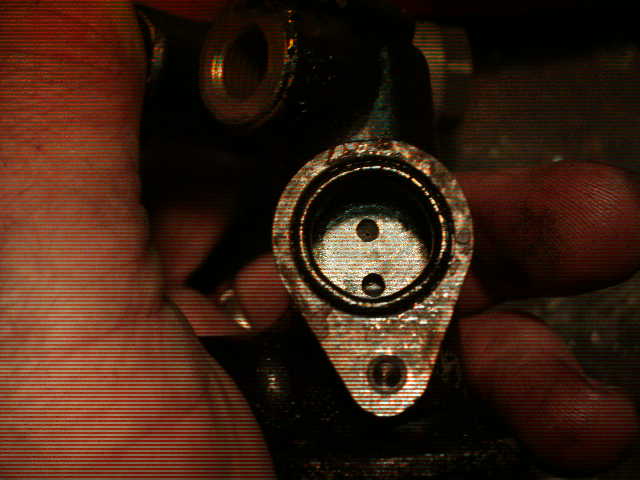
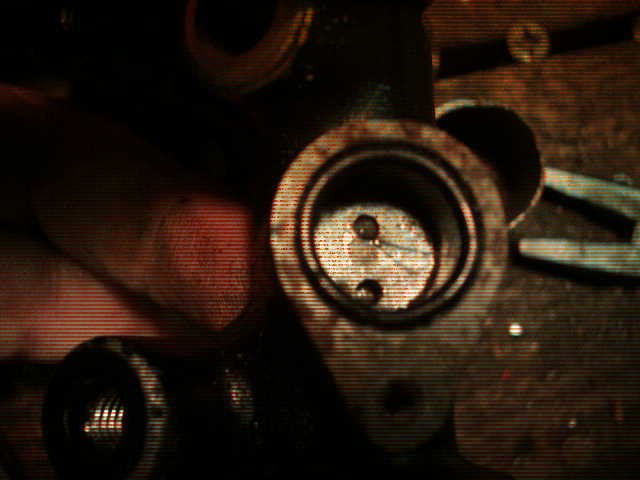
I took the rear wheel off to check the placement of the caliper bracket, the washer looked to be in the wrong place. The collar was missing, I sure could use one if any one has one they could part with it. Some one put a new tire on looks to have put no collar, caliper bracket, washer then forced the swing arm over to keep the wheel in place. I would like to know the order of the parts to put them back. Collar,Bracket,Washer.
-
OK,,,, here goes Will 1986-1993 rear bag guards work on a 1983 venture will the bolt up or will i have to modify some part Thanks lee :confused24:
-
 Coming home from work today, I heard a weird noise from the rear of the bike. At first I thought it was a brake pad dragging. Nope. Then I thought maybe something stuck to the tire. Nope. Only 250 miles on my week old RSV. Called the dealer service dept. The service man asked if it was a "creaking" noise, regaless of bike running. Yep! Taking the bike to him in the morning. He said he has seen it before. The splines to the final drive (? i think that is what he said) were not set deep enough. Anyone else have this problem? Is it safe to drive the bike the 10 miles to the service dept?
 -
 The '96 - '01 Royal Stars have a different rear suspension than the 2nd gen Ventures, and no one makes any leveling links for them, so I'll be making my own. That opens up the option of being able to raise the bike any amount I want. Since the 1st gens are said to handle so well I compared the rake angle of the 1st gen to the 2nd gen, and did some calculating to see just how much the leveling links change things. The rake angle on a 1st gen is 28.5*, and the 2nd gen is 30*. The 1" that the standard leveling links raise the bike changes the angle of the bike by .86*, creating a fork rake angle of 29.1*. To get to a 28.5* fork rake angle the back of the bike would have to be raised by 1 3/4". I could always split the difference somewhere by raising the rear say like 1 1/4" and dropping the front 1/2". As long as the rear rise plus front drop equals 1 3/4" it's all the same thing. Myself, I would prefer the full rear rise for the most cornering clearance, and I'm such a tall guy I wouldn't mind the higher seat either. This weekend I propped the rear wheel up 1 3/4" with boards and sat on the bike and it felt fine. My only real concern is that with that much rise on the bike the kickstand will be a little short. On the boards in the garage it seemed okay, but I wonder how it would be if a parking lot somewhere was sloped the wrong way or something. So the question is - for those of you with the standard 1" leveling links, how much concern is there about the slope of the ground where you park? Any at all? I'd like to get a feel for how much rear rise I could get away with as far as the kickstand length is concerned. I'd really like to not have to make these more than once. I suppose with some extra work I could design an adjustable link. Then I could make a height change in only a few minutes. Thoughts anyone?
 -
I don't think anybody posted a picture of Tom, so I thought I'd post the one from the front of the program for Tom's memorial service of which Sherry is riding in the rear. Of course, this pic goes back a few years. They were find folks, God fearing and all, and again; we will miss him. Rich
-
hello all, Statement: I have a rear fender rack for my 97 RSTD. Question: Does anyone know what other years it would fit? (I'm thinking of selling it on ebay and I think that fact might be helpful). thanks in advance.
-
Here is a question for all you mechanical gurus. The rear brake on my 05 RSTD has just started to bind while parked. I get on the bike and rock it a bit to see if I left it in gear, and find that it rocks only a little, but is in neutral. I can hear the rear brake rub a bit if I force it to move, and I can push the bike some and it will release a bit. then when I start the bike it is entirely free. What would cause the brake caliper to not release? This doesn't seem to happen when I am riding, when I'm stopped at a light it never binds up like that. OK Gurus, what are your ideas?
-
Brakes that is ! The chap putting on my tires told me i will need Rear Brakes soon. There is only 19000kms on the Bike . Does this sound right ?
-
I don't really want the jack on the oil pan/bottom of the engine, but I cannot seam to get it placed onder the RSV to get the weight off the rear wheel to put on leveling links. Any help?


.thumb.jpg.8ac7cbcc5e8e733b48942912385c263d.jpg)


.thumb.jpg.310f1418e315f5385a5c87fd25c13c6a.jpg)