Search the Community
Showing results for tags 'cover'.
-
 I've just bought an '89 VR, and haven't even had a ride yet (too much snow!). I still don't know much about the bike, but I'm learning much from the forums here. I have a 3' steel antenna (probably original) on the bike that doesn't fold. My bike will be outside in the summer, and so I just bought a cover. Unfortunately, to put the cover on, I need to remove the antenna, which I am figuring will be a pain. This is an antenna for the radio and the CB, and I'd like to keep just one antenna, as I'm unfamiliar with dividing into two. Is there an antenna short enough that it will go under my cover, or is there a fold down adapter that will work with my bike? I went to my dealer but they didn't offer up anything... When hunting around online, what do I need to look for technically speaking?? Thanks so much for any advice that anyone can give!
 -
I took my grand daughter on a toy drive this past weekend. Beautifull weekend and great ride. Around 200 bikes of all makes and models. Great turn out. Anyway, I had the intercom set up on her helmet but she is not really tall at 9 years old and I did not notice the cord from her head set was dragging on the bag cover. This caused a scuff mark approx 1/2" wide by 4" long across the width of the cover. Is there anyway to get rid of that? (not looking for a paint job here LOL) Thanks all.
-
 This should be an easy one. Does anyone know of a company selling just a plain (good quality) chrome water pump cover for my 05 Tour Deluxe? I was able to get a plain chromed timing hole cover from Baron's, but the only water pump covers he has are the "V Four" etched ones (to me, no better than the ones marked "Yamaha"). Let me know if there is a company you know of. Thanks.
 -
I’m thinking of having the front forks on my 07 chromed. Has anyone ever done this? What might the problems be if I do this mod? It looks like all the parts I would need chromed are listed below. How difficult a job is it on a scale from 1 to 10 to disassemble and reassemble the front forks? I’m used to turning wrenches. SKU: 5MB-23126-00-00 TUBE, OUTER (LEFT) SKU: 5MB-23136-00-00 TUBE, OUTER (RIGHT) SKU: 4NK-23123-10-00 COVER, LOWER (2) SKU: 4XY-23121-10-00 COVER, UPPER (2) Am I forgetting anything or any parts?
-
I've got an Ultraguard cover right now that has just, unfortunately, ripped. This cover is thin enough that I can fold it up and put it in the saddle bag and, if scrunched down, leaves about 1/2 the saddle bag still available. This is a full cover with windshield protection and heat shield on the bottom. I looked at covers on line but you just don't know how thick, heavy and bulky they are on line. I was wondering it anyone uses a similar cover, for their RSV, and what kind and model it is. I like it because it doesn't take up much space and I can take it with me and cover the bike anywhere. Any suggestions?
-
At maintenance day I was looking at the rear flaps on the bikes. I've got my order in for a Venture Dad hitch. One flap I saw had a cut out for the stinger to fit through and a plug to cover it with a star concho on it. Any idea whose bike or where I can get a similar flap? Thanks as always for the help. Mark
-

Need a brown/tan seat cover
Guest posted a topic in Venture and Venture Royale Tech Talk ('83 - '93)
Howdy All, A friend has almost completed the fix on his Gen 1 Venture Royale. Still needs a seat or cover to match. Bike is a tan/brown '84. Anyone have or know where is the best place for this other than buying a complete new seat (very expensive)? Thanks for any help! Barry -
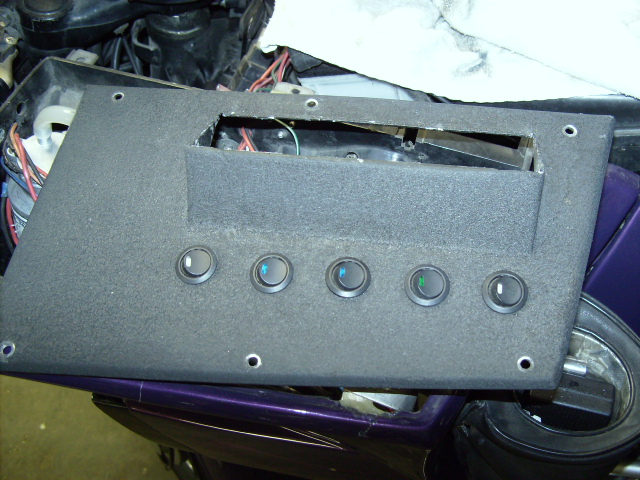
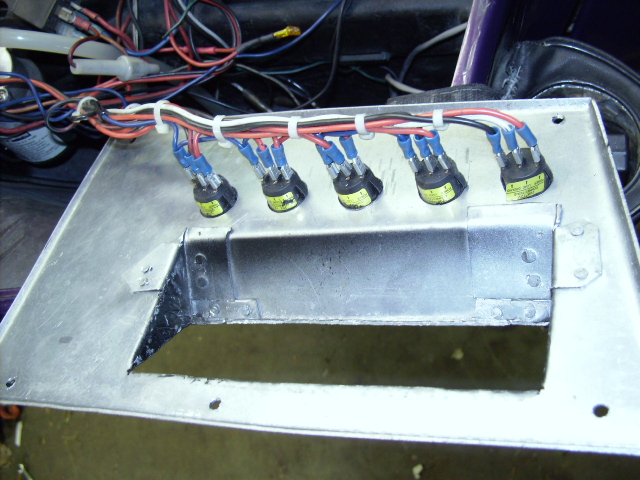
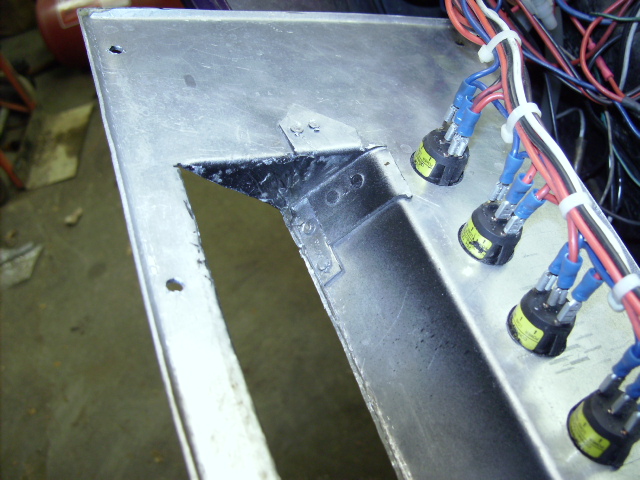
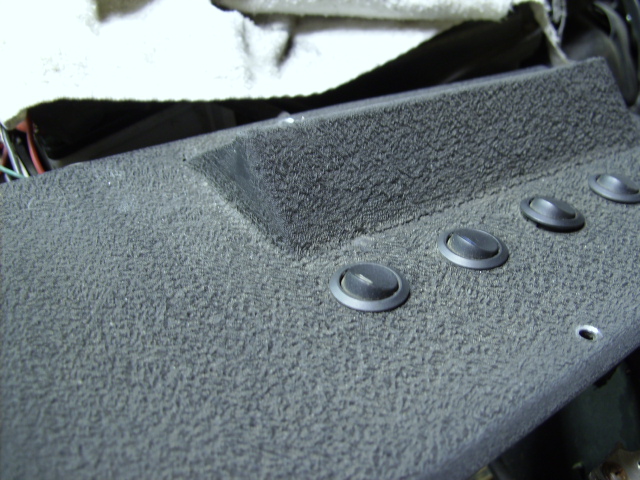
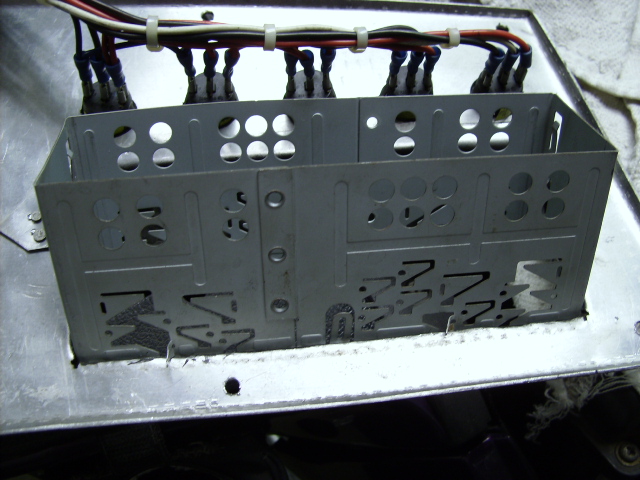
 My 83 standard had a radio mounted in it when I got it using a plastic cover from Cycle Sound. Over the years it got in bad shape. I made a cover similar to the one shown and the radio went straight down. I then made a stiffer one and made it so the radio mounted at a 30 degree angle. This made the CD work better and made it also easier to get the CD's out and even change them on the run. I have taken some pictures to help anyone contemplating doing this. It is a bit of work and I did use some good thick aluminum sheet. When I was finished making what I wanted, I painted it with black "wrinkle" paint. This give it a surface texture and covers some of the blemishes. As you can see, I also installed some switches. These go to my fog/running lights, the rear light bars, the radar detector and two sets of strobe lights in the headlight bucket. RandyA
-
Plain and simple NY SUX! Got my bike inspected today, ( know the guy so just gave him the Mileage and Reg) and found out alot about new bullcrap of NYS bike inspections. First of all the safety inspection which is nuts. Car tires are automatic fail and they are instructed to look for that. Also they are supposed to ride the bike and also remove a wheel. Now that leads to two problems. First is how can you do this and make any money or even cover your time for a fee of $6 and who wants an inspector to ride your bike. Im very protective of who rides my bike and I dont want it rode. Who knows what can happen. Also we are hearing alot of dealers quoting for things like fork seals. Guess you need to figure out ways to cover all the time you loose doing these $6 inspections. Just venting and fortunately I have an in but watch your butts if you are in NY. Maybe something the AMA should look into. Are they this stupid in other states?
-
What Does This Do? It Is Located Under The Right Side Cover In Front Of The Two Relays. Horse
-
I recently purchased this kit for my 05 RSTD. Darn thing won't install on my bike. The seller claims it installs inabout 15 minutes. When I tried to install the parts over the existing valve stems the little thingy that the air hose goes on hits the top of the triple tree cover. I tried removing the TT cover and then the kit installed no problem, however then the Triple Tree cover could not be reinstalled. What the H*LL? Anyone else have any experience with this problem? HELP!!!!! Snake:225:
-
I need a headset cord 1 (part #1NL-88196-00-00). This is the cord that goes from the radio unit to the tank cover bracket. If anyone has one I'd appreciate contact!
-
 I just changed the oil on my '84 this past weekend. It went well but I am now reading posts about "overfilling." I thought I was being smart by filling it to its upper limit. Sounds like I was wrong. Do all these bikes have the overfilling issue ? Looks like I will have to take the air breather apart to see if I have oil in there. I am assuming that that is the cover just inside the fuse box cover ? Also, I see a lot of folks recommending seafoam. What is that ? A search on Google suggests there are many seafoam products available. Any recommendations ? As usual, thanks.
 -
This weekend, while waxing down the front fender on the Venture, my knuckle LIGHTLY brushed the fins on the completely exposed radiator and bent the damn fins where my knuckle dragged. I thought to myself why would anyone leave such a large radiator just hanging out there? My neighbor has a Suzuki C50, pretty cheap bike cost wise, yet it's radiator at least has a plastic cover. I have a couple of questions reagrding the radiator. If damaged by something being throw up from the roadway, would this be covered under warranty. I know, your paint being chipped or some other damage by road debris wouldn't be covered, but I think a resonable person would think the radiator would and should be protected from flying road debris. How much is a new radiator form Yamaha? Finally, are there any "poor man" covers for the radiator? I can' really afford the fiberglass one right now, but did come across a "Celstar" chrome cover for 70.00 dollars new? Any thoughts or fixes. Thanks again for everyones input and opinions!
-
This website is great. I happened to come across this doing a search for a part i'm needing. Reading the threads, all the information that is offered. Wow! I just bought a 1984 yamaha xvz12 1200cc venture. Still trying to get use to it. Never had a bike with a fairing on it. Gonna take some time to get use to it. Great bike. I have a problem. On the side cover. There is a clip that attaches the side cover to the frame on the bottom of the cover. It is black and it says the word pull on it. You pull it off the sidecover and let it down and pop off the cover. I looked at the schematics from different websites and can't seem to find the part on it. Can you advise. Thanks, Kevin
-
Anybody on here bidding on this left side console cover? The bid at the moment is up to $227.00. That's a little pricey for me. http://cgi.ebay.com/ebaymotors/ws/eBayISAPI.dll?ViewItem&ih=008&sspagename=STRK%3AMEWA%3AIT&viewitem=&item=180233622609&rd=1 RandyA
-
Hello, Help, Hi! I have a 86 Venture Royale that has a heel toe shifter. It broke off of the crankcase cover. I took the crankcase cover off and had it welded and beefed up. After being careful to put all the gears right from the starter to the 'flywheel', I closed it up. I was pretty proud of myself until I tried the starter. A miniature whine almost inaudible. I tried to think of what would be wrong and charged up the battery thinking that maybe I was too low on juice. Put battery back in and tried again. Nothing. Reluctantly, I took it apart again, thinking that perhaps I had the gears binding. I made sure that the starter was free and working before I put the next sprocket/gear on to connect the started to the flywheel. I even made sure that the flywheel would turn. I was VERY careful to put the cover on gently and tightened it up. I took a deep breath and hit the starter. It clicked. Not whined, but clicked. Thinking that perhaps the lead to the starter was bad, I used a jumper cable to go from the battery to the starter. Good sparks, but nothing else. Now I need help! Anyone else experience this? Any ideas? I need to fix as soon as possible because I moved two weeks ago and it is still in the other parking lot. I thought I was good at mechanics, until I have been working on this bike. Even though I am not a guru, I am good at learning, which I am doing a lot of! One great thing on this site is the folks here are not the 'take it to the dealer to fix it' type. I appreciate your advice!
-
.thumb.jpg.176b2ebbe9863175975d94710375c414.jpg) Don, was kind enough to spend time on making this so it would read on-line I just emailed him the stuff from Word and he made it work.. Thanks Don. He as added this to the TECH Section. http://www.venturerider.org/forum/showthread.php?p=192219#post192219 I will post pics of my new radiator and the new cover from Steve after I get everything installed, I hope nobody has to go through this. Or if so I hope it helps you, Jeff
Don, was kind enough to spend time on making this so it would read on-line I just emailed him the stuff from Word and he made it work.. Thanks Don. He as added this to the TECH Section. http://www.venturerider.org/forum/showthread.php?p=192219#post192219 I will post pics of my new radiator and the new cover from Steve after I get everything installed, I hope nobody has to go through this. Or if so I hope it helps you, Jeff -
I know this is probably the wrong place to post this butttttttttttt, it has alot of people viewing! Can anyone tell me if you torque the valve cover bolts when replacing the valve cover gaskets and if so what would it be? Thanks very much:confused24: It is for a 89 VR
-
For trike riders or anyone else interested my trike is on the cover for the spring 08 issue. Jerry M
-
I just picked up an 89 Venture Royale. It has an oil leak above the exhaust crossover when running. The left frame behind the shift lever has oil on it. I think it must be the Middle Gear Cover because: - I can't see anything down the back of the engine or on top of the transmission except a coat of grime. And the oil on the floor looks like it just came out of the bottle, no dirt. - PO said the clutch slave was leaking and he hadn't been able to fix it (not clear if he tried). - The bottom of the cover is gooped up like someone tried an external patch or put lots of RTV in the joint when assembling. Before I pull the cover are there any known issues I should be looking for first? Thanks for feedback.
-
here is some photos of my 2008 rsv. i have been busy adding lights, back rest, sirius satellite and a tank cover, plus other items.hopefully i can get the video to load up.
-
I did the stebel horn upgrade, Thanks to all the help on this site it went great, also Thanks to Larry, his bracket is perfect for the job fits and looks great!! I removed the chrome cover from the rear as recommended and put a big dab of clear silicone on the top of the unit and stuck that cover rite on top, it looks great, also siliconed the side chrome cover on, my question, do you guys use some kind of covering over the wires, like a rub guard, to keep the insulation from wearing off? or is that overkill, also the connections seem dangerously close to the tail pipe, is that going to cause a problem? I have visions of those air-horns going off because of a short somewhere, and not being able to shut them off. Thanks Craig
-

Carb Diaphram Replacement
Marcarl posted a topic in Venture and Venture Royale Tech Talk ('83 - '93)
There's been some questions in the past as to how to replace the carb diaphrams, so when I did mine last night, I took some pictures, everybody always like pictures, RIGHT? Well here goes the write up: 1) Remove the false tank cover, side covers, side rad covers and loosen the lower faring. Remove the air box lid and the air filter. This would also be a good time to clean the air filter and the air box. You need to do this so you can reach into the carbs later. 2) Identify the part, the diaphragm cover, which has 4 torx screws, the one having a pin in the middle. This was done to make it hard, otherwise everything would be easy and any mechanic could do it. I didn't have one to show you, so you'll have to take my word for it. It can easily be snapped out by using a needle nose pliers or if it's stubborn a small punch. Just work it back and forth once or twice and it will come clean out. 3) Remove all the screws and the cover will pop out by it self, seeing as there is a spring behind it. Save the spring, it will come in handie when you put things back together. 4) Now that you have this area open, it's a good time to use some Carb Cleaner to clean the area, and all the little ports you can see. Finish by blowing out with air. At the bottom you'll see a little built out area that has a rubber ring in it. Be sure to save this ring as well, otherwise it's sure to get itself lost and then you'll have to wait longer for more parts. 5) Inside the diaphram body you'll find a plastic screw, turn it out by turning counter clockwise, that's the opposite way the hands on a clock turn. Under that screw will be another spring, not at all the same as the first spring, but a spring none the less. Keep it handy as well. Under the spring will be the needle assembly. This consists of the needle itself, a 'C' ring and a small washer. Best not to loose these either. They all need to go back in order in the new diaphram. 6) You are now ready to begin the installation of the new diaphram. Make sure that the little washer is mounted on the short side of the needle (#3) and then with a needle nose pliers insert the needle into the new diaphram (#1). Now comes the part where you pay attention. On the collar of the the needle you see a little plastic pin,(#2) this needs to seat in the hole provided for it in the base of the diaphram. Once the needle is inserted into it's rightful location you can very slightly push it back and then by turning it you'll have it find the hole (#5). Now you cannot turn the diaphram over again until the plastic screw is in place, but first you need to put the little spring back in on top of the needle (#6). Then with a needle nose pliers you drop the plastic screw down into the diaphram and with flat screwdriver wiggle it until it jumps into it regular spot, at which time you can gently attempt to turn it into the threads. Sometimes this goes easy, sometimes it takes a bit more time, but don't give up, it will happen. 7) Once you have the diaphram together you can slide it back into the carb. You'll find a tab on the outer edge of the diaphram and that seats into the cutout for in the carb. This is also a good time to remember to put the rubber O ring back in place at the lower end of the carb. To make things easy, fold the diaphram to-wards the carb and seat it in the grove provided for it. Next insert the long spring, that pushed the cover off in the first place, into the diaphram, but do not let it seat the plastic slide into the carb as this will cause it to unseat the rubber from the carb. Now seat the spring in it's approved place on the cover. Do not push it together just yet. 8) Now as you can see, I did mine while the carbs were off the bike, that was because the motor was already out and second gear was under construction. You really don't have to wait until second gear goes or you have to take the engine out for some other reason. This can all be done very nicely right on the bike. So now comes the final process: before you push the cover back into place, put your finger or have someone else place their finger, or use a piece of plastic or steel, (I wouldn't suggest wood as you may get dirt into the carb) into the throat of the carb to prevent the diaphram from sliding in. This will keep the bead seated in it's proper spot. Once the cover is in place and two screws have been inserted and tightened you can withdraw your 'finger' from inside the carb. Now, wasn't that easy????? -
 I have recently purchased a 1989 Venture and now have it home in my garage where I can crawl around in it. I have ordered and am waiting for the battery cable upgrade, and as well I ordered a new set of plug wires,caps and resistors. Being the curious type, I have removed the lower leg fairings, side covers and fuel tank cover, as well as rad cover and chin cover so I can see where everything is. Question#1. When I do the battery cable replacement, will I have enough room to also replace the plug wires? Or, will I have to remove more fairing etc once I remove battery box etc from the top? Question #2. While exploring, I found some oily, dirty areas. By removing the rubber covering for the clutch bleed screw, you can see down to it. From underneath, the wires and area directly above the sidestand switch appear to be quite grimey. Also, from underneath it seems to be above and maybe a little forward of the exhaust collection manifold. I have run the bike a few times in the garage and I see no oil on the floor. I think it is probably a small leak/seep that has been doing this for years...or maybe is more evident after a good run. I know most engines have a bit of area that collects oil and grime but I had to see it. Should I be concerned enough to start tearing this apart, or maybe this should be next winters project? Any ideas what it is and whats all involved? Thanks for replies, and I am sorry to get two different questions on one post.