Search the Community
Showing results for tags 'diaphram'.
Found 13 results
-
Hi there venture riders, I am posting a thread for the first time ever and here! I have enjoyed this forum since I bought my 83' venture 1200 and now have a reason to find some help. My bike ran good but lacked full power, I took off air box and noticed left rear diaphram slide not opening. I took outside cap off and found the metal sleeve seperated from the plastic slide. I took a little epoxy and reassembled properly, diaphram looked great. I started the bike and checked operation ( all 4 working properly) it now when warm idles at 3000 rpm. Checked choke and throttle cables lubed them and saw they were operating properly. I feel this is a vacuum related issue and can't find the fix Thanks in advance for any help, this bike is my only transportation right now.
-
Each diaphram cover has 4 screws. The upper right screw seen to take a star or allen wrench while the other 3 are Philips head. But I can't tell for the screw seems to have a center tip the stick out preventing the tool to slid into the head. Is there such a tool with a center hole?
-
When screwing in the Carb Bowl screw how far does one tighten. Just when you feel the spring tention, or all the way in until it stops or somewhere inbetween? From the center of the diaphram cover one goes straight down and the screw is in a long tunnel.
-
 The reason my VR has been steadly running worse. I replaced the diaphrams last fall, with good results. I prepared myself for the replacement of several components that had obvious issues. My intake boots looked as though they were breathing better than I could, as well as the nozzle and needle set being harmonously worn out. I ordered the boots form the Serius folks, as well as the rest of the required parts from cheapparts.com. I decided to tear into it this weekend, but it really started fussing at me yesterday. I came home today, got into the first level of disassembly and after the airbox was off, I jiggled all the slides out of habit. I noticed that #2 slide was frozen in the closed position. I jiggled the others and #1 seemed weird, so I remove the cap before pulling the carb assembly. Ready for this? As #1 cap came off, the diaphram and the spring came out wrapped up in each other. Inspection of the slide showed the internal aluminum sleeve had come out of the composite body of the slide, allowing the diaphram to seperate and leave the slide to act on its own. Just when you think youv'e seen it all. It apppears to be a salvagable effort but sheese............Its all good, should have it worked out by Friday. Then off to the Hill Country to try out these E-3'S!
 -
 Ok, I have posted about this problem before and got some recommendations from adjusting the shift linkage to the type of shoes I'm wearing (??). Well, I have adjusted the linkage every which way possible with no improvement in the bad up-shifting. I've had a number of 1st Editions(6) and never had one like this. There has got to be something else causing the hard upshifting. I've just got in a complete clutch rebuild kit from Buckeye and am prepared to install new friction plates, new diaphram spring, etc., but I don't think that will help either. I am now thinking I may have a dowel pin problem (loose and/or just not fitting properly) in the shift cam. Does anyone think replacing part 6 and 8 in the microfiche will help? Just in case it comes up....rebuilt the m/c, installed new slave and no air in the line.
 -
 Well, I'm finally back from Iraq and took the bike out today. Ran fine except for a little overheating... The coolant reservoir showed fine, but when I opened the radiator it was very low. Added some coolant and the bike ran cool. I think there may be a small leak as I noticed a few drops of coolant on my right toe. While returning home, I had a fall off of power, kind of a bogging down when I got off the freeway. had to run it in 2nd to get home and keep the rpms around 4k. When I got home I noticed some fuel leaking in front of the rear wheel. I had that problem when I first got the bike, but can't recall how I fixed it. I also noticed the right rear spark plug wire had come loose and reinstalled it. After restarting the bike, It would try to stall unless I very slowly applied throttle... too fast, it bogged down and died. I pulled off the air cleaner and noticed that the two carb slides on the left side of the bike were stuck open. and I mean stuck. pushing the slide on #1 wouldn't open it at all. #2 would push open but not close back. Noticed some "backfiring" from the right side carbs also I've been searching the forums for about 2 hours now, and I think I'm at the point where I'm imagining everything I read could be the problem. I definitely need to check the diaphragms, and I need to search a bit more about how to drain and clean the bowls. I need to check the tank for rust and water. I'm not really wanting to do a full carb rebuild/cleaning, but worst case I'll mentally prepare for it. Does anyone here have any other Ideas or Input? perhaps a pointer to some good writeups? I do have the service manual and have found a good how-to for the diaphrams so far. Thanks, Mark
 -
 Hello........... I have had my new ride for about 3 days now, posted a question about bogging down and with the help a few of you was able to determine the diaphrams have some holes in them. I have them out. How does a person take the diaphram portion off of the slide? Where the diaphram hooks onto the slide there is what looks like a plastic washer on top and underneath. Does it unscrew? I can get it to twist a little but do not see it coming off very easily. Anybody have an idea how this is done? Thanks Bnkrbill
 -
1st Gen Carb Diaphrams
MasterGuns posted a topic in Venture and Venture Royale Tech Talk ('83 - '93)
There is a lot of posts concerning 1st Gen carb diaphrams being bad, how to repair them, how to replace them, places they may be obtained at varying costs, etc, etc. What I would like ask those that have much more experience than I concerning diaphrams on the lst Gen, is how does one know when one or more need replacing in the first place? What are the symptoms of a bad diaphram and should the diaphrams be regularily checked for issues? Also, if I were to find one bad can one be exchanged from a another set of carbs? Can only the diaphram be reutilized from another carb or would it be wise to exchange the entire assembly diaphram and slide together? Just curious. I don't have any carb issues at the present time but one never knows what the future may hold with a 20 year old bike. -
Tech question, I have discovered that the rear master cylinder needed to be rebuilt. I decided to remove the reservoir and clean it out. I have never touch this but to add fluid as I bleed the system. There was crude in the tank, but I had one heck of a time getting the lid off of it. The previous owner, back in 1989 somewhere there abouts, took it apart and stuffed the rubber diaphram down into the reservoir. I don't think it will ever get back into a usable shape again. Is this needed for the system to function properly?? Oh, forgot to add, the reservoir was glued shut with something. I did manage to get it open, and I didn;t brake it. Do I need it? Or is there something that will work? I did see that there is a groove in the lid and the top of the reservoir for venting I guess and to allow the diaphram to expand as the fluid level drops. Will a thin rubber gasket work? joe
-

Carb Diaphram Replacement
Marcarl posted a topic in Venture and Venture Royale Tech Talk ('83 - '93)
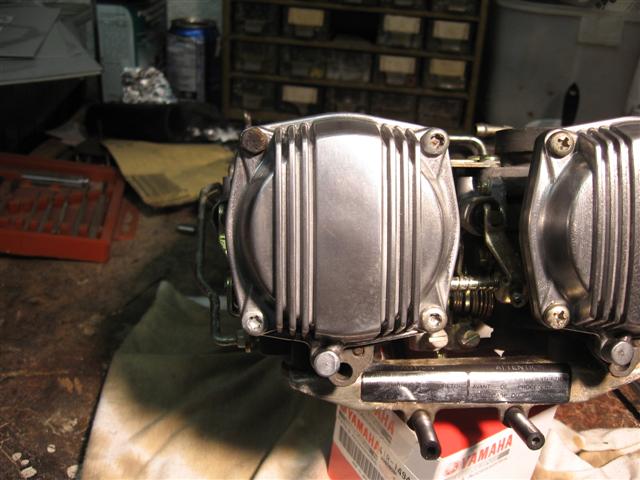
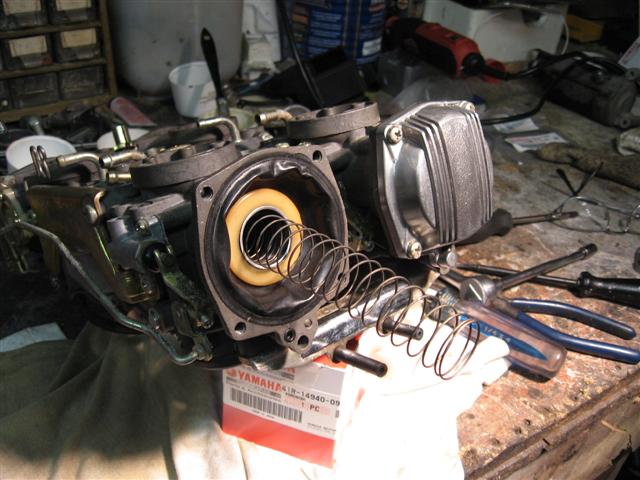
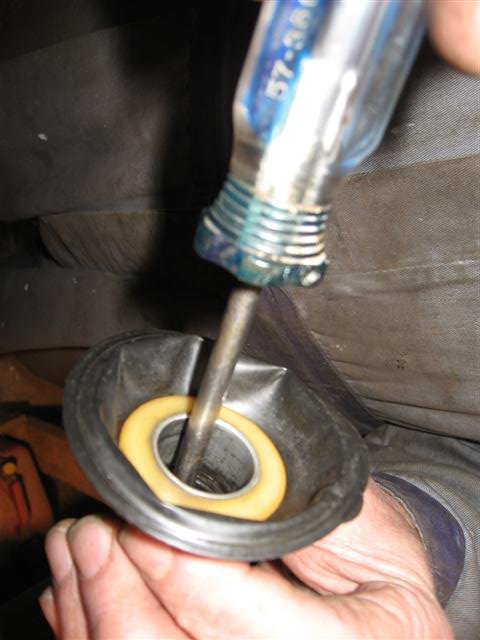
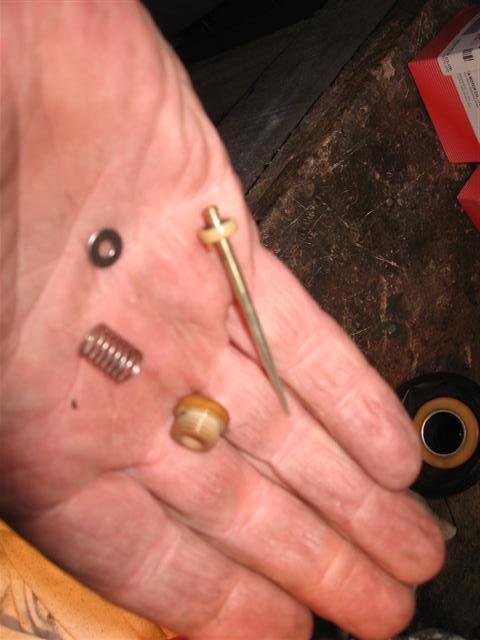
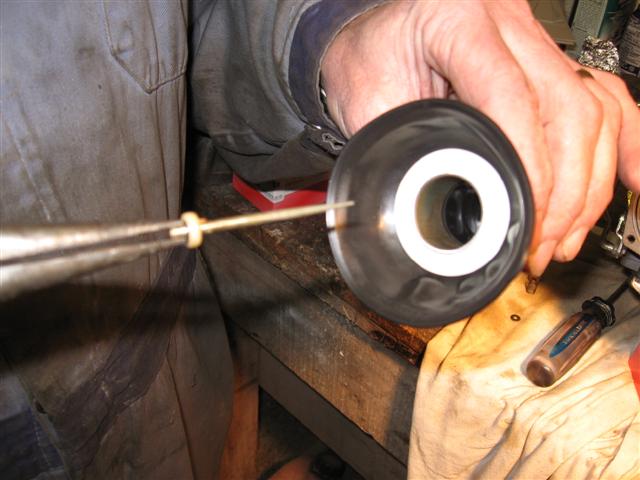
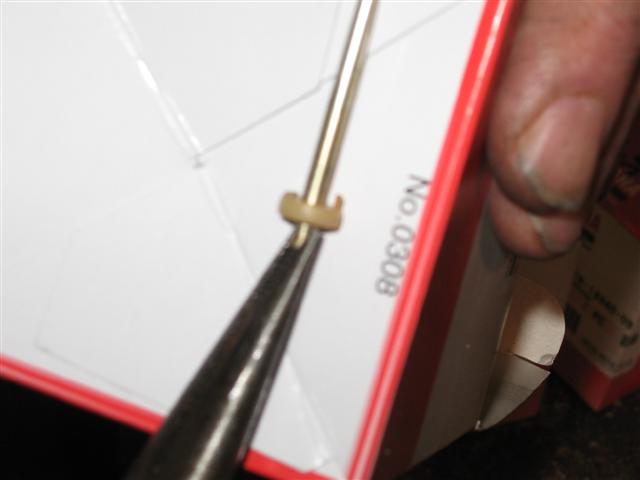
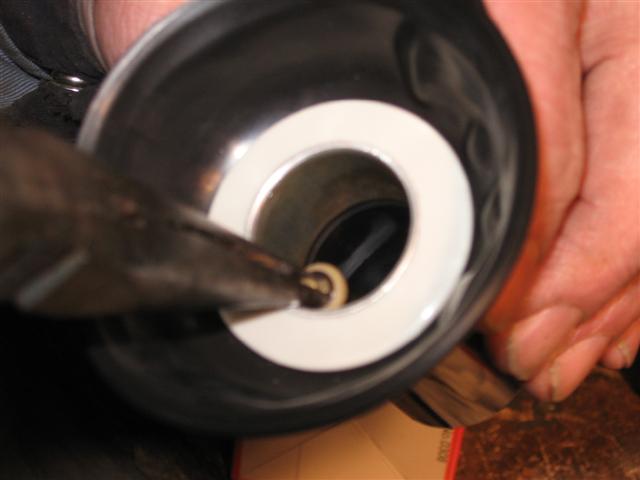
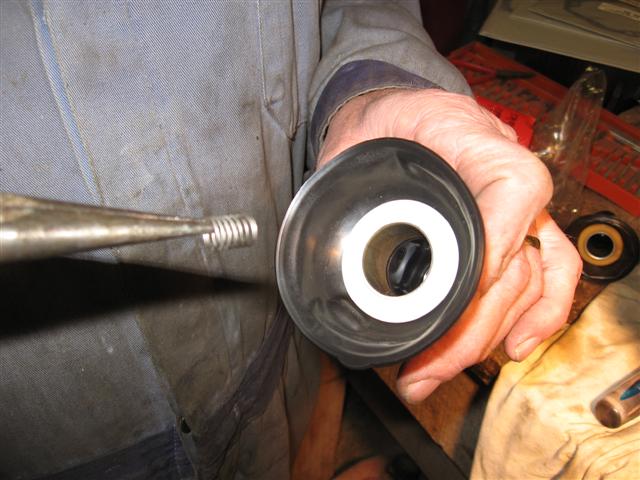
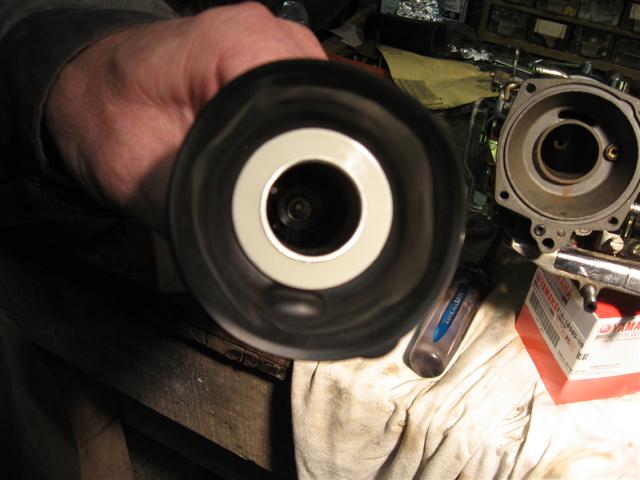
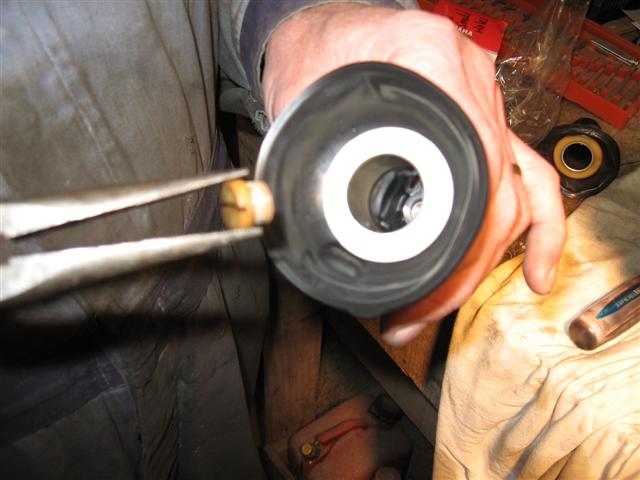
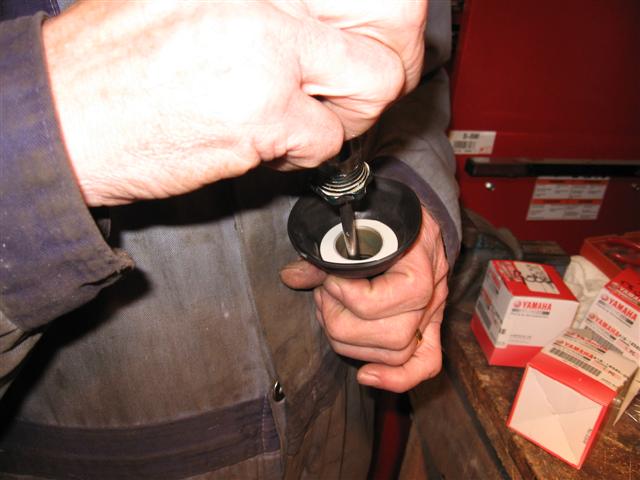
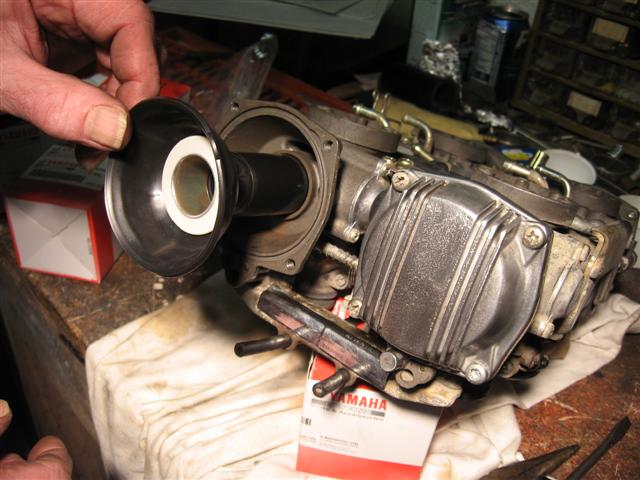
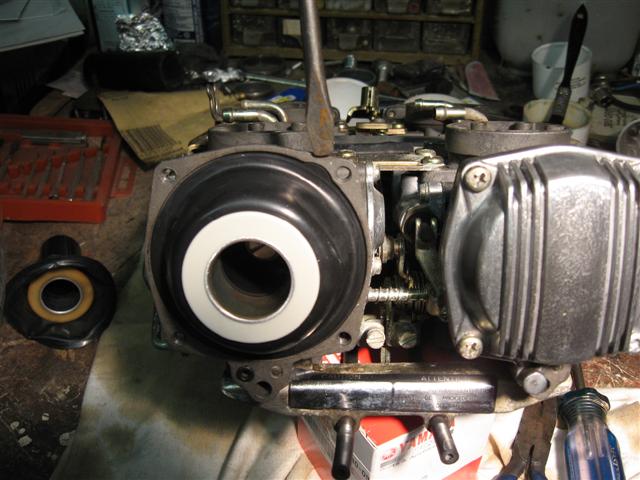
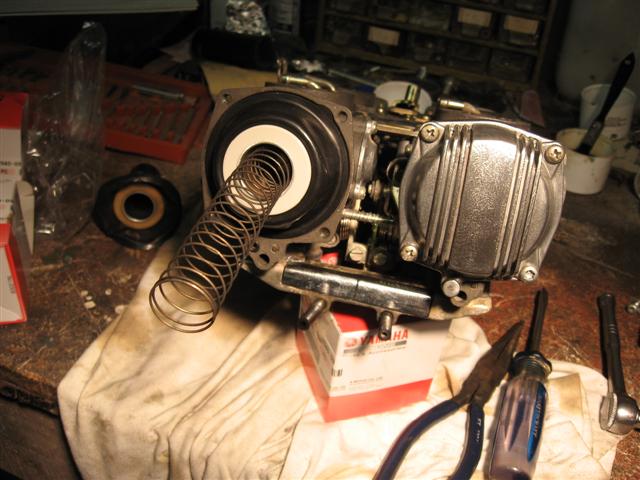
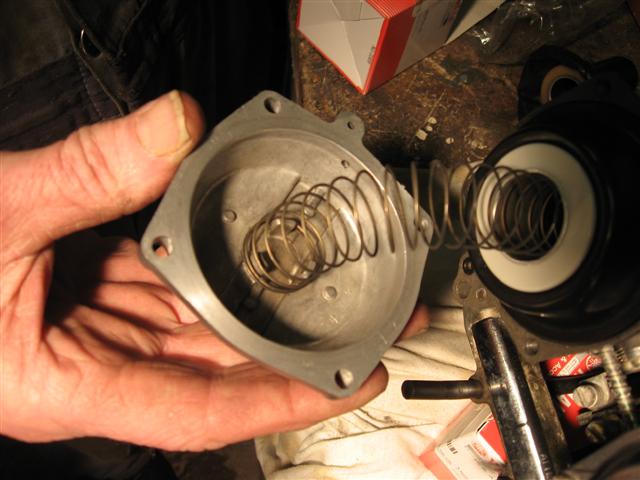
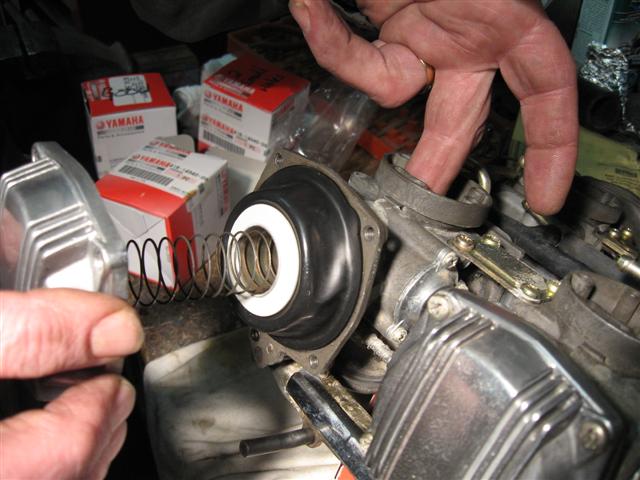
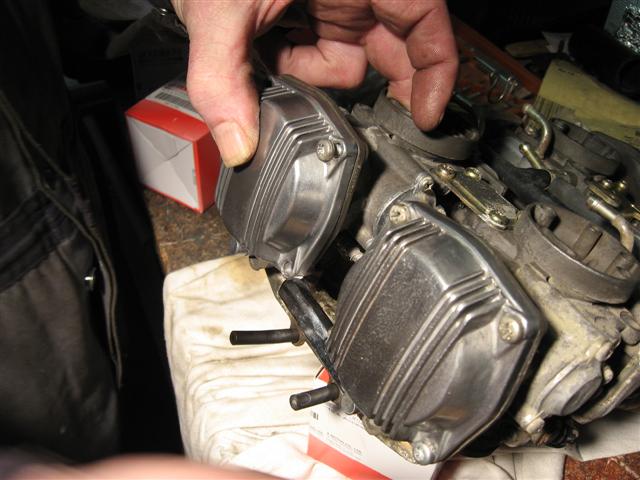
There's been some questions in the past as to how to replace the carb diaphrams, so when I did mine last night, I took some pictures, everybody always like pictures, RIGHT? Well here goes the write up: 1) Remove the false tank cover, side covers, side rad covers and loosen the lower faring. Remove the air box lid and the air filter. This would also be a good time to clean the air filter and the air box. You need to do this so you can reach into the carbs later. 2) Identify the part, the diaphragm cover, which has 4 torx screws, the one having a pin in the middle. This was done to make it hard, otherwise everything would be easy and any mechanic could do it. I didn't have one to show you, so you'll have to take my word for it. It can easily be snapped out by using a needle nose pliers or if it's stubborn a small punch. Just work it back and forth once or twice and it will come clean out. 3) Remove all the screws and the cover will pop out by it self, seeing as there is a spring behind it. Save the spring, it will come in handie when you put things back together. 4) Now that you have this area open, it's a good time to use some Carb Cleaner to clean the area, and all the little ports you can see. Finish by blowing out with air. At the bottom you'll see a little built out area that has a rubber ring in it. Be sure to save this ring as well, otherwise it's sure to get itself lost and then you'll have to wait longer for more parts. 5) Inside the diaphram body you'll find a plastic screw, turn it out by turning counter clockwise, that's the opposite way the hands on a clock turn. Under that screw will be another spring, not at all the same as the first spring, but a spring none the less. Keep it handy as well. Under the spring will be the needle assembly. This consists of the needle itself, a 'C' ring and a small washer. Best not to loose these either. They all need to go back in order in the new diaphram. 6) You are now ready to begin the installation of the new diaphram. Make sure that the little washer is mounted on the short side of the needle (#3) and then with a needle nose pliers insert the needle into the new diaphram (#1). Now comes the part where you pay attention. On the collar of the the needle you see a little plastic pin,(#2) this needs to seat in the hole provided for it in the base of the diaphram. Once the needle is inserted into it's rightful location you can very slightly push it back and then by turning it you'll have it find the hole (#5). Now you cannot turn the diaphram over again until the plastic screw is in place, but first you need to put the little spring back in on top of the needle (#6). Then with a needle nose pliers you drop the plastic screw down into the diaphram and with flat screwdriver wiggle it until it jumps into it regular spot, at which time you can gently attempt to turn it into the threads. Sometimes this goes easy, sometimes it takes a bit more time, but don't give up, it will happen. 7) Once you have the diaphram together you can slide it back into the carb. You'll find a tab on the outer edge of the diaphram and that seats into the cutout for in the carb. This is also a good time to remember to put the rubber O ring back in place at the lower end of the carb. To make things easy, fold the diaphram to-wards the carb and seat it in the grove provided for it. Next insert the long spring, that pushed the cover off in the first place, into the diaphram, but do not let it seat the plastic slide into the carb as this will cause it to unseat the rubber from the carb. Now seat the spring in it's approved place on the cover. Do not push it together just yet. 8) Now as you can see, I did mine while the carbs were off the bike, that was because the motor was already out and second gear was under construction. You really don't have to wait until second gear goes or you have to take the engine out for some other reason. This can all be done very nicely right on the bike. So now comes the final process: before you push the cover back into place, put your finger or have someone else place their finger, or use a piece of plastic or steel, (I wouldn't suggest wood as you may get dirt into the carb) into the throat of the carb to prevent the diaphram from sliding in. This will keep the bead seated in it's proper spot. Once the cover is in place and two screws have been inserted and tightened you can withdraw your 'finger' from inside the carb. Now, wasn't that easy????? -
i have a 93 venture and i was cleaning out my carbs when i got to the diaphrams i notice there are three holes in the diaphram the holes are spaced far apart from each other it seems like they might belong there however on one diaphram the hole seems as if it has ripped wider than it is supposed to be. is this something that i should consider replacing? ive shopped around for them and they are kinda pricey. if i do need to replace them do you know any place where i can get them cheap or do any other ventures interchange the diaphrams? i will be posting some pictures a.s.a.p. so you can see what im talking about thank you, -mike
-
There's been some questions in the past as to how to replace the carb diaphrams, so when I did mine last night, I took some pictures, everybody always like pictures, RIGHT? Well here goes the write up: 1) Remove the false tank cover, side covers, side rad covers and loosen the lower faring. Remove the air box lid and the air filter. This would also be a good time to clean the air filter and the air box. You need to do this so you can reach into the carbs later. 2) Identify the part, the diaphragm cover, which has 4 torx screws, the one having a pin in the middle. This was done to make it hard, otherwise everything would be easy and any mechanic could do it. I didn't have one to show you, so you'll have to take my word for it. It can easily be snapped out by using a needle nose pliers or if it's stubborn a small punch. Just work it back and forth once or twice and it will come clean out. 3) Remove all the screws and the cover will pop out by it self, seeing as there is a spring behind it. Save the spring, it will come in handie when you put things back together. 4) Now that you have this area open, it's a good time to use some Carb Cleaner to clean the area, and all the little ports you can see. Finish by blowing out with air. At the bottom you'll see a little built out area that has a rubber ring in it. Be sure to save this ring as well, otherwise it's sure to get itself lost and then you'll have to wait longer for more parts. 5) Inside the diaphram body you'll find a plastic screw, turn it out by turning counter clockwise, that's the opposite way the hands on a clock turn. Under that screw will be another spring, not at all the same as the first spring, but a spring none the less. Keep it handy as well. Under the spring will be the needle assembly. This consists of the needle itself, a 'C' ring and a small washer. Best not to loose these either. They all need to go back in order in the new diaphram. 6) You are now ready to begin the installation of the new diaphram. Make sure that the little washer is mounted on the short side of the needle (#3) and then with a needle nose pliers insert the needle into the new diaphram (#1). Now comes the part where you pay attention. On the collar of the the needle you see a little plastic pin,(#2) this needs to seat in the hole provided for it in the base of the diaphram. Once the needle is inserted into it's rightful location you can very slightly push it back and then by turning it you'll have it find the hole (#5). Now you cannot turn the diaphram over again until the plastic screw is in place, but first you need to put the little spring back in on top of the needle (#6). Then with a needle nose pliers you drop the plastic screw down into the diaphram and with flat screwdriver wiggle it until it jumps into it regular spot, at which time you can gently attempt to turn it into the threads. Sometimes this goes easy, sometimes it takes a bit more time, but don't give up, it will happen. 7) Once you have the diaphram together you can slide it back into the carb. You'll find a tab on the outer edge of the diaphram and that seats into the cutout for in the carb. This is also a good time to remember to put the rubber O ring back in place at the lower end of the carb. To make things easy, fold the diaphram to-wards the carb and seat it in the grove provided for it. Next insert the long spring, that pushed the cover off in the first place, into the diaphram, but do not let it seat the plastic slide into the carb as this will cause it to unseat the rubber from the carb. Now seat the spring in it's approved place on the cover. Do not push it together just yet. 8) Now as you can see, I did mine while the carbs were off the bike, that was because the motor was already out and second gear was under construction. You really don't have to wait until second gear goes or you have to take the engine out for some other reason. This can all be done very nicely right on the bike. So now comes the final process: before you push the cover back into place, put your finger or have someone else place their finger, or use a piece of plastic or steel, (I wouldn't suggest wood as you may get dirt into the carb) into the throat of the carb to prevent the diaphram from sliding in. This will keep the bead seated in it's proper spot. Once the cover is in place and two screws have been inserted and tightened you can withdraw your 'finger' from inside the carb. Now, wasn't that easy?????

-
 I have an 89 royale that is leaking oil from something? maybe a crossover?! It is between the heads at their base, this thing runs from one side to the other and has a bango fitting on it w/small hose going somewhere. How should I fix it? #2 question --- I believe my bike to have a diaphram issue, does anyone have pics on step by step repair and how to step by step repair? I've read something about liquid tape or yamabond? All help is good help. I just bought it couple months ago, don't know alot about it except it has 28k on it one owner, and I don't think he did anything to the carbs. It starts fine but it definitely doesn't have the power it should! I did check the temps of the exhaust right at the header, soon after startup at idle the rear 2 are in the 360 degree range and front 2 slowly climbed to 185 and on up, but nowhere near the rear 2 exhausts temps, checked for spark in the fronts, both ok. When you really twist the throttle she tends to come to life a little. I'm hoping it to be a diaphram issue. Thanks for any responses:feedback: