Search the Community
Showing results for tags 'cap'.
-
OK, I'm cheap, and had too much time on my hands! Here's my $2.00 GPS mount for my 2nd gen: http://i81.photobucket.com/albums/j204/DragracerUSA/GPS%20Mount/IMG_7849.jpg I started with this cup: http://i81.photobucket.com/albums/j204/DragracerUSA/GPS%20Mount/IMG_7846.jpg I centered the gas cap in the cup facing downward, and cut off the top 3.5" of the cup. I then mounted the flat stick on disk that came with the GPS to the bottom of the cup.. I screwed it to the cup just to be safe. I used a heat gun to mold the cup to fit the gas cap snugly. http://i81.photobucket.com/albums/j204/DragracerUSA/GPS%20Mount/IMG_7851.jpg http://i81.photobucket.com/albums/j204/DragracerUSA/GPS%20Mount/IMG_7852.jpg Here is is pushed onto the gas cap without the GPS mount stuck on. This is held to the gas cap by friction only. I just rode it over 2.5 miles of lime rock, and it never moved. http://i81.photobucket.com/albums/j204/DragracerUSA/GPS%20Mount/IMG_7850.jpg The cup came from Wal-Mart in a pack of 4 for $2.00. So technically, it really only cost .50 cents! To remove it, twist slightly and it pulls right off! http://i81.photobucket.com/albums/j204/DragracerUSA/GPS%20Mount/IMG_7853.jpg
-
So last time I was out riding as I went around a corner I heard that familiar sound of metal hitting ground. Kinda like dropping a wrench on concrete. I pulled over right away to check out my baby and didn't see anything odd or wrong with her. Rode the few miles to home and looked it over a little better but still didn't see anything. Skip forward to today and I jump on for a short ride and I can hear a a rattling noise coming from the back of the bike. So I jump off determined to locate this racket once and for all. Start with the trunk, nothing loose a broken. Move to the bags, nope still nothing. OK let's check safety chrome, yep there we go. The right saddlebag guard is the source. Apparently the end cap bolt came loose and I lost both the bolt and the little cap that connects to the crash bar(near passenger foot). So the question is, can I buy just that part or is it one of those all or nothing things? Or if anyone has one off a crashed bike and that rail is damaged and they don't need that little end cap I'd be happy to purchase it from them. Thanks in advance, I'll be outside doing a thorough nut check. Stop it you know what I mean!
-
Questions for you electronic tech geek types. I'm installing a cylindrical electrolytic capacitor for noise suppression, from the hot lead to ground. The cap, from Radio Shack, has one end where the lead comes out of a plastic insulating disc, and the other end is all metal with the lead coming out. There is an arrow on the body pointing from the plastic end to the metal end. Is there polarity on the cap? Which end goes to hot, and which to ground? What would happen if it was installed backward? Thanks, Jeremy
-
I know this is a dumb question but..... I bought a bike that runs great etc, but doesn't have a helmet connector. Looked under the plastic housing at the gas cap, nothing there. Where should I be looking for the cable? Thanks in advance.
-

need a 1st gen camshaft cap
Guest posted a topic in Venture and Venture Royale Tech Talk ('83 - '93)
I need some help please...does anyone have a VR1300 camshaft cap? These thingies hold the overhead camshaft in place and tie down the valve covers. Correct me if I'm wrong...I'm assuming they are the same regardless of their location on the cam so any one will do. I'm told the 1300s are different than the 1200s though. Yamaha doesn't sell them separately; local wreckers are not willing to open up their salvage engines. Anyone come to my rescue? -
I am messing around with installing end weights to Kuryakyn grips. I want to keep my Kury throttle rocker - but for this application I will need to glue/epoxy it to either the end cap or the wend weight. So - what should I use to make sure this thing sticks to the other piece of metal? Thanks folks, Shep
-
It's kind of a pain to add oil by removing the 2 covers and then the oil cap to add oil. I'm thinking of eliminating the cap (or drilling a hole in it) and running a funneled hose outside the covers. But it has to look decent. Has anyone done something like this? Maybe I should change to nickname to Mr. Mod?
-
 While rebuilding the carberators on my 87' VR this past weekend, one of the hardest things was getting those phillips screws out of carb. covers! What a pain. I destroyed over half of them removing them. I searched all over town and bought a few boxes of Stainless Steel metric Allen Head cap screws and some really nice Stainless Steel flat washers to give my rebuild a nice "Custom Touch". After I bought the cap screws, I polished the heads of the cap screws on my buffing wheel to a mirror finish. I have a few sets of these cap screws left over and If anyone would like a set I have placed an ad in the Classifieds, the link is below. http://www.venturerider.org/classifieds/showproduct.php/product/1643 I think you will find the quality of this hardware to be excellent! It was purchased from a Marine supply house and to top it off I have hand polished the head of every cap screw to a mirror finish! For our members North of the border, the shipping might be a bit more but I will only charge the actual shipping cost, nothing more. Paypal is prefered, Checks take a while to clear. You will get 16 cap screws and 16 washers, enough to do all 4 carbs.! Shipping is included to the lower 48 states.
 -
Anybody else have this? Rumor has it my dsl provider will impose a 5GB per month usage cap starting in December or January. That doesn't sound like much bandwidth to me considering I have 5 computers ( wife and kids ) using the service. Someone is usually online 24/7. I have a speedstream 6520 router. My question is how can I monitor my bandwidth usage just to know what my monthly activity is before a suprise bill arrives later?:mo money:
-
 I'm 5' 8" and have stock RSV 2008. The Chrome Filler Cap reflection on Windshield is annoying and not Safe at times. What have some of you "seasoned" RSV Riders 2nd Geners doing about it? I think maybe a Dark Beverage Can Cooler cut off the bottom and invert it over the Chrome Filler Cap? Ideas?
 -
Hi All, Has anyone found a place to get a radiator cap from besides the stealer for an 87' VR? Thanks for any help you can provide. Ride Safe, Earl and Jean
-
Hey Guys! I am sure that if any of you are wired with Gerbings heated gear, that your original end-cap (the plastic cover the power-plug connector), has probably fallen apart like both of mine have. I have two of these. One for my wife (passenger) and one for myself. This is really no big concern, but I would like to keep moisture from getting in there with something which doesn't look out of place - like a baggie. I'm thinking that something like a flexible rubber tire-valve stem cap which isn't threaded. I'll have to check with some of the local tire shops to see if they have something which would work well. Anyone else run into this? Thanks! Pete.
-
about a half dozen times in the last few months, my 97 rstd has just shut down after about 1/2 mile. i pulled over opened the gas cap , thinking maybe a gas cap venting problem but i don't know. the bike starts back up and runs fine afterward. i was thinking gas cap vent problem or maybe ignition switch short but not sure. any ideas would be appriciated. thanks, thumper1
-
Ordered 07/28/08 and received on 09/15/08.....falls within the 5 to 7 weeks. Easy install.......looks great. Standard height with gray tint and vent. I do see the gas cap reflection at times and would like suggestions on how you solve that problem. I really do not wish to paint the gas cap black. IndyDog RSV08
-
Bob Meyer and his friend just arrived in SLC safely. Bob ('86 Venture) called and he is having difficulty getting his clutch to release. My initial thought is that because of the elevation change from Kentucky to Utah that the system has additional pressure and that if we open the master cylinder cap that will relieve it and his system will function normally again. Any ideas or suggestions before I go home from work would appreciated. Dave
-
I bought a leather gas cap cover from Yamaha that in there catalog. it came in Fri. when I went to put it on it so small it took the owner to put it on and took him 5 min. he said it would stretch with time. I tried to take it off and put on myself today came off a no go putting back on. Does anyone out there have one of these and are they that hard to put on? :7_6_3[1]::7_6_3[1]::7_6_3[1]:
-
Well I installed the new clearview shield tented today I am 5'8" tall I bought the med 3" shorter the stock. I think it may be just a little short but not to bad. I took it out for a ride It did not take long to find out the clearview leans back more then the stock shield The sun hit the gas Cap and bulls eye the reflection hits the shield and where is it on that shied right at eye level so what is next? $250.00 later it will be hard to see and what a distraction. OK pull back into the house tell Teri get me that blue rag over there so I can put over the gas cap bing reflection gone next step gas cap cover ordered over the phone should be here next week. then I will try again. At the end of the day next shield well have no tent and if it is a clearview I will go with the large. The shield does look like it is will made when you order one though make sure of the hight you need. PS don't take off the cover it is shipped with in case you want to send back ask me how I know that, needless to say I am not the sharpest knife in the drawer I should have read the tag on the shield.
-
Well,after being home from the rally,I'm just not feeling myself. Dr.Shari has diognosed the problem as "Timmies Withdrawl" She thinks we may have to head back to Canada to get me a large Ice Cap... I usually don't like cappachino,but those were really good...:D:D
-
I'd like to replace and torque my steering head bearings. Anyone know where I can find a ring nut wrench (complete with 3/8 inch slot for a torque wrench) and fork end cap socket? In reading the shop manual, looks like it calls for removing the forks? Is there any way to get around that? Thanks. Jim
-
Am changing my oil brand from Amsoil to Mobil 1. Was at Wally's and noticed several different caps and I seem to remember that the gold cap is the one with friction modifiers. Silver cap does not. Is that correct? DJ :confused24:
-

help Progressive springs
funrider posted a topic in Venture and Venture Royale Tech Talk ('83 - '93)
I am in the proses of putting in new springs. when you put the new progressive springs in, what do you leave out? Below the cap bolt is a cap with a o ring on it, does that get left out? If you put that in, it is already higher than what is recommended without using a spacer at all. Any help will be appreciated. -
 Since I have half the bike torn apart, I thought I may as well see what's under the travel trunk and seat. I am now trying to replace/regenerate the desiccant (silicagel) in the drier tube in my 1989 Venture. Got to the part where owners manual (and manual for 1st gens) say to push on cap and remove circlip. WELL....what a chore. Pushed with all my might and finally got the circlip out. Thought man that must be one heck of a spring....but nothing happened after removing the circlip. I CAN NOT remove the cap. I even grabbed it with a plumbers pliers. I can wiggle it, can slightly turn it, but can't remove it. The whole canister and cap seem to be made out of aluminum. I wonder if this has never been changed and it is all corroded up inside? Any suggestions? Probably my next move is to soak the heck out of it with penetrating fluid or such. It will ruin the silicagel, but that can be replaced. Open to suggestions from this knowledgeable crowd.
 -
I lost one of mine. Anyone know where I can find a replacement?
-
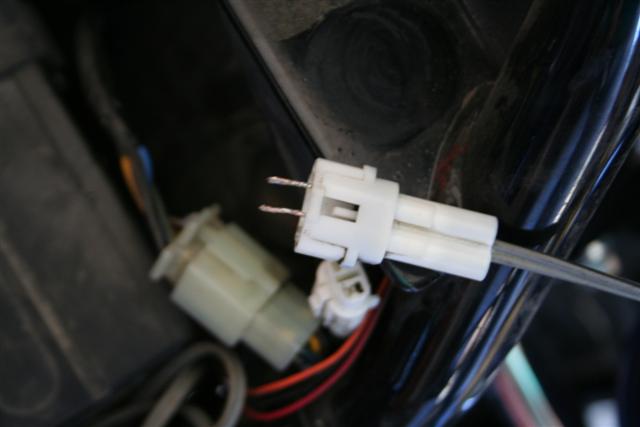
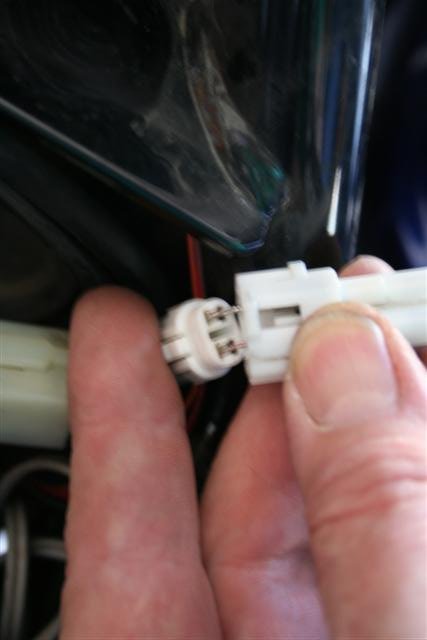
.thumb.jpg.4e1b3809c4633f365ba67afc212f21df.jpg) Hey y'all, I found an easy way to use that white aux power plug located just behind the battery on the left side. Even though the cap does not have the necessary pins in it to make a connection, the pin retaining clips work somewhat like wire clamps. I just stripped the ends from some 18 gauge zip cord and tinned it, then used hemostats (or small needle nose pliers) to insert the wire into the contacts in the bottom plug - they fit very snugly after tinning. Here are a couple of pictures - not the best, but you should be able to see what I am talking about: [ATTACH]16155[/ATTACH] [ATTACH]16154[/ATTACH] Just make sure you insert the wires into the metal contacts in the plug, not the empty spot next to them where the retaining clips are (I think that the second picture actually shows me holding the wires in the wrong hole)! The way the plug cap is designed, the wires are protected from accidentally touching once the cap is put back in place. Also, remember that this plug is only on a 5 amp fuse (located behind the right front cowling). Good luck, Goose
Hey y'all, I found an easy way to use that white aux power plug located just behind the battery on the left side. Even though the cap does not have the necessary pins in it to make a connection, the pin retaining clips work somewhat like wire clamps. I just stripped the ends from some 18 gauge zip cord and tinned it, then used hemostats (or small needle nose pliers) to insert the wire into the contacts in the bottom plug - they fit very snugly after tinning. Here are a couple of pictures - not the best, but you should be able to see what I am talking about: [ATTACH]16155[/ATTACH] [ATTACH]16154[/ATTACH] Just make sure you insert the wires into the metal contacts in the plug, not the empty spot next to them where the retaining clips are (I think that the second picture actually shows me holding the wires in the wrong hole)! The way the plug cap is designed, the wires are protected from accidentally touching once the cap is put back in place. Also, remember that this plug is only on a 5 amp fuse (located behind the right front cowling). Good luck, Goose -
Hey y'all, I found an easy way to use that white aux power plug located just behind the battery on the left side. Even though the cap does not have the necessary pins in it to make a connection, the pin retaining clips work somewhat like wire clamps. I just stripped the ends from some 18 gauge zip cord and tinned it, then used hemostats (or small needle nose pliers) to insert the wire into the contacts in the bottom plug - they fit very snugly after tinning. Here are a couple of pictures - not the best, but you should be able to see what I am talking about: Just make sure you insert the wires into the metal contacts in the plug, not the empty spot next to them where the retaining clips are (I think that the second picture actually shows me holding the wires in the wrong hole)! The way the plug cap is designed, the wires are protected from accidentally touching once the cap is put back in place. Also, remember that this plug is only on a 5 amp fuse (located behind the right front cowling). Good luck, Goose