Search the Community
Showing results for tags 'switch'.
-
Can anyone tell me what i would need to install 5 "l.e.d." pods on my bike. I want to put a toggle switch on with it??????
-
Need some help. Anyone here know the difference between these 2 switches? I'm trying to install some LED lighting in my trunk so that when I open the trunk, the lights come on & when I close the trunk, the lights go out. Just testing the switches with the lights attached, I hooked up to my truck battery, but both switches turn the lights on & when the other side of the switch comes in contact, the lights don't go out. Regardless of the switch (open loop or closed loop), the lights are on whether in contact with the other half of the switch or not. What am I missing? Thanks.
-
Took my first ride Saturday and the bike started shutting off. Got caught at a light and it quit and had to do the tip toe walk to get it out of traffic. Got it started and as long as I kept it revved up, I could keep it running. Sunday, I took the battery tray out and cleaned the connections on the TCI and tightened the terminals. I also took the kill switch off and cleaned with contact cleaner. I also put my new diaphragms in and a new set of plugs. It still was acting up. When I got home today I took a good look at the electrical schematic. I pulled the windshield and headlight and found the emergency cut off switch, the 60º tilt switch, out of the rubber holder and hanging down. I took it apart and checked it inside and tightened the terminals and reinstalled it with a spacer to hold it tight. I started the bike and it sounded very good, very crisp and responsive. I put it back together and as I started down the driveway, it went dead. I got it started and made a loop around the block and at about 30mph in 3rd gear I let off the gas. The tach dropped to Zero and it was dead. I flipped the kill switch on and off and it backfired and it was running again. I got it back home and again took the kill switch off and checked it out. When checking voltage across the two wires, there is no voltage drop across the two wires. I really thought I had found the problem with the tilt switch hanging down, but obviously that was not the problem. I don't know anything about the TCI and when it is running, it runs very good, especially with the new diaphragms. I also pulled the pressure sensor hose loose and put a vacuum pump on it and it would rev up when vacuum was applied. I also blew cleaner through the #2 carb tube and it was open. I also checked the clutch lever and it is out all the way. Tomorrow I intend to start the check on the TCI, but for anyone that knows about these things, is it common for it to be intermittent and run so good when it is running? It is obvious I am loosing electrical power somewhere, but with it being intermittent, I am having a problem isolating the problem. I appreciate any suggestions. RandyA
-
 Some months ago I was asking about this swap- I am nealy complete now but need some advice on wiring the (electric) anti-dive soleniods to work. Do I simply use the brake switch to feed them 12V? Do I setup a relay? Do they need a different voltage? Any help is deeply appreciated, Mark Koontz '83 Venture Wichita, KS
 -
 Ok, this is a weird one to me. Lately, first time I try to start the bike, hit starter switch everything goes out, lights dash nada. So pulled the seat, checked the battery, 12.0v. Checked battery cables, all tight. So think the ignition switch is going out on this one. But I do not believe it. So pulled battery cables, made sure they were clean, re-attached, turn ignition key on, have lights and dash is back, hit starter switch everything goes dark again. Ok, now I am believing the battery cables are the culprit. Undo again, re-attached, turn ignition key back on, press starter switch and bike starts up. Go the rest of the day no issues. Next day repeat above scenario. This morning repeat above scenario, but this time on the first attempt I put the hot wire to my trailor lights between the battery post and the bike's hot wire, tighten down, bike starts immediately. Ok, I am , what gives with the battery hot wire. Everything is clean and tight. I believe it is heat related, where the bike starts everything stays tight, but after bike sits over night (cools down), issue arises. Any thoughts ?
 -
I know , I know ya think I am crazy . Anyways, I got this project finished today. I now can run both Odyssey Battery's at the same time or run one at a time with my Big Perko Switch! The Odyssey in the trunk is the 680 a little larger, I also am going to put my cell charger and some other stuff to power off of the trunk battery. I can charge both at the same time or one at a time. OR run BOTH at 12 volts at the same time now. I still have to put a rubber cover over the positive side input though. I also can use it as a back-up Battery as well Anyways here are the pics. [ATTACH]30896[/ATTACH] [ATTACH]30897[/ATTACH] [ATTACH]30898[/ATTACH] [ATTACH]30899[/ATTACH] Jeff (the thing behind the Perko Switch is my AMP that I installed about 3 years ago)
-
.thumb.jpg.bea94b2fb3a7dc72d417d9ffb4f4fc28.jpg) At MarCarl's VentureIn event, a few members suggested that I post an idea for mounting running lights that dosen't require brackets. I mounted a pair of "Xreme" 55w lights just below the fairing and beside the rad side wings by removing the top threaded screw holding the aluminum side piece and using a longer threaded screw in its place to hold the lights in place. In my cse, I inserted a half inch spacer so the light that I used were in a perfect position. You can judge for yourelf whether the location looks good for you, but it sure functions well. Also, with "Xtreme" lighting kit that I bought (the oval shaped lights), everything needed came with the kit to install it directly to the battery (with an in line fuse) and to locate the switch inside the gas cap area. Didn't have to cut a single wire or drill holes. I may mount a switch on my dash some day, but for now, the location works surprisingly well as I can easily switch the lights on or off when I am riding.
At MarCarl's VentureIn event, a few members suggested that I post an idea for mounting running lights that dosen't require brackets. I mounted a pair of "Xreme" 55w lights just below the fairing and beside the rad side wings by removing the top threaded screw holding the aluminum side piece and using a longer threaded screw in its place to hold the lights in place. In my cse, I inserted a half inch spacer so the light that I used were in a perfect position. You can judge for yourelf whether the location looks good for you, but it sure functions well. Also, with "Xtreme" lighting kit that I bought (the oval shaped lights), everything needed came with the kit to install it directly to the battery (with an in line fuse) and to locate the switch inside the gas cap area. Didn't have to cut a single wire or drill holes. I may mount a switch on my dash some day, but for now, the location works surprisingly well as I can easily switch the lights on or off when I am riding. -
I've been contemplating buying this product; however, when I look at the installation instructions, I can't "fathom" how to connect it up using a relay either for the switch as a whole or separate relays for each accessory connected. Does anyone have suggestions...wiring diagram c/w relay, etc?
-
 I keep seeing the Kuryakyn Master Cylinder Switch panels. This would solve all my switch problem at one stroke. I have two switches installed in my right hand dash cover as of now but they are a bit awkward in that position. I want to mount my digital volt meter in the dash where the switches are now and find a way to mount a switch panel on the left side handbar. I would like to have 3 switches or even a 4th one. They don't seem to have anything that's bolt on for a 1st Gen, Doh!, no surprise there but I was hoping that someone here has made a mod for something like this. Any suggestions? Mike
 -
I've put 1300 miles on my '84 Venture in the last 2 months. The previous owner had put a toggle switch on the dash for manually turning the radiator fan on/off. As the air temp is now gotten up over 60 degrees with warmer weather, I've had to switch the fan on more, as I expected. Well the original toggle switch froze up and stopped working, so I replaced it with a spare accessory toggle switch I had from my car. It worked at first but now seems to stop working intermittently. When caught in traffic a few times, the gauge will push just into the red, but no signs of boilover or overheating, but with the intermittent on/off problem I can't kick my fan on. Then I'll get moving and it drops down into the green. Do I need a special heavy duty toggle switch or something for this? Why does it work sometimes? What readings do most of you have in warmer weather and when stuck in traffic?
-
1st time was last July. Had just forded 3 shallow streams on a rustic road. 1/4 mile later, bike dies. Seemed like loss of ignition, all other lights and stuff worked. Starter would work fine, just no fire. I did look underneath, and cleaned dust and gunk from those 4 drip lines that vent onto the end of the kickstand. One of them suddenly appeared to vent some fuel vapor, and shortly thereafter, it fired up and was good for months. 2nd time was October and we had been riding in the rain for hours. Suddenly died. Flipped the key off and on while still rolling and it would fire for a second or so, and then cut off again. Once stopped, I checked those vent lines again, and they appeared clear. After several minutes and several flips of the kill switch, ignition switch, and general fiddling in desperation, it suddenly fired up and away we went. 3rd time, yesterday, lots of rain and getting worse and it dies 3 miles from home. Flipped the key off and on while still rolling and it would fire for a second or so, and then cut off again. Cleaned vent lines 1st, no help. Lots of switch fiddling, no help. Went for shelter to discuss our options for getting bike hauled home( hate the thought of that ) we tried it again. Crank and crank and no spark. Just for laughs, I pushed the Cruise switch to "off" from the usual center position an bang, it fired up and off we went. On the way home, I did flip that cruise switch back to the middle where it was and it stayed running. Very intermittent, therefore very hard to troubleshoot, especially when on the road, in the rain, and no testing equipment at hand when the problem occurs. Starter works, just no fire. Anybody heard of any certain connector related to the ignition system that has had moisture issues? Any other thoughts on the subject?? I don't want any of my HD buddies around when this happens again, if you kow what I mean. Thanks, Scooter Bob
-
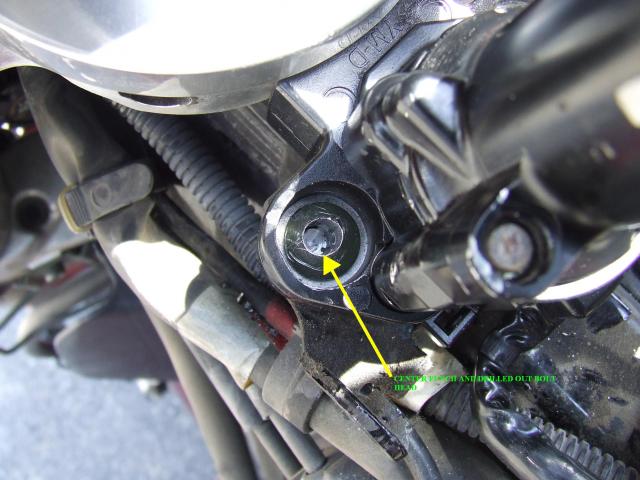
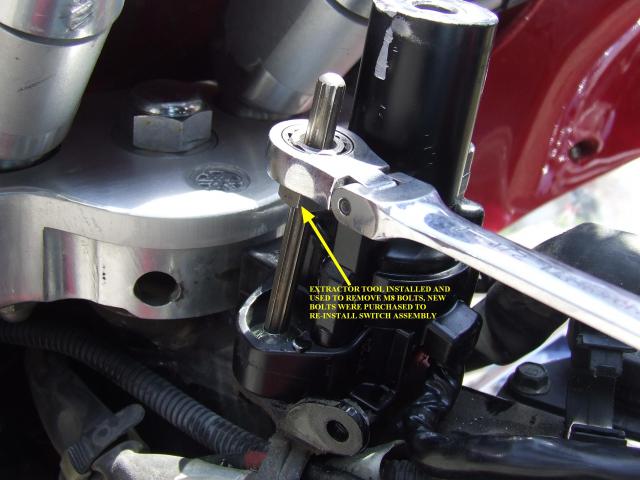
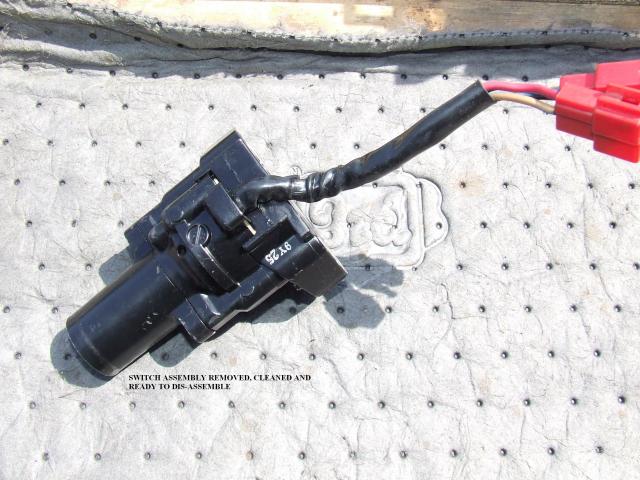
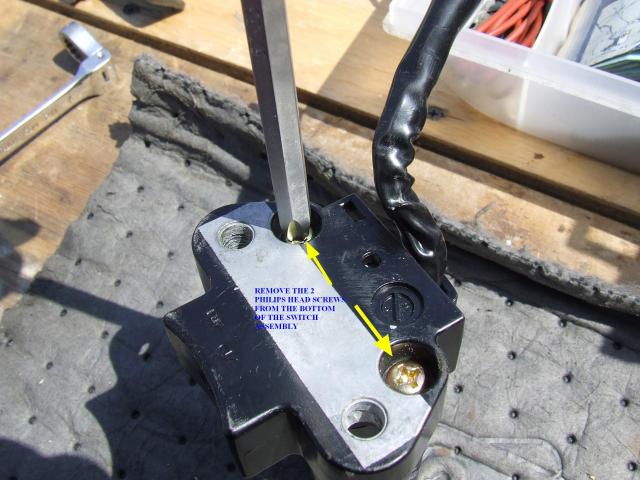
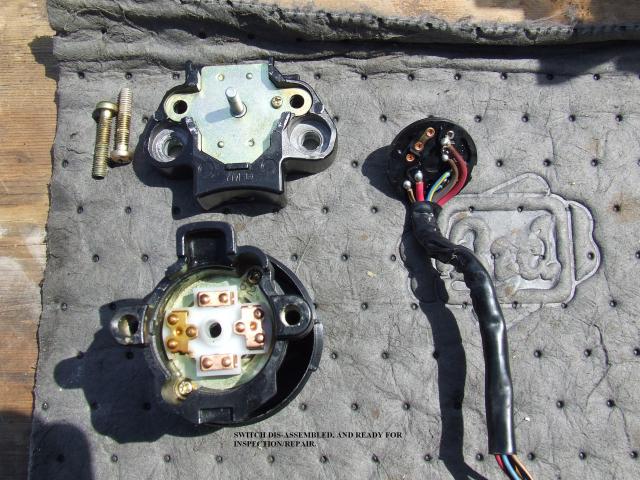
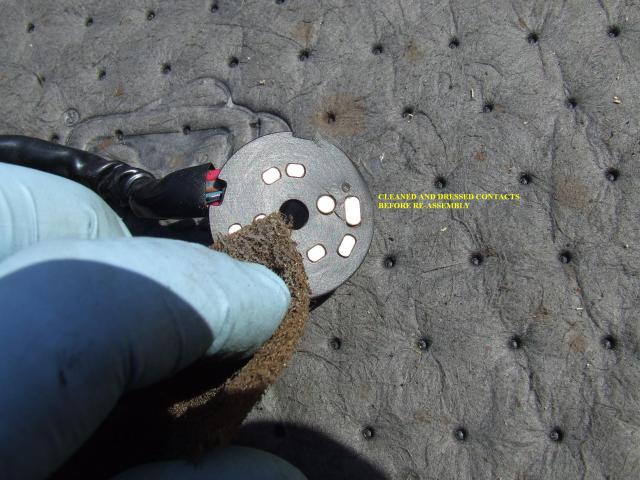
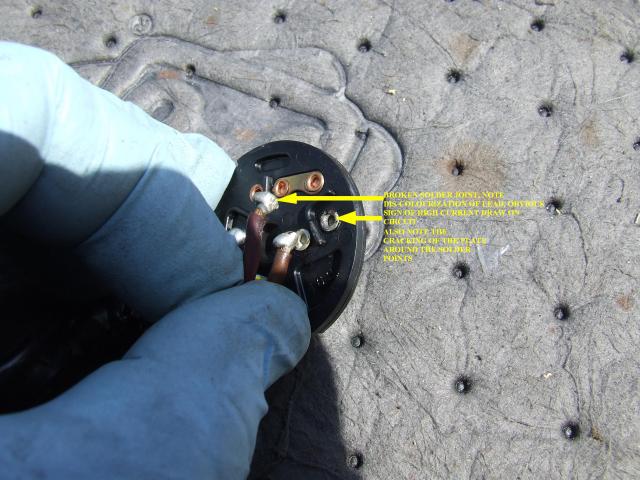
Nothing bums you out more than purchasing a used vehicle and having it break down a week later, well 9 days. Was out for a blast down the highway last Friday, rolling down the off ramp, hit a pot hole and the bike dies, nothing working but the radio. Called a friend who showed up with some tooling. Check of the fuses showed that they were all good, and power right up to the switch, but nothing out. Trailered the bike to our shop, 3 hours later, got it going again. No problems for the next couple days, and unfortunately my computer was in for service, so no way to read up on the site about the problem. Then on Tuesday, about 15 kms from home, bike just dies, except for the radio. Check of the switch this time did not solve problem, so, trailered her home. Contacted the dealer for a price check on a switch, $288.00, YOU GOT TO BE FRIGGIN KIDDING ME!!!! Got our computer back the next day, straight to Venturerider, and find out that there are a few good posts on the issue. All of them explain how to prevent it, or the emergency repair proceedure to at least drive the bike home. One member even mentioned repairing his switch, but no details. So I thought I'd tackle it myself, and post the repair of the switch for anyone like me, to damn cheap to pay outragious dealer mark-up prices. Started by removing the seat, tank and front frame panels to gain good access to the switch. Had previously noted the rounded off bolt heads, obviously done after assembly, as a anti-theft measure, as the steering lock is part of the switch assembly. Had puzzled over how to remove the bolts, and had read of others using dremels to cut out the weld nuts, or cut slots into the heads. I decided to take a different route, and treated them and broken bolts, and used an extractor set. First - center punch and pilot drill the bolts, then drill them out to the size required for the extractor, I used a 1/4" Snap-on extractor tool. Install tool and remove bolts, I had purchased new bolts to replace the old ones, as they were obviously destroyed when removed. Second - with the switch now out, I cleaned it with electrical component cleaner. I then removed the 2 philips head screws from the bottom of the assembly. Carefully separate the switch assembly, and make note of the position of the contactor before removing it. With the switch now opened up, the problem was very obvious, the red lead solder joint had failed. I also noted that the lead was dis-coloured and the plate had small cracks around the solder points. Third - Cleaned solder point with abrasive pad, and applied flux, then re-soldered joint. After cooling, the plate was flipped over and the contacts dressed, prior to re-assembly. Fourth - Switch assembly was then re-assembled, and before final tightening, an ohm reading was taken in the "ON" position, all leads that were to have continuity did. Philips screws had lock tight applied and were tightened in. Fifth - Re-installed switch onto frame, and terminated all wiring. At this time I installed the "Relay Modification" to prevent any further issues from occurring in the future. However, I did make up a "Emergency By-pass" kit, 2 leads, toggle switch, and cable splice crimps. Placed it in a zip-loc baggie and put it in the right saddle bag, tool kit area, better to have it and not need it, then need it and not have it. With all the repairs done, the tank, covers and seat were placed back on the bike, which fired up and ran great, and took off for a 3 hour test ride. All worked out great. Hopefully this will help others tackle the switch issue, providing the plate isn't damaged beyond use, you should be able to salvage the switch.
-
08 venture Where can I tap in to get a hot lead that goes off with the switch to run the relay for my driving lights. No not the head light. on off with the togal switch & off with the key? thanks!
-
One of things that I have wanted to add to my '84 was more switches to control extra lighting and power for other toys. As you all know the 1st gen is lacking in any flat panel spaces to really do a clean and accessable install in the cockpit area. I'd seen the Kuryakyn Master Cylinder switch panel and I thought there had to be a way to install something without obstructing anything on the controls. So I went digging in my odds and ends and after a quick trip to Radio Shack and a stop at the hardware store this is what I came up with. No mods to the bike, controls, panels or handle bars. This will mount by changing one bolt. Parts needed: (1) Radio Shack Project box. I used a 4x2x1 model. Part # 270-1802 (1) 10mm x 1.25 pitch x 2" stainless bolt. (2) 3/8 washers (an extra couple for spacing if you like) (3) On/Off switches / your choice, just watch that they are not too big. (1) Steel spacer / 1" long x 3/8 I.D. Just needs for the bolt to go through it. (1) 1/2 I.D. rubber grommet. (3 ft) Plastic wiire loom casing or wrap. (4) Small self tapping machine screws. Of course wire, terminals, sealant, and a few zip ties. And maybe a beer. Tools: A drill with a bit the size of the switch studs. All my holes were 3/8. A Dremel is great but a small file or Exacto knife will do fine. And either wire crimpers or a soldering gun. First things first and I'll try to keep the pics in the right order to follow along. Open up the project box and remove the metal top panel and lid. The metal panel is meant to be the top plate for the box. I mounted it on the bottom to reinforce that where the bolt will go through. It will fit over the bumps on the bottom of the box so just drill small holes in the center of the bumps and attach it with the self tapping machine screws. Set up how you want your switches to lay. Mark your holes and carefully (my box is ABS) and drill the proper size holes for the switch studs. Now drill a 3/8 hole in the bottom of the case (and metal plate) for the mounting bolt. Check your placement on the bike but about dead center is good. Don't install the switches yet. There will be some ridges inside the box. You will need to grind or file them down so the switch retaining nuts will seat flat. Again, check your postion on the bike and decide where you want the wires to exit the box. Drill a hole and install a rubber grommet. It needs to be large enough to slip the wiring loom casing though it. Ok, slip the 10mm bolt through the hole from the inside before you install the switches. Check for clearence at the terminal studs to prevent shorting them on the bolt head. Slip a washer over the bolt, then the 1" spacer and another washer. Ok, now where to mount it? Look at the clutch master cylinder and see where the mute button in bolted on. The Royales should all have that, the standards may not. Which ever model you have there will be a blind 10mm hole in the body of the master. Remove the bolt and install the assembly with the new bolt there. Use washers to adjust the height so it clears the mute control. It will be above the master clyinder cover so you can open that to added fluid without removing the new panel. Adjust the position to your liking an tighten the bolts. I'm using star lock washers to hold it in place. Now you can install the switches and wiring. Before replacing the plastic cover make sure you have room for the inner lip to clear the nuts on the switches. I had to do a little grinding. A little sealant around the cover and were the wires drop out should keep the inside dry. I drilled a very small weep hole in the lowest corner of mine. So that is pretty much it. Don't look to bad, in a good location for the left hand, it don't interfer with anything else and should hold up real well. Paint or finish it to your needs. I had most the stuff laying around so cost was under $12.00 for what I had to pick up. If you had to buy it all maybe under $30.00. Maybe this will solve some problems for a few folks. Just a DIY day around here. Good luck. (An added note: I bought another project box and took the metal plate from it and polished it to a high gloss to go on the top of my finished panel. Looked real nice. Rode for about half and hour and went home and painted it flat black. Worse than a chrome gas cap.) Mike
-
Nothing bums you out more than purchasing a used vehicle and having it break down a week later, well 9 days. Was out for a blast down the highway last Friday, rolling down the off ramp, hit a pot hole and the bike dies, nothing working but the radio. Called a friend who showed up with some tooling. Check of the fuses showed that they were all good, and power right up to the switch, but nothing out. Trailered the bike to our shop, 3 hours later, got it going again. No problems for the next couple days, and unfortunately my computer was in for service, so no way to read up on the site about the problem. Then on Tuesday, about 15 kms from home, bike just dies, except for the radio. Check of the switch this time did not solve problem, so, trailered her home. Contacted the dealer for a price check on a switch, $288.00, YOU GOT TO BE FRIGGIN KIDDING ME!!!! Got our computer back the next day, straight to Venturerider, and find out that there are a few good posts on the issue. All of them explain how to prevent it, or the emergency repair proceedure to at least drive the bike home. One member even mentioned repairing his switch, but no details. So I thought I'd tackle it myself, and post the repair of the switch for anyone like me, to damn cheap to pay outragious dealer mark-up prices. Started by removing the seat, tank and front frame panels to gain good access to the switch. Had previously noted the rounded off bolt heads, obviously done after assembly, as a anti-theft measure, as the steering lock is part of the switch assembly. Had puzzled over how to remove the bolts, and had read of others using dremels to cut out the weld nuts, or cut slots into the heads. I decided to take a different route, and treated them and broken bolts, and used an extractor set. First - center punch and pilot drill the bolts, then drill them out to the size required for the extractor, I used a 1/4" Snap-on extractor tool. Install tool and remove bolts, I had purchased new bolts to replace the old ones, as they were obviously destroyed when removed. Second - with the switch now out, I cleaned it with electrical component cleaner. I then removed the 2 philips head screws from the bottom of the assembly. Carefully separate the switch assembly, and make note of the position of the contactor before removing it. With the switch now opened up, the problem was very obvious, the red lead solder joint had failed. I also noted that the lead was dis-coloured and the plate had small cracks around the solder points. Third - Cleaned solder point with abrasive pad, and applied flux, then re-soldered joint. After cooling, the plate was flipped over and the contacts dressed, prior to re-assembly. Fourth - Switch assembly was then re-assembled, and before final tightening, an ohm reading was taken in the "ON" position, all leads that were to have continuity did. Philips screws had lock tight applied and were tightened in. Fifth - Re-installed switch onto frame, and terminated all wiring. At this time I installed the "Relay Modification" to prevent any further issues from occurring in the future. However, I did make up a "Emergency By-pass" kit, 2 leads, toggle switch, and cable splice crimps. Placed it in a zip-loc baggie and put it in the right saddle bag, tool kit area, better to have it and not need it, then need it and not have it. With all the repairs done, the tank, covers and seat were placed back on the bike, which fired up and ran great, and took off for a 3 hour test ride. All worked out great. Hopefully this will help others tackle the switch issue, providing the plate isn't damaged beyond use, you should be able to salvage the switch.

-
I need some help in tracking down a problem! In the past couple of days, I have had my 84 not willing to start. She seems to run OK but twice now when I go to start her, she won't turn over. It acts like the kill switch is off, but it isn't. The first time it happened I played with things (turning the kill switch off and on, kick stand up and down, turned the key off and on, etc) and she eventually fired up. The second time... same stuff,but no help....sooo being on a hill I jump started her, no problem at all. After both times, she started up later and runs ok. SO I am off tommorrow and have some time, where should I start looking? and how should I test (I have a low wrench IQ) Dave
-
I know this subject has been beaten to death, I am no electrical wizard and I've read the fix for the ignition switch, what I'm not sure of, the 2 red 10g wires going to the toggle switch, is one connected to the Brown/Blue and one to the red, or is the Br/Bl and red joined together and then the two 10g wires attached to that. My ignition would come on when the key is between the Acc and On, but when it went to the On position the dash cut out but radio still worked. I was trying to loosen those screws that hold the switch with a hammer and punch...I was a millright we were good with a hammer...and now the switch is working again, I've tried wiggling the key and off and on and its still working. So was it a contact problem and would putting in this "Emergency switch" solve the problem should it occur again. So my dilemma is do, I leave it or wire in this toggle switch. Advice Please. Ian
-
 Hi all, anyone got a spare left hand cruise control kill switch for an 84 Venture Royal for sale? My one works but one of the lugs that hold it in place has snapped?
 -
 First of all I’ve got to say that I love this site and all the ideas, opinions and constructive criticism that flow through it. Some of the bantering that goes on is pretty funny too… like what color is the fastest, lol! ... Isn’t that silly, we all know that Black Cherry is the fastest and that 2nd Gen rules! So I’ve been wanting a new ‘Do you see me now’ horn because as you know stock horns just don’t make the cut. Stock horns are nice when you want to politely get someone’s attention without shouting but that’s about it. Having said that my goal was to find an alternate location for a horn, install a separate switch and keep the stock horn operational. I lucked out on a Bad Boy horn for $29. but couldn’t find a decent switch for a fair price so here’s what I did… I came across a left hand control cluster off an old Kawasaki, it’s almost identical to one on the venture. Long story short I cut the horn switch off the bottom of the cluster, made a separate switch out of it and installed it under my existing horn switch. Now I can use either horn (or both) and the switch is in reach of my thumb. Although it was a tight fit I made a little bracket and mounted the horn under the front faring to the left of the cassette player/amp (black box). Being under the faring the horn is still quite loud and its right up front where I want it. The horn is on a separate fused circuit through a relay wired directly to the battery. The other thing I did (with some help from our tech library) was a headlight mod. I now have the Tri Bar headlight with passing lamps to match. I’ve upgraded the headlight bulb to an ultra and the passing lamp bulbs to the PIA H-3. There is not much more I want to do to the bike besides ride it... although I do like the idea of swapping out the cassette player for some gauges... does it ever end!?! Here are some pictures including a before and after of the headlight...
 -
If you've ever had the hots for a trike and trailer. Check this one out. Almost makes me want to switch????..... Nah.... Gotcha!! EBAY TRIKE
-
Say you were running low of fuel so you switch to reserve. You then top off with gas but you forget to switch back to the main tank. Will you have any gas left in the tank if you run out of gas?
-
Ok, I have a small problem and I'm sure I'm not the first to experience this. I added new grips to my bike about a month ago. Now when I try to set my CControl the switch will not let me use it to SET the speed. I can use the top part that is for Resume and the bottom cancel works but when I push on the part that should be for "set" speed it wont go in at all. I took the switch housing back apart thinking I had a screw too tight or something but even off the switch still would not let me push in on the bottom part that "sets" your cruise. Any ideas? Am I gonna have to get a new switch?
-
My ignition switch is acting weird. It only works when IN BETWEEN the ACCESSORY position and the RUN position. It takes a little finagling to get it in the right spot. Then I'm afraid I'm gonna hit a bump and it will fall out of the spot and I'll lose all power. Is there a way to rebuild/refurbish it? I'd kinda like to eliminate it as an electrical source and replace with a discreet switch somewhere. I'd keep it for the lock feature, though. Any thoughts on how to do this? I'd love to have a switch that turns on the brake & running lights for those nights when I pull over on the road. And another to power the ignition...just like the General Lee. ```````````````````` On another vein, I seem to recall mods being done to reduce the electrical load through the switch...can someone help me out with those mods? What they are, how they're done and the benefits. (This is in case I just replace the switch itself.) Thanks gang!
-
1. Get a (mercury?) tilt switch and any toggle switch, (10 amp?) I had a tilt switch laying around from Radio Shack for years. From pink wire side of the horns (or experiment), won't hurt anything, go the the toggle switch then to the tilt switch then to ground. The tilt switch will be tilted on an angle so it is off when the bike is on the side stand, but once the bike is pulled upright to ride (or be stolen) the tilt switch makes contact. Horns go off (if it is hot wired). 2. To make it work any time, just disconnect the brown wire to both horns and run a fused wire from the battery to both horns. Horns now will work anytime with the tilt switch or the horn button. Locate switches in one of the locked side pockets of the fairing. Very simple, very loud, very unexpected, very cheap. May want to cover electrical connectors at the horns so they can't be disconnected. Mercury switches maybe banned, I'm sure other types are available.
-
Has any one els had a problem with the kickstand safety switch going on when they were running down the road? If so how can this be fixed , not a good feeling when motor shuts down because of it. HELP:detective:


.thumb.jpg.176b2ebbe9863175975d94710375c414.jpg)


.thumb.JPG.86d9722f4ac86bdebadb2b456a9ec8b6.JPG)