Search the Community
Showing results for tags 'install'.
-
what brand bi xenon for 2nd gen rsv and price paid? also is it worth it? what about a projector? brand, price how does it install?
-
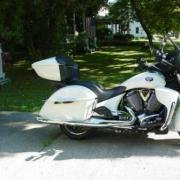
2012 Victory Cross Country Tour, still thinking about what bling to install................. [ATTACH]68978[/ATTACH] [ATTACH]68979[/ATTACH] [ATTACH]68980[/ATTACH] [ATTACH]68981[/ATTACH] [ATTACH]68982[/ATTACH]
-
 12997.1 I bought a pair of the Custom Dynamics 162 LED Passing light replacement Bulbs while I was home on R&R. I tried to install them with no luck. My issue with them is that they will not stay in the housings. I have the H-3 bulbs in them and not the actual par 36 lamp. Custom Dynamics says they will fit both housings. Has anyone had a problem installing these replacement lights? I did not have time to call CD for technical support. A friend of mine is going to attempt to install them for me. Any guidance or assistance will be appreciated. Gunner
 -
 After this last weekend's ride down to San Jose, then up to Sacramento/Auburn, then back home to Olympia, WA...I am tired of the error factor on my speedo and Odo. I have previously installed the SpeedHealer units on my previous 3 GL-1800's, dialing them in to match my Garmin Zumo 550. Now it is a must that I install a new SpeedHealer on this '06 RSMTD. I am disappointed that Yamaha had to join all the others in putting out a speedo that reads so darn high, compared to what the bike is really doing. If I just putted down the road, doing the speed limit, and falling aslepp like the rest of the sheep in traffic, then it would not be needed as bad. But it is still crazy to be riding along just slightly faster than the flow of the other vehicles, and my speedo reads 80 - 85 mph. I have had such great success with the SpeedHealer on my other bikes, and am hoping that the same device (but specific to the RSTD) will correct the error factor in my otherwise cool looking speedo. If my speedo is reading 85 mph, I want to really be riding at 85 mph...not 75 or even 72 mph. Urgh ! I will get this issue fixed. BTW, those new Flanders handlebars (650-08783) really are nice. Yeah !
 -
Did this on the Wing so posting here ... The dilemma I was facing was how to put together a nice, clean, somewhat out of the way wiring connection for the trailer. Different hitches might present a different way of doing this but the design of the Rivco hitch doesn't offer much for possibilities. So, I figured I could install a "flush mount" type round plug underneath the trunk, next to the side bag and trunk release levers. As I had already installed a trailer wiring isolator kit designed for plug-and-play at the back of the bike, it was just a matter of taping into the wiring coming out of the isolator. Here's pics of my install... Product Used... [ATTACH]68744[/ATTACH] Backing Plate... [ATTACH]68745[/ATTACH] Wire Routing... [ATTACH]68746[/ATTACH] Marking for the holes using the metal template... [ATTACH]68747[/ATTACH] All cutout and ready for the plug... [ATTACH]68748[/ATTACH] The plug from underside of trunk bellypan... [ATTACH]68749[/ATTACH] The inside of the plug waiting for wires... [ATTACH]68750[/ATTACH] All wired up (had to use same color wire coz I didn't have others but that's no problem) [ATTACH]68751[/ATTACH] Finished Product ... male connector yet to wire up. [ATTACH]68752[/ATTACH]
-
HID kit arrived..going in for the install...wish me luck..lol
-
Anyone buy one of these from ebay? Where did you install it? Any specific install instruction?
-
Can anyone inform me of which " xenon or hid bulb to install in my 03 venture..i dont want to replace the housing ..just the bulb on my headlight and passing lamps...thanks.
-
 Here is the install instructions that come with the Chrome Side Cover Rails. Hope this can assist anyone trying to install these. Rick F.
 -

Auto volume control
lonestarmedic posted a topic in Venture and Venture Royale Tech Talk ('83 - '93)
Anyone ever try and diagnose or repair the auto volume microphone in the 1st gen. ? Mine was working until this week. Possible that I got water in it washing the bike. Or I changed out my speakers. Pulled the radio and both side panels to install them. Also installed a noise filter on the C.B. I got used to the auto volume. JB -
Does anyone know of a good mechanic in the Denver area who can install progressive springs in my 1987 Venture Royale?
-
http://www.komonews.com/weather The fork oil will be draining for 24 hours and so tomorrow morning will begin the removal of parts to install my new progressive springs. Hope all goes well for I'm off Friday for a short ride.
-
Bring up another old topic: horns I am looking at the RIVCO air horns from Buckeye. They apparently install on the swing arm of the 2nd generation RSV. Mine is a 2001 RSV. Have any of you had any experience with these horns ie ease of install, life span, mainteance etc.? Thanks all Jinx
-
THEY ARE IN... NOW FOR A WARMER DAY TO INSTALL AND SCUFF EM!!
-
 I found this white electricial plug underneath the trunk of my 91 VR as I removed the trunk so I can install a trunk guard. It has two female plugs Anyone know what it is for?
 -
I've been runing Trend anti-virus for over 15 years and have been very happy with the results, but..... this year after I renewed on my machine and tried to install it on the family laptop (they allow 3 installs) I have run into a ton of user unfriendly snags and wasted more time that I want to admit.. I've had it!! So toss some suggestions at me... The laptop came with Nortons but I erased it per trend requirements before trying to install trend. Now I wish I hadn't, but that's life in the fast lane.... Is anyone just using MS Security Essentials??
-
I just recently acquired a set of rotor covers that included the install instructions and I thought I would share that with everyone here who might need to reference it. Hope this helps. Rick F.
-
Hi guys, Happy New Year.. what better way to spend the evening than in the garage working on the bikes eh? (gosh I need to get a life!!) My new shiny WORKS Performance shock finally arrived today and wow, it's real purty! Almost too purty to mount it under a bike. Its all preloaded and ready to go. Though I'm mechanically inclined and have all the tools to install this shock, is there something out of the ordinary or 'don't forget to do this' notes I should do to install this shock properly and such? Oops, just read through the manual and looks like i have to pull the rear wheel, bags, fender and pipes to change the shock?! Ouch.. is this true? Thanks in advance for any advice or comments Cheers
-
 Just some little info for you all. I could not find any info on how the proportioning valve is put together and I know someone else (& it was a dealer) worked on the one I have on my parts bike before I got the bike, because the rear brakes would not release after you pump on the rear brake pedal. First I checked the rear caliper by opening the rear bleeder and then the wheel would move just fine . I checked the rear master for a pluged up return little hole but that was clean , I rebuilt the master because I had it out , so then on to the proportioning valve . Well I took it apart and found the following. The person before me put the last seal in under the spring washer which is wrong. It is to go in the end nut and then I also found out that the first seal you install DO NOT INSTALL ON THE PISTON.(which the dealer did ) and I also did the first time. The proportioning valve will not work ,the seal goes to the wrong place and will not release the pressure back to the master. You have to install the first seal by pushing it down the tube all the way to the bottom then push the piston into the seal then install the spring,spring washer and last the nut with the seal placed inside if the nut. Then I put back on my bike Everything works fine. Just to prove that even if you take it apart and put it back the way you took it apart, may be the wrong way and that is what I found out. It would have been nice to have a breakdown of it to save some time. The Yamaha service manual does not have anything on the proportioning valve except a picture for my 1986 Venture Royal. I hope this info might help others that have the same problem. Most of the time this problem is a plugged small return hole in the master but not this time.
 -
Happy New year Everyone: When I first joined almost two years ago I did not have any issues posting pictures. Then just about Cody time, I tried posting pictures of my completed Harley Trunk install on my RSTD. Many of you had helpful suggestions, but I was still unable to post before Cody. I got busy and neglected to try again until this weekend. I am stuck in the house do to the winter cold and I am "ON Call" and cannot go very far. So I made more attempts at the file uploads and they finally worked. For those that would want to look around in my albums. Their are good pictures about several popular upgrades. Flanders Bars (Before and After). DMY aftermarket trunk install with Wompus Rack. Harley Trunk install on the same Wompus Rack. Bar end weight idea and my own invention of adding a spacer to the RH side to allow for a "Total Grip" when the Crusie is on. Grippy Puppy pictures. Along with pictures of several local friends and VR members that I am honored to call my FRIENDS.....Mark:)
-
I have a question for the masses, as I know we have a greatly diversified group of folks here. The new house that Lonna and I are moving into, has in the past been burglarized and they stole copper wire and such. We are going to install an alarm system as the owners of whom we are going to purchase it from in a couple of years, have agreed to split the install cost in half with us. We checked into ADT, and I guess they think their stuff and product is gold. Price was not what I would have thought and they were very pushy to have it installed immediately. There also was a quote from FrontPoint security, lots of the bells and whistles like ADT, but more reasonably priced. My question for y'all is, have any of you dealt with this FrontPoint and or other security companies, and what insight can you pass on to me about the industry for those of you in the know?
-
Got the following bar riser kit for my Wing and took pics of the install process. http://wingstuff.com/pgroup_detail/322_handlebar_risers/2361_gl1800_handlebar_risers_mbl_risers_standard_or/?goto=%2Fpgroup_list%2Fgl1800%2F322_goldwing_handlebar_risers%2Fdes%2F The process... http://s393.photobucket.com/albums/pp16/SilvrT/2003%20Gold%20Wing/Bar%20Riser%20Insallation%20-%20GL1800/
-
 Just finished installing a HID headlight in my 05 RSTD from Canadian Cruiser Customizing. Have to say this was one of the easiest changes to do. Everything was plug and play and went together very easy. The hardest part is running the positive back to the battery. I zip tied my ballast to the back of the bracket that the headlight mounts too. Looks like you could also install it on the backside of the mount for windshield, but I didn't feel like taking everything back apart. Haven't had it out at night to tell the difference, but the installation was simple.
 -
.thumb.jpg.9dfefb49018580a1813c8128f131546e.jpg) hey everybody! trying to get ahold of skydoc, to see if he has some progressives. where is the install with photos? also, has anyone removed anti-dives with this install? how about some pics please........i said please......thanks a bunch, this forum is PRICELESS!
hey everybody! trying to get ahold of skydoc, to see if he has some progressives. where is the install with photos? also, has anyone removed anti-dives with this install? how about some pics please........i said please......thanks a bunch, this forum is PRICELESS! -
I'm going to install the wiring for my Widder heated vest with dial controller and was wondering how others routed the wiring and where you mounted the controller. This is all going on my '01 RSV. I want to be able to use it for rider or passenger.