Search the Community
Showing results for tags 'plate'.
-
i have a quick question for someone...i ordered the barnett kit (all friction discs, steel discs, and pressure plate w/ springs) and it arrived yesterday. I plan on tackling my clutch today or tomorrow but everything i read mentions to "line up the grooves at 11 oclock and 5 oclock". The problem i am having is...the barnett friction discs have no grooves on any of the tabs. I dont want to get the basket opened up only to realize i have the wrong discs. Can someone with some knowledge help me out here. Since i am replacing the pressure plate does it no longer matter about the grooves? Thank you all for your input. -Motor
-
 Have any of you come up with a way to mount your DOD decals that won't ruin the paint/chrome/windshield? I was thinking about putting the sticker on a plate, then somehow attaching the plate to the bike (windshield mount bolts?). This would allow me to remove it someday without damaging the bike surface where the decal was. If you have done anything along this line please share your ideas. Thanks, Nico
 -
I was browsing through the Custom Dynamics web site a few days ago and found these little LED license plate bolts. http://www.customdynamics.com/illuminatorz_licence_plates.htm#LED_Tag_Bolts I thought they were kind of clever so I ordered a set and just installed them tonight. I decided to mount them to either side of the plate on their own bracket. Otherwise they would have to be disconnected in order to remove the plate. I wired them as brake lights and they add a little twinkle to the lower corners of the plate. Here's a photo. Dennis
-
 Thanks for the help getting my VR running again. It was my ignition, took it apart & the contact plate was bent. I straightened it & put back in it RUNS:fatsmiley: thanks Al
 -
hi guys, after the problems I've had with my clutch (twice this year I burnt it out during Advanced Rider courses), I've decided to go back to stock configuration and dropping the PCW mod I had in it since last year. I have a Barnett Spring kit in it now, but with still the full disc stack up as per the PCW mod only because I could not find my original half discs. So I ordered new ones.. But I can't seem to figure out how this goes back together. Once I pull off each plate (friction and steel) its the set up for the half plates I'm not seeing properly in the diagrams for some reason.. I believe I have all the correct parts now.. and some spares.. I have these parts 26H-1632101 (half size friction plate) 26H-16384-00 (small steel disc) 1Fk-16383-00 (small steel spring plate..) and the small spring clip, 26h-16385-00 From what I can see in the parts diagram, the flat plate goes in first then the spring plate, the friction plate fits OVER these (as it is larger in circumference) and the plates get held in by the spring clip. But which way does the spring plate go in? does the larger edge go against the back of the basket or towards the front? I'm not sure on this one or if it makes a difference.. Luckily, i ended up with three extra clutch cover gaskets =) Thanks in advance! ADDENDUM: Oops, MY BAD, it actually says on the spring plate OUT SIDE, to show which side of the plate should face the clutch cover.. silly me.. Cheers
-
Just wanted to let everyone who doesn't know this about some old Vermont motorcycles laws. The State Police are now stopping people and checking to see if they have at least four square inches of reflective material on their helmets, this one has been on the books for awhile. I'm not sure of the fine but any fine is too much. The other law is about your license plate, it has to be horizontal and not vertical. I went to get my Hardtail inspected and had to turn my plate around, The guys at the shop were only doing their job. This one again could've cost me some money never mind points! The Killington Classic is coming up soon and the rumor is the State Police will have a "motorcycle checkpoint" close by, same thing as Americade! Don't give them the chance to tag you!! Joshua
-
...will she...uhh...come? I finished it up today, 5 months in the making, only had a few welds done professionally, the rest was me hacking away in the school's auto shop during my spare time, what little we civil servants DO have...cutting, drilling, grinding, and finishing up the electrical and painting in my shop at home...right next to the TV and coffee table. I got the idea from this website and eye balled all measurements. http://motorcycletrailer.com/tib/ Some of you may remember in late winter me asking about where the centre of gravity is on the VR...this was the reason...LOL...I enjoyed you guys guessing why I wanted to know such a thing. I changed a couple of features like only having a 2-piece backbone instead of 3 piece like they have. It's designed to be taken apart and all fit into the HHR when we reach our destination. I ended up with a couple of snags like not leaving enough room for where I planned to put the license plate, so will have to solve that, right now the plate is tie wrapped on. It's the biggest transportation related thing I've ever built, and given my pretty boy skills, I'm happy with it. It has received final approval by the Pretty Butt, so after 5 years of being a good boy, begging, pleading, and general a$$ kissing, we are going on a trip down the Blue Ridge together...YAHOO! So here's the multiple choice question for you all... Why ELSE would a guy like me build something like this??? A) because the Browner is really becoming a trailer queen of priceless value worthy of tender care during it's final years. B) because deep down I know that BradT hates being bugged for trailering duties. C) because the Pretty Butt has me ass whupped more than I realize. D) because I need to be ready on a moment's notice to head to the USA to pick up my new Gold Wing...or... E) (insert your opinion here)
-
I'm currently on a road trip from New Mexico to wahoo NE. and when I last stopped for gas I noticed a plate sized circle of fluid on the ground jusy below the raditor at first I thought oh no a radiator leak but after looking closer found out it was fuel couldn't find any leaks so I continued on to my final stop after I arrived and said hello to family I went to move the bike to a better location and there was the plate sized circle of fuel. This morning took off the lower fairing and found that fuel had come out of both hoses by the air filters. is this something I should be concerned about or do I have a major problem. I want to get this taken care of before I head back next week.
-
.thumb.jpg.86b14ff76d3485995b1240269d027bfc.jpg) Hello everyone, Did the clutch upgrade(2nd gen). Installed new extra disk, removed wire, half disc, 2 rings. cross sanded the plates, soaked all the disk in fresh Rotella. re-installed with two notches on disc all aligned, installed pressure plate to marks, put new spring on, ring that holds bolts. Bike has 45k, but was barely slipping in 3rd gear with two up and pulling trailer. NOW watched the pressure plate move freely with clutch handle engage, disengage. put the cover back on, fill up oil. Took for a spin..............slips with barely any throttle. must have missed sumptn.!!!! Any good suggestions on what I missed .....hate to think I have to find another gasket. Leaving on the 3rd of June for a 3000mile trip. Clutch lever feels even weaker than before...also clutch doesn't engage until it is almost totally released. Jim
Hello everyone, Did the clutch upgrade(2nd gen). Installed new extra disk, removed wire, half disc, 2 rings. cross sanded the plates, soaked all the disk in fresh Rotella. re-installed with two notches on disc all aligned, installed pressure plate to marks, put new spring on, ring that holds bolts. Bike has 45k, but was barely slipping in 3rd gear with two up and pulling trailer. NOW watched the pressure plate move freely with clutch handle engage, disengage. put the cover back on, fill up oil. Took for a spin..............slips with barely any throttle. must have missed sumptn.!!!! Any good suggestions on what I missed .....hate to think I have to find another gasket. Leaving on the 3rd of June for a 3000mile trip. Clutch lever feels even weaker than before...also clutch doesn't engage until it is almost totally released. Jim -
Here's one with the go pro mounted on the back of the license plate. I think it sounds a little better. Link [ame=http://www.youtube.com/watch?v=jmwSysQuTho]YouTube- yamaha royal star TD plate mount go pro[/ame]
-
Well I made a short trip to Wilmington last night... (about 60 miles) Met up with a fella' who wanted a motorcycle, and he had what I wanted... So we did the trade... With a baby on the way, this is a more practical toy... My New '65 Mercury. The license plate will say HAYLEY (if it's available) I'm pretty stoked! http://hphotos-snc3.fbcdn.net/hs378.snc3/24168_1320261879511_1019701763_30764700_7012435_n.jpg Anyhow, even though I gave up riding, I'll still check in with you guys, keep ya' posted about the lil' peanut the wife is brewin', and lookin' forward to Boomer's one-liner signatures!
-
Need some help trying to remove my cassette deck from my 07 rsv have the 4 bolts out from the sides the 2 screws from the front it's loose but it's like the front door (closed) wont fit thur the opening, its hanging up. From what i can see the face plate is catching on top and i dont have enough room for it to slide out. Dont want to froce it. any suggestion's Thanks Ken
-
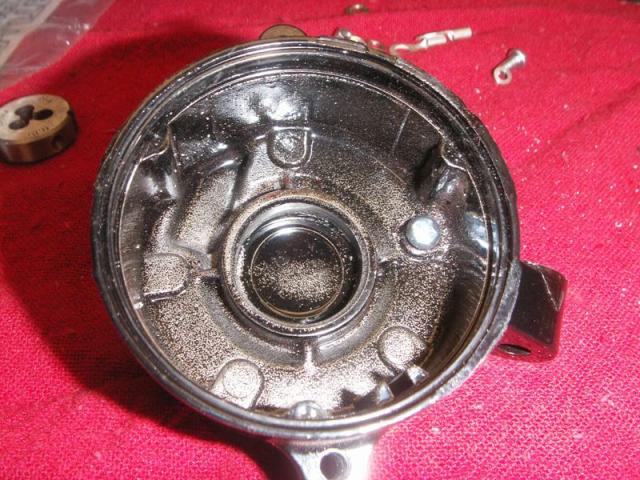
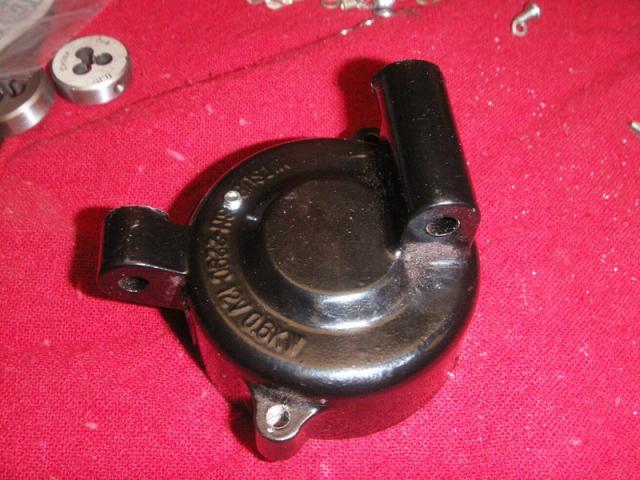
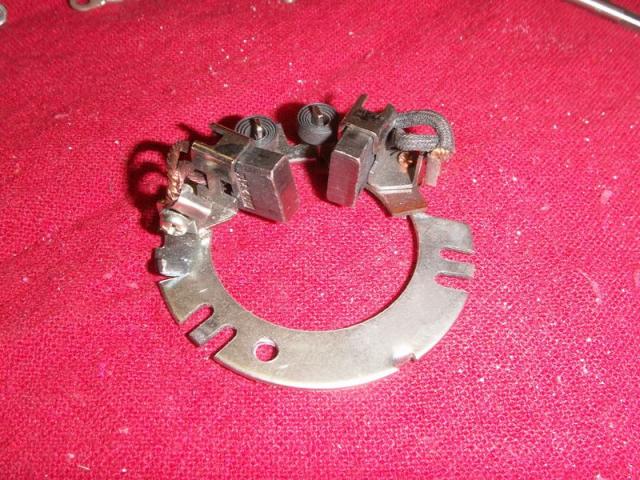
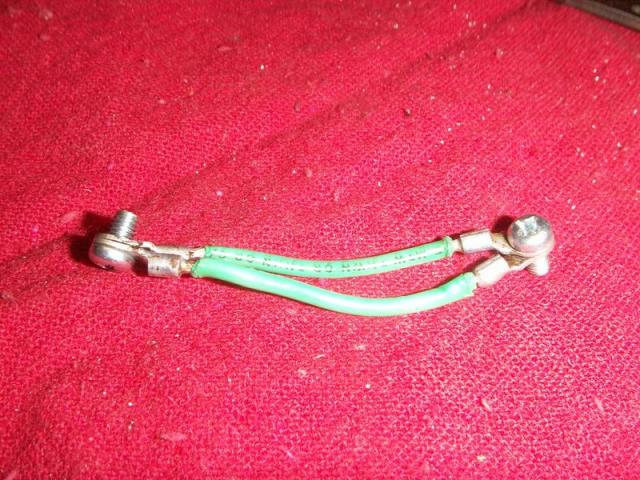
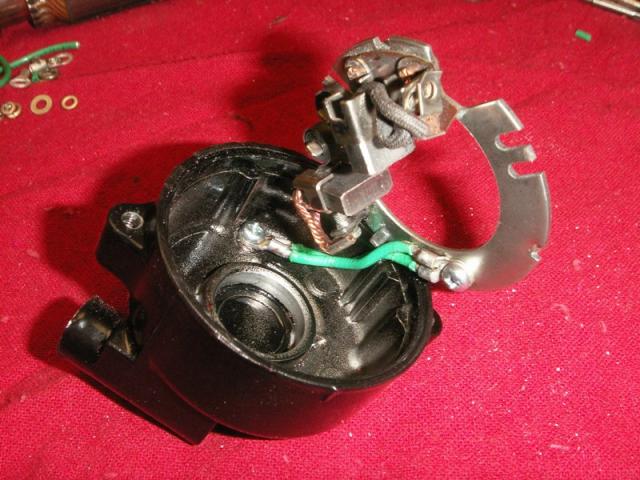
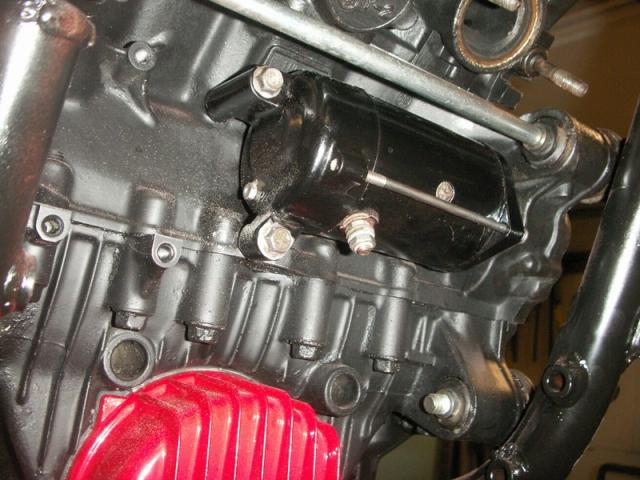
Attached are some pictures of the modification I made to the starter on my 83 1st gen. The purpose of this is to give a better path to ground for the brush plate. Stock version allows a path to ground through the tabs around the plate. Snaggletooth had posted about this mod several weeks ago, but I do not know of any pictures that are available to show it. Gary This shows the location of the drilled & tapped hole. I used a 4mm screw to attach wire with. Hole is at 2 o'clock position. This shows location of hole from outside of cover. The hole in the brush plate is shown at the 7 o'clock position. Picture of grounding wires. I used two 14 gauge wires. The terminals for 12 gauge and up had too large of a mounting lug for mounting screw size I wanted to use. Wires attached to end cover. Wires attached to brush plate. View of starter mounted on engine. I have since added an 8 gauge wire that runs from the bottom mounting bolt for the starter to the right side of the engine block. I attached wire to the block at the same point the main ground wire from the battery attaches.

-
I was digging through the junk box the other day. Found a set of caliper covers off my old 83 VR. Yes:banana: more safety chrome!! Where can I put them. Wouldn't fit on the front. But on the back they make a nice license plate frame. Added a couple of lights and oblonged the holes to make them fit. I still have the old style Alberta plate (huge) so I don't know if it will work with smaller plates. But this should get the old gears turning.
-
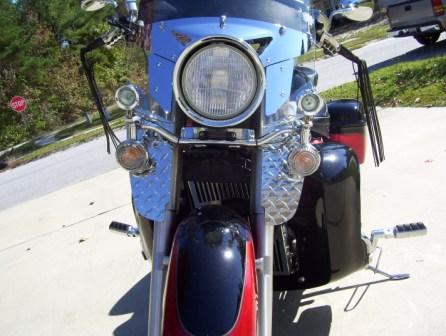
 I decided to make some windshield lowers out of diamond plate aluminum. I think they turned out pretty good. Let me know what you think. I have some ideas for a few more items on the bike to be replace with this diamond plate.
-
I looking to buy and install a license plate frame that have some bright LED's that I can use for both running and additional break light. Do any of you kind folks know where I gould find such a thing for my 07 RSTD? You help will be appreciated. Mark;)
-
http://www.signaldynamics.com/products/LicensePltFrame/cd_chrome_led_frame.jpeg A few weeks ago I replaced my tail light with a LED board and a clear lens. What I failed to do and I didnt realize it until one night last week when a cop pulled me over at 230 am by work was the fact that I didnt have a licence plate light anymore. I then realized that when I switched to the LED board it no longer illuminated upwards like a regular bulb, thus no plate light. My explanation worked and I promised the kind officer that I will get a lighted frame this weekend. After searching several sites, JP being the most expensive in the 59.00 to 120.00 dollar range. I found the above frame at www.signaldynamics.com for a paltry sum of 35.00. 42.00 with shipping and tax....yes, they are located in my home state. Exciting, huh!
-
What are some of the LITTLE things you have added to your bike that most people might not have thought of...either ornamental or practical? For example, I have the License plate grifter plate: http://www.bikesax.com/Merchant2/merchant.mvc?Screen=PROD&Product_Code=ACCGRIFT01&Category_Code=ACC-ESS This little gem locks and can keep your paper work...extra keys, a small flash light, fuses...and best of all, it locks. It is not really stealth...but you do need to know what you are looking for. Anyone else? Wally
-
 I apologize for so many questions. I am not a dummy...but I sure feel and am acting like one. I haven't got my new plates yet...so I look back there where they had the temp plate, take it off and this is what I see. I think something is missing...surely they don't sell the venture without a cover for these exposed wires.
 -
I'm doing the PCW clutch mod. After opening the cover and exposing the clutch. I decided to take a couple of pictures (see below) I used the link below as a guide plus the instructions that came with the kit. Great write up. Here is my dilemna. As you can see by my picture which was taken prior to disassembling the clutch, the single notch on the pressure plate is aligned with the two dots on the housing. I've got 20100 miles on it The clutch has never been opened. I feel I should put it back together the way it came appart. Any thoughts?? [ame=http://www.venturerider.org/forum/showthread.php?t=10518]Clutch Upgrade - VentureRider.Org[/ame]
-
Has anyone made, or had made, a license plate that has the motto "Life's a Venture" written on it. I want to get one to put on the rear of my newly aquired trailer that I am now the proud owner of. :banana: There is a large void on the lower part of the rear of the trailer, I am planning to put the "Life's a Venture" license plate on the trailer with the " ventureriders.org" over the top of it. I am open to suggestions for a design for one if anyne is interested in helping. I really think the raised decal that Freebird has produced would look good in a license plate form, but I want to get the approval of the "Boss" before I go using that. I believe that we should stay with one standard for the advertisement of this group. If anyone has any ideas please let me know. Thanks
-
Check out this site....I just ordered vinyl diamond plate paper from them to re-do my garage cabinets. Sure beats painting them. http://cutsmetal.net/index.html
-
Mounted the XM antenna (GXM-30) for the Garmin Zumo 500 today. Used a Kuryakyn inspection sticker plate (part #9168) mounted to the right side mirror post. Drilled two 5/32" holes in the Kury plate, using the Garmin antenna's steel baseplate as a template. Screwed the baseplate to the antenna from below (screws & baseplate provided with the GXM-30 antenna). Used two screws and nylon locking nuts to secure the baseplate to the Kury plate. Screwed the right side mirror post through the Kury plate's mounting hole. Easy installation, works great, looks good and is pretty secure. Pics below. Now it's time to go out riding & enjoy the XM radio.............
-
to LED's. I bought 1 1/4" X 3 1/2" LED's from J & P Cycle, REAL nice people, the entire experience with them was first class. The rear LED's fit perfectly inside the existing reflectors. Just popped the reflectors out, drilled another hole to accept the wires and ran them thru the crash bar. On the front I replaced the reflectors totally with the new LED's. I had to make a backing plate out of aluminum with a stainless flat head screw thru the lower portion. Not wanting to make the wires bulky I merely taped them with black electrical tape and ran them with the brake line. I didn't attach them to the line but I think I can find some stand offs to keep them in place if they start moving. The LED's are 1 1/4" wide and the smallest aluminum flat I could find was 1 1/2" so I cut them down with my band saw, knocked the corners off and went to work with 180 girt paper. With some patience and a lot of rubbing I managed to come up with 4 smooth edges on each one and nice radius on the corners. To set the stainless ( 12/32 X 3/4" ) screw in the plate I drilled, put a champfer in it and locked it in place with it's nut then used a nail set to 'marry' the aluminum to the screw head. Then just for insurance I put a drop of crazy glue on the head and the underside. I neglected to take a picture of the front mounting plate but it's pretty simple once it's shaped to the LED. Thanks to all that have already done this conversion, it ended up a fairly easy chore. So - thanks for posting your methods and results
-
Got got the bell....Fantastic:dancefool: I'll hook it uo on my skid plate You know the one that is made out of plastic:rotfl: