SaltyDog
-
Posts
123 -
Joined
-
Last visited
Content Type
Profiles
Forums
Gallery
Events
Store
Everything posted by SaltyDog
-

Taking the Kickstand Off
SaltyDog replied to rumboogy's topic in Royal Star Venture Tech Talk ('99 - '13)
Since I live outside of Searcy, I could give you a hand holding the bike or I have a Black Jack bike lift that may come in handy. Give me a call (501-729-4357) and we can meet if you want another person to assist you. Leave a message (no cell phone) if I am outside at the time. Scott Butler (SaltyDog) 1983 XVZ12 std. -
Gary, It's another fine mess you have gotten me into! Just when I thought I had the bike ready for warm weather riding, you show up with another kit to fix something I had blissfully ignored. My sight glasses on my '83 standard are really in need of this repair if it proves to be reliable. Please keep us informed when you are confident with the components that make up the repair kit. I would really like to be able to see the fluid level in my clutch and brake master cylinders again...
-
Handlebar Adjustment
SaltyDog replied to SC89Venture's topic in Venture and Venture Royale Tech Talk ('83 - '93)
Simple answer YES. The individual lower handlebar units can be rotated CW or CCW alittle. There are stamped marks on the bars and center splined mount. The upper round handlebars can be rotated again alittle up or down. Just loosen up the pinch bolt and slide out the bar and reinsert back into desired location. Just be sure to tighten up the fasteners to the correct torque. Look in owners manual or check out downloadable version in the tech section. Also verify that the hoses and throttle cables aren't being stretched or pinched when the front end is at full lock. -
Thought I would post some pictures of my rear LED signals that I built for my '83 venture. I used the square Superflux type of leds which have a four pin mounting so they are very vibration resistant and are high intensity. I purchased them on Ebay from some Chinese Ebay sellers. They are very reasonable in price and come with the correct dropping resistors for 12v operation. All I had to do was get some perf board to solder the leds onto and add the resistors. The perf board is made of fiberglass which has copper pads on one side and holes in the standard center distance. Once the boards were soldered up, I experimented with an additional resistor for the dimmer running light function and added diodes to isolate the brake and running lights circuits from each other. Most all these modifications have been posted here before by others so search around and you will find the postings or it is all on the internet. I just wanted to show that these can be built for a low cost with only your time invested. These units are very bright at night and clearly visible during the day. And they will last practically indefinitely since they are all solid state components. Since I also upgraded my charging system with the Shindengen regulator last year, my bikes electrical system is very stable and provides a good enviroment for the solid state leds.
-
I bought the "first GT750" 28 years ago from a welding shop floor. All I saw at first was a three cylinder block laying amid steel cutoffs. I asked the owner about the history of the bike and who it belonged to and he replied that it belonged to one of his sons forgotten projects and was for sale. SO, I bought it as a incomplete basket case. It took me three years to find enough parts to put it together and ride. It had twin leading-shoe drum brakes that look cool until you try and stop. I later found a number of parts bikes and one of them was a 76 with dual front disc brakes (good catch on the model mixing). I always liked the calipers on the front of the sliders for access and just the looks so I swapped them around left to right. Over the years I have collected many of the GT750 from all over Arkansas, Missouri and Tennessee. I have three complete engines put up incase I ever blow this one up. I sold two of the front drum brake unit years ago (pre-internet) to an individual who raced in the historic type classes. I still have one setup left for a future project or maybe to restore the 72 GT750J to original state. I live on a farm so having alot of bikes isn't a space issue. My family and friends are resigned to my ongoing facination with the 70's and 80's era bikes.
-
Here is a picture I took of the 1972 GT750J Waterbuffalo (or Kettle for you UK guys) last spring. I have ridden it for almost 25 years and it is really a solid bike. Always get a comment when I ride up to a gas station or dairy queen. You gotta be alittle perverse to love a three cylinder watercooled two-stroke bike. But I have my ways. Also here is a picture of my other Suzuki, a 1975 RE5M rotary, only made for two years (75 & 76). I bought this bike on Ebay for a great price and had it running in 4 hours. Since then I have cleaned and overhauled the fuel and brake systems. This is a truly "out there" bike. It's exhaust note is unlike any other bike I have every been around and as you can see I like the "odd" types.
-
I run Arkansas Antique plates on three of my bikes, 1972 Suzuki GT750, 1977 BMW R100RS and the 1983 XVZ12T. Arkansas only requires a onetime fee (same as yearly renewal) and that you have another standard licensed car or bike. There isn't any mileage or useage restrictions with the operation. They also state that the car or bike is in "orignal like condition" but there isn't any enforcement or documentation required. I like the convenience of not having the yearly renewal payments and the insurance isn't a factor since my bikes are just covered for the basic limits. My bikes were all purchased as projects and I have fixed/repaired them over time.
-
Last fall I replaced all my dash illumination lights and indicator lights with LED replacements. I used side firing type for the illumination locations and 4 led type for the indicator positions (high beam, turn signals, neutral and headlight out). Now I can see the neutral indicator and turn signal indicators even in bright sunlight. I also don't have to worry about having burnt out dash illumination lights when I drive at night. I used all white LEDs but could have used colored ones to match the indicator lenses. I bought my LEDs on Ebay from different vendors to get the two types, side firing flat top and 4 led type. You just have to verify the correct operation in the socket since the LEDs are polarity sensitive. If they don't work then just rotate them 180 degrees. I have replaced all the lights (dash, turn signal, running lights and brake lights) with LEDs that I have purchased (dash) or fabricated replacement inserts (turn signal, running lights-both front and rear, and brake). I like to experiment with LEDs and have built replacement inserts for all my motorcycles (2 BMWs and the 1983 Venture). It isn't just for the lower power draw or lifetime operation. I make my turn signals into running lights and add additional red LEDs in rear turn signal housings to to provide two extra brake/running lights on the rear of my bikes. More lighting is always a good thing. You can find all the help about building your own units on the internet. It may not be the best cost effective solution, but I like the infinite ability to customize my lighting devices. I also recently replaced the halogen bulbs in my driving lights with luxeon LEDs to make them lifetime daytime running lights. It just seems I can't stop myself with all these lights. I also swapped out my headlight with a HID Bi-Xenon system last year and converted the high beam indicator so it would function when I bypassed and removed the redundant reserve lighting device. All these modifications are made possible because I have jumpered the CMS warning reed switches for the headlight, turn and brake lights. I changed out the turn signal and hazard relays to modern electronic type also, but I did lose the automatic cancelling function. But with the brighter turn indicator LEDs in the dash, it is easy to see when I forget to cancel the signals. Not hard to remember for me since I also ride three other motorcycles without the cancel function. It takes some experimentation to get it all right and there are other ways to get the same results (load resistors, rough duty bulbs, and high output Xenon equivalent bulbs). But, these are my bikes and I tend to do things MY WAY. You will have to decide for yourself if it is worth the effort on your bike. All my modifications have proven reiable on multiple bikes and makes (Yamaha, Suzuki and BMW) and haven't given me any problems once I worked out the initial fitment.
-
I added the little filter on the crankcase vent this past summer and just plugged the drain and vent lines on the bottom of the airbox. I don't have any excess oil on top of the engine from oil mist through the new filter and my airbox stays nice and clean. Now it is even easier to remove and install the airbox in the future. As long as I don't develop alot of blow-by or overfill the oil level then I don't expect to see any external oil leaks from this modification.
-
All those ships were just targets seen though the crosshairs of a periscope for me. I served on a fast attack submarine out of San Diego, USS Haddo (SSN604). Our only goal in life was to find and sink everyone elses submarines, All those surface ships were just targets of opportunity, no real challenge to get close up and dispatch with one Mk 48 torpedo. When you have the whole Pacific Ocean to roam around in, it is hard to find just one quiet hole beneath the sea.
-
Improving gas mileage...
SaltyDog replied to 5bikes's topic in Venture and Venture Royale Tech Talk ('83 - '93)
Mine ('83) came with fixed needles and so did another set of carbs from a '83 donor bike. I don't believed Yamaha installed the adjustable needles on all the '83 bikes. I have heard the same story over and over that they should have these adjustable needles. I would be interested in knowing the serial numbers of a bike that DID come with them from the factory. -
Improving gas mileage...
SaltyDog replied to 5bikes's topic in Venture and Venture Royale Tech Talk ('83 - '93)
I have a '83 standard that has about 70K miles and this last summer I wanted to check the mixture with my brothers Air/Fuel meter. I placed the sensor into each tail pipe after the bike was warmed up and took some initial readings. With no real suprise the bike was quite rich at idle and throughout the rpm range up to 5K RPMs. I haven't had any problems with the plugs fouling but I wanted to get the bike into a better air/fuel ratio range. I considered using small washers to adjust the needle depth but I like the stock plastic centering washer. With alittle careful sanding on the top, I reduced the thickness of the stock plastic washer 1mm, from a measured 2.5mm (.100") to 1.5mm (.060"). I figured if this was too thin, I would just add shims on top of the plastic washer below the c-clip on the needle. On other CV carbs I have tuned (car and bike), the piston needle is biased or located in the needle jet bore. The Venture carb needle plastic washer also keeps the needle from spinning in the piston. I don't think it moves much during use but I like to keep the variables to a minimum. After reducing the thickness of the plastic washers and reassembling the carburettors, I ran another test with the Air/Fuel meter. The mixture dropped close to perfect at idle and slightly rich during higher RPMs. I called it good and then ran the crap out of the bike the rest of the summer. The plugs look good and show no sign of overheating. The bike starts great when hot (I already upgraded the electrical starting system) and no problems when cold. This is a great modification to attempt on these bikes and will show real world improvement. My gas mileage had been running in the 40-45 MPG range with all my 50-60 MPH runs through the hills and curves in Arkansas (not bad but I wanted to see if more was possible). After the change to the plastic washers, my mileage has moved up into the 45-50 MPG range. I ride pretty mildly when in the hills (too many deer and slow farm trucks) and my rides include alot of hills and curves. On my trips where I can get on a 4 lane highway, my mileage has stayed in the ~50 MPG range. I run the speed limit ~65-70 MPH and really like the power the bike has when needed to pass slow vehicles. -
Looking for dead 83-89 TCI units
SaltyDog replied to dingy's topic in Venture and Venture Royale Tech Talk ('83 - '93)
I am replacing the glass diodes purely from a preventative standpoint. I will do the back-up TCI first after I make sure it runs correctly. I cut the back panel off of the TCI case to allow access to both sides without having to de-solder the board from the plugs. I will add screws in the corners of the removed panel and a gasket when I am done with the conversion. This will allow me to open it up in the future if needed. Pictures will follow as I get further on the project... -
Looking for dead 83-89 TCI units
SaltyDog replied to dingy's topic in Venture and Venture Royale Tech Talk ('83 - '93)
Gary, Thanks alot for the .pdf on the TCI board. This last Spring I successfully desoldered my current TCI and cleaned it up and then re-soldered all the plug pins. I also used a solder sucker and solder wick to get the old joints cleaned up. It took some patience and careful handling but all is well and the TCI has worked pefectly for over 6 months now. With this spare TCI, I plan to just cut open the opposite side of the TCI enclosure to gain access and spare all the extra work. I can glue the cover back together when I am finished. I have ABS solvent that has worked great on the fairing repairs and I will use it on the TCI. With the TCI relocated to the top of the airbox, water ingress isn't much of a problem anymore. I just have to keep small flying critters from becoming lodged in the works when I fly low on my '83 down the interstate. -
Looking for dead 83-89 TCI units
SaltyDog replied to dingy's topic in Venture and Venture Royale Tech Talk ('83 - '93)
Gary, I am interested in upgrading my spare '83 TCI also. Could you tell me the type of replacement diodes needed for the procedure. I have fixed automobile ECMs before with bad components and I am a ex-Navy electronics technician, so I am not unfamiliar with circuit board repair. -
I need one for my riding jacket. What is the size?
-
When I looked for a security system for my '83 standard I finally settled on this one from Internatrix (TW-1000) http://www.internatrix.com/. It comes standard with a long range FM paging remote, shock sensor, microwave motion sensor (I mounted mine under the seat) and ignition/starter disable. The price was very competitive and the system installed without incident.
-
1983 first gen HID installation
SaltyDog replied to SaltyDog's topic in Venture and Venture Royale Tech Talk ('83 - '93)
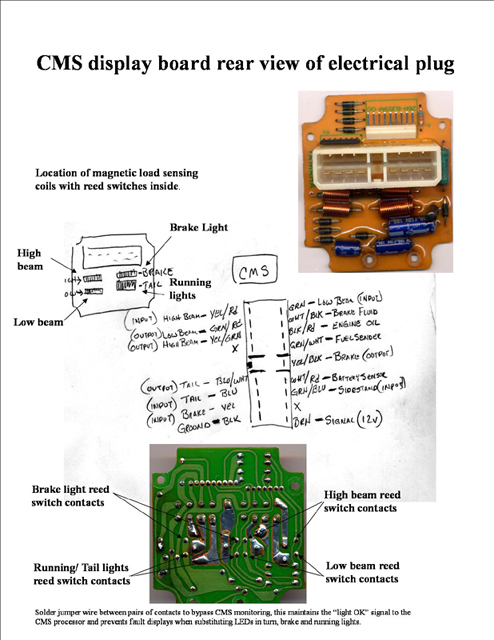
The CMS needs to have the headlight reed switches on the circuit board jumpered to prevent a error signal to the readout. I had previously jumpered the brake and running lights switches to allow the use of LED light modules on my bike so the additional jumpers were very easy to solder onto the back of the board. You can look up the other thead I posted showing the location of the reed switches. With the reed switches jumpered, the CMS doesn't know how much current is flowing thru the circuit so you won't get a error on the display when you use non-standard lights on the bike. Another modification needs to be carried out with the reserve lighting device. This unit will not like the lower current draw of the HID solenoid and try to switch to High beam. I removed the green/red and yellow/green wires from the plug to the reserve lighting device to remove control over the high beam. I just pushed the pins out of the plug and taped them along side the cable. I also added a jumper between the blue/black and blue/white wires which feed power to the headlight high/low switch on the handlebar. Both of these modifications to the reserved lighting device probably aren't needed but this takes the unit out of the circuit (it is working on my bike now without any problems). I will reattach high beam signal wire (yellow/green) later to see if I can get the high beam indicator on the dash to function again.
-
1983 first gen HID installation
SaltyDog replied to SaltyDog's topic in Venture and Venture Royale Tech Talk ('83 - '93)
My reason for installing the HID lighting was to 1st: increase light output without changing external appearance, 2nd: continue updating lighting system (already changed all lights and signals to LED) to something more modern and less prone to failure on the road and 3rd: reduce lighting current demand on the bikes electrical system. These are the reasons I tell myself, but the real truth is I am a gadget junkie and really wanted to test this type of lighting to see if it will stand up. I have 4 other bikes and my 1983 venture is one of the youngest at 26 years old (1972 Suzuki GT750, 1975 Suzuki RE5, 1977 BMW R100RS and a 1989 BMW R100GS). I keep them all running and licensed so I can ride which ever one strikes my fancy. But wilth the increasing age of my small motorcycle collection, I find I want to make them safer to ride at night. With the high cost of good Halogen bulbs in higher wattage ratings, I figured if I could get a reliable H4 replacement HID solution then it would be worth the effort and modest expense ($58.00) of the system I installed. The longevity of the system is still a unknown at this time. The system I bought is marketed for motorcycle use and carries a one year manufactures warranty. You will have to decide for yourself if it is worth it. I enjoy the process of modifiying my bikes and can't seem to leave them alone. I have a extensive background in industrial electrical controls and electronics so changing up the electrical systems on my bikes is very comfortable to me. I don't allow anyone to work on any of my bikes, I even mount and balance my tires. I know that doesn't sound like a big deal, but when you have to do it to 4 or 5 bikes it can add up to a never ending job. -
1983 first gen HID installation
SaltyDog replied to SaltyDog's topic in Venture and Venture Royale Tech Talk ('83 - '93)
I too am interested in the service life of the HID kit. Since the HID bulb doesn't have a filament, vibration shouldn't be a problem. The high/low solenoid is de-energized in low beam and in the lower position. So vibration and run time shouldn't affect it too much. The manufacturer has a one year warranty (for whats thats worth). With a purchase price of just $58.00, I figured it was worth a shot. The slim ballast is mounted in a good location for weather protection so water shouldn't be a problem. The electrical connections are the sealed automotive type. Since I already run a new regualtor/rectifier, my DC system stays very stable. So voltage spikes should be minimized. All said, it is just a experiment in lighting that will have to play out thru the next year and then we shall see if I will add this system to my other bikes. -
I have a '83 standard that I have been altering the electrical system since I got it last year. So far I have added the Shindengen R/R, a cooling fan run timer, a Internatrix security alarm, replaced the fuse box with a ATO style, moved the TCI onto the top of the airbox and today I would like to share the installation of a HID Bi-Xeon headlight. [ATTACH]37353[/ATTACH] I bought the HID kit on Ebay for only $58.00 and the shipping was free from Hong Kong. The package arrived in 6 days! I had followed the previous thread on the projector type headlight replacement but didn't like the change in the front look of the bike. I like the square headlight and I wanted to see if I could find a good H4 HID kit to increase the light output and longevity. I found this kit on Ebay Item number:170371397794 and I went ahead and purchased it. When it arrived, I was pleasantly surprised with the completeness of the kit and the ease of installation. [ATTACH]37354[/ATTACH] I decided to mount the slim ballast in the fairing next to the headlight frame using dual-lock mounting strip (super velcro!!). This makes it very accessable and adds cooling if neccessary. The included relay module (routes 12v direct from battery) was secured behind the left turn signal inside the fairing cavity. I use this space to mount additional relays for my drivinglights, dual fanfare horns and cooling fan timer relays. This space is easily accessed and fairly protected from heat and weather. I had previously installed a 20W halogen (type BA9s) light bulb into the metal headlight reflector. This gave me a daytime running light to reduce the unnecessary useage of the main headlight and reduced the amp draw on the charging system. I incorporated this smaller bulb into the new headlight circuit by installing a rocker switch on the left side fairing next to my 12v receptacle. The rocker switch selects between the 20W halogen daytime running light and the HID low beam setting (daytime or night selection). I have only had the HID system installed a short time but I am very pleased with the function. The HID bulb is tilted in it's socket by a solenoid to change between high beam and low beam. The bulb stays energized all the time so the light output stays constant. The bulb just tilts upward for the high beam. The kit is marketed for motorcycle use so I expect it should stand up to use on the Venture. Only time will tell....
-
Here is one that might be what you are looking for. http://www.boats.net/parts/search/Yamaha/Motorcycle/parts.html I haven't tried them, but they were recommended by a member on this site.
-
Full Throttle Thanks to all the Great Gear-heads on this forum
SaltyDog replied to jonsmyth's topic in Watering Hole
The filter I used to replace the crankcase vent hose to the breather box I got on Ebay. It fit fine and has worked for over a month now. The seller has more of them listed, here is the item number for one he selling now , Item number:390090774044. It costs $5.99 and the shipping is $5.99. I don't have any affiliation with the seller, I am just a satisfied customer. I installed mine on my 1983 Standard XVZ12. The only interference I encountered was one of the metal hard lines, I just used a socket extension to reach it and bent it slightly to clear the base of the new filter. Now I can remove the breather box easily and it goes back on without any trouble. So far I haven't seen any oil gather on the outside of the new filter and I know my crankcase will breathe clean unrestricted air. -
Indian regulator/rectifier group buy
SaltyDog replied to Dano's topic in Venture and Venture Royale Tech Talk ('83 - '93)
I would install the appropriate fuse for the size of wire you are running between the regulator and battery. If you have a short in the regulator, any fuse will open up, even a 100 amp fuse. The fuse is to protect the wiring. If you are using #12 wire then a 30 amp is good and if you use # 10 then I would go with a 40 amp. These sizes will keep you from melting your wiring and protect the bike from burning down due to melted wires. The stator is only rated for a maximum of 30 amps @ 5000 RPM in a perfect world. The claims of the aftermarket stators of increased output are just that - claims. Bottom line is to protect the wiring with a fuse of the correct size for the type and size of conductor used. This is just from my experience of over 30 years of avoiding being electrocuted in the Navy and civilian sectors. It's your bike so you are the final authority. -
Indian regulator/rectifier group buy
SaltyDog replied to Dano's topic in Venture and Venture Royale Tech Talk ('83 - '93)
Just a suggestion to those installing the new regulator. The manufacturer recommends that a fuse be placed into the 12+ wire running to the battery. And the Ground wire should connect directly to the battery also, not on the frame. This regulator senses the battery voltage through it's output lines and needs a low resistance path to the battery. The unit I installed last month has given me ZERO problems and doesn't get any hotter than the surrounding air. I only mounted mine in the right faring duct work because it was such a new item and I didn't have any history of it's performance. It also was easy to mount in that location since I use that wasted space for my auxilary relays, timers and security alarm. I like that it is somewhat isolated from the engine heat and is still accessible for service without totally taking the plastics off the bike. If you look at my earlier post before the group buy, you will find the performance graphs. It is rated for 50 amps but only with some air cooling. The unit also has a startup delay when you start the motorcycle. The output voltage will slowly ramp up over ~10 seconds to the 14.2-14.5 VDC. I like this as it doesn't give the electrical system a jolt at startup. The old regulator on my bike was left in place. Since I already upgraded the wire connectors previously to a higher quality/amperage type, all I had to do with the stator wires from the new regulator was to install a similar plug and leave the old one tucked away. That way I have a onboard spare regulator for road trips or fellow riders use. The old output connector was used as a source for power to the rear of the bike. I added another relay at the plug so I have ignition switched power to my trunk. It also feeds out to the trailer for "on the go" charging during trips (laptop, camera) or to run a trouble light at the campsite. All this new wiring can be easily disconnected and returned to original if I wanted.