SaltyDog
-
Posts
123 -
Joined
-
Last visited
1 Follower

-
I've had a battery bug for a couple of years and mine came with the long hook up wires also. I mounted it on the dash with Velcro so it could be moved to other bikes. It stays on all the time (at least the lcd display), the backlight goes out after a short period. I knew it wouldn't draw a lot of current so I only use it as a troubleshooting aid when I suspect my dash voltmeter is acting up or I want to check the starting health of the installed bike battery. It will give you a health status after each start in a percentage of battery life available. Not sure how accurate it is with motorcycles but I like to use it as a tool instead of a permanent voltmeter.
-
I installed a alarm from this company ( http://www.internatrix.com/ ) about three years ago. It is very reasonable and works great. It has the adjustable shock sensor and a proximity sensor as stock. I mounted the proximity sensor under the plastic seat pan (it can sense thru plastic, I doubt it would thru steel). The proximity sensor goes off if anyone leans over the bike too close or leans in to mess with the dash area. By "looking" mostly up, the proximity sensor doesnt' get upset by crowded parking areas with people walking by. The shock sensor can be set at different levels to suit your needs and paranoia. The key fob remote is two way paging and lets you know if the bike is OK while you are in the restaraunt or hotel. The other features of this alarm are really handy and work as programmed. I have no connection with this company, just a satisfied customer with the product and with the service I received when I have questions.
-

Water Jacket Joint
SaltyDog replied to OrlinEngh's topic in Venture and Venture Royale Tech Talk ('83 - '93)
I purchased my 1983 standard as a basket case 3 years ago due to the owner thinking the head gasket was bad and leaking coolant into the oil. He disassembled the bike and then lost interest in the project. My good fortune is the bike sat for a number of years in the classic shed gathering dust and pissing off the wife. I got the project for $300.00 and reassembled the bike to test it out. After getting enough of it back together to start up I found that it did have water in the oil, but had good compression in the cylinders and no excess pressure in the cooling system. Upon close inspection of the weap hole under the water pump I found one of the previous owners had filled it with silicone sealant. I guess he thought that he was fixing a leak by plugging the hole in the case. When I cleaned it up I got coolant AND oil out the weap hole. I ordered a new water pump kit (impeller, bearings and seals) along with a new oil seal for the impeller drive shaft and put it all back together. I flushed the engine by changing the oil four times with new oil and filters untill the drained oil showed no signs of coolant in the oil. I got lucky with the engine since it wasn't run much once both oil and coolant seals let go. I inspected the cam shafts and removed the lower cover and cleaned the oil pump and screen and found all looked good without any rust. The engine doesn't knock or use any oil and the new seals have performed their tasks perfectly since installation. It pays to check the weap hole since it will give you a early warning of which seal is failing and prevent cross contamination from the coolant ceramic seal to the water pump shaft drive oil seal. -
Block plate design.....FAIL!
SaltyDog replied to jimmyenglish's topic in Venture and Venture Royale Tech Talk ('83 - '93)
My setup allows me to adjust the compression action of the front forks instantly with the turn of the adjusting screw. I could drain the fork oil and add lighter or heavier oil to change the compression AND rebound together. I could add air to the forks and increase the compression (spring) rate and the electric antidives (i have hydraulic, since I have a 1983 model) will only stiffen the compression damping during braking when the solenoid is energized by the brake signal. This is a noticable electrical draw I hear but have not had to deal with. My hydraulic actuated antidives just steal brake fluid from the initial brake application and delay brake actuation. So my adjusting plate doesn't affect the spring rate (I have Progressive springs installed), it doesn't affect the rebound rate and it can be easily changed to suit my load or riding conditions. Plus it can be returned to stock very easily without draining the fork oil. Just my way of dealing with the OEM antidive situation without too much hassle.... -
Block plate design.....FAIL!
SaltyDog replied to jimmyenglish's topic in Venture and Venture Royale Tech Talk ('83 - '93)
I have a 1983 with the hydraulic antidives and in 2010 I removed the hydraulic piston on top and made a manual adjuster. This gave two benefits, first,it let me remove the hydraulic delay/loss to the front brake actuation and second,it allows me to still have a adjustable compression valve on the front fork dampers. I can screw in the adjustment and increase the compression damping just like when the hydraulic system shifted it during braking in the stock system. This manual adjustment is full time so I can stiffen up the front fork compression when I want to. Not hard to do and it avoided having to deal with the fluid pressure and possible leakage that the block off plate has to contend with. -
I have pictures in my photo album showing the other LED replacement units I built and installed on my '83 standard. http://www.venturerider.org/forum/album.php?albumid=1054
-
LED inserts custom made for all lights and signals
-
-
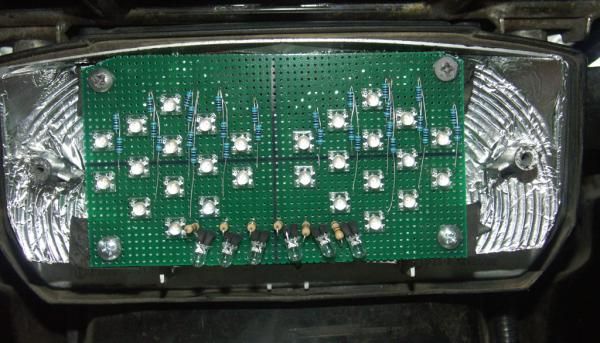
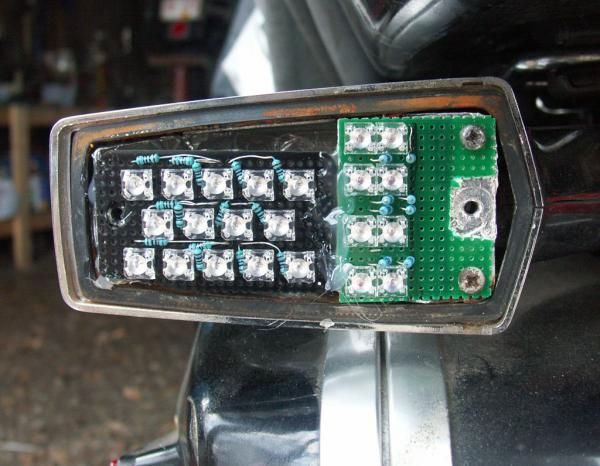
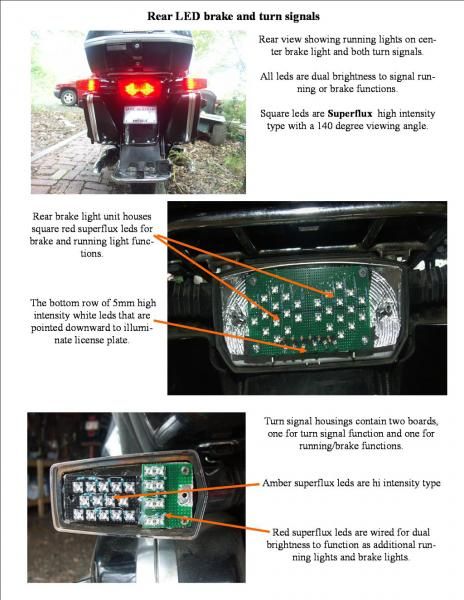
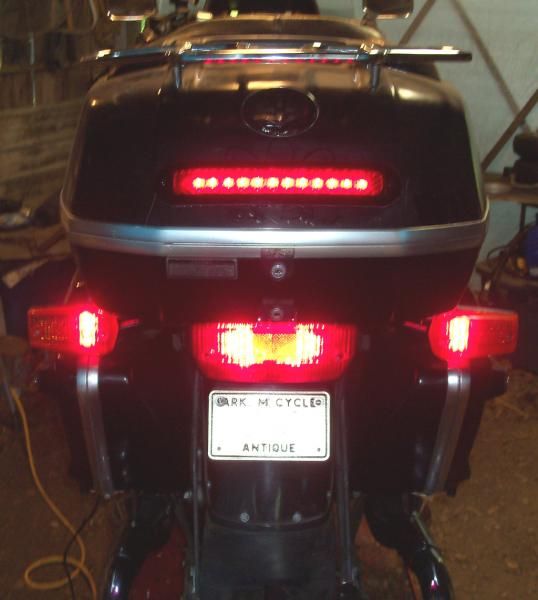
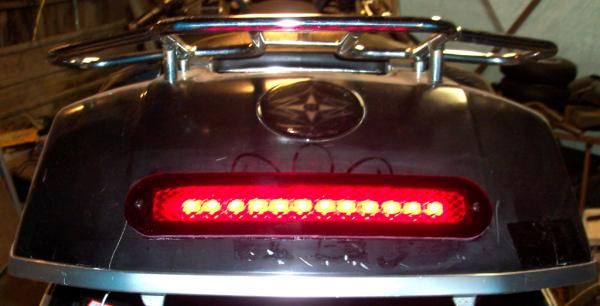
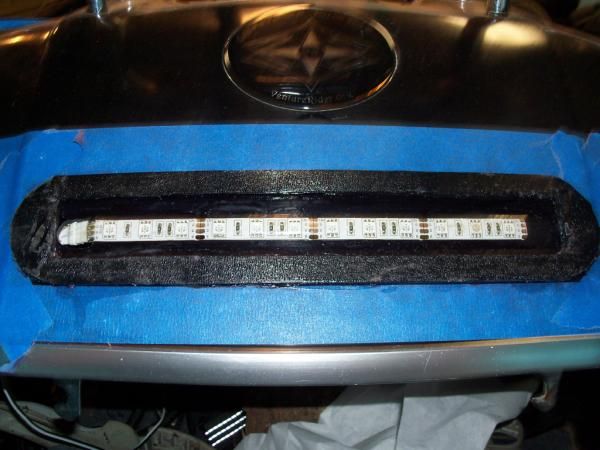
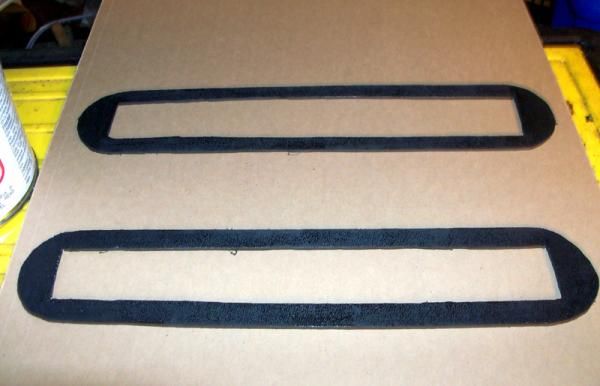
Your new trunk looks great. I just finished adding LED brake lights on my '83 standard trunk. I also have replaced the center running/brake bulbs with a LED insert (custom built) and the two turn signal lights contain LED inserts that have red running/brake LED's and amber turn signal LED's. The combination gives me more points of light out back to let the following drivers know I'm there and when I want to slow down or change lanes.
-
Reflectors to LEDs (with turn signals)
SaltyDog replied to Motorpig's topic in Royal Star Venture Tech Talk ('99 - '13)
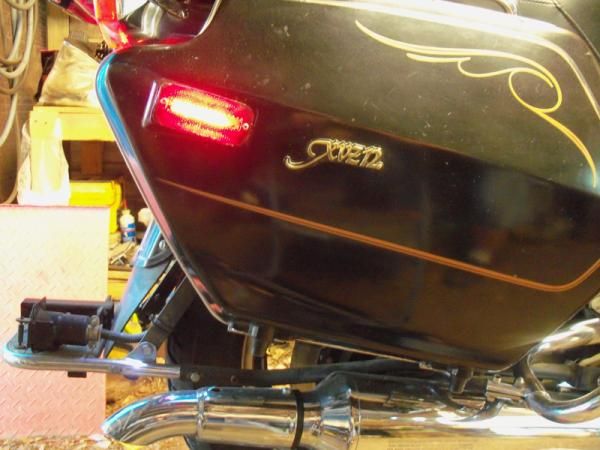
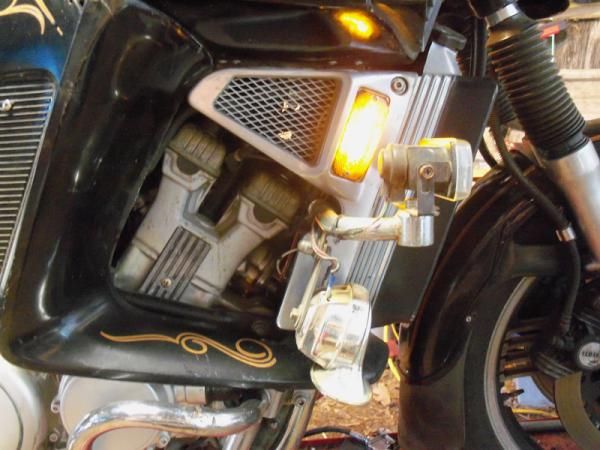
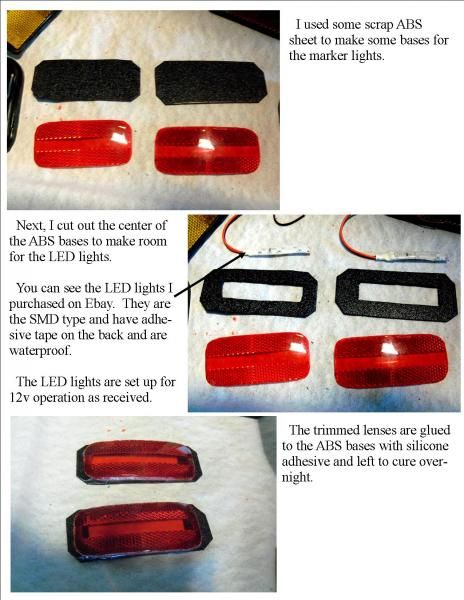
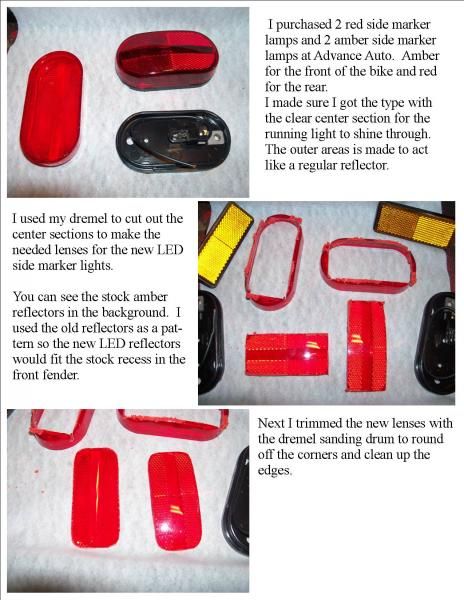
I wanted to increase the side visibilty of my '83 XVZ12 by converting the reflectors on the saddlebage and front cooling ducts to LED illuminated reflectors. I had already completed the same project on my '89 Honda PC800 and purchased enough LED strips to work with the Venture. I know there are some aftermarket LED reflectors available online, but I wanted to see if I could come up with my own conversion. The lens material comes from standard incandescent side marker lamps at $6.00 a pair, the LED smd strips cost under $6.00 a pair from China and the ABS base material was purchased from partsexpress. Not alot of money involved and pretty easy to make. I made up a pair of amber and a pair of red in a couple of hours. Then I let the silicone adheasive set overnight which let me install them the next day. The LED markers are secured with Stainless Steel 3mm pan head screws and wired to operate when ever the key is switched on. The lenses have a transparent center section to allow the LED lights to shine through and are flanked by reflector prism sections along each edge. Check out the pictures of the finished lights and some of the in process pics. -
Now would be a good time to add to the gussets on the frame under the rear of the engine. The weak crosstube (thin wall and too much twisting load) that holds the lower rear engine mount and centerstand brackets and lower shock relay arm pivot has a history of breaking on the '83 and early '84 bikes. Inspect it now for cracks and weld some additional gussets or braces before the tube cracks and drops you rear suspension onto the tire. Not all the bikes will develop the break but it should be inspected annually to look for the failure early before the crack develops into a full break of the cross tube. I was lucky and discovered mine while it was just cracked (at about 50,000 miles) and just cleaned up the surrounding area and welded additional gussets bridging the weak areas on both sides of the lower cross frame tube. It has been three years since the repair and still no signs of the new repair cracking or showing any signs of failure. I check it each spring while up on the lift and doing my pre-season inspection and swingarm greasing. Search around and you will find reference material on the possible fixes and failures of this frame weakness.
-
Shindengen voltage regulator
SaltyDog replied to frankd's topic in Venture and Venture Royale Tech Talk ('83 - '93)
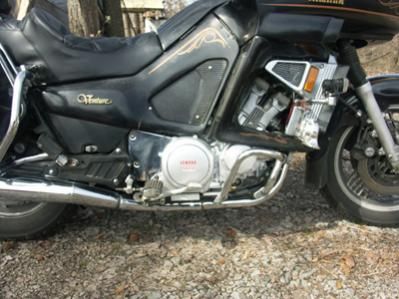
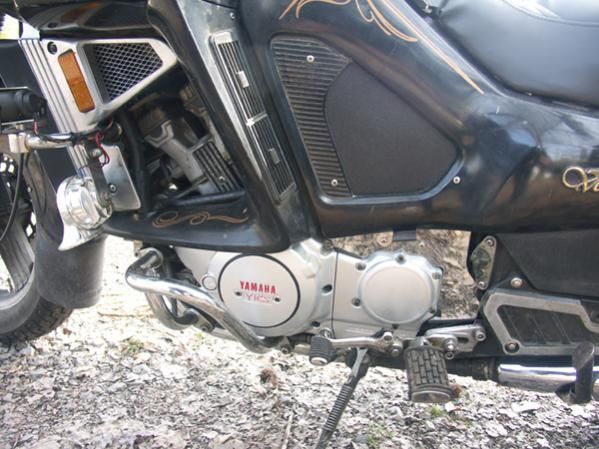
I have had the shindengen FH0012AA regulator since 2009 on my '89 XVZ12. I always thought it was a series regulator. But with all this discussion saying it was a shunt type got me to thinking. I decided to buy a 50 amp current shunt (50mv=50A) and test the DC current on the output from the regulator to battery (+) connection and on one of the stator lines running from the stator to the regulator. If the shindengen FH0012AA is a series regulator, then the output of the regulator to the battery should vary by the load applied to the electrical system. This would be the battery charging current and any other loads ( engine TCI, lights and cooling fan). So I hooked it up between the output of the regulator and the positive post of the battery and started up the bike. The current read about 4 amps @ 14.3V without any other additional loads other than the TCI and battery charging current. I made sure the battery was fully charged before doing any of the testing. I then turned on the headlight on highbeam, current went up a couple of amps. Then I turned on the cooling fan, the current from the regulator went up the 11-12 amps @ 14.3V. At all RPMs the current from the regulator only varied due to the electrical load applied (lights or fan turned on or off). NO real suprise there since either a shunt or a series regulator should perform in this fashion. This first test was to find out if the charging system was operating in a correct manner to supply the correct voltage and enough current for the loads applied. I then moved the meter shunt to one of the stator wires running from the stator to the regulator. I spliced the shunt into the lead and verified the connection had little or no resistance (less than .3 ohms). The meter shunt is marked as .5 ohms resistance so my meter is reading close enough for comparison. I then started the bike back up and measured the current flow (amps) through the single stator wire while turning on and off the different electrical loads on the bike ( no load- only TCI, headlights (HI and Lo), and with the cooling fan running). In all cases the current flow to the regulator from the stator on the lead I was testing NEVER went about 4-5 amps on the single stator lead. It cycled from 0 amps up the a reading of 3 to 4 amps and then back off. Just as I would expect for a FET SERIES regulator that was opening up or closing the stator coils as needed to maintain the battery at the 14.3 V setpoint. I also measured the battery voltage during these tests and it stayed at 14.1-14.3 volts at all RPM's. If this regulator was a shunt type them the stator wire under measurement should have had a higher and more steady current reading. It didn't react like a shunt type of regulator. It reacted exactly like a series type of regulator, controlling the current output according to battery load and maintaining battery voltage at the setpoint at all RPM's. My stator in my bike is one I had rewound by a specialty shop that specializes in motorcycle stators. It was rewound to increase output as much as the stock stator core would allow (not much) but with modern wire and superior methods of vacuum coating and encapsulation. I am very happy with their work and have had ZERO issues. The combination of the Shindengen FH0012AA and the rewound stator produce great output (current (amps) and voltage) at all RPM's, from idle to redline. I have no doubt that this regulator is a SERIES type, it doesn't perform in the manner of a shunt type. The OEM regulator may have been a shunt type, I never tested it. I know the older combination regulator/rectifiers suffered from too much internal resistance in the rectifier section which caused alot of heat gain during operation. The newer generation of Low internal resistance FET rectifiers/regulators don't suffer from high internal resistance and therefore don't produce much heat during operation. Shindengen doesn't even require additional airflow for the loads (25 amps or less) our bikes produce. I know on my bike even with everything turned on with a 15 or 16 amp load on the regulator, the unit is not hot at all. All this is just to satisfy my curiosity on this shindengen FH0012AA unit and to try and put some real testing with meters instead of relying on the wisdom/speculation of the web. I am satisfied with my testing and have a new tool for future projects (50 amp meter shunt). You can make up your own mind or make your own measurements, your choice. I am done. -
A couple of years ago I got tired of the streaked and stained engine side covers. Since I was changing out the stator, I went ahead and used scotchbrite pads to clean up the corrosion. I found some sliver spray paint (rustoleum) and sprayed them. Next I used a small paint brush and red paint to outline the writing on the covers. It still looks clean and even colored. I should have went ahead and painted the cylinders, but as always I had other things to accomplish and wanted to get back riding. The picures are in my album under painted sidecovers.
-
-
-
Draining the coolant system.
SaltyDog replied to PBJ's topic in Venture and Venture Royale Tech Talk ('83 - '93)
The drain cock under the radiator is actually a valve that can be rotated to bypass the coolant flow around the thermostat. It is used when filling and draining the system to insure a complete drain or to get all the air out of a new refill of the coolant. The drain plug under the waterpump housing is used to drain the engine block completely. See this thread on the drain cock settings http://www.venturerider.org/forum/showthread.php?t=52580&highlight=coolant+drain+valve -
I just looked at the owners manual at the Garmin website and it says that the Zumo 550 is made to pair with your phone for handsfree operation AND and bluetooth headset also. The MP3 player in the Zumo will play music through the bluetooth connection and when you receive or make a call it will automatically mute the MP3 music. Go to the Garmin website and download the owner manual and look in the bluetooth pairing section for all the setup and priorities.