Search the Community
Showing results for tags 'clamp'.
Found 20 results
-
I hope having sidecars added to the forum title is welcome - the styling choices and motivations of trikers and sidecarists may be different, but lots of the technical challenges will be similar. There aren't a lot of kits available to fit sidecars to ventures, so unless you make your own subchassis, you have to hunt around a bit for places to mount to, not least because the seat and panniers attach to a bolt-on sub frame which is quite narrow tubing. I didn't think it suitable for attaching fittings to. (Unlike bikes which have twin shocks, where the tubing around the top has to be more substantial.) Either way, I took some pictures for someone who asked how I sorted my sidecar fittings and would be interested in knowing how other people achieved the same aims. Bear in mind that I'm in the UK, so the sidecar is fitted on the left. Also I fitted it several years ago, so excuse the grotty paintwork. This is a view of the fittings between my 1983 VR and Squire QM1 sidecar: http://i252.photobucket.com/albums/hh10/greg_in_london/venture/frontview.jpg I was a little worried about the stiffness of having all the mounts so far forward, so used three fittings at the back, but it was also because I could double triangulate across from the sidecars two chassis rails. Here you can see the bottom two fittings: http://i252.photobucket.com/albums/hh10/greg_in_london/venture/triangulatedrearlowermount.jpg And here they are again from above http://i252.photobucket.com/albums/hh10/greg_in_london/venture/rearmountsfromabove.jpg I used a box clamp on the sidecar frame to have some forwards/backwards rigidity. I felt that I needed a good strong fitting on the left of the bike that would prevent there being any movement / flex when cornering, so I replaced the footrest hanger with a steel plate I could weld two eyebolts to. http://i252.photobucket.com/albums/hh10/greg_in_london/venture/footrestplate.jpg There was a couple of inches of tube that I could squeeze a clamp onto, so that sorted the rear top mount on the bike. At the front I had the conventional two fittings. I couldn't manage a clamp on the lower front bike fitting, so I used a female eyebolt onto an engine mounting bolt. I used an extra plate to spread the load, but in retrospect I'm not sure it makes much difference. http://i252.photobucket.com/albums/hh10/greg_in_london/venture/frontbottombike.jpg At the top there is even less space so I had to make up a frame clamp - an eyebolt welded to a piece of plate, with holes drilled to accept U-shaped exhaust clamps. They never fail to amaze me just how durable these clamps are - much stronger than we have any right to expect. http://i252.photobucket.com/albums/hh10/greg_in_london/venture/fronttopbike.jpg The mounts to the sidecar are not unusual on the front, but the bottom is the box clamp and gives some rigidity, the other is only there to stop the bike flexing towards the sidecar. http://i252.photobucket.com/albums/hh10/greg_in_london/venture/frontmountssidecar.jpg There's another fitting at the back, which to be honest I mainly put on because I liked the way it swept around the pannier, so I've not shown it. Not necessarily the best way of doing it, but it has worked for me for several years and twenty thousand miles, mostly pulling either a camping trailer or a trailer tent, usually with luggage. Hope it's of some interest.
-
Just wanted to pass this along for those that may be unaware, but Sena has a helmet clamp that you can simply plug in your ear buds versus using the speakers, Sena SMH-A0303 Helmet Clamp Kit for Earbuds. Amazon has it for $34.62 and free shipping. I purchased one last week and after I got it the wife wanted it for her helmet. So, I ordered another one for myself last night. Neither of us particularly cared for the speakers and loved the idea of just having the earbuds plugged in and listening to both, music and being able to talk with the push of a button with sound quality of the earbuds. When the other order comes in and the weather cooperates we will be able to do a road test!
-
 I lowered the price of my Hitch Flag Mounts for this month. Just wanted you all to know. I also now offer a Hitch Clamp that works very well. Check them out in the classifieds area. CLICK HERE >>> http://www.venturerider.org/classifieds/showcat.php?cat=500&ppuser=4963 Regards, Fuzzy
 -
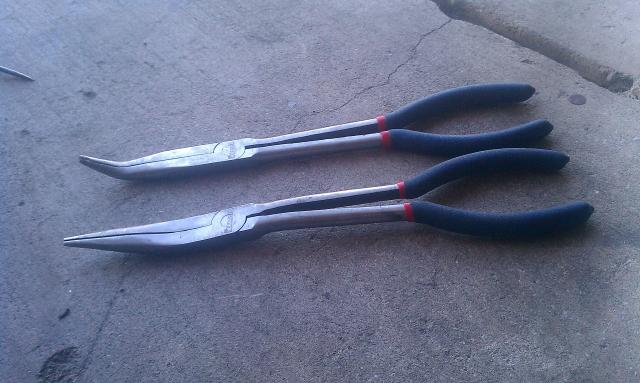
I bought a set of these large pliers from Harbor Freight. I can not believe how many times they have come in handy in such a short time. Today I was trying to tighten a hose clamp that the screw was in a position that I couldn't get a small open end or screw driver to it. The long needle nose work well in loosening the clamp so I could spin it and re-tighten it. They also work really well on the oil breather line under the air box on a 1st Gen. I recommend a set of these for every tool box.

-
 Just bought an 05 Venture 2 weeks ago and its too quiet. I bought a set of Monster Ovals that fit Harley touring bikes. I have been doing alot of reading up on this procedure. I bought the 1 3/4 to 1 7/8 chrome clamps that everyone uses to get the slip ons to mount to the stock head pipe. My problem is that once I put the clamp where it is supposed to be there is about 1 1/2 inch of head pipe showing between the stock heat shield and the new clamp. I can slide the clamp all the way to the heat shield and cover this gap but then the slip on wont fit over the stock header pipe because its too long. Anyone else run into this before?
 -
I'm considering Progressive springs for my ol' girl and also want to lower the front end. If I remove the air ride system (as many seem to suggest with progressives) what will I find under the "clamp" on the forks? I want to raise the forks in the triple clamp but will I have to plug any holes which allow the air to enter the fork to prevent loss of fork oil??
-
This is the cheapest and easiest ipod mount that I have found. It cost me about $9 for the case and I had the hose clamp in my tool box. Here is how to do it. 1. Use a razor blade to cut out the soft lining in the back of the ipod case directly behind the circle cut out of the face of the case. 2. Open the case and lay it flat on it's face. 3. Mark and cut two horizontal slots on the back of the case about 1/2" apart and about 1" long. Try to center the slots where you removed the soft lining. (I used a dremmel with a cutting wheel to cut the slots. They do not need to be wide, just completely through the metal) 4. Use a grinding attachment to smooth out the rough edges on the slots. (This step is important! It will prevent scratches on your handlebars and ipod.) 5. From the INSIDE of the case, push on the piece of metal between the two slots that you just cut. You don't have to push hard, just enough so that you can feed the hose clamp through them. 6. Feed the hose clamp end through one slot from the back and out the other slot and then feed it around the handlebars. 7. Adjust to final mounting position and clamp down tight. I have attached some pics below. I hope they help. Here is the link for the case although I found mine at Walmart so I did not have to pay the s&h. Check there before you order online. I have the 2nd gen ipod nano. 1st gen ipod Nano: http://www.accstation.com/dappnanolc18.html 2nd gen ipod Nano: http://www.accstation.com/dappnanolc52.html 30g-80g ipod: http://www.accstation.com/dappipodca23.html
-
Thanks for all of your help. Is there a device to hold the rpms steady when syncing the carbs. When you are doing it by yourself, there should be a throttle clamp of some sort or some way to keep precise rpms. Thanks again Midnight ryder:cool10::cool10:
-
 Well we are trying to get the engine out of my 84 so that we can fix 2nd gear. Right now the problem is that we cannot get the pipes to separate from the collector. Tail pipes are off but the front and rear exhaust pipes just will not come loose. Afraid of breaking the collector and it appears to be in good shape. Any ideas? Is there a trick? I already broke one of the bolts trying to loosen the clamp on one of them. (gonna be looking for a clamp probably) At least that clamp is loose now. :-)
 -
Axle clamp bolt - dumb question?
Godlover posted a topic in Royal Star Venture Tech Talk ('99 - '13)
When I removed my front wheel all I needed to do was loosen the main axle bolt and remove the calipers. I mounted the new tire and put the wheel back on then torqued the bolt to 58lbs. I read on a forum about an axle clamp bolt - is there a bolt I need to tighten to secure the main axle bolt? -
i broke the upper clamp on my Marklands , you can see the one with the broken clamp and what it looks like whole on the other one , i need to beg , borrow , or steel one but i would prefer to buy one from someone . me and my bad knees would be very thankful ! Thom
-
Hey all, bought kuryakyn longhorn offset dually highway pegs 7980. Just can't seem to get them exactly where I want them. Couple questions? -The clamp that snugs to the engine guard. Does it make a diff. where it goes? Either facing forward or backward? My foot seems to be catching the longarm part with the clamp facing backtowards the bike. -any torque specs on the bolts? I have tightened it to all most breaking point & the clamp is still slipping off the engine guard. (1") Maybe a piece of rubber inside the clamp?? & finally any pics of how you may have yours installed? Thanks Gang,
-
 Tried searching internet for the V-Twin clamp 31-9920 chrome clamp to mount HD mufflers to the RSV Is this something that can come from HD dealer or other bike shop. I did see some on Ebay but don't like dealing with it so does anybody have a part # or web site to get these.
 -
I Love the other mods for the passenger floorboards they have been great idea's! I was even making a set until I talked with GunnyButch and had him shoot me so photos and with the new conversion to trike I can not have them in that area. Finding Afterwords that my wife needs more forward leg room anyways do to an old injury. she needs to stretch them while riding once in a while. so going down-word will not make her happy.... After saying that.. This is what I came up with on my proto type. I made my templates out of Aluminum (easier cutting and drilling) In this proto type I used the aluminum that I had laying around. the angle was 2 inch. ( will go to 1" Steel) But you must use a 1 inch die aluminum rod for the pegs to bolt on perfect (peg clamp). I will be making the bottom support out of steel painted black, the round aluminum will be polished like chrome when I am done The length now on the rod is at 6 inches long. Just want to make sure the height requirement before I cut to the right size and round the top. I also used the same Kuryakyn Pegs as I use for the front (7980 Longhorn Dually 1" clamp) I got to thinking of Dons Center Stand, and bolted to the same spot he did. also adding two large hose clamp on each side of that helped as well for even more support to the bikes frame on the underside. Anyways , shoot away with any comments you have so I can learn and maybe even make this better. Not having the center stand anymore, I am thinking that even if you still had one on there you could use longer bolts and still be able to attach at the same point. Here are some pics.. [ATTACH]26871[/ATTACH] [ATTACH]26872[/ATTACH] [ATTACH]26873[/ATTACH] [ATTACH]26874[/ATTACH] [ATTACH]26875[/ATTACH] I have a few other idea's and I will Post when this project is complete If it seems to be a winner I will to a write-up on the dimensions of it .
-
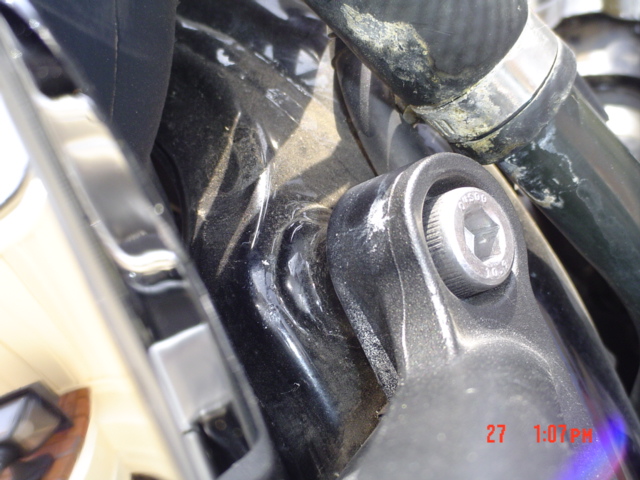
2nd Gen owners... You may have a slow water leak.... and not even know it. This slow leak can only be seen when the fuel tank has been removed because of its location. The water hose clamp I found leaking is located just above the right hand side engine dog bone. The leak will appear as a white powdery substance on the rubber hose, or on the hose clamp. You may even notice a spot or two on the TOP of the rear valve cover located on the right side front jug. Look carefully because it looks like dirt. I was able to turn the clamp tightening screw about 6 turns before it finally became tight on the hose. NOTE: Do not over tighten the hose clamp where it cuts into the rubber hose. I enclosed this picture to help you see what it will look like.
-
 So I will be installing RK mufflers on my RSV this weekend. Got Brad's brackets (Thanks Brad, by the way, they look great) and got the wide V-Twin muffler clamps. The inside of the clamps have a ridge at one end on the ID side. 3/4 of the ID is one size and 1/4 of the ID is a little smaller. How do I install the clamps with this smaller I/D on one end of the contact surface. Do I put the smaller ID onto the pipe and the larger ID onto the slotted end of the muffler (but clamp might not tighten all the way on the mufller side), or do I install the smaller ID onto the slotted muffler end ? Did you guys use any high temp silicone to seal everything up ? Your help will be greatly appreciated. Long live this forum !
 -
Use caution when ordering these extra wide clamps from Choppercycle. If you look at the pictures (use Link) you will see a raised rib portion on the inside of the clamp. The raised portion of the clamp makes the clamp too small to allow the muffler to fit unless you spread the clamp open. If you spread the clamp open it will fit over the muffler but because of the extra thickness the rib presents it wil not tighten down properly on the exhaust pipe. If you want to use these clamps you will need to grind this raised portion of the clamp down. This took me about 40 min each and I went through 6 dremal sanding dics. I didn't notice this when I ordered the clamps. They do look good however. http://www.chopperscycle.com/page/VTS/PROD/42-264/24032
-
I don't know if this has been covered before or not, so I'm asking.When you install RK mufflers on a Venture has anyone noticed that at the joint there is a exhaust leak?I put high temp silicone on the joint and used new RK clamps. The left side seems worst then the right side.I took them off several times and moved the clamp to different positions.Right now the bolt on the clamp is at the bottom and is covering the slits of the muffler at the top and bottom.Each time the mufflers were removed new high temp silicone was applied.Is this problem something that has to lived with or does anyone have a solution?
-
I was wondering if anyone knows if the Yamaha STR-4YV27-17-03 handle bar clamp will work on a Venture if you have the risers installed? It looks to me like the clamp will not clear the inside of the fairing where the cruise control on/off switch is located. Does anyone know for sure? Thanks http://i40.photobucket.com/albums/e224/royalsteve/STR-4YV27-17-03.jpg
-
I bought a cheap lift table off eBay, and found it wasn't safe to put my Venture on. So while surfing eBay, I found a set of plans for a wooden table that uses your floor jack for lify power. Here are a few photos. http://i81.photobucket.com/albums/j204/DragracerUSA/DSCN7766.jpg http://i81.photobucket.com/albums/j204/DragracerUSA/DSCN7767.jpg Here's the Venture secured by the clamp. http://i81.photobucket.com/albums/j204/DragracerUSA/bike2.jpg Here's the finished product, painted, and with an over center front wheel clamp similar to the Condor. I found plans for it on the Internet. http://i81.photobucket.com/albums/j204/DragracerUSA/DSCN8160.jpg http://i81.photobucket.com/albums/j204/DragracerUSA/DSCN8163.jpg http://i81.photobucket.com/albums/j204/DragracerUSA/DSCN8161.jpg


.thumb.jpg.176b2ebbe9863175975d94710375c414.jpg)