Search the Community
Showing results for tags 'bracket'.
-
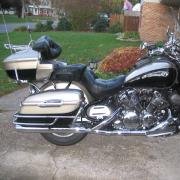
 Here are a few pics of the detachable bracket i'm manufacturing & selling. This bracket has Rosette thumbscrews which make the on/off process quick & easy. There are six (6) one inch slotted holes to make the bracket fairly universal, although you may need to drill your own holes if your tour pak can't make these holes work. Can be purchased in black powder coat to match the bikes framework, unfinished (either one $199.00 + shipping) chrome plated ($325.00 + shipping). the Rosette thumbscrews will screw directly into the existing threaded (chrome capped) hole on either side of fender bracket. http://i42.tinypic.com/1hcpk0.jpg http://i41.tinypic.com/5n55pu.jpg
 -
I was looking at JCWhitney and found these highway boards http://www.jcwhitney.com/Floorboards/GP_2002565_N_111+10211+600014704_10111.jcw?currentRecordCount=12 the live chat lady claims that the horizontal mount for the bracket is due to bracket design??? That seems like a bunch of compost. Anybody seen these, use these or have an opinion on? And yes they be pricey!! I am looking to mount something like this on the vertical support for the engine guard since that would allow for better angling and will provide the requisite offset to clear the fairing and still be able to plant your feet. ('course cheaper would be nice) Thanks.
-
As some of you remember and though I was CRAZY in this last thread, http://www.venturerider.org/forum/showthread.php?t=32974 I took the template and some advise from some of you folks and came up with a formed 1" round stainless steel rod. Then I had a bracket placed were the kick stand goes. (off set under there as well) then had the Darn thing Chromed. (Thanks Mike for bring that part back) great guy! Wife is very happy that she now can extend her legs outward It also does not get in my way. I almost had it figured out a way for the kickstand not to hit the darn thing when up.. gave up since I did my Trike Conversion last month and had the kickstand removed anyways. Just thought I would share my finished results. Wife tried then today on about a 100 mile ride. she loved them! I also placed a Shinny New Quarter one each side. one from Iowa were we live now and the other from were we came from. Calif. The support strength from this new bracket is stronger then the ones that I have up front, off the crash bar. Take a look! the last few are from under. Still trying to up-load pics folks.. something is wrong.. not working right today.. Jeff
-
Well we finally got the 'real' bracket back from the water jet cutter. with a few little tweaks we installed it on my bike. it works just as i had hoped, easy on and easy off. as we were doing the final install, my friend came up with (another) brilliant idea - one of the items which drives up the cost of this unit is the 'locking mechanisms. he figured we could replace those mechanisms with spacers (would be welded to existing bracket) and provide knurled thumb screws which connects directly to the chromed side fender mount, using the hole already in that piece (it is currently blocked off by a chrome cap). of course this would do away with the security of locking the tour pak to the bike. or the other option would be to use one locking mechanism and one knurled knob. my bracket will be painted today and installed tomorrow, i'll post some finished pics. here are a few shots of our final unpainted product. http://i39.tinypic.com/2dueeci.jpg http://i43.tinypic.com/eqv9mv.jpg http://i42.tinypic.com/2e36anl.jpg
-
So I get the new bike home Tuesday night. The wife and I take about a 5 mile ride to check it out. Pull up in the driveway, and notice one of the rear speakers aren't working.. BRAND NEW.. come on now... SO, I call the dealer the next morning, and of course, depends on how busy we are if we can get to it right away or not... UM... I just spent how much for what?!?!?! Got home last night and decided I'll look at it myself.. Pull the seats, and yep, sure enough, plain as day is a a connector with nothing plugged into it... I start looking around for the other end. It's up under the trunk, with the wire running between the trunk and the trunk bracket. You could tell exactly what happened... They put it together, couldn't get the connector pushed back through from between the bracket and the trunk, so said WTF.. it's only one speaker.. I ended up pulling the speaker pod loose, and it gave enough clearance to force the connector through... I also noticed that one of the connectors for one of the antennas wasn't routed correctly and placed in the holder for it.. and another wire laying loose that should have been run through a wire keeper.. SO.. I sorted it all out, put it all back together, and now I got sound all the way around, and no worries of wires rubbing from being in wrong places.. It sure makes me wonder what other problems I'm going to find from the dealer assembly though... If they do something like this with a brand new bike, I'll be damned if I'm going to trust my life to others when you have no ideas if they take shortcuts or not.. At least when I work on it, I know what was done.
-
 I need everyones' help here. I had to alter my left passenger bracket when the sidecar was fitted (had to be altered and raised for frame) now the sidecar is off ready for the trike conversion the floorboard will go back to original position and I need a bracket now. The dealers here will make me take the whole unit of board and bracket for over $AU400. So pleeease, has someone got one out in the garage, or knows how I might get just the left-hand passenger bracket???? :confused24: (2007RSV) Any help would be appreciated _____________________________________________________________________ never ride faster than your guardian angel:2133:
 -
Finally got the prototype detachable tour pak bracket back from the water jet shop (thought it was going to be laser cut). i'm attaching some pics. keep in mind that this material is only .060 thick and the final product will be .125 (i.e. 1/8"). there are several changes to be made, one is more radiusing on several areas, another is removing some additional material from the sides, and possibly utilizing gussets if necessary. you will notice that the front of the bracket uses the stock front mount for the stock backrest, you will also notice the back of the bracket uses additional docking hardware with locking mechanisms. the tour pak in the pic is one i purchased for approx. $110.00 (plus shipping), it is ABS plastic and actually has lines on the top of pak which mimics the gas tank lines. we will be repainting the tour pak (getting rid of that silly yellow dot on the top of tour pak) and will also be painting the bracket to match the bike. feedback would be appreciated, thanks. and keep Freebird in your prayers and pay your subscription today (additional donation would be awesome)!! http://i44.tinypic.com/x391dg.jpg http://i42.tinypic.com/fn5j43.jpg http://i42.tinypic.com/359flnm.jpg http://i43.tinypic.com/2iqho42.jpg http://i42.tinypic.com/aamg.jpg http://i41.tinypic.com/zss36x.jpg
-
Finally got the prototype detachable tour pak bracket back from the water jet shop (thought it was going to be laser cut). i'm attaching some pics. keep in mind that this material is only .060 thick and the final product will be .125 (i.e. 1/8"). there are several changes to be made, one is more radiusing on several areas, another is removing some additional material from the sides, and possibly utilizing gussets if necessary. you will notice that the front of the bracket uses the stock front mount for the stock backrest, you will also notice the back of the bracket uses additional docking hardware with locking mechanisms. the tour pak in the pic is one i purchased for approx. $110.00 (plus shipping), it is ABS plastic and actually has lines on the top of pak which mimics the gas tank lines. we will be repainting the tour pak (getting rid of that silly yellow dot on the top of tour pak) and will also be painting the bracket to match the bike. feedback would be appreciated, thanks. and keep Freebird in your prayers and pay your subscription today (additional donation would be awesome)!! http://i42.tinypic.com/359flnm.jpg http://i44.tinypic.com/x391dg.jpg http://i42.tinypic.com/fn5j43.jpg http://i43.tinypic.com/2iqho42.jpg http://i42.tinypic.com/aamg.jpg http://i41.tinypic.com/zss36x.jpg
-
I finally got back out in the garage yesterday and finished doing all the work that I had planned to get done on the bike over the winter and had been procrastinating about. I even repaired the windshield bracket where the plastic tabs had broken. Never fails, read about something on here, go out and check the bike and sure enough there it is, broke. Oh well, I made up the brackets welded them to the ends of the windshield bracket and bolted them to the speakers. Good to go. Just had to change the oil and wash the bike. I got the oil change done this morning. Then we were invited to an Easter brunch at noon. So I figure as soon as we get back I'll give it a quick wash and I can go out and enjoy the rest of this beautiful day and break in the new tires. OH NO! I no more then finished drying off the bike and in comes the neighbours to visit. They leave and in come some other friends to visit too. By now it's about 6:30 and the temp is dropping and it's time to eat. No ride today, but it was close. Hope it's nice tomorrow.
-
 Made the modification and it worked out fine - see http://www.venturerider.org/forum/showthread.php?t=20293 . I even found the bracket you used at Menards. Also tried a different approach with an "L" bracket - didn't work out too well - was, in my opinion, just too stiff and might cause some cracking in the ABS - was also just butt ugly (see pictures). Thanks for a good write up on the subject. Jinksy
 -
I removed the tape player and created a small storage compartment I also installed a duel plug-in for mp3 and whatever else. My question is: I would like to know if anyone has purchased or made a handlebar or other type mounting bracket for the mp3 player? Any ideas would be appreciated. Thanks
-
Last weekend Craig ("Clearview Shields") and I mounted one of his new "Shields" on my 2007 RSV. We have developed an axhillary bracket to help support the windshield on the outer edges closest to the handle bar grips. I have stated in other posts that this seems to be an area that needed some support over the factory design. This should give added support especially for the taller & wider "shields". The brackets should work with any style & brand of shields. They connect to the outside bolt of each speaker and attach to the outside metal factory backer bracket and windshield. I will post Photos if anyone is interested. Craig at "Clearview" can answer any questions about the new shield design and the bracket design. I believe he will make the brackets available for a modest fee if the is enough interest. More later, Thanks DNB
-
I bought my 09' about 3 weeks ago and the bike comes without the cd player installed. The dealership has to order the players and then install it for you all on yamaha's bill. My CD player is now in at the dealer and I was thinking of just picking it up and selling it off before it ever comes out of the box. It comes with a storage bracket and a rubber isolation case to go around the player. What I am looking for is a picture of the CD player installed in the right saddle bag like it is suppose to be on the 09'. Can anybody help?
-
Hi, does anyone have the step washer for the back wheel that goes between the wheel and the caliper bracket, and the washer that goes between the caliper bracket and the swing arm!! desperate to get in a few more rides before snow fall. thanks Gord
-

Let's fix the passenger footpegs once and for all!
Guest posted a topic in Royal Star and Royal Star Tour Deluxe Tech Talk
OK folks I have read just about everything I can find on the forum here (and several others) and seen a few of the mods that folks have done to lower and stretch out the passenger floorboards/pegs. Perhaps with a consolidated effort we can master this and come up with something we can all use. Sooooo - let's limit this conversation to a "custom fix/fabrication" and stay away from recommending the Diamond R etc. It seems most of those do not drop the position just lengthens it. Here is how Boe did it on an '06 RSTD: http://www.venturerider.org/forum/showthread.php?t=23575&highlight=passenger+highway+pegs And here is how Jercoupe did his mod: http://www.venturerider.org/forum/showthread.php?t=16960 And according to another post I read we can use peg mounts from a Road Star - since the mounting has not changed. If this is so - then we should be able to use this Kury adapter: (attached below) With this attachment - we should be able to mount this on the back of the stock mount (maybe a spacer or two) and then attach a Kury longhorn offset with a peg - and retain the original floorboard. (This is the first picture attachment - I decided not to go this way) Whatcha think? OK - let 'er rip - let's solve this issue once-and-for-all so that we can all benefit with lower pegs/floorboards Shep Information added 10/11/08 OK folks - I decided to go with Jercoupe's modification with a few "slight" changes. The main change being that I decided to weld my 1/4 in angle-iron "onto" the existing passenger bracket. (I thought it might have a little more strength this way and allow me to use slightly shorter bolts to put everything back together. I am going to try and give a step-by-step of what I have done so far. (And I want to say "Thanks" to those who have gone before me on this mod - really they have done most of the engineering.) 1. I bought a 3' piece of 1/4" 2X2 angle iron from Lowe's - Home Depot didn't have it. You won't use it all - but that was the shortest piece I could find. 2. I cut 4 pieces off the end at 3 1/2 inches long. (you will need 2 for each bracket) 3. Next I drilled 2ea - 5/8 in holes - 2 inches on center on one side of the angle iron. Keep these holes as close to the top as you can. This will allow more at the bottom of the bracket to but up against the frame for rigidity. (remember you will need to do this for 2 brackets.) 4. This one might be a little hard to explain - There is a U-shaped bracket that comes with your Longhorn clamps. The bolt that holds the clamps on goes through the clamp first - then this U-shaped bracket and this bracket is what keeps the peg from turning. (Picture attached) a. The edge of this has to be trimmed off to fit over the edge of the 1/4 angle-iron where the peg will mount. (check out Jercoupe's mod above - he has a good picture of this. 5. Once this bracket and the corner of the angle-iron is "form fitted" to each other you can drill the hole in the corner of this piece of angle-iron. No guess work here - because the bracket gives you the location of the hole. 6. Now you are ready to weld the two pieces together. (Picture included) 7. Now you have some grinding to do to get those welds flat. (You must do this before your next step of welding your new bracket to the old one or you will not be able to reach the weld between them. 8. Slip new bracket with the 2 5/8 in. holes over the old floorboard bracket and weld together. (It helps to "round out the tops" of the new bracket holes to allow for the welds on the old bracket so it will set flush better. (No turning back now:Laugh:) Now you are ready to "fit" everything" together as a dry-run: 9. Bold up the Longhorn and its peg first (leave loose for adjustment). 10. I bought new metric bolts 1/2 in longer to mount the entire bracket to the frame. 11. You will need spacers between your new "system" and the frame - this allows the bottom of your new bracket to hit the frame at the bottom and also keep your mount - tight at the top. I just slipped a couple of larger nuts over the bolts for the dry run. But have since bought spacers. 12. Everything should bolt up well and as you can tell from the pictures - this adds a new variable passenger position with about a 5 1/2 in drop. (If you need more forward as well as the drop - just slide the botton angle-iron piece more to the front of the bike before you weld them together. Will add more as I make the other side and smooth them all out for paint. Shep -
Do you have the bracket for the Stebel Air Horn that will fit my 06 Midnight Venture? If so please PM me as to method of payment for the bracket. Much thanks...........Boomer
-
(Copy2).thumb.png.4e3eec1576b3e080ae685eca64852a8a.png) OK, so like many others, I bought one of them Bad boy air horns at Harbor Freight. The stock horns I had were just about as useful as a tender whisper in an offender's ear, so I had to do something. I bought the horn, happened on to some scrap 3/8" aluminum to cut a bar from, and went to work. The original horn bracket was way too short to mount the air horn, so I cut a new bracket from the aluminum scrap I had. I cut the bracket, drilled the holes and mounted the horn. http://i38.tinypic.com/2pt544i.jpg http://i38.tinypic.com/2885uzo.jpg I ran it like this for a couple of weeks and everything worked fine, but I really didn't like where I had it mounted. It just stuck out there like a sore thumb. So I set to looking for an alternate location, preferably down lower at the front of the front engine guard. We just happened to have a couple of small 90 degree brackets laying around at work, so I spirited them home and got to work once again. Here's what I came up with. http://i33.tinypic.com/2cyo844.jpg http://i38.tinypic.com/16gjtyd.jpg http://i35.tinypic.com/2edyyhg.jpg I like this set-up a lot better. And since I have an extra bracket, I can now mount a second horn on the other side! The overall appearance is a lot cleaner and there is less exposed wiring and I now have two spots where the original horns were that I can use for mounting passing lights. my only concern at this point is concerning heat from the exhaust pipe possibly melting the plastic. I've only had the horn in this location one day so far and I check it every time I stop to see if it's getting hot. So far it's staying quite cool.
OK, so like many others, I bought one of them Bad boy air horns at Harbor Freight. The stock horns I had were just about as useful as a tender whisper in an offender's ear, so I had to do something. I bought the horn, happened on to some scrap 3/8" aluminum to cut a bar from, and went to work. The original horn bracket was way too short to mount the air horn, so I cut a new bracket from the aluminum scrap I had. I cut the bracket, drilled the holes and mounted the horn. http://i38.tinypic.com/2pt544i.jpg http://i38.tinypic.com/2885uzo.jpg I ran it like this for a couple of weeks and everything worked fine, but I really didn't like where I had it mounted. It just stuck out there like a sore thumb. So I set to looking for an alternate location, preferably down lower at the front of the front engine guard. We just happened to have a couple of small 90 degree brackets laying around at work, so I spirited them home and got to work once again. Here's what I came up with. http://i33.tinypic.com/2cyo844.jpg http://i38.tinypic.com/16gjtyd.jpg http://i35.tinypic.com/2edyyhg.jpg I like this set-up a lot better. And since I have an extra bracket, I can now mount a second horn on the other side! The overall appearance is a lot cleaner and there is less exposed wiring and I now have two spots where the original horns were that I can use for mounting passing lights. my only concern at this point is concerning heat from the exhaust pipe possibly melting the plastic. I've only had the horn in this location one day so far and I check it every time I stop to see if it's getting hot. So far it's staying quite cool. -
Brad25ca, is in need of a Bracket from an old Carb Set for his 86. Anybody out there who has replaced his complete Carb Set, might still have the parts laying around that he needs. ( part he needs cannot be ordered seperatly ) Its the Bracket assembly that holds the Throttle " Pull " cable In place, located between the two left side carbs. If anybody can help, drop him a message !!!
-
Anyone know if a set of bub slip-on pipes for a RK will fit using the RK bracket and clamps that we normally use for a conversion ? Thanks tj:doh:
-
 I had previously posted a query about how to repair the broken rear trunk lock bracket which broke off the lid. A lot of suggestions forwarded and a lot of attempts 'attempted' but they failed unfortunately.. Even using the ABS glue and sealant, making a slurry trick didn't work (poor man's welding). No matter what I had tried, a day's ride and vibes would break the bond. I can now happily say I have the lock bracket glued and secured in place for the past 2 weeks with a lot of locking useage, variable heat and humidity and vibes to really put the test to it and it's a good bond.. this one ain't going to come apart. Ultra Bond Plastic Expoxy... It comes in a purple package, comes in the typical 2 parts mini-containers. You brush on one liquid to both parts and let dry 30 secs, and then apply a bead to one part, and press together for 30 secs.. full solid bond in 24 hours as most 2 part epoxies do.. I tried to find an online image of the package to make it easier for others to locate but to no avail.. Oh and when they say "caution, bonds skin instantly" they mean it.. kewl. The product causes the two parts to melt and bond, basically 'welding' to each other very nicely. So, after 2 weeks, the bracket is rock solid and shows no signs of fatigue or re-cracking. I still have the package in the trunk, if someone is desperate enough to need to see it I can do a pic and post it.. etc.. FYI to a fix that actually worked.. =)
 -
If any of you know anyone who has an 1100 Vstar Custom that wants to put the 1100 Classic Silverado bags on it, I have a bracket that I make to make this happen. They are not listed to fit the bike, but I ran them on my custom for 10,000 miles. They really looked great. If you know anyone, I have a set of the bags for sale with the bracket. I also have the template to make the bracket if anyone just needs the bracket. Safe riding to all!
-
.thumb.jpg.5bc608c29d230c44c77c79acb0510cd8.jpg) I pulled the rear light bar off the 83/84/86, and the license plate bracket had been removed many years ago. Anyone have an 83-85 Mark I bracket laying around I could buy off them??
I pulled the rear light bar off the 83/84/86, and the license plate bracket had been removed many years ago. Anyone have an 83-85 Mark I bracket laying around I could buy off them?? -
I need a headset cord 1 (part #1NL-88196-00-00). This is the cord that goes from the radio unit to the tank cover bracket. If anyone has one I'd appreciate contact!
-
I'm looking for a replacement bracket for my right wind-wing, the black pot metal one. Somehow mine broke. Any thoughts? Le Roy
-
Got new rubber front and back - but I got to tell you getting the rear wheel back on was a pickle. Don't know what I was doing wrong. Loosened up the 4 bolts to the rear drive, but still had the dickens of a time getting the tire past the protrusion that the caliper bracket fits over.. The bracket & caliber kept getting in the way - just too tight of a fit. What was I doing wrong?

.thumb.jpg.176b2ebbe9863175975d94710375c414.jpg)