V7Goose
-
Posts
3,588 -
Joined
-
Last visited
Content Type
Profiles
Forums
Gallery
Events
Store
Everything posted by V7Goose
-
Wow, a full 3000 miles before the tire started coming apart! Now someone ask me again why I will never buy a Metzeler... And to top off that wonderful experience, you even get the pleasure of getting stranded and having to pay even more money for a tow. Sure glad nothing worse happened!. Me, I would absolutely walk before I would give that company even 1 cent for a tire - just not worth the risk to me, my bike, and others, nor the aggravation of dealing with such a terrible company. You can get new tires from Southwest Moto in about 3 days (standard shipping - free when you buy two). If you decide to order a decent skin, give me a shout - I'll show you how to mount it on my tire machine. And that offer goes for anyone else that wants to come over to my place in the DFW area - happy to help anyone out, as long as they are not mounting a Metzeler (just not worth the liability risk to me to be connected in any way with one of them). Goose
-
.thumb.jpg.4e1b3809c4633f365ba67afc212f21df.jpg)
Fuse Issue---Lower Faring
V7Goose replied to Everette's topic in Royal Star Venture Tech Talk ('99 - '13)
It is not a screw - it is a self locking rivet. 1/4 turn releases the inner post to pop up (a little), then you pull the whole thing out. Easier to get out than back in. To replace, you have to hold the inner post up just enough to let the bottom petals compress. Once you manage to get it back in place, you just push down on the center post to lock it in. Goose -
Just an FYI for anyone wondering about pulling a trailer with the 2nd Gen - I built the cheap Harbor Freight utility trailer a while back for general use and to occasionally haul my dogs (the kit is about $125 with 8" wheels). I didn't do anything special except make certain the frame was exactly square when building it. Up 'till now, I have only used it for relatively short trips locally, but yesterday we decided on the spur of the moment to take a trip up to Oklahoma - no plans to have someone take care of the dogs, so I strapped the travel crate onto the trailer and took off. After 500 miles, I am thrilled at how well this little utility trailer tracked behind the bike. I decided that I would not pull it over 70 MPH, but it pulled so effortlessly that I had to use the cruise to keep from having the speed creep up when on the highway. I absolutely could not tell this thing was there at anything over 15 MPH - and even under that, the only issue was some noise from the hitch rattling when I hit a bump. Even with a fairly stiff crosswind, the trailer was unaffected. This little trailer may be ugly, but it sure is a great deal for the price! Goose
-
This is standard for all the 2nd Gens - strange, but still normal. Nothing I know that you can do about it. Goose
-
Many Many of us have had that worthless rear shock go out - that is what happened to you. Usually it just pukes the oil and still holds air, but sounds like your's we the other way. Get the dealer to replace it. May or may not be "safe" to ride that way, but sure won't be fun. Take it in. Goose
-
Sorry, but at that price, there is no way I would even consider attending such an event, and I can afford it. Seems way out of line to me. Being forced into such a choice, especially at per-person rates, is not my idea of wise planning. I wouldn't support them. Goose
-
I have done some detailed comparisons - you can find that info with a search on my posts from last summer. In short - the Elite J&Ms are very good, but horrendously expensive. The mid priced J&Ms are complete garbage. The OLDER cheap J&Ms had the same great speakers as the Elites do, but I do not know if that is still true. The Edsets are MUCH cheaper and very close to and probably as good as the J&M Elite. Goose
-
Unless you are meeting a group on running 19, don't expect to find anyone just monitoring the radio - just does not seem to happen. Goose
-
Well, I swore I was not gonna add anything else to this thread, but I just cannot help myself. As far as big feet go, I wear 13s, and I also always wear cowboy boots (they tend to be longer than other boots in same size), and I have absolutely NO problems fitting my big feet on the floor boards and moving them around with the stock heel/toe shifter. It is not a matter of space, it is all in what you want. If you don't want it, you will find lots of excuses why it is no good. If you do want it, you will adapt to whatever you have. I personally find it terribly uncomfortable to up-shift with the toe on floorboards. But that is just me. I get to enjoy what I want, just like everyone else gets to make their own choices! Goose
-
driver's seat bolt nuts
V7Goose replied to dharnie's topic in Royal Star Venture Tech Talk ('99 - '13)
All this talk about needing to find replacements for the seat nuts seems strange to me - I have over 50,000 miles on the 2nd gen RSV, and I have never had any problem with the stock nuts coming lose. Taking them of only takes a quick 1/4 turn with the 10mm socket, then they spin off quickly with the fingers. Works fine for me. -
I don't do a lot of welding, but manage with both arc and gas. A couple of years ago I was intrigued watching the dude at a bike show patch holes in coke cans and engine side covers with these rods and a propane torch, so I bought some. Side note - they are expensive at these shows - now available quite reasonably at Harbor Freight! Anyway, I didn't try them for over a year, but had a need a while back so I got them out and started playing around with a big hole punched in the bottom of a coke can. Turned out it was quite easy - just like he showed (it absolutely helps to actually see it done before you try it). They work extremely well on many types of aluminum, but some types of casting are very difficult - sorry I do not know enough to accurately specify the differences. The instructions tell you that the best way to weld the casting type of metal is to make a sand form and heat it in there to effectively re-cast it, using the rod like a binding agent. In my opinion, using these rods is something of a cross between welding and brazing, but closer to welding. It is interesting to heat the metal to the point the rod melts as you wipe it over the top, then watch the rod metal effectively disappear as it is "sucked" into the metal while you continue to gently heat it. Because the two metals seem to actually combine, that makes it very different than brazing. I think a propane torch is ideal for this work, as the rod, and aluminum in general, has a very low melting point; you do need to be careful to work in the right temperature range if you don't want to see the base metal suddenly disappear on you! When welding with this stuff, you don't actually melt the base metal, just get it over the melting point of the rod and let it "suck in" some of the rod. In this way it LOOKS more like brazing. In the little I have done with it, welded joints seem to be quite hard, but not brittle. When I patch a hole punched in the bottom of a coke can, I cannot punch a new hole through the patch - it is much stronger than the original can. On the other hand, I had a piece of aluminum bar stock that got bent, which weakens the metal and makes it bend much easier, quickly breaking. I welded the weak point after straightening it, and it continued to bend easier than the original stock, but it did not break like the un-welded bar stock would. I did not experiment with any type of annealing or heat/cooling treatment to attempt to make it stronger again, but that might be an interesting experiment. If you do any welding or brazing at all, this stuff is worth trying out before you give up on an aluminum part. Goose
-
I've been riding floorboards and using heel-toe shifters since the 70s, and I will never accept anything else on any touring machine. Goose
-
Repairing Your Broken Fairing/Windshield Tabs
V7Goose replied to V7Goose's topic in Royal Star Venture Tech Talk ('99 - '13)
Jeff, the brace I made is attached to the original bolt that you find in the end of the windshield bracket where it should be attached to the tabs sticking down from the inner fairing. If the ends of your windshield mounting bracket move at all, the mounting tabs are broken. If you look at the first picture again, you can see me holding the long rear tab that most often breaks off. Even if both the rear tab and the shorter front tab are gone, There is enough ridge still sticking down in the middle to clamp the bracket against if you make sure the new brace is long enough to go clear up to just touch the lip of the inner fairing overhang. Now look at the second to the last picture carefully - this is the right hand side of the windshield bracket as you face the bike. The stock windshield mounting bracket with the rubber strip is obviously in front running across the middle of the picture - nothing is in the way of mounting the windshield. If you look above and behind it, you can see the bracket re-attached to the original mounting tab on the inner fairing (the front tab is still in place). You CANNOT hardly see the new brace at all in this picture, as it is hidden between the screw head and the rubber grommet. What you do see, left to right are: a) the nut encased in the rubber grommet, b) the vertical gold bar is the mounting arm on the back of the windshield bracket, c) the little blue mounting tab sticking down from the inner fairing - notice that this fits in the groove in the rubber grommet OUTSIDE of the windshield bracket mounting bar, d) just to the right of the blue tab you see the end of the rubber grommet, somewhat misshapen from the pressure of the screw against the new brace, e) then if you look carefully at the top of the rubber grommet, you see a little silver piece of the upper corner of the new brace that looks like it is angled somewhat to the left, between the screw head and the blue tab. All of this is attached with the stock screw that was there to begin with, and it simply re-attaches the ends of the windshield mounting bracket to the place they are supposed to be on the inner fairing. The last picture clearly shows the brace in place on the OTHER side of the fairing. I hope using some pictures from the left side and some from the right didn't cause the confusion - I just chose the ones that I thought best illustrated what I was trying to say. You may have to loosen the two center bolts on the windshield bracket (right above the radio) to allow it to shift a little for the ends of the bracket to properly fit against the mounting tabs). On one of the bikes I repaired, I actually had to put a bigger curve in the windshield mounting bracket to make it fit properly. When I got done repairing my 07, the rub marks on the windshield where it had been against the top of the dash showed that the whole windshield had actually moved up about 3/16th of an inch by putting the bracket back where it was supposed to be. Goose -
Using the full WYSIWYG editor, while writing a new post or reply, look up at the right top corner of the Message: screen (the gray box). See the double arrows next to the Font button? Just click the two arrows pointing down to increase the edit window size. Hope that is what you wanted, Goose BTW - if you don't want a huge text box there, but are frustrated by the wasted gray space below the text edit box that makes you have to scroll down to find the submit button, you can make that smaller too by just selecting fewer "favorite" smileys to display on the right side.
-
Actually, there IS a way - I did it myself some years ago. Unfortunately, it is not particularly easy to find, and I cannot remember how to do it. I wanted to make mine smaller again a while back and gave up after poking around for 5 minutes or so. Goose
-
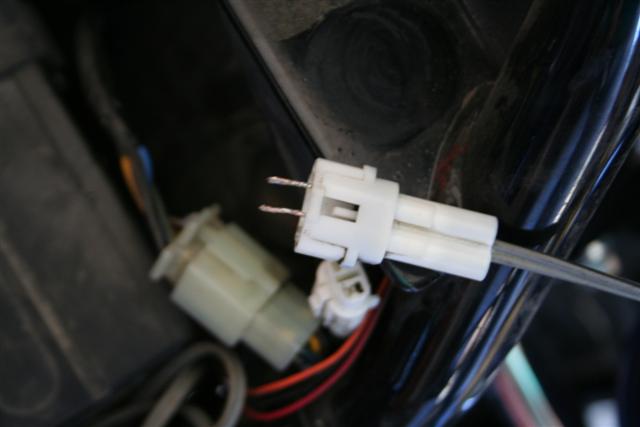
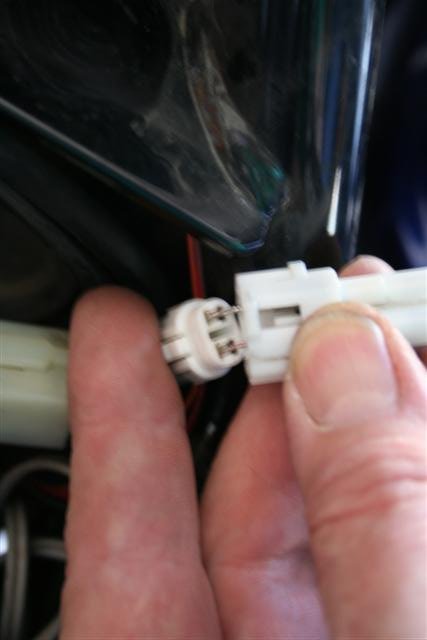
Hey y'all, I found an easy way to use that white aux power plug located just behind the battery on the left side. Even though the cap does not have the necessary pins in it to make a connection, the pin retaining clips work somewhat like wire clamps. I just stripped the ends from some 18 gauge zip cord and tinned it, then used hemostats (or small needle nose pliers) to insert the wire into the contacts in the bottom plug - they fit very snugly after tinning. Here are a couple of pictures - not the best, but you should be able to see what I am talking about: [ATTACH]16155[/ATTACH] [ATTACH]16154[/ATTACH] Just make sure you insert the wires into the metal contacts in the plug, not the empty spot next to them where the retaining clips are (I think that the second picture actually shows me holding the wires in the wrong hole)! The way the plug cap is designed, the wires are protected from accidentally touching once the cap is put back in place. Also, remember that this plug is only on a 5 amp fuse (located behind the right front cowling). Good luck, Goose
-
Hey y'all, I found an easy way to use that white aux power plug located just behind the battery on the left side. Even though the cap does not have the necessary pins in it to make a connection, the pin retaining clips work somewhat like wire clamps. I just stripped the ends from some 18 gauge zip cord and tinned it, then used hemostats (or small needle nose pliers) to insert the wire into the contacts in the bottom plug - they fit very snugly after tinning. Here are a couple of pictures - not the best, but you should be able to see what I am talking about: Just make sure you insert the wires into the metal contacts in the plug, not the empty spot next to them where the retaining clips are (I think that the second picture actually shows me holding the wires in the wrong hole)! The way the plug cap is designed, the wires are protected from accidentally touching once the cap is put back in place. Also, remember that this plug is only on a 5 amp fuse (located behind the right front cowling). Good luck, Goose

-
Check out this thread: http://www.venturerider.org/forum/showthread.php?t=17655 I think most of us have trouble getting full face helmets into this trunk - couldn't Yamahaha just give us an extra 1/4"??? Anyway, changing the bolts helps a lot. I can put two full face Nolan helmets side-by-side as long as I make sure they are touching in the middle and pushed all the way back (but critical to make sure none of the cords are caught under the edge). Goose
-
I HATE pot holes on the super-slab. Not only do they wake me up and knock the cruise control off, they might even damage the bike! So all you members out there who have some in your state, get out and get 'em fixed before I come by, OK? Goose
-
Mine balance just fine using the axle on two jack stands. Doesn't cost a thing. Goose BTW - I have had stick-on weights come off several times over the life of a tire - much prefer the stock type of weights.
-
Yamaha passing/driving lights screws don't fit
V7Goose replied to dharnie's topic in Royal Star Venture Tech Talk ('99 - '13)
Other than being extremely difficult to get a wrench on them, my stock screws fit the new bar just fine. Goose -
The nut on the seat adjusts the camber as he (or she) leans into the turns. It has to be dynamically adjusted on each turn. Caster can be adjusted by judicious application of throttle in lower gears and quick release of the clutch.
-
How do I know if I have a bad rear shock?
V7Goose replied to a topic in Royal Star Venture Tech Talk ('99 - '13)
No way that gauge should go all the way to max with one pump (or even 10). Something is wrong, and it sounds like you may have a bad valve stem in the shock. I'd first try to remove it and make sure it seems to be working correctly. The other possibility is a bad valve in the pump. Put it on a tire and see if you can pump it without it going to max. Goose -
When I first got my 05 I was concerned about noise from the front brakes on very hot days and stop and go riding - Under these conditions they sounded like gravel stuck in the pads. But as soon as I could get up to normal speed and make a stop or two, they would clear right up. I checked them out several times looking for anything wrong (especially scored rotors), but never found anything. That noise seemed to go away after a couple of years, but maybe I just got used to it and quit noticing? While creeping around Daytona this week in the heat and stop-and-go traffic, I noticed the same chatter and groaning from the front brakes on both my 07 and my brother's 07 as I had on my 05 - seems to be consistent. Goose
-
How do I know if I have a bad rear shock?
V7Goose replied to a topic in Royal Star Venture Tech Talk ('99 - '13)
I'm 250, my wife is 130 or so, and we do a lot of touring FULLY loaded, so we've had the bike at least to maximum weight capacity, and I have NEVER had it bottom out. Goose