Fvogt
-
Posts
47 -
Joined
-
Last visited
Content Type
Profiles
Forums
Gallery
Events
Store
Everything posted by Fvogt
-

Need 86-93 Venture headlight unit
Fvogt replied to bobcat's topic in Venture and Venture Royale Tech Talk ('83 - '93)
Yes you can. I did it to my 84 a long time ago. I believe you can just alter the R & L faring supports and replace the upper support & get the small bracket for the bottom of the headlight. I think I wrote something on this & I came across some pictures of how to retain the windshield accent I will post. http://www.venturerider.org/forum/showthread.php?t=17820 [ATTACH]14225[/ATTACH] [ATTACH]14226[/ATTACH] [ATTACH]14227[/ATTACH] [ATTACH]14228[/ATTACH] Fred -
Santa sighting [ATTACH]14211[/ATTACH]
-
From our house to yours Fred & Pat
-
In MHO the size of the battery will limit the amount of heat it can produce over a time period. I personally never got cold around the chest it was my hands and feet that got cold. Of course that is ridding mainly in Nevada and the south of I40. Just a thought.. Fred
-
Replacement Battery 1st gen
Fvogt replied to Fvogt's topic in Venture and Venture Royale Tech Talk ('83 - '93)
That could be right. It is a Canadian product and with the dollar down it is $136 on the site I use. I had one and it served me well. The sealed battery I was getting was $75 I see that has Climbed to $84. Marry Xmas Fred:bighug: -
How much stopping power?
Fvogt replied to mark reed's topic in Venture and Venture Royale Tech Talk ('83 - '93)
I have no problem sliding my front tire on my 84 after I converted the anti dive from hydraulic to electric like the 86-93. I never liked the idea that one side or the other would work unless you used both front & rear brakes. I IMHO if you use braided brake lines you would feel the difference also. Fred -
Replacement Battery 1st gen
Fvogt posted a topic in Venture and Venture Royale Tech Talk ('83 - '93)
While doing some searches for a stronger Battery for my RS Warrior I came across this. http://www.batterystuff.com/batterySearch.php?theType=Motorcycle&theMake=Yamaha&theModel=XVZ13%20Venture/Royale&theYear=1986&m=1#result I have been ordering my batteries from these people for several years and have had good luck with them. They have added a new battery to the ones used for the first gen Venture. It is the bottom one and delivers 350 CCA, which is 25% more then, the top one that I normally buy for just $10 more. They ship free from Oregon via UPS or USPS to anywhere in the lower 48, Sorry Canada, Alaska, Hawaii. Thought this might help someone Fred -
Jack http://www.venturerider.org/forum/showthread.php?t=17207 look at this Fred
-
Yes sir It's a good deal I got my GAP in 1997. One thing not mention is Camping in Nat-parks is 1/2 price. So if you are a camper / RV / tent you can realy cash in. Fred
-
Pics as promissed
Fvogt replied to Condor's topic in Venture and Venture Royale Tech Talk ('83 - '93)
Jack that was the color of the most popular of the 91's sold. Steve and I have the left overs from 1990 Fred -
Carb Question
Fvogt replied to CrazyHorse's topic in Venture and Venture Royale Tech Talk ('83 - '93)
11 3G2-14231-34-00 . JET, PILOT AIR (#170) . . . . . . 1 behind the DIAPHRAGM 14 3G2-14231-16-00 . JET, MAIN #80 (#80) . . . . . . . 1 Top of carb 40 4G0-14142-37-A0 . JET, PILOT #37.5 (4G0-14142-37-00) . . . . . . . . . 1 inside the carb 44 3G2-14231-25-00 . JET, MAIN (#125) . . . . . . . . . . 1 In side of carb Fred -
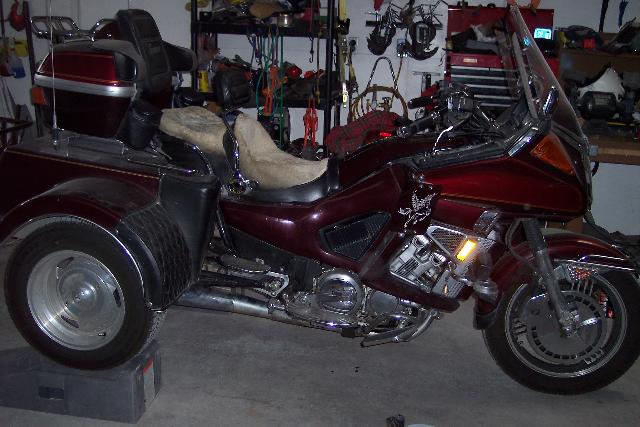
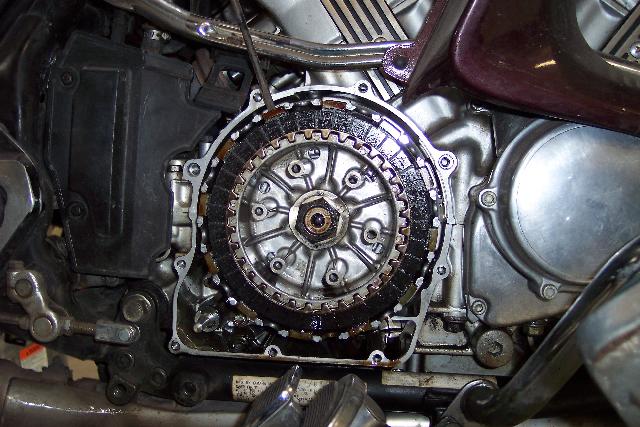
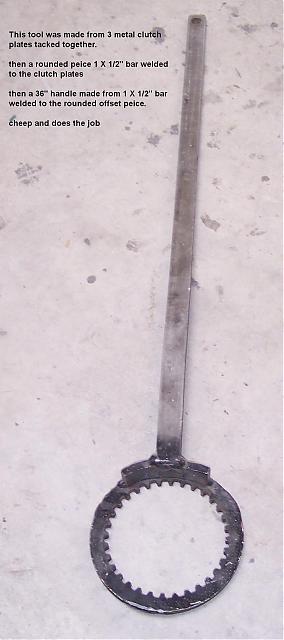
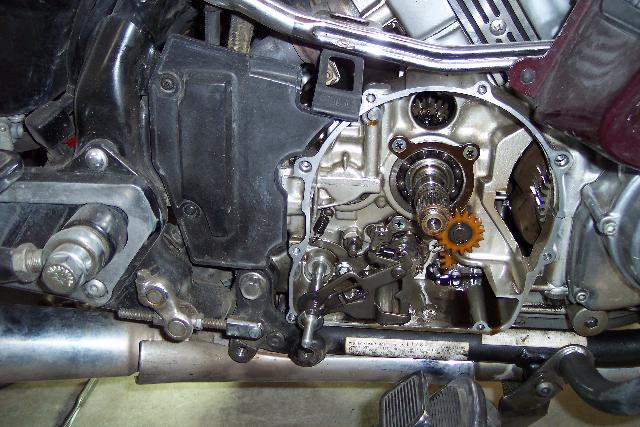
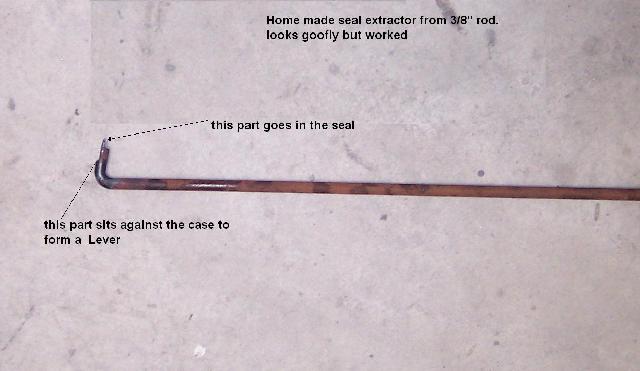
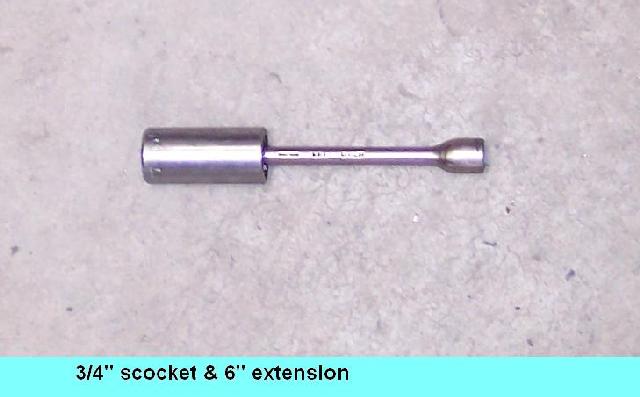
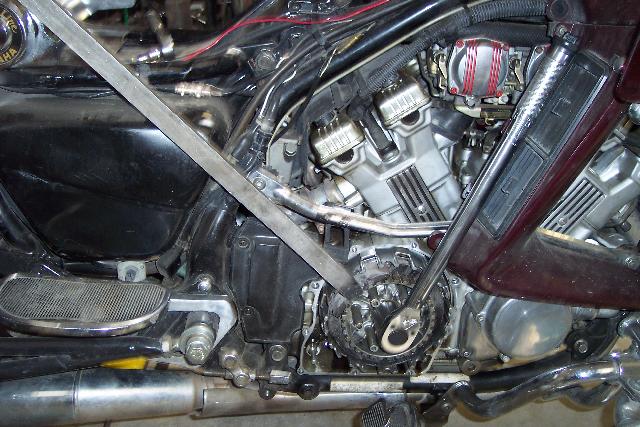
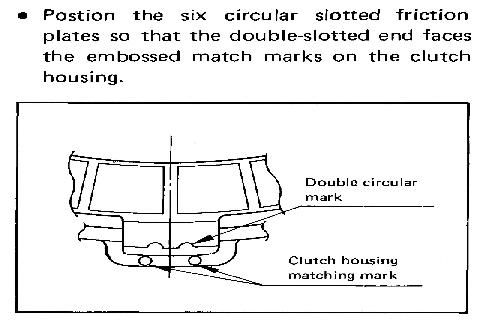
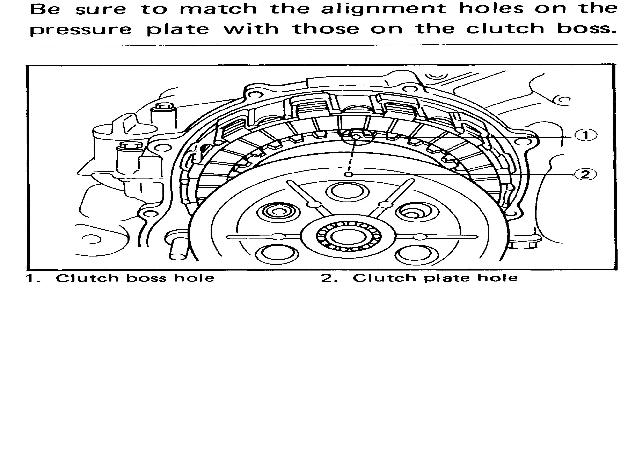
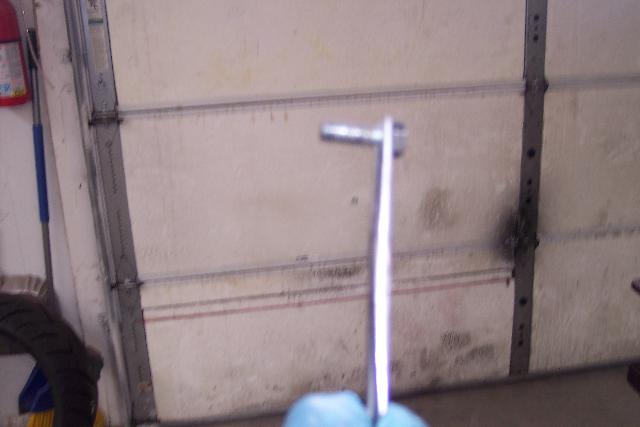
Is your Venture vying to look like an old Harley? Last year I developed a leak that I thought was the mid-cover gasket so when I repaired the stator that started to dye and the center bearing in the transmission, I replaced all the gaskets. Now that should have been that, but the leak is still there spotting the floor like a bad puppy. I have let the trike set for a long time (2 months) and noted that the leak was getting worse, so I took a look at the underside of the motor and found the culprit. It was the seal on the shift shaft at the rear of the motor and this was first time that I have had this seal leek. The fix Having a trike to work on will make this easier because I can put the trike on auto ramps that will make the oil go forward in the engine and not have much come out when the Mid-gear & clutch cover are removed. It also gives me an extra 6.5 inches of space under the bike that will make this job a lot easier. If you have a lift it would make this job easier also. 1) Remove seat, tank top, side covers. 2) Note the position of the clamp at the end of the shaft, mark the shaft so you can put it back in the same position. My shaft was marked. Remove the 10MM bolt & Spread the clamp with a blade screwdriver and remove the clamp with the screwdriver and leave it attached to the screwdriver. (See driver.jpg) 3) Place oil collectors under the case covers cuse it’s gonna leak. Now remove the foot pegs, clutch cover & mid-gear cover. 4) Remove the clutch spring (s) & pressure plate. Use a screwdriver to remove the clutch plates keeping them in order so they can be put back in the same position (yes it is important!). (see Rplates.jpg) You do not have to remove the clutch plate held in place with the wire. 5A) Bend the locking tab away from the nut & while holding the clutch boss with Yamaha or home made tool, use a 30MM socket and remove the nut, plunger and ball bearing. (See tool1.jpg) If you have an impact wrench go to 5B 5B) You can use an impact wrench to remove the nut, but you will need the tool to torque the nut when you reinstall the boss. 6) Remove the clutch boss, thrust washer and clutch basket. 7) Lift the claw on the shift mechanism and pull it out about 2” this will clear the seal. (See claw.jpg) 8) I had to make a tool to remove the old seal because I have did not have anything that would do the job. (see tool2.jpg) 9) Be sure to oil the new seal then Install the new seal by taping into place. I did this by using a ¾”socket with wheel bearing grease on the end & 6” extension inserted in the socket backwards. (See tool3.jpg) Now use the female end of the extension to seat the seal into place. 10) Now reinstall the shift shaft by lifting the claw into place on the shift barrel. 11) Install the basket, washer and boss on the shaft and tighten the nut to 50 FT LB holding the boss in place with the tool. Lock the nut in place with the locking tab. 11A If you don’t have a tool to hold the boss & because this shaft is part of the transmission, if you re-attach the bracket to the shift shaft and put the motor in 2ed or 3ed. Then it should be possible to hold the foot brake down and torque to 50 FT LB. I have not tried this but I can’t see why it would not work. 12) Install the clutch plates the way you found them. (See Iplates.jpg) 13) Now reinstall the clutch Ball bearing, plunger, presser and spring(s) torque bolts to 5.8 FT LB. plate (remember to align the dots on the presser plate & basket “See dots.jpg”) 14) Use the screwdriver to put the clamp back on the shaft & a pair of Forceps to put the bolt back in the clamp, tighten clamp with 10MM socket. 15) Put the case covers back on and torque the bolts to 7.2 FT LB 16) Replace foot pegs or the floorboards. 17 Replace any lost oil. [ATTACH]13770[/ATTACH][ATTACH]13771[/ATTACH][ATTACH]13772[/ATTACH][ATTACH]13773[/ATTACH][ATTACH]13774[/ATTACH][ATTACH]13775[/ATTACH][ATTACH]13776[/ATTACH][ATTACH]13777[/ATTACH] [ATTACH]13778[/ATTACH][ATTACH]13779[/ATTACH][ATTACH]13780[/ATTACH] This repair is not particularly difficult, but the space is very small to work in. I did have a problem in removing the old seal and had to make a tool. Fred
-
Is your Venture vying to look like an old Harley? Last year I developed a leak that I thought was the mid-cover gasket so when I repaired the stator that started to dye and the center bearing in the transmission, I replaced all the gaskets. Now that should have been that, but the leak is still there spotting the floor like a bad puppy. I have let the trike set for a long time (2 months) and noted that the leak was getting worse, so I took a look at the underside of the motor and found the culprit. It was the seal on the shift shaft at the rear of the motor and this was first time that I have had this seal leek. The fix Having a trike to work on will make this easier because I can put the trike on auto ramps that will make the oil go forward in the engine and not have much come out when the Mid-gear & clutch cover are removed. It also gives me an extra 6.5 inches of space under the bike that will make this job a lot easier. If you have a lift it would make this job easier also. 1) Remove seat, tank top, side covers. 2) Note the position of the clamp at the end of the shaft, mark the shaft so you can put it back in the same position. My shaft was marked. Remove the 10MM bolt & Spread the clamp with a blade screwdriver and remove the clamp with the screwdriver and leave it attached to the screwdriver. (See driver.jpg) 3) Place oil collectors under the case covers cuse it’s gonna leak. Now remove the foot pegs, clutch cover & mid-gear cover. 4) Remove the clutch spring (s) & pressure plate. Use a screwdriver to remove the clutch plates keeping them in order so they can be put back in the same position (yes it is important!). (see Rplates.jpg) You do not have to remove the clutch plate held in place with the wire. 5A) Bend the locking tab away from the nut & while holding the clutch boss with Yamaha or home made tool, use a 30MM socket and remove the nut, plunger and ball bearing. (See tool1.jpg) If you have an impact wrench go to 5B 5B) You can use an impact wrench to remove the nut, but you will need the tool to torque the nut when you reinstall the boss. 6) Remove the clutch boss, thrust washer and clutch basket. 7) Lift the claw on the shift mechanism and pull it out about 2” this will clear the seal. (See claw.jpg) 8) I had to make a tool to remove the old seal because I have did not have anything that would do the job. (see tool2.jpg) 9) Be sure to oil the new seal then Install the new seal by taping into place. I did this by using a ¾”socket with wheel bearing grease on the end & 6” extension inserted in the socket backwards. (See tool3.jpg) Now use the female end of the extension to seat the seal into place. 10) Now reinstall the shift shaft by lifting the claw into place on the shift barrel. 11) Install the basket, washer and boss on the shaft and tighten the nut to 50 FT LB holding the boss in place with the tool. Lock the nut in place with the locking tab. 11A If you don’t have a tool to hold the boss & because this shaft is part of the transmission, if you re-attach the bracket to the shift shaft and put the motor in 2ed or 3ed. Then it should be possible to hold the foot brake down and torque to 50 FT LB. I have not tried this but I can’t see why it would not work. 12) Install the clutch plates the way you found them. (See Iplates.jpg) 13) Now reinstall the clutch Ball bearing, plunger, presser and spring(s) torque bolts to 5.8 FT LB. plate (remember to align the dots on the presser plate & basket “See dots.jpg”) 14) Use the screwdriver to put the clamp back on the shaft & a pair of Forceps to put the bolt back in the clamp, tighten clamp with 10MM socket. 15) Put the case covers back on and torque the bolts to 7.2 FT LB 16) Replace foot pegs or the floorboards. 17 Replace any lost oil. This repair is not particularly difficult, but the space is very small to work in. I did have a problem in removing the old seal and had to make a tool. Fred

-
Strange concept although I have seen a Venture pulling a Venture. I will say that in pulling heavy things with a Venture you need brakes on the trailer. I know the bike will pull a lot because I ride Venture Trike (1200LBS) to pull a camper (4-500LBS) and can run 80 all day if I wish (&don’t get caught). But stopping is a whole different story. Fred
-
Humm Sounds like fun but it is a little far for lunch (600 MI ) but thanks for the invite Lone Eagle. Rich did you go to the 4 corners rally, I looked for ya but with is as spread out as it was it isn’t suppressing I missed you. Fred:backinmyday:
-
Pat and I went on Royal Caribbean Caribbean on the Radiance of the seas in 04 and had a blast, 06 we went up on the bike and did the walk-a-bot again. The Alcan changed a lot since 1992 when we went the first time. Some friends went with Princess and did the inland passsage and the walk-a-bot last year and loved it. I guess a lot depends on the weather and ruff seas ain't for a good time. Pat and I will do the anniversary thing in 2010 for our 50th. Fred:cool10:
-
Originally Posted by StuD Buddy of mine has same bike, also saw one being parted out in WA...........QUESTION is the trunk is the same as 86 & up have only seen it on this colour 85. Can anyone shed some light on this delema??????????? :canada: I have a 85 rack and it had a removable bag, it is about the same size as the 86-93 but removable. I don't know if both types were made. Fred
-
What did I do wrong...?
Fvogt replied to tooldood's topic in Venture and Venture Royale Tech Talk ('83 - '93)
Better take it back apart and see. I know of nothing that could nock in the case unless you left something inside that don't belong Fred:confused24: -
Stator helpful hint
Fvogt replied to Fvogt's topic in Venture and Venture Royale Tech Talk ('83 - '93)
Thanks for the kind words. I feel if it helps someone then it is well worth it.. Fred -
New twist on how to replace the Stator with out pinching your pinkies. I had thought of trying this a long time ago and when the stator went out on me on the way home from FL, I thought what better time. I took 3 long bolts that came from a water pump, Cut off the heads and rounding the cut off end leaving 6.4CM of stud. Then installed them after removing all the bolts from the case. I was waiting for the pull of the magnet & to my surprise it just slid off. Mind the magnet still has resistance but it is easily overcome. When putting the cover back on, the studs will hold the gasket in place and eliminate the heavy pull of the flywheel there for allowing you time to get the shifter shaft through the case with out a hitch. Fred [ATTACH]10332[/ATTACH][ATTACH]10333[/ATTACH][ATTACH]10334[/ATTACH]
-
air filter alternative sources ?
Fvogt replied to 6m459's topic in Venture and Venture Royale Tech Talk ('83 - '93)
In MHO the K&N is the way to go (K&N air filter # YA-1283) The first filter I bought for the 84 is still in the 84 after 250,000 miles. I clean it and re-oil the filter every odd year. That is more then you have to do But I live in a dusty place. Great value Fred -
thanks for the info I have made a copy for my archive. Well I for one switched to Mobel1 15-50 last year and have put 20k on since and found it to be a good oil for my 84 Venture trike with no clutch problems. Fred