Search the Community
Showing results for tags 'rear'.
-
I have around 50,000 mile on my 02 Midnight. This year maintenance I will be removing the carburetors for cleaning, lubing and adjusting the steering, replacing the fuel filter, spark plugs (Iridium), rear breaks pads, new rear Avon tire, Air Filters, Clearview windshield and oil/filter. These part number and pricing may be some help. Yamaha Fuel Filter: 1FK-24560-10 $12.19 (Dealer) Spark Plug: "Iridium" NGK DPR8EIX-9 (2202) $9.99 each Total $39.96 (Dealer) Break Pads rear: EBC FA124HH (HH for heat) $21.19 (JC Whitney) Air Filters: K&N YA-1399 $82.20 (JC Whitney) Tire Avon Venom: 150/90HB-15 305321 $123.95 (Southwest Moto Tires) Clearview Windshield XXLarge: $135.00+shipping (Clearview Shields)
-
Thinking about Metzlers for my TD. Any size suggestions? I wanted to go with a bigger rear tire, but i'm not sure if it is wise. Any input is welcomed.
-
i found this on another site thought some of you may like to have a look this is not mine im just placeing a post here Travelcade "Road Sofa" by Saddleman for the RS Venture (used, low mileage). Part #Y963J. It features gel inserts front and rear for the comfort of the rider and passenger. It is equipped with a removable riders backrest that is fully adjustable. A goodie pouch is secured by velcro to the rear of the rider backrest and it includes a hideaway shoulder strap for off-bike use. Included with this package is a matching cover for the trunk mounted passenger backrest. The seat material (#96-22 Black) is called SaddleHyde.... it feels and looks like leather, is easier to clean and care for and it offers greater protection from the elements..... $450 Canadian. Shipping is extra and photos are available upon request. ken.jo@shaw.ca
-
I posted this a while back on a similar post and I suspect what you are experiencing is an alignment problem. I have used a procedure for mounting a rear tire on any Venture that will align the rear end perfectly every time. I was told about this proceedure by a Venture mechanic back in 89 or so and have used it ever since. 1. Before removing the tire, put the bike in gear. 2. When removing the rear tire, loosen slightly the 4 - 14mm nuts to the rear member. This will also give you a little wiggle room to remove one of the wider tires. 2. With the tire off remove the 4 - 14mm nuts and remove the rear member and drive shaft. Grease the drive shaft splines and slip it back in the drive tube. This can be a bit tricky but feel for the inner spline U joint and move it up and rotate it where the drive shaft enters the U joint and the studs enter the holes. Put the 4-14mm nuts back on but leave them a bit loose. 3. mount the wheel into the rear member. Grease the axle lightly and slip it into the wheel through (1.) the large washer and (2.) the caliper bracket. Tighten the axle nut to where it pulls the axle through and snugs into place and then loosen the nut. With a 10mm allen wrench, you can rotate the axle. Turn the axle until you feel a loosest spot around the circumference of the axle. Mark this spot at the pinch bolt slit with a file for future alignments. 4. With the axle pulled through and snug, tighten the pinch bolt and then torque the axle nut to 110 lbs. This gets the axle and inner wheel splins into perfect alignment with each other. 5. Now go back with a good 14mm boxed in wrench and tighten the 4-14mm acorn nuts on the rear member in a cross pattern. This now pulls the drive shaft into alignment with the rear member. 6.You are finished with this part and can now put the caliper back on along with everything else that you took off. Now you really don't need to go through this entire process, but you do need to raise the bike where the rear wheel is off the ground and loosen everything up as follows: 1. Raise the bike with the rear wheel off the ground. 2. Loosen the axle nut completely. 3. Loosen the axle pinch bolt. 4. rotate the axle until you feel the loosest spot and mark this spot on the axle at the pinch bolt slot. 5. Loosen all 4 - 14mm acorn nuts from the final drive assembly. Now you are ready to tighten it back up starting with: 1. The axle to the point the axle nut just starts to tighten. 2. Tighten the pinch bolt 3. Torque the axle nut to 110 lbs 4. Tighten up the 4 - 14mm acorn nuts in a cross pattern. If it's still making a clicking noise then take it back to the dealer and have them look at it. If the rear fluid was not flushed at 500-1,000 miles, then you might have a set of needle bearings going bad in the final drive
-
I was thinking about putting SS brake lines on my 05 RSV. For those of you that have done this, how much difference did you notice from the OEM brake lines to the SS? Since Yamaha doesn't seem to offer them for the rear, I presume its because the rear line is so short there wouldn't be a noticable improvement. Am I thinking right on the reason for no rear SS line? Just wonder if there is enough improvement to justify doing it. Cheers, Gary B
-
Have any of you fine folks retrofitted rear speakers onto your first gen? How'd ya do it? Jeremy
-
Forwarded to me by another member. Very good stuff to know. Street Strategies, David Hough "..quickly reach for the front brake and squeeze progressively with all four fingers to allow the weight to transfer forward before applying maximum front brake. Simultaneously, you step down hard on the rear brake pedal, but in the the panic you push down too hard, and the rear end slides sideways in the curve. Your survival rection takes over, and your right foot lets up on the pedal. In a split second, the rear tire grabs the pavement again, snapping the year end back toward the center so violently that the bike flips. You're catapulted off the bike, which tumbles down the pavement behind you. Miraclously, you slide to a stop without getting run over, and your smart decision to wear your leathers even on a short trip pays off. Deciding to do a quick stop was smart, too, and your technique to brake progressively helped prevent a front-wheel slideout. Overbraking on the rear should not have prevented you from stopping effectively, even with the rear end sliding sideways. It was your survival reaction to let up on the rear brake that caused the violent high side flip." Ride Hard Ride Smart, Pat Hahn "How many people really know how to use their brakes? Many riders avoid the front brake for fear of flipping over or locking up the front wheel and losing control. This is an uninformed and dangerous mistake. Under extreme braking on a two-wheeled motorcycle, the front brake accounts for 75-90 percent of the bike's stopping ability, and does so with mind-boggling authority. As the brake lever is squeezed, weight is transferred to the front tire, increasing traction and stopping power, which allows the rider to squeeze still further. As more weight is transferred forward, more traction is transferred forward, more traction is available, allowing the rider more braking power. As the motorcycle loses speed and the front end decompresses, the weight begins to shift back toward the rear tire, allowing the rider more grip from the back. But by now the bike's stopped, and you're in first gear, ready to scoot out of the way of the car approaching rapidly from behind. You knew about that because of your mental strategy--you were aware before you made your emergency stop of who was behind you, how far back they were, and how attentive they were. That, and you could hear the screeching tires. .... Like swerving, this isn't something you read about and then execute whenever you need to. It, also needs to be learned and practiced. An additional note on swerving and braking: they absolutely must be separated from one another--they cannot happen simultaneously. You can either swerve or brake, but not both at the same time. Each maneuver uses tremendous amounts of traction, and the traction available on a motorcycle is limited. When you push your motorcycle beyond that limit, the result is usually a crash. Here your mental skills again come into play: You must decide beforehand whether you will swerve or brake, or if you need to do both, when you will swerve and when you will brake, and how you will separate them to maintain control of your motorcycle."
-
Well, Mine finally went after 30k miles on my 05.Its got oil all over the boot and the lower mount.I wonder how many here have had the shock replaced at least once, and how many have had it replace more than once. If you have had to replace your rear shock post a quik reply so maybe we can get a count. Just added some pics of what to look for for those that have not had this problem yet
-
I see in a couple of posts that some people are very adament about not using DOT5 brake fluid. I have been using it for well over a year on the RSV in the clutch and front and rear brakes as well as in the front a rear brakes on my 1997 Honda Shadow ACE for about 4 1/2 years. I have had no problems, leaks, loss of brake strength or anything to indicate this is the wrong stuff. I do know that you need to be careful and not mix any different types. Please explain why you feel that this is so wrong. If Im headed for trouble I would like to fix it before but it should have happened already if it was.
-
Hey folks, does anyone know of a kit that turns your rear turn signals into a combination tail light/turn signal? I own a '06 RSV. I have a friend who bought such a kit from HD, and it really looks great. T/Y!!
-
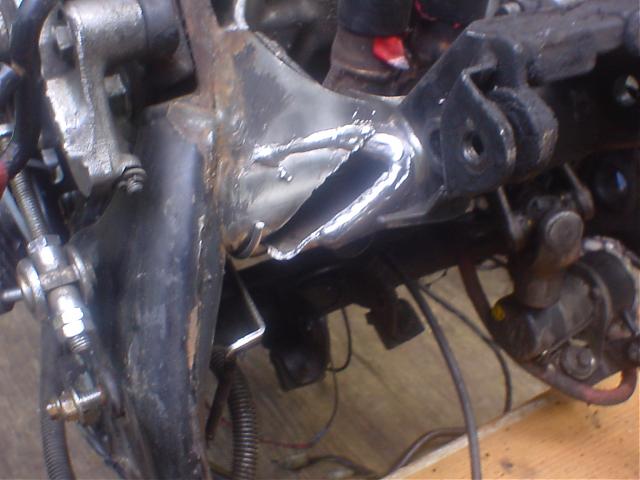
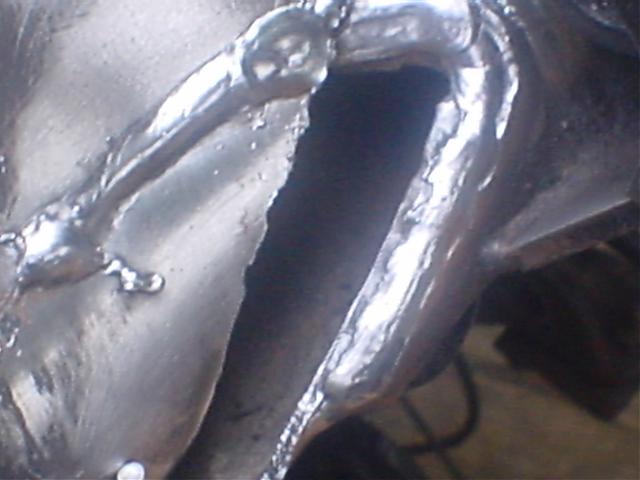
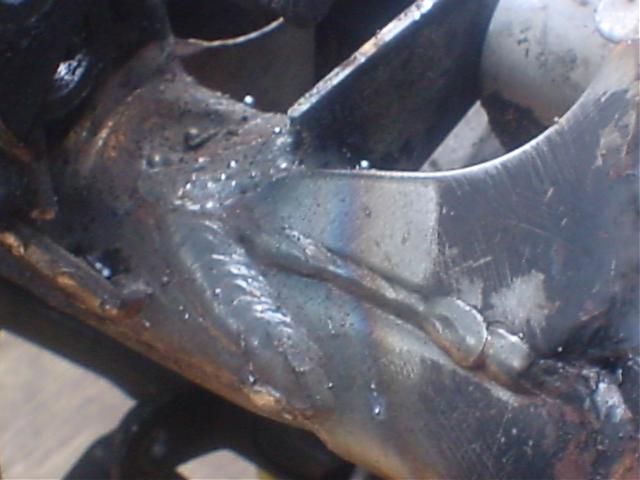
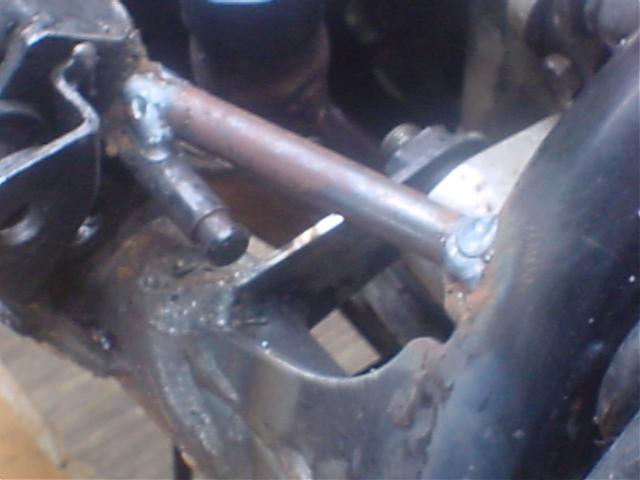
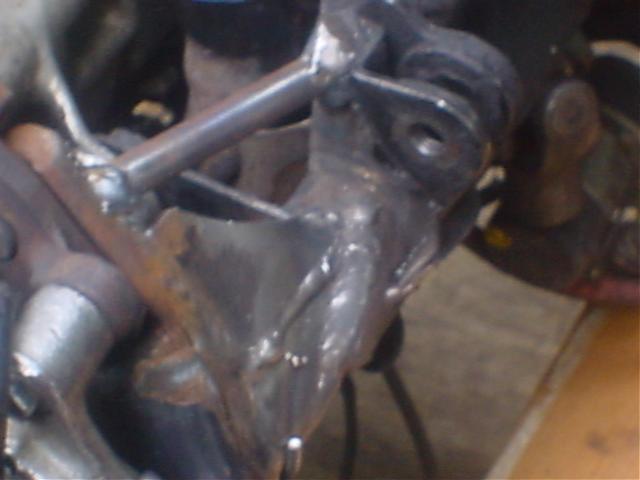
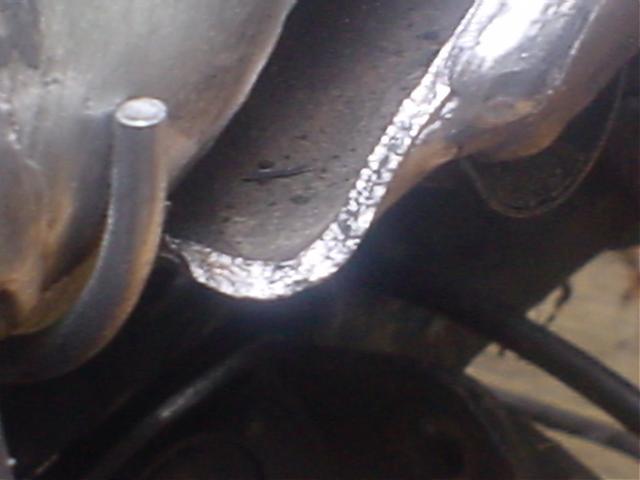
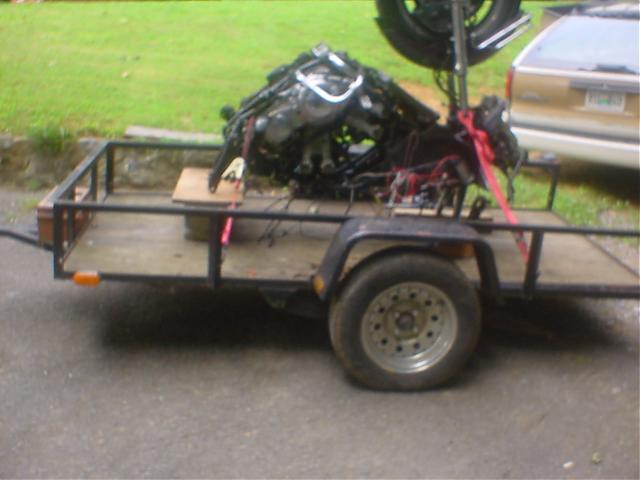
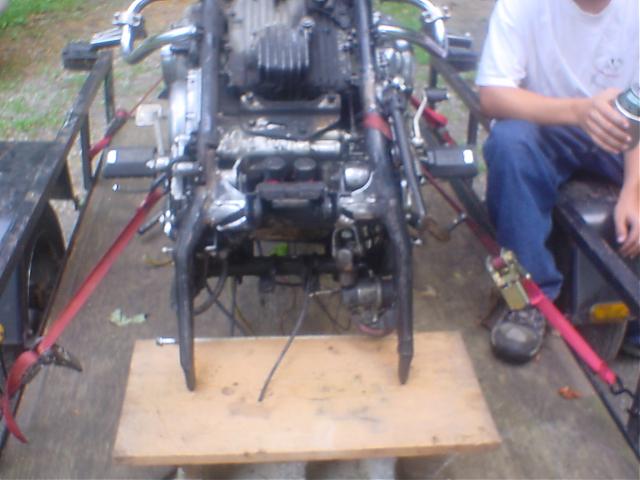
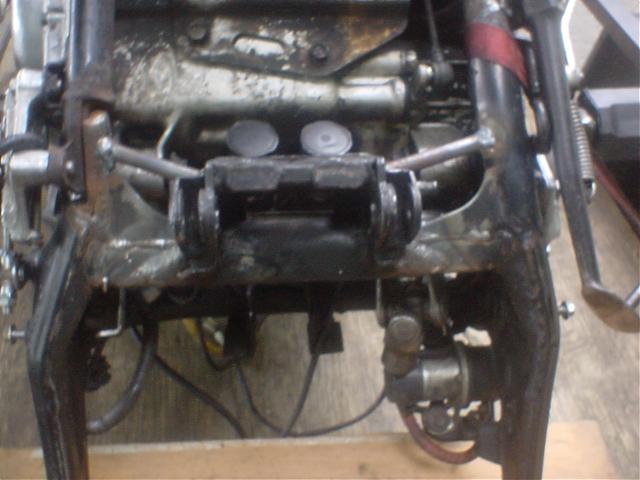
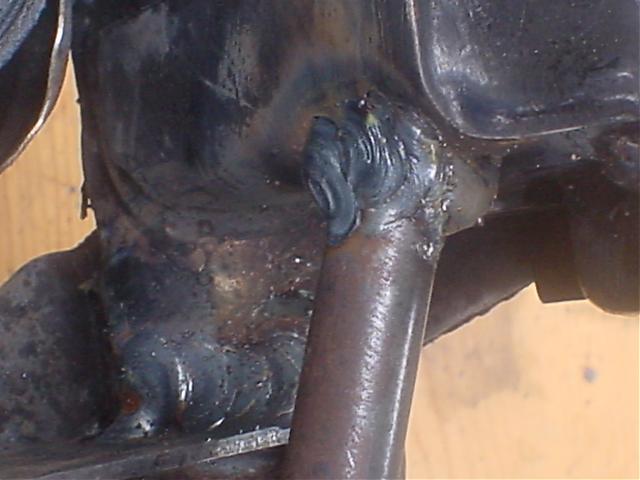
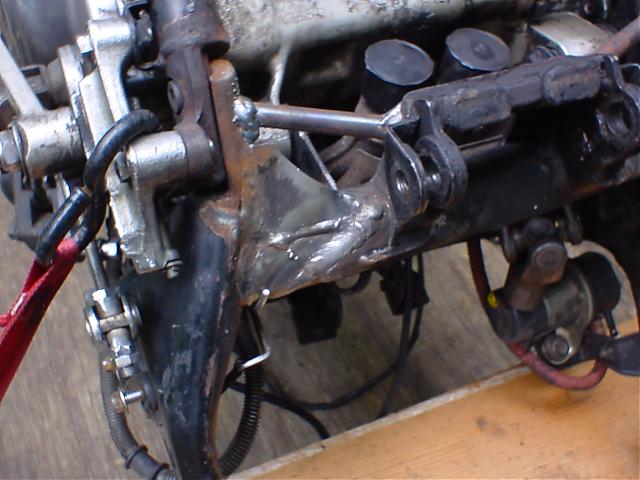
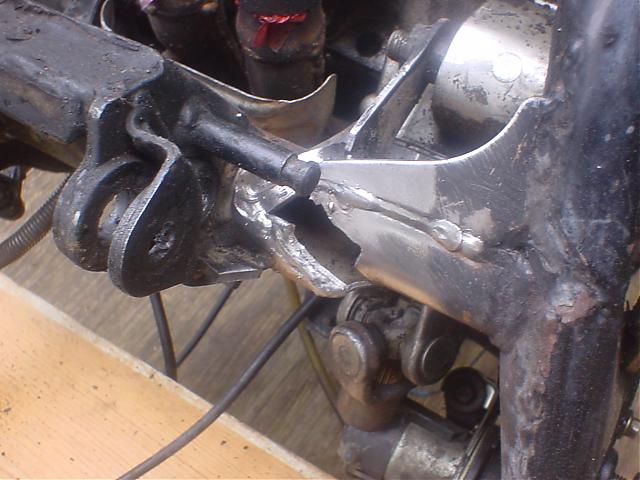
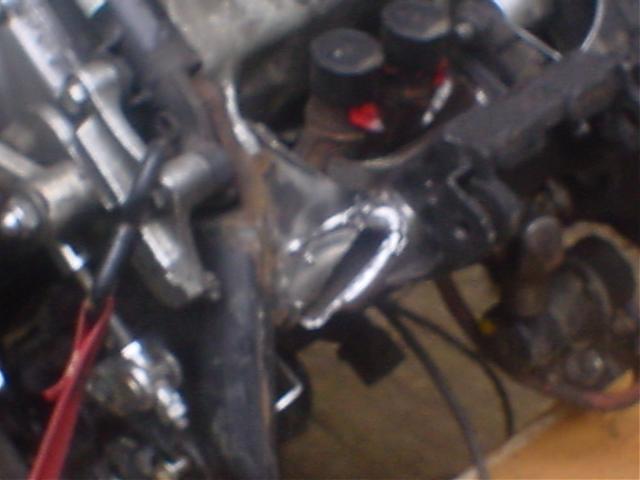
Sunday, after getting our camping stuff set up in Townsend TN, below Gatlinburg, my son and and grandson on their Yamaha FZ1, and the wife and I on the Venture took off down the Foothills Parkway to ride the Dragon. Just after we turned onto 129, as I hit a bump at the beginning of the first bridge, I thought I had a blowout or busted the rear shock. When I found a good place to pull over, the rear tire looked fine and when I checked the rear shock pressure, it was what I had it set on. When I looked under it, I saw that the rear suspension linkage had shifted forward and the frame on the cross bar was twisted and split. I have checked the frame several times on my 83 Venture and felt confidant that my frame had been replaced with a new one somewhere in its earlier life. I had asked what to look for on this site and was told to look for gussets and any signs of rust. There has never been any signs of rust and the frame looked beefy with gussets around this area. My first look with a flashlight does not indicate any rust present in the split areas and the frame walls look aproximately .075 thick and shiney. The bike is still sitting on the trailer that I hauled it home on Sunday night. At the moment I have the bike sitting upside down on my trailer. I have all the plastic off except the front fender and the rear frame section off. It appears that what has happened is the center section has twisted and split. I am taking it to a friend that has made a living as a welder and has built many racecars. I am going to have him look at it and see what we can do. I know that if he will agree to tackle it, it will be stronger than new when he finishes it. What really concerns me is this frame WAS NOT RUSTED AT ALL. It just twisted with the suspension pushing up and the engine weight pushing down on the other side. I did see areas that appeared to have poor weld penitration. I will post some pictures as soon as I can. Well, she is sitting upright and the rear suspension is on. I took it to my racecar building buddy and he did a great job getting it back right. He also added some 3/8 rod from the tower that has the suspension mount and center stand over to the frame, creating a triangulation for much added strength. I had my collector with me so we could see where we had room and it would not get in the way. Even though there was obviously some poor welding, but absolutely no rust, I feel I may have also contributed to the problem over the last nine years that I have had the bike. I have routinely spun the bike around while on the centerstand. My garage floor is very smooth and the bike spins easy, but I am going to stop doing that as this has probably put a lot of pressure on the frame in that area.

-
Submitted by Bill Anton If this is something you may need to do (Sunday or Monday when bike shops are closed) print the procedure and put it in your owners manual. DISASSEMBLY PROCEDURE ===================== NOTE: This info is specific to the 1983-1993 Yamaha Venture motorcycle. Make intelligent (safe) changes for other motorcycles. Included in the procedure are REASSEMBLY torque specifications. The size listed is for the socket or wrench, not the bolt thread size. Initial tools required: - ratchet - 3" extension - sockets: 12mm, 14mm, 19mm - 14mm box-end wrench (if you loosen/remove the final drive) - 27mm flat wrench (rear axel nut) - 6mm Allen wrench (front axel pinch bolt) - pliers (for cotter key) OR get a get a 5/32" $0.75 hitch pin clip (Lowes / Home Depot) and never have to hassle with the archaic cotter key again - tie-down strap(s) - carpet / cardboard (for under forks) !! IMPORTANT: Control the bike's weight balance to make it safe to work around. You may have to ADD some WEIGHT to the REAR of the bike (saddlebags & trunk) BEFORE starting the procedure, so the front of the bike doesn't fall when the front wheel is removed in step 13. You should REMOVE everything from the saddlebags & trunk AFTER the front wheel is removed so the rear of the bike doesn't fall while working on the rear wheel. 1. Put the bike on the centerstand. 2. Connect tie-down straps from the bottom of the centerstand legs, to the engine guards. Pull them as snug as practical. 3. To keep the fork tubes from getting damaged in step 10, place a cardboard or carpet (from a car?) under the front tire area. 4. Loosen the right muffler-to-exhaust clamping bolt - 12mm. REASSEMBLY - Torque 14 ft-lbs. 5. Remove the right muffler mounting bolt - 14mm, and remove the muffler. REASSEMBLY - Torque 18 ft-lbs. 6. Remove the rear brake caliper - 2, 12mm bolts. REASSEMBLY - Torque 32 ft-lbs. TIP: Use axel wrench flat end to spread the brake pads during reassemble. 7. Loosen (not remove) the rear axel pinch bolt - 12mm. REASSEMBLY - Torque 14 ft-lbs. TIP: If the cotter key is aligned vertical, file marks on the pinch bolt end of the axel for easier future alignment. If it isn't aligned vertical, make the marks when you have the axel out. 8. Remove the rear axle nut and washer - 27mm flat wrench. *** DO NOT REMOVE THE REAR AXEL NOW *** REASSEMBLY - Torque 110 ft-lbs. TIP: Replace the cotter key with a 5/32" hitch pin (Lowes / Home Depot). 9. Front wheel remove: 1. Remove both brake calipers (2 bolts each) - 12mm. REASSEMBLY - Torque 32 ft-lb TIP: Get 2 pieces of cardboard 4"x4" and fold them in half and insert them between the pads to hold them apart TIP: Use axel wrench flat end to spread brake pads during reassemble. 2. Loosen the front axel pinch bolt - 6mm Allen wrench. REASSEMBLY - Torque 14 ft-lb 3. Remove the front axel bolt - 19mm. REASSEMBLY - Torque 75 ft-lb 4. Remove the front wheel. TIP: When you pull the wheel out, the speedo cable and drive will fall away -- don't worry unless you are over a dirt surface. REMINDER: On reassembly the speedo housing top-tab goes into the fork notch. 10. Carefully lower the front of the bike until the fork tubes are on the cardboard or carpet. 1. Start slowly pulling down on the fairing near the mirrors 2. As the pull-down becomes easier, slide one hand under the fairing for support 3. Squat a little as the fairing gets lower 4. As the weight increases, bring the other hand down for more support ****** REMOVE WEIGHT from the saddlebags & trunk for better counter balance. 11. Remove the rear axle. Notice the caliper bracket washer, it goes between the bracket and the swingarm. 12. Remove the brake caliper bracket. 13. Remove the 4 final drive attaching nuts - 14mm. then reattach one lower nut 1 1/2 turns so the drive shaft can't pull out of the U-joint and waste a lot of time to put it back together. REASSEMBLY - Torque 30 ft-lb 14. Pull the final drive rearward until it is against the nut. This gives a little more clearance to get the tire past the final drive. CAUTION: The wheel and tire weigh about 42 pounds. Be prepared for step 15. 15. Pull the wheel away from the final drive, and out of the swing arm. 16. Roll the rear wheel out under the fender and do what you removed it for. *-*-*-*-*-*-*-*-*-*-*-*-*-*-*-*-*-*-*-*-*-*-*-*-*-*-*-*-*-*-*-*-*-*-*-*-* Removal of the final drive unit at this point is recommended to lube the driveshaft splines (Molybdenum Disulfide Grease) as long as the wheel is off anyway. See the FINAL DRIVE REMOVAL procedure below. *-*-*-*-*-*-*-*-*-*-*-*-*-*-*-*-*-*-*-*-*-*-*-*-*-*-*-*-*-*-*-*-*-*-*-*-* 17. Reverse the DISASSEMBLY procedures from 14 to 1. - in step 10, do the sub-steps in 3-2-1 order. ---------------------------------------------------------------------- FINAL DRIVE REMOVAL PROCEDURE (optional) ============================= 1. Remove the 4 final drive attaching nuts - 14mm. REASSEMBLY - Torque 30 ft-lbs. 2. Pull the final drive out of the swingarm. NOTE on 86-93 models: The driveshaft oil seal makes the shaft "stick" to the final drive. The driveshaft can be pulled out with a firm force. DO NOT lube 86-93 driveshaft rear splines, final drive fluid lubes them. BE CAREFUL if you pull the shaft out of the final drive, oil can drain from the final drive. FINAL DRIVE REASSEMBLY PROCEDURE ================================ 1. Reinstall the driveshaft: 1. Pull (hard on 86-93 models) the driveshaft out of the final drive. Set the drive aside, being careful to keep it tilted up to prevent fluid loss. 2. Put the transmission in neutral. 3. Use a flashlight, and insert the driveshaft into the swingarm, and use it to align the U-joint so that the yoke is vertical (12 & 6 O'clock), and angled down toward the bottom of the swingarm. 4. Put the transmission in gear (so the U-joint can't turn). 5. Reattach the driveshaft to the final drive. 6. Insert the driveshaft into the swingarm, letting the front end drag on the bottom of the swingarm. 7. Wiggle the wheel mating gear on the final drive to mate the driveshaft with the U-joint - then put the 4 nuts on http://www.venturerider.org/firstgenwheel/Rear%20wheel%20removal%20-%201%20Kneeling%20position%20-%20rear%20view%20(Small).JPG http://www.venturerider.org/firstgenwheel/Rear%20wheel%20removal%20-%202%20Kneeling%20position%20-%20side%20view%20(Small).JPG http://www.venturerider.org/firstgenwheel/Rear%20wheel%20removal%20-%203%20Kneeling%20position%20-%20front%20side%20view%20(Small).JPG http://www.venturerider.org/firstgenwheel/Rear%20wheel%20removal%20-%204%20Kneeling%20front%20view%20(Small).JPG http://www.venturerider.org/firstgenwheel/Rear%20wheel%20removal%20-%205%20Parts%20removed%20in%2010%20minutes%20(Small).JPG http://www.venturerider.org/firstgenwheel/Rear%20wheel%20removal%20-%206%20Centerstand%20tie-down%20strap%20(Small).JPG http://www.venturerider.org/firstgenwheel/Rear%20wheel%20removal%20-%207%20Wheel%20out%201%20(Small).JPG http://www.venturerider.org/firstgenwheel/Rear%20wheel%20removal%20-%208%20Worms-eye%20view%20of%20rear%20wheel%20well%20(Small).JPG http://www.venturerider.org/firstgenwheel/Rear%20wheel%20removal%20-%209%20Rear%20brake%20caliper%20bracket%20position%20pin%20(Small).JPG
-
and picks up a screw, gets plugged runs fine. However I am preparing for an Iron Butt sooo It seems as though Venom's are the most popular. I don't plan on down sizing the front tire (which is the plugged tire) the rear is a dunlap original. Should they both be changed at the same time because of different tred patterns?
-
Hey guys, help me out here if I've missed something, but why is it I've seen in the Yamaha catalog rear LED spoilers already painted for EVERY color they are EXCEPT the Black Cherry?!!!!! And even in the VOTE FOR FAVORITE COLOR forum, you didn't even mention BLACK CHERRY!! Whats up? Does people NOT reconize the 2006 Black Cherry?!! Is there a pre-painted spoiler somewhere out there? Help! mid life crisis
-
Interesting note from the Continental Tyre site on tire mileage: http://www.conti-online.com/generator/www/de/en/continental/motorcycle/img/void_uv.gifMileage A tyre which can achieve high mileage is an asset because a longer lifespan leads to lower costs. The mileage attained by motorcycle tyres and in particular that by the rear wheels of performance bikes cannot be measured in the same way as that of car or truck tyres. Because the motorcyles themselves weigh comparatively less they are able to accelerate faster and during this acceleration the rear tyre slips. This slipping leads to wear on the tyres. A pillion passenger whose weight is mainly placed on the rear tyre helps to prolong the life of the tyre. The rear wheel is pressed onto the road with more force, thereby reducing the amount of slipping. The tyre therefore lasts longer. Side note: Now that I've got everyone running Avon Venoms, I'm thinking of trying the Continentals! I find some of the information on their web site about the TK17 and new Milestone tires interesting. I need to get more information from them - they do not make the stock size for our front tire in the front tire design, but their fitment guide actually specifies to mount a rear tire on the front! First time I have seen this from a manufacturer. Anyone here run Continentals on their RSV? Which style? Your opinions? Thanx, Goose
-
Starter This article should help the do-it-yourselfer understand the probable cause and cure for the starter. The starter is a high speed DC motor that uses carbon brushes much like the ones used in a rechargeable drill motor and can have the same or similar problems. If your starter drags (runs slow) when you try to start the bike in cold weather or when the bike is at operating temperature, you have one of two possible problems: You will need a battery or you need to fix the starter. If the battery is okay, you are going to have to remove the starter from your bike to find the problem. To remove the starter, I would suggest that yon start by removing the radiator and the thermostat housing. I have found the best way to remove the radiator is to take all the hose clamps and four 10 mm bolts on the side, loosen, then pull the top hoses off; then take the bottom ones off using great care with the small hose in the center of the bottom tank. This tube is the only one that is NOT SOLDERED! It is a press fit and if You pry too much or slip and hit it as I did, you will find yourself on the way to the local radiator shop to have it fixed. To remove the thermostat housing, remove the two 5 mm cap head screws at the bottom of the unit and remove the small metal tube; then the large plastic pipe from the housing or the pump. Now remove the two 10 m bolts holding the rear of the starter to the motor and remove it from the motor. NOTE: It's a tight fit, so spray some WD-40 on the front of the starter where it fits into the motor and carefully pry it out. Now that the hard part is done, you should clean the outside of the starter and look for a scribe mark on the front and rear covers where they meet the center part of the housing. Now, remove the two screws that hold the starter together and tap the rear cover off. Note there is an O-ring seal at this joint, so be careful not to damage it! You can now see the rear bearing and the brushes; check them for wear. Carefully remove the front cover and the armature from the center part of the housing. Note this cover also has an O-ring seal. Inspect the parts for rust and wear, use #600 emery paper to clean the corrosion from the commutator. A dirty or corroded commutator is the most likely culprit for a dragging starter with a bad rear bearing running a distant second. If the bearing is stiff when you turn it, try a thin oil or WD-40 on the back of the bearing until it turns freely. This should work unless the bearing is damaged; and in that case, it will have to be replaced. Yamaha does not have a part number for the rear bearing, so take the number off of the bearing and go to your local bearing outlet, then go down to your dealer and have the bearing changed. Check the armature shaft where it fits in the front cover and the gear at the end of the shaft for wear. If you find noticeable wear, the starter will have to replaced. Next, you should check to see that the coating on the copper wires of the armature is not damaged. If you find exposed copper wire, cover it with a coating of shellac, varnish or clear fingernail polish. The last thing to check is the commutator itself. To do this check the spaces between the copper bars to be sure they are free of foreign material and that they are slightly lower than the copper bars. Most starters will only need cleaning, but if the commutator needs work, Page 7-4 of the service manual covers the necessary steps to be taken. If you have decided to replace the brushes, install them before you reassemble the starter. If you found rust inside the starter and you have used the high pressure water at the car wash, you know what to do, or should I say you know what not to do. Reassemble the starter and remember to line up the scribe marks before tightening the screws, and you could also use some non-adhesive silicon to help the O-rings do their job. Test the starter before you install it by using jumper cables and a battery, then test it again after you have it bolted in place. If it passed the tests, reassemble the rest of the bike. Fred Vogt, #01037
-
Frame Front Suspension Fork springs: At the 1985 V-Daze I attended a seminar given by Yamaha Motor Corp. and during that seminar, I asked this question "why do my front forks bottom when I stop on ruff pavement?". The answer "If you have more then 24,000 miles on the bike you should replace the fork springs" I left the seminar and rushed to the Progressive Suspension both and got the last set of after market replacement springs. I have over 176,000 miles on those springs and have been pleased with their continued performance. You can find a link to Progressive Suspension's web site on the links page of this web site. Fork seals: The fork seals on your Venture are tender and if you get even a small neck in the fork tubes they will start leaking! So before you replace the seals be sure to check the tubes for nicks. If you do find nicks, feel them and if you can feel it so can the seal, with a small fine file VERY CAREFULLY smooth only the high spot of the nick. Zerk fittings This article appeared In September l988 Issue of Venture road on page 15 and In 1991 Yamaha installed grease fittings as standard equipment There has been a lot of talk about installing zero fittings on the mono shock assembly and I have heard that at least one Priority Network dealer is doing just that. I decided to start with a set of arms off the wrecked '83 I have in the garage. Although this bike only had 14,000 miles on it, I could see some wear or pitting on all the metal surfaces and after some thought, I set off for the local auto parts store to purchase a 1/4-24 tap, a 7/32" drill, 2 long zerk fittings (11/16" overall) and 3 short ones (9/16" overall). The bill was $5.35 for the lot and as I drove home I could have kicked myself for waiting so long. Procedure... With the bike on the center stand, remove both mufflers and place a board under the rear tire to take the load off the assembly. Then remove the four bolts and the two bearings at the bottom of the mono shock. (Note: There are dust caps on each side of these bearings and they are not all the same, so make a note on where they came from). After you remove and clean both arms, you are ready to get started. I took my time with the first hole between the bushings marked "A", starting with a 1/16" drill, then a 7/32" drill and keeping the tap straight, I tapped the hole and installed one of the short zerks. The bushings marked "B" were not as simple because the '83 Venture has a metal bushing about .030" thick and I felt that the zerk was too long to go straight into the arm, so I used part of the weld to gain a little thickness but a thin washer would also have done the trick. Remember to drill the holes as close to the center as possible so the drill goes through the groove in the center of the bushings. (Note: 1984-87 Ventures have the thicker fiber bushing in the "B" position, so you only need to drill and tap through the one side of the bushing so that the zerk extends a little into the fiber to hold the bushing in place). The last two bushings marked "C" are drilled and tapped through the raised portion and then counter sink the holes with a clearance drill deep enough so the zerk extends into the fiber bashing. After you thoroughly clean the bearing surfaces, re-install the arms back in the bike and use enough grease to insure an even coating. Wipe off the excess grease. Now each time you change oil, give each of the fittings a little shot of grease for a smooth ride. Fred Vogt, #01037 On later models the procedure is the same and on the "C" bushings you will notice a flat spot where it looks like a grease fitting could go. http://www.venturerider.org/pictures/swing.gif Venture Rear Wheel Service You may ask, "Doesn't my dealer do that?" NOT UNLESS YOU TELL, HIM THAT YOU WANT IT DONE. This service should be completed every tire change or 10,000 miles (16,000k) or at least every two years; but in most cases it isn't done because we don't always have a dealer replace our tires and/or we don't tell him to do the work. So if you just bought the bike or you are not sure it has been done, it would be a good time to think about servicing the rear wheel of your Venture. The procedure is fairly simple to do on bikes without a trailer hitch and only a little harder if your bike has one. Remove the rear bags, right muffler, rear brake caliper and deflate the tire; then remove the rear wheel. If your Venture is a 1983, 84, or 85 you will need to remove the rear drive or differential and remove the drive shaft. Clean the drive shaft and coupling, then grease both ends before putting it back in (note: make sure that the shaft goes back into the u-joint. If you are not sure, remove the spring on the boot covering the u-joint and check it. Next clean the spline or gear on the rear drive and grease it with a good quality grease, personally I use a medium Moly based grease. Now find a couple of 2" x 4" and place the rear wheel spline side up on the boards. When you clean the hub and splines off you will see the spring clip or circlip that holds the hub in place; remove this clip and before you remove the hub mark the possession of the hub so you can replace it in the same holes it came from. Now clean the hub and inspect it for wear then apply grease to the inside of the hub and to the six posts that fit into the wheel. Check the o-ring on the wheel to be sure it is in place before you replace the hub and circlip. Check the bearings inside of the wheel and check the bearing movement; if they are rough or worn replace them. Now for the mono shock pivots place a jack under the rear drive to take the strain off of the mono shock then dissemble. Clean and grease all of the pivot points and reassemble (if you have a 90 - 93 or you have had grease fittings installed, just give them a squirt). Before you install the rear wheel take the axle and put it back through the swing arm into the final drive to check the alignment. If you find that it is in a bind you will have to change the wedge shim between the final drive and the swing arm. Check the oil level in the rear drive or replace the oil if it has been 10,000 miles since it was serviced and check the brake pads for wear. You can now reassemble your bike and have another year or two of trouble free riding. Fred J. Vogt, #01037
-
Mic-Mutes Installation Mic-Mutes is a product designed and marketed by VentureRider member Bill Morphy. This is a fantastic product and one of the best things I have done to my audio system. The one thing I have always disliked about the intercom system on the RSV is the fact that the mic is always on. In order to communicate with my wife, I need to set the IC volume on at LEAST 14 and that is borderline if you are in a noisy area or running at freeway speeds. Any higher though and the wind noise picked up by the mics is really a bother, not to mention that it severely degrades the music quality. Mic-Mutes solves this problem with a totally integrated system which allows you to toggle the mics on and off by using the push to talk buttons for the CB radio. Operation is very simple...just press and release either button (front or rear) to turn both mics on. To turn them off, just press and release either button again. To use the CB...simply toggle the mics on and then press to talk as you normally would. After using this system, I can honestly say that no RSV should be without it. This is a quality product at a fair price and not difficult to install. The hardest part of the installation is stripping the bike down and getting it ready. This is not difficult but a bit time consuming. You will need to split the fairing, remove the seat, remove the gas tank. The Mic-Mutes comes with a small black module that will need to be placed either under the seat or near the battery area. I placed the module just behind the battery. Look carefully and you'll see it in this picture. http://www.venturerider.org/micmute/pic10.jpg The wiring is pretty simple and mostly plug and play. Under the rear seat, on the left side, you will see a 5 pin din connector. Simply unplug the connector and plug one of the included headset adapters in line with the separated plugs. http://www.venturerider.org/micmute/pic1.jpg Now you will do the same thing with the 5 pin din connector inside the fairing. There are 5 of these connectors inside the fairing, you want the one that is marked with the red tape. Simply unplug that connector and plug the other headset adapter in line as you did on the rear. http://www.venturerider.org/micmute/pic2.jpg Integrated into each headset adapter, you will see the telephone type jacks. There are two control module cables that come out of the black module. You will want to run the long one to the front jack and the short one to the rear jack. The best way to run the cable is along with the other wiring going to the front of the bike. As you can see in the following picture, there is a guard over the top of the wire way that you will want to remove to run the wires to the front. http://www.venturerider.org/micmute/pic3.jpg After the wires are run, just plug them into the jacks. http://www.venturerider.org/micmute/pic4.jpg http://www.venturerider.org/micmute/pic5.jpg Now that the headset adapters are installed and connected to the control cable, we have to connect the module to the passengers audio controller. This too is done under the rear seat. On the right side of the bike, near the trunk, is a 6-pin connector. Mic-Mutes supplies a tap slice connector to make an easy splice to this wire but I prefer soldered connections. Whichever way you decide to do it, you want to splice the yellow wire from the Mic-Mutes module to the green wire of the bikes connector. http://www.venturerider.org/micmute/pic6.jpg The next picture shows my connection soldered. Then just tape it up well and this part is done. http://www.venturerider.org/micmute/pic7.jpg The last step is to connect the power to the module. Most of you know that there is an unused power circuit under the seats of these bikes. It is located on the left side of the battery on the left side of the bike. It is simply two wires with a white connector which is not connected to anything. This is the easiest place to connect the power to the Mic-Mutes module. Again, Mic-Mutes supplies tap splice connectors for this splice but I chose to just cut the factory white connector off and use butt splices to connect the power. Very simple. http://www.venturerider.org/micmute/pic8.jpg That's it folks. Just put everything back together and test. Mine worked perfectly and does exactly what it is advertised to do. Try it, you will like it. For more information or to order, check it out at http://mic-mutes.com/
-
Curious where the best place to pick up a tire would be. I believe there is many that order the tires on line and have them shipped to you door. I was looking for a rear tire for the 1999 but I would like white walls. Any suggestion on a brand. The Dunlop 404 was the one that I had a problem with, not saying I would not purchase another. Brad
-
How much affect does a rear tire have on the tracking and unstable feel of a bike? A LOT! Much more than I ever suspected. In another thread several weeks ago I reported that I had to take off my rear tire before I had a new one available. Because I ride every day, I decided to re-mount an old Brickstone rear tire that I had sitting around for emergency use. This tire was flat as the proverbial fritter and mostly bald, but I figured I could run it for a couple of weeks. I was absolutely shocked with how bad the bike handled! This thing started trying to weld itself into every groove and ridge on the road, and if there was a spot near a light where the asphalt was bubbled or rolled up from the heat and weight of the cars, the bike would pitch hard back and forth as it contacted the uneven surface. Going over a ridge of uneven pavement between lanes was actually scary. All of this attributed to just the BACK tire alone. Last night after work I finally decided I had to mount the new Avon rear tire. Today, the bike handles absolutely perfectly again! No more tracking, the rolled up asphalt is undetectable, and the bike makes the transition between uneven lanes with hardly a blip. My front tire is an Avon Venom MT90 with 16,000 miles on it - same tire I had on it yesterday when it handled so badly with that old Brickstone rear. Today with a new Avon Venom on the rear, that 16,000 mile Venom on the front is handling every bit as well as I remembered when I first mounted the Venoms. I suspect that the quick handling that we get from the MT90 size up front actually made the impact of that flat rear tire worse than it was when it was still in use with the original front tire. On another note, anyone who has run the stock Brickstones is undoubtedly familiar with the infamous howl they make as they wear. I can conclusively tell you that the flat rear tire is where that howl is coming from! As soon as I put that old tire back on, the howl was back with a vengeance any time the bike as not being held in a perfectly straight line. The slightest hint of a lean left or right would just make that tire wail! Stay tuned for the next phase of this impromptu experiment. In about a month, while that new Avon rear tire is still new, I am going to re-mount the old fat Brickstone front tire to see just what effect that tire alone has on the handling of the RSV. I'll let y'all know! Final bit of information for anyone who has hung in here this far - I use a Harbor Freight tire changer that makes mounting skins a breeze. The learning curve is minor - after about the third tire change, the operation is so smooth and easy that dismounting and mounting a tire is truly a 5 minute operation. If you want to do this work yourself, that tool pays for itself with the very first set of tires you change. For anyone in North Texas who is interested, I'm more than happy to let you come over and use mine s'long as you bring a six-pack with you! I can't supervise without a beer, ya know? Good luck, Goose
-
Thanks to Cougar for this excellent write-up FYI- Picture's of Rear Tire Removal Well, With all the searches and Folks Changing out there REAR TIRE. I learned A Lot today from you guys! And I said to myself ** SELF ? ** why not try this and takes some pics for other folks? Ok, here go's... I did what most of you said ! I did remove the Bags Because I had a hard time getting that little part out for my new Bag Rails. So they were off and Thats when the light went off and figured I have these Brand new Michelin Commanders laying around so I went to work on this project today.. With a Few emails to Mr. FreeBird! I got the Job Done! (thanks) Then I went Ahead and removed Both Mufflers (tell ya why in a bit) http://www.venturerider.org/wheel/thumbnails/attachment_029.jpghttp://www.venturerider.org/wheel/thumbnails/attachment_007.jpghttp://www.venturerider.org/wheel/thumbnails/attachment_025.jpg Then I Used a 1 1/16" Socket and took the main bolt off http://www.venturerider.org/wheel/thumbnails/attachment_019.jpg Then Remove the Rear Brake Caliber and place it on the passenger foot rest. This is also a good time to loosen the pinch bolt on the right side. The axle will NOT slide out if you don't. http://www.venturerider.org/wheel/thumbnails/attachment_014.jpg Then undo the bolt for that swing arm thingy. http://www.venturerider.org/wheel/thumbnails/attachment_011.jpg Now this is were I was glad I did remove the Left side bag and Muffler Cuz I could not for the life of me get that darn MAIN AXLE BOLT out with out having to take my socket extension and hammer it out.. http://www.venturerider.org/wheel/thumbnails/attachment_003.jpghttp://www.venturerider.org/wheel/thumbnails/attachment_010.jpg Here she comes! http://www.venturerider.org/wheel/thumbnails/attachment_005.jpg KEEP IN MIND THAT YOU PUT THIS WASHER BACK IN THE RIGHT ORDER WHEN PUTTING BACK TOGETHER! http://www.venturerider.org/wheel/thumbnails/attachment_008.jpg After the Shaft gets about half way is when I could pull the rest of they way on my own. http://www.venturerider.org/wheel/thumbnails/attachment_005.jpg http://www.venturerider.org/wheel/thumbnails/attachment_027.jpg Note: My bike was on a Lorin Lift. So What I did was have that rear tire about a half inch off the ground when I pulled that Axle. (worked great) http://www.venturerider.org/wheel/thumbnails/attachment_018.jpg Then I lifted just a bit more and pulled from the right side until the tire kinda fell on its own. http://www.venturerider.org/wheel/thumbnails/attachment_016.jpg Now the FUN PART! I just kept lifting http://www.venturerider.org/wheel/thumbnails/attachment_024.jpg MORE http://www.venturerider.org/wheel/thumbnails/attachment_026.jpg AND MORE http://www.venturerider.org/wheel/thumbnails/attachment_015.jpg AND MORE http://www.venturerider.org/wheel/thumbnails/attachment_017.jpg Man it was getting Scary! sheesh! http://www.venturerider.org/wheel/thumbnails/attachment_021.jpg Even with more room left the lift on my jack the tire Came right out! *VBS* PLOP! http://www.venturerider.org/wheel/thumbnails/attachment_004.jpg http://www.venturerider.org/wheel/thumbnails/attachment.jpg Put back together in reverse order ~S~ I also did this as well. Took the main rear Diff off and there was no grease on the Splines. http://www.venturerider.org/wheel/thumbnails/attachment_013.jpghttp://www.venturerider.org/wheel/thumbnails/attachment_020.jpg http://www.venturerider.org/wheel/thumbnails/attachment_002.jpghttp://www.venturerider.org/wheel/thumbnails/attachment_022.jpg http://www.venturerider.org/wheel/thumbnails/attachment_009.jpghttp://www.venturerider.org/wheel/thumbnails/attachment_012.jpg http://www.venturerider.org/wheel/thumbnails/attachment_028.jpghttp://www.venturerider.org/wheel/thumbnails/attachment_006.jpg This is what my Rear Brake Pads look like at 5,100 miles. http://www.venturerider.org/wheel/thumbnails/attachment_023.jpg then I did the Front! (easy) And the lift kept the bike very stable even after the front Tire was removed.. I am impressed with the lift. When my tires get done being Mounted and Balanced I will go into the HUB and get that all greased up as well! (this was very simple after I got it all figured out and the help from reading what you Pro's had to say. Its just sometimes I need to SEE a picture to make me understand more *LOL* I hope this will help folks if needed.. I know I sure could have used something like this. ( this is on a 2K MM with 5,100 miles on her) Jeff P.S. PLEASE add any comments in case I made a mistake ! Thanks! NOTE: this Job could be done in 30 Min's with Pictures *LOL*file:///C:/VentureRider/wheel/showthread.php_files/rasberry.gif PLEASE READ ! OTHER NOTE'S BY, Denden, When you're re-assembling it... After you put the driveshaft in, put the differential on but leave the 4 nuts only finger tight. Then install the wheel and axle. Torque the axle nut to 110 ft/lbs. After the axel is torqued, THEN tighten up the 4 nuts on the differential. John Drummond, "Wrenchman" When you go to install the drive shaft a small diameter wire like an old antenna mast works great for holding the yoke up so you can slid the driveshaft in. Once the shaft makes contact with the yoke you can pull the wire out, and slid the shaft in to the yoke. This might take a try or two to get it in but works pretty well for lining up the yoke. Buz Rutan, "Naturbar" The author of the article says "I could not for the life of me get that darn MAIN AXLE BOLT out with out having to take my socket extension and hammer it out.." here is my addendum: On my 07 RSMTD - at the end of the axle shaft there is an place to use an Allen Head wrench - if you will turn it counterclockwise (loosen it) the axle shaft comes right out with no hammering (clockwise - or tightening to replace shaft)- also if you have slight pressure on the wheel assembly (i.e. tire resting on floor)while removing the axle it makes it much easier to remove.
-
GREAT write-up from Melon13. I recently took my stock mufflers off my new Venture and added Road King Classic mufflers and have been very pleased with the installation. I wanted to keep the Venture heat shield and add it to the RK pipes for a better look so I took the heat shield off the stock Venture pipes and attached to the RK's. For the installation I picked up two Harley Davidson muffler clamps for the RK pipes at the local HD store for $8.95 ea. After installation I also drilled out the rear baffle of the RK's with a bi-metal 1 1/8 inch hole saw and got the sound I wanted from the RK's. Drilling is optional of course and some riders have drilled out both the front and rear baffles using a drill bit extension and others just like the stock RK sound without drilling. I picked my Road King Classic mufflers up on E-Bay, one word of caution, the Classic style RKpipes have the slanted rear which I wanted but there are some RK pipes that do not have this style and have the bullet style rear end similar to the Venture factory pipes, make sure you get the style of RK pipes you are looking for, especially if E-Bay is your source. I also purchased an adapter from our member, SofaPilot who made a mount for mounting a RK pipe to the rear exhaust mount of the Venture, this eliminated the need to cut off and re-mount the stock rear bracket from the Venture pipes. First step is to remove your rear side saddle bags and then remove the stock exhaust, loosen the muffler clamp underneath the front of the pipe and remove the bolt from the rear of the pipe and pull the stock pipes off the bike, since I had a new bike this was a breeze, but this could be harder for those who have older bikes. http://www.venturerider.org/rkmufflers/1.jpg After removal of the stock muffler I took my Dremel tool and cut the three rivets holding the stock heat shield to the Venture pipe. http://www.venturerider.org/rkmufflers/2.jpg Looking at the heat shield next to the RK pipe in the following picture you can see the square opening for the muffler clamp, just below this square opening cut the heat shield in the center, DO NOT cut the top section above the opening, just the bottom section, this will allow the heat shield to expand around the RK pipes. Next drill three 1/8 inch holes in the heat shield, I drilled them near the spot welds. Now put the HD muffler clamps over the muffler end and position the heat shield so that opening is to the inside, hint, the factory dimple in the HD classic pipes goes to the inside, I aligned my opening on the same side as the dimple in the pipes with a slightly downward angle so that I could easily get to the muffler clamp once the muffler is on the bike. Be sure and put the HD clamp on BEFORE putting the heat shield on the RK pipe. Now drill through one of the 1/8 inch holes in the shield and into the RK pipe and put ONE rivet in. http://www.venturerider.org/rkmufflers/3.jpg I then installed the RK rear bracket I got from Sofa Pilot onto the RK pipe. http://www.venturerider.org/rkmufflers/4.jpg Next thing to do is put the muffler on the bike, I used a rubber hammer and with some gentle pings to the bracket area, (NOT THE REAR OF THE MUFFLER) Mine went on fairly smooth and I temporarily attached them using the RK rear bracket. Now carefully align the heat shield so that it is even all around and not touching the muffler, you can then mark the remaining two holes with a pencil or felt tip and take the RK muffler back off the bike, drill the two holes where marked and place rivets in the remaining holes and remount the RK muffler. When I remounted the RK's for the final time I went down to the local auto supply and got some anti-seaze compound in a tube and made sure the exhaust pipe coming out of the Venture was clean and coated it with anti-seaze before the final install. Instead of marking both holes I ended up being able to drill one of the holes while the RK muffler was mounted and the heat shield was aligned, I then took the RK muffler back off and drilled out the third hole and riveted. I then used a standard drill with a bit extension and then drilled out the RK mufflers after installation from the rear of the bike. I used a magnet to retrieve any metal filings left. inside the muffler. RK's installed, you can see the rear mount attached to the RK pipe. http://www.venturerider.org/rkmufflers/5.jpg Finished product. http://www.venturerider.org/rkmufflers/6.jpg Hope this helps anyone interested in doing this modification, I love the sound that I achieved with the Road King pipes.
-
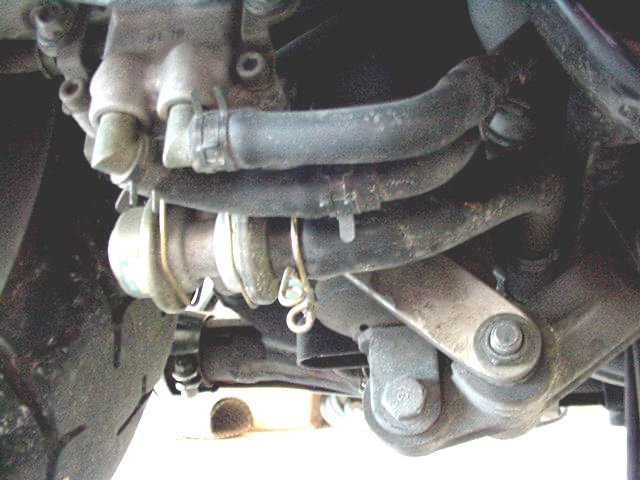
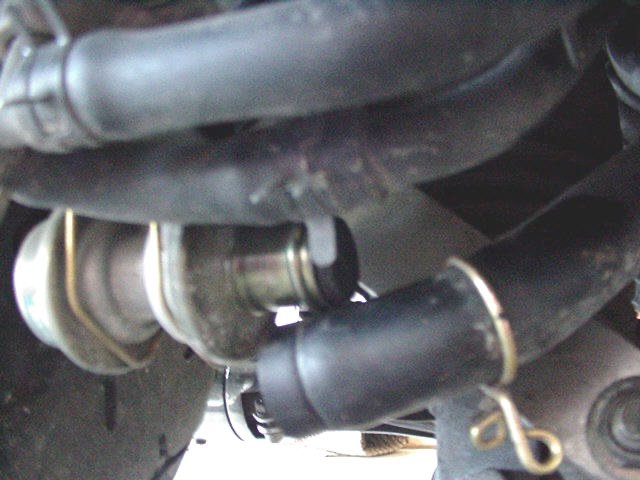
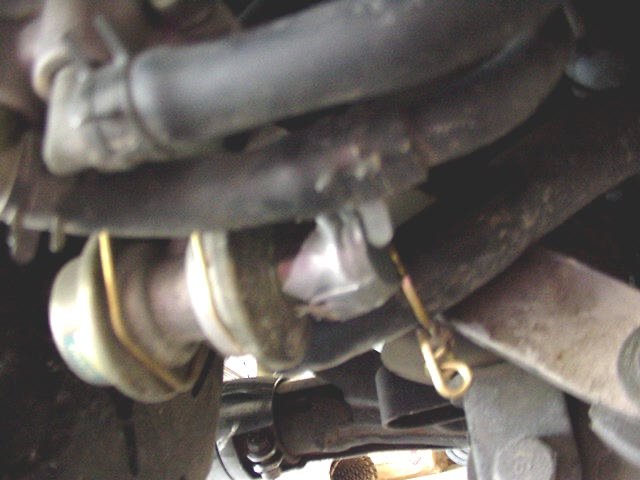
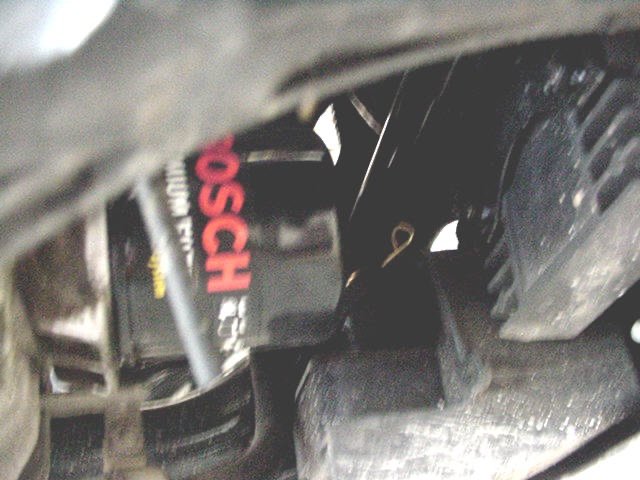
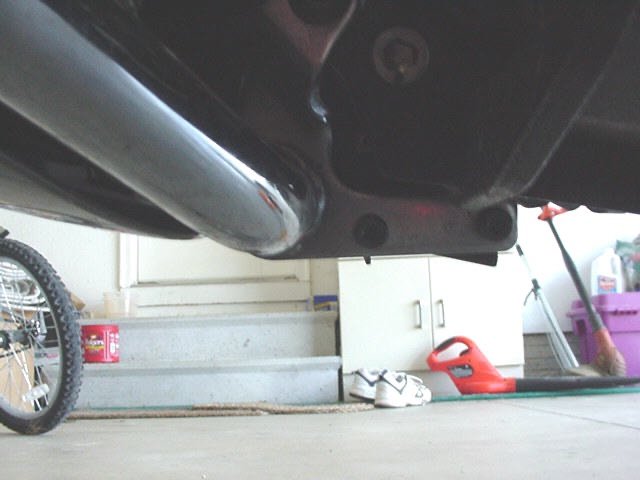
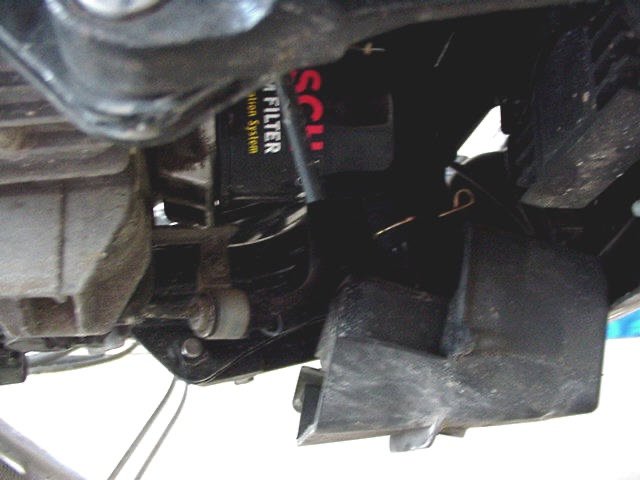
Plugging the AIS System The AIS is an emissions system which introduces oxygen-bearing air into the exhaust ports on the exhaust stroke. This induces further combustion of hydrocarbons in the exhaust pipe and greatly reduces emissions. It is driven by intake vacuum pulses. The only purpose of this system is to help satisfy our good old EPA requirements. Though good in theory, it's bad in that under certain conditions it can cause a HUGE backfire on deceleration that actually sounds like a shotgun going off. The first time this happened to me, I thought we were being shot at and my wife almost jumped off the bike. Disabling the AIS is a simple process and one that will not affect the performance of your bike in any way. The following is one way of doing so. There are two assemblies that you have to deal with. One on the rear and one on the front. We'll start with the rear and it is very easy. On the right side of the bike, just below the rear shock, you will find the first one. You'll want to disconnect the large hose with the gold clamp. Now..you can use most anything to plug the hose. I used rubber stoppers that I had picked up at a local Home Depot store. You can find these in the hardware department but a wooden dowel rod or most anything of the proper size will work fine. Look carefully and you can see that I have stuck the rubber stopper into the inlet on the AIS valve. Now in this next picture, I've simply stuck a piece of duct tape over the end of the valve and stopper. You can probably skip this step if you want but being born and raised in Texas...it's just part of my upbringing. Any job worth doing is worth using a bit of duct tape on. Besides...it keeps the plug where I want it and not up in the hose somewhere. Now you put the hose back on and you are done with the rear. That wasn't so bad was it? Don't worry...though essentially the same process, the front will give you plenty of grief simply because it's harder to get to. Now the front AIS valve is located just in front of the oil filter. The attached blurry picture is a bit hard to see but you can see the gold clamp that secures the hose you'll need to remove. Now....there are two ways to do this to make it a bit easier. The first way would be to do it when you do an oil change. With the filter removed, you can pretty much forget the rest of this write-up. Simply disconnect the hose as you did on the rear, insert the rubber plug, add the duct tape, reconnect the hose and you are done. If you are ready to do this and you are not ready for an oil change, here is a tip that will make it easier. Just below the drivers floorboard on the left side of the bike (shifter side), you will see two allen bolts. These are the bolts that secure the AIS assembly in place. Remove those two bolts and the assembly will be free, held only by the hose that you will disconnect. You can now pull down on the assembly enough to get to the clamp without skinning your knuckles. Once the hose is off, the assembly just drops out. Now...just plug this hole in the assembly as you did on the rear. Put it all back together and you are done. Not a difficult job at all. Figure about 30 to 45 minutes total.
-
Hey everyone, Just took the Venture (83) up to West Va to ride in the mountains for the weekend. We did 1200 miles in three days!!!! It was the first over 100 mile trip that I have had the bike on. I noticed that around 80 MPH I would get a wobble that felt like the bike was flexing in the middle. The other way I could describe it was that feeling when you hit a rut in the road. Letting off the throttle would bring it back into control. I also noticed that it would do it on the mountain switchbacks around 65 MPH. I checked the front axel, brace and tire pressure (40 psi). I checked the rear axel, swingarm, shock pressue (35psi) and tire pressure (40 psi). Ichanged the dampining adjuster to "2". Now it seemed to get more tolerable after all this. I have not checked the front shock air pressure due to the fact that the line is still hooked up to the Class compressor. The rear line has been removed and fitted with a shrader valve. Could the lack of air in the front forks cause this? If so what should the pressure be in the front and rear shocks? Sorry about the long post. Thanks Ron B
-
Drive shaft maint. On 1st Gen Here is a good article that was written by Mr. Fred Vogt. Fred published a lot of this type articles for the MTA's Motorcycle Roads Magazine. This service should be completed every tire change or 10,000 miles (16,000k) or at least every two years; but in most cases it isn't done because we don't always have a dealer replace our tires and/or we don't tell him to do the work. So if you just bought the bike or you are not sure it has been done, it would be a good time to think about servicing the rear wheel of your Venture. The procedure is fairly simple to do on bikes without a trailer hitch and only a little harder if your bike has one. Remove the rear bags, right muffler, rear brake caliper and deflate the tire; then remove the rear wheel. If your Venture is a 1983, 84, or 85 you will need to remove the rear drive or differential and remove the drive shaft. Clean the drive shaft and coupling, then grease both ends before putting it back in (note: make sure that the shaft goes back into the u-joint. If you are not sure, remove the spring on the boot covering the u-joint and check it. Next clean the spline or gear on the rear drive and grease it with a good quality grease, personally I use a medium Moly based grease. Now find a couple of 2" x 4" and place the rear wheel spline side up on the boards. When you clean the hub and splines off you will see the spring clip or circlip that holds the hub in place; remove this clip and before you remove the hub mark the possession of the hub so you can replace it in the same holes it came from. Now clean the hub and inspect it for wear then apply grease to the inside of the hub and to the six posts that fit into the wheel. Check the o-ring on the wheel to be sure it is in place before you replace the hub and circlip. Check the bearings inside of the wheel and check the bearing movement; if they are rough or worn replace them. Now for the mono shock pivots place a jack under the rear drive to take the strain off of the mono shock then dissemble. Clean and grease all of the pivot points and reassemble (if you have a 90 - 93 or you have had grease fittings installed, just give them a squirt). Before you install the rear wheel take the axle and put it back through the swing arm into the final drive to check the alignment. If you find that it is in a bind you will have to change the wedge shim between the final drive and the swing arm. Check the oil level in the rear drive or replace the oil if it has been 10,000 miles since it was serviced and check the brake pads for wear. You can now reassemble your bike and have another year or two of trouble free riding. Fred J. Vogt, #01037


.thumb.JPG.9b9156ccbbfe45097177e3bd18bd417d.JPG)


(2).thumb.jpg.7092a7f3a80adddbf4f7a25510b6c0b0.jpg)