Search the Community
Showing results for tags 'piece'.
-
My Venture Royale does not have a CB Radio. thirdbike (from classifieds) will sell me the control unit and the transformer/filter piece that fits to it. What else do I need to add a CB to my bike? -Vinny
-

motor hesitates after tire change
Guest posted a topic in Venture and Venture Royale Tech Talk ('83 - '93)
I have an 84 Venture and removed both wheels to have new tires put on. I got the instructions on this website and they were great. When I removed the right muffler, a small piece of baffle came out of the exhaust pipe. It looked like a bent piece of kitchen sink drain. I did not put it back in. After reassembilng my bike I test rode it and things were fine. The next day I filled it up with gas and road 250 miles. About 3 miles out the motor began to hesitate when I increased the throttle at low rpms. I reinstalled the little piece of baffle and it ran the same. I took off the other muffler and their was no piece of baffle. Needless to say I am baffled. Why is it running poorly? -
OK...no pictures yet, but maybe tomorrow. Now some background. I love the size of the saddle bags, but the little rectangle depressions in each saddle bag are kinda useless and the RSV toolkit barely fits in there. So I thought I would see what I could do to make it more TOOL friendly and also less disruptive when I have my saddle bags packed. Here's what I decided to do with the RIGHT SIDE saddle bag to make it more organized. First I went to WallyWorld (no not my house...Walmart), and purchased a plastic tray (kitchen area)...which was 6"x15"x2"...I think it cost about $10. Next, I took the foam rubber liner out and traced it on some HEAVY card board and cut it out with a sharp knife so that I had an identical copy of the liner (except in cardboard). Then I velcroed the tray to the bottom of the saddle bag and butted the end up against the BACK of the saddle bag (actually not butted...I left about 1/8th of an inch)....so that the tray sat off centered and towards the back. I took my cardboard copy and laid it in the saddle bag and marked where the FRONT of the tray was located on the liner. Once I had it marked, I took out the cardboard liner and cut the liner along the mark I made for the tray. So I now have two card pieces...the back end and the front end. I cut another piece of cardboard 6" wide and 2" tall. (this was to be my hinge. I attached the small cut piece to the back piece with duct tape and left about a 1/8th inch gap and then attached the front piece and also left about 1/8" gap and again secured it with duct tape. Now I had a single piece of liner made out of cardboard that had a "step" or hinge towards the front. I secured the hinge so that it would be flexible and yet still strong by using more duct tape. OK...so now I am done with the liner and set it into the saddle bag OVER the long rectangle tray and then the front portion rested on the bottom of the saddle bag. PERFECT FIT!!! Now, to make it look better I had bought some trunk carpet at AutoZone and I cut a piece larger than the liner and then spray 3M adhesive over the top of the liner and then mounted the CARPET to the cardboard and pressed it all in place. It works PERFECTLY and takes up only a little more space than not having it all, BUT gives me a placed to "hide" my tools, gauges and other maintenance items I don't use that often. It looks MUCH better than the original liner and is much more efficient use of space (for me at least). I will add pictures tomorrow. Wally
-
This bike is cleaner than most 2009's! http://cgi.ebay.com/ebaymotors/YAMAHA-VENTURE-ROYALE-TOURING-MOTORCYCLE-3K-MILES-BIKE_W0QQitemZ290415067710QQcmdZViewItemQQptZUS_motorcycles?hash=item439e16423e
-
I sometime get tired of how quickly the trunk becomes a mess on a trip. Last year at the Roundup in Cody, Iowawegian (Gary and Deb) had some pouches in the trunk that allowed them to keep things where they could get them easily. I liked that!! I've been looking online for something that would go in my '86, with no luck. So, last night I decided to do something..... I took a piece of Lexan I had in the garage and cut two pieces to fit the width, height and curvature of the trunk bottom. I used adding machine tape rolls as spacers and with four bolts to hold it together. A little stick on velcro to hold it in place to the rear of the trunk but still allow it to be removed. (I was going to install only the rolls as spacers but Jan reminded me of how often we or someone asks if someone has a piece of paper and pen, so I left it on to use up on the road) This isn't everything I would want but in the mean time it creates two pockets in the back corners and three more between the plastic to help hold things in place and there is still room for my helmet inside. http://s470.photobucket.com/albums/rr70/utadventure/86%20Venture%20Rt%20Faring/?action=view¤t=IMG_0684.jpghttp://i470.photobucket.com/albums/rr70/utadventure/86%20Venture%20Rt%20Faring/IMG_0684.jpg Dave
-
For those who witnessed one of my last threads unfold, where I thought about selling the bike so my wife could buy herself some...well... surgery-induced-mammorial-swelling, you may already know that we put it on hold until we can afford to do so, WITHOUT selling the scoot. Well, I'm starting to think they're gonna be delayed even MORE... Call me selfish, throw rocks at me, do what you must... But I believe I'm going to set up my garage for electroplating, and anodizing! It's going to cost well over $1,000 to get started, which is 1/5 what she needs towards buying me a 'new backrest' but I can't resist! I have no patience, and can't forsee waiting FOREVER to save $4,850 for some saline bags... I'd rather be able to walk in the garage one day with a plain piece of steel, and next time it sees daylight, it will emerge as a nice triple-plated chrome piece of art! SO- Once I get the hang of it, and my work comes out gorgeous, I'll start chrome plating parts that people send to me. I'll only charge cost of materials & shipping, which I'm sure won't be much. I'm planning to setup tanks large enough to handle fenders & tanks (some people LOVE chrome...) but not much bigger than that. As for my wife... :whistling:She's gonna kill me, so if you'd like to donate to my funeral fund, my paypal payment account is... This all may just be a pipe-dream, but if it works out, I'll be a chrome-plating, and aluminum anodixing fool by Winter!
-
OK, you never know unless you ask. I need a piece of chrome for the '91. I don't care if it's bent, rusted, etc. As long as it's in one piece. It's number #11 in the attached pick of accessories. When I bought the bike it was already missing, and my guess, from the condition of the fairing, it was lost during the big drop?? Anyway I have the left side and could sure use the right side to keep the bike from falling over.... So if anyone has seen or might have one laying around on an old upper right, and would like to part with it, shoot me a price. Thanks. http://www.cast-aways.com/QUICKY/access3.jpg
-
-Copy.thumb.JPG.e58cff17f54af7db7d9892e57b761574.JPG) i was wondering if anyone here had an extra center cover forover the battery and gas tank.. mainly need the gas door, but the whole piece would be better.. for an 86 venture.. 83 will also fit...
i was wondering if anyone here had an extra center cover forover the battery and gas tank.. mainly need the gas door, but the whole piece would be better.. for an 86 venture.. 83 will also fit... -
 This maybe a simplistic question but I have to ask. I have been working on putting a 1988 venture back on the road after some neglect. My question is: the rear rotor is a two piece design with bolts/studs holding the outer and inner ring together, does the ring normally have play or should it be locked down? The rotor is in good condition no nicks or excessive wear----so is this normal or another piece to replace.. Please let me know...
 -
 its a long story so the question is... on the vac line to the vacuume sensor as it should be called, there is a small plastic piece that couples two pieces of vac line tiogether. there is an arrow on that piece that points towards the carb, or toward the sensor??? I have been fighting an extremely annoying problem for some time now that i think may be related to this part and its orientation in line. Im gonna cry if its just a matter of the stupid thing being in the wrong way... its almost always a very easy fix, made alot more difficult by our own over thinking....
 -
Pardon my ignorance if this sounds like a dumb question. The piece in question is number 4 in the picture. The bike only has one on the left side and it makes taking off the seat a hassle because it's doesn't allow full access for my socket wrench. Granted I could always get a socket that doesn't requre a step down adapter. I took it off to make it easier to remove the seat. How important is this piece and am I supposed to have one on the right side too? http://i278.photobucket.com/albums/kk86/jason1gp/random/cylinderhead.jpg
-
Many years ago I refinished old/collectable furniture but it's almost impossible to find someone to strip the old finishes off anymore because of the toxic waste. 10 years or so ago I started building rustic furniture for resale and have continued because I enjoy creating different pieces. I also have a habit of waking up at 3 or 4 in the morning so I go out to the shop and make some saw dust. Attached is the piece I finished this morning, all poplar wood with the exception of a couple resawn oak panels in the doors. It's a 2 piece unit so I can handle it by myself.
-
Has anyone had any experience with the Tourmaster Elite II 2 piece rainsuit. My Frog Toggs are worn out and I want to try something different. I have read some good reviews and I like the way they look. Any thoughts? http://www.tourmaster.com/xcart/catalog/Elite-Series-II-2-Piece-Rainsuit-Jacket-p-84_8.html
-
My clear plastic fairing protectors were ruined by the dealer with liquid wax that stained little white dots. Is it possible to Tint the whole piece smoke or black to get some use out of them or should I just trash them?
-
 today , i finally got around to taking the rear wheel off of my '86 to have new "elite III's put on.in the process of removing the muffler, i broke one of the exhaust collector "outflow tubes" off.my question now is, can i just fabricate a pair of 2into 1, manifolds/collectors, to replace the 20 plus year old piece of hardware? is there a REASON that all four cylinders must empty into a single box? thanks to any and all who respond. just jt
 -
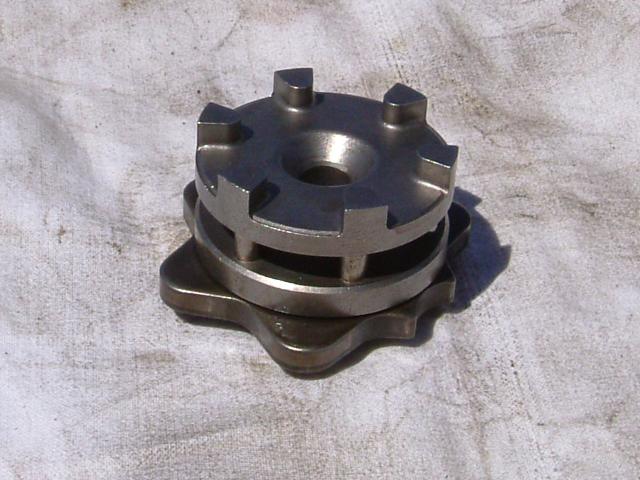
One reason that the 1st gen Venture sometimes shifts hard or clunky is that the pins in the shift segment get loose over time. There is a stamped metal piece that hold the pins in place, and it doesn't take much for that piece to get bent and the pins don't fit tightly any more. Once the pins are loose and sloppy, the transmission will be a clunky shifter. If the metal tabs get bent enough that one or more of the pins fall out, the transmission can't be shifted past that point at all and you're stuck. Yamaha upgraded these parts to a one piece casting in the 2nd gen Venture. The one piece casting holds the pins solidly. The later parts are a direct swap into the earlier models, but Yamaha doesn't really acknowledge these as upgraded parts. If you ask for the parts for any year of a 1st gen bike, you're going to get the old style parts. You have to know enough to order the later parts or have the part numbers handy. Total parts cost is right around $50. Here are the part numbers needed: NOTE: Received this tip from Trader. When replacing old shift segment assembly from a 1st Gen. with the one piece shift segment from a 2nd gen, the old pins are too long and must be replaced with the part numbers shown. NOTE: save the shortest and smallest diameter "locator" pin from the old assembly to be reused (1) shift segment 4NK-18185-00-00 (5) long pins 93604-12037-00 (1) short pin 93604-16092-00 (1) clutch cover gasket 4NK-15462-00-00 These parts are in behind the clutch basket. I swapped these parts and did the PCW clutch kit at the same time. On my shift segment, the metal tab is badly bent and the pin was sloppy, and the two pins next to it are very loose. Even the other three pins were also a little loose. None of them were tight at all. The shift linkage can be wiggled up out of the way without having to remove the shift arm. These two projects took only a couple hours from start to finish and I was back on the road. Incidentally, this also applies to '96 and '97 Royal Stars and '98 and older VMXs. They use the exact same parts here and the same later upgraded parts bolt right in. For some reason, the VMX got these parts a year later than the Royal Star. All '98 and newer Royal Stars, '99 and newer Ventures, '05 and newer RSTDs, and '99 and newer VMXs already have these upgraded parts.

-
I was going to a meeting with a sheriff in Avery county NC, and I was on 70 going to the mountains when some one lost some stuff off there truck. I thought I missed all three piece's but #3 took a bounce and hit my bike. I think it was a piece of metal it hit my left rear turn signal caught the corner an chipped the chrome an took the amber lens completely off. If any buddy has one they can part with let me know, I will check Ebay also. The trip to the mountains would have been perfect I will be working with the sheriff the ride was great except for the piece taking out my turn signal out. Thanks, Dale
-
 Can anything be put in between the brackets on each side? This is where it bolts onto the bike w/ the 2 bolts. We will only use the radio antenna side as an example. Using the 2 bolts, can another piece of metal be sandwiched between the bracket that attaches to the antenna and the side that attaches to the bike. What I am wondering is if the metal piece with either affect radio reception or the SWR on the cb. This would be a piece of metal on each side of the bike Hope this makes sense. If not let me know and I will put it together and post pics. Thanks
 -
What do you do with wood? I did this some 20 years ago and have been making some MODS. Basically,three 4x4 "H" frames,thru bolted(not lagged). Thus it can be tightened and 2x8's for the main bench, 2x6 for sides and other bits. The rear "H" frame and rear most 3' of bench slides out as one piece after removing some 6 bolts. Which allows me to remove the rear wheel quickly. I should have taken a pic of that also. One man easy to ride up w/the outriggers I just made using shelf brackets. Super strong-Total weight w/o the ramps ~150#. Can be stood on end to take up less space. As you see I have the center stand on a "loose" piece of 2x10...which is not needed. If anyone wants closer pics just say so. I set the camera to PC setting. Hope it shows enough detail. I am not selling anything. Just here to give you ideas.
-
Apparently, I had a screw loose (in more ways than one, I'm sure), but this one was on my '07 Venture, and it's no longer loose, it's gone! Darn! I hate loosing parts. My probably with this one in particular, is that I can't locate it in Yamaha's exploded microfiche. The dealer can't find the part number either. We're both stumped. Let me try and explain where and what it is. There is a section of plastic (ABS) directly in front of the left floorboard. I always called it "Cowling", but perhaps that's not the correct term for that part. Anyway, directly in front of my left floorboard in that plastic piece, there is a place for a screw of some type. That's what's missing off my bike. The plastic piece now rattles a bit, and vibrates at speed. I would like to know a Yamaha Part number for that particular screw if possible. And, even more importantly . . . exactly what size and type of screw I would need to replace it correctly. Any assistance would certainly be appreciated. Thanks! Pete & Sandy
-
Hi, I am short one bodywork bracket for my red '84. I wondered if anyone here might have an extra they'd part with? The bracket I need is the one that holds the bodywork piece just near where the front left lower faring turns to join the picece that goes under the radiator. It anchors the plastic to one of the mounting bolts for the LHS engine case guard. Its a small right angle piece that has a threaded hole on the bodywork end and an open hole at the case guard end. I hope I am being clear. Anyone got one that for a few bucks they'd put it in the mail to me? Thanks, Brian H.
-
Ok, Gang I know some of you have additional led brake lights etc . I know one of them was Juggler with some nice lights on a folded piece of Stainless on the rear of his bike. Owen has some great flat Led lights on his bike. I am interested in adding new taillight/brake lights to the inside of the bag rails and also adding clearance (orange) lights to the outside portion of the bag rails with a piece of Mirror stainless that will screw to the inside side of the bag rails ( with the lighs there in between the upper and lower rail. Who can point me to a good source for the brake lights and clearance lights. I have looked high and low across the web and cant find anyting I am satified with so far for a brake light. Send me your ideas. If I can find the correct match I am going to make a chrome insert that goes in the saddle bag guards and holds both the side marker lights and the rear brake lights in one piece. I know most of you have seen the Diamond R 2 piece set that sells for $400 but I am going to attempt this with one piece of mirror stainless steel that wraps to the back for the taillight/brakelight. I have seen several bikes on this site that have add on lights. Let me know where you got you lights and what they look like. Once I can work out which lights to use I will post the Prototype and let you tell me what you think. I am trying to accomplish this and keep the cost low. I would appreciate any ideas that you think work. This will be available for all once I can put it together. Post your suggestions/pics and where to get the lights It will be appreciated Jim:smile11:
-
Greetings... Went to Wally World yesterday. Was parking under the overhang between the Garden center and the part of the store where they park the shopping carts, where most of the cycle riders park. Backing in, there was a somewhat drunk middle aged woman with a scooter talking on her cell phone, wandering around. As I backed under the overhang to get in the shade, I caught a whiff of nasty sewage, looking down was an uncovered hole in the concrete right under where I'd parked. I commented about it to her, and procceeded to move over a bit so I wasn't directly over it. For some reason, this prompted her to move her little scooter too - she slowly backed it out (she had put it in - nose first) standing on the RIGHT side. I was still in the process of backing, preparing to shut down, when her center stand clipped the edge of a bench, put her off-balance, and down she went - slowly, dropping her scooter (to the left of course)- then slowly falling on top of it, as only a practiced drunk can, deftfully rolling over it backwards, heels over head. As she rolled over it, she muttered something like " sorry, I have a broken elbow" The little scooter exploded into a pile of plastic and metal parts!! It litterally disintegrated!! Completely out of proportion to the slow drop - The seat came off - apparently the main stowage - and cloths, drink bottles, basicly everything a woman would normall carry in her purse - all spilled out. Front wheel came off, instument panel seperated, mirrors, muffler, the chrome ring around the headlight, the headlight itself - everything!! I was stunned at the almost total destruction! I walked around trying to help her collect the carnage, and trying to help her piece it all back together - she wouldn't let me! Each time I'd hand her a piece, she'd grab it and growl like I was trying to steal it, then put it in the pile - and all the while she's trying to apologize and reassure me that she's "Not a weirdo" What can you say to that? - I thought it was downright scary! Like something you would see on some old BBC comedy program, only in real life!! The Benny Hill jingle started playing in my head!! When I got into the store, I had to pause and look back out - and all I could say was Whoa! The whole encounter was just so bizarre, weird and well into sureal territory. I was only in the store for about 10 minutes, and when I came out - she and her scooter, and all the parts were gone. I shudder to think that this is probably at least a daily occurance for her. That thing's going to kill her!
-
There is only 1 piece (actually set) of chrome left to put on the bike. Eck this is what a clean RSV looks like :rasberry: doesn't have mud all over it like yours does. :rotf:
-
 Here is my dilemma. When I removed the slave cylinder the rubber item you see illustrated as "C" was installed. As you can tell by the way it is warped and too large to be the proper seal I can onlyl assume it was wrongly installed by the PO. So, I ordered the factory "Push Lever Seal Kit" from mother Yamaha and it finally arrived today. But rather than being a one piece seal, it is two very different seals. Now I am trying to figure out just how this two piece seal kit is suppose to be installed on the slave. The two piece seal is both A and B as shown. "B" appears to fit perfectly as shown in pics 5 - 9, but for the life of me, I simply cannot figure out what to do with seal "A". Does anyone have the knowledge if both seals are suppose to be used or just Item "B"? I have tried to provide goods pics and hope they are suitable. I look forward to any assistance provided. Forgot to mention, this is for a MKII 1st Edition.


.thumb.JPG.86d9722f4ac86bdebadb2b456a9ec8b6.JPG)