
Search the Community
Showing results for tags 'fairing'.
-
 I recently picked up another parts bike that has Chrome Air Intake Grills.(please see attached pic) Does anyone know of a way to install these grills on a Venture Royale WITHOUT taking the Fairing off the bike? I would love to have these grills on my 87'VR but am not looking forward to taking both halves of the fairing off to install them! Please Help!! Earl
 -
I would like to purchase a Quadzilla Fairing for my 2006 rstd. Does anyone have any experience with the install of the fairing. Is it wired directly to the battery? My bike is black and I am wondering if the Gloss black paint option will match the black on my bike.
-
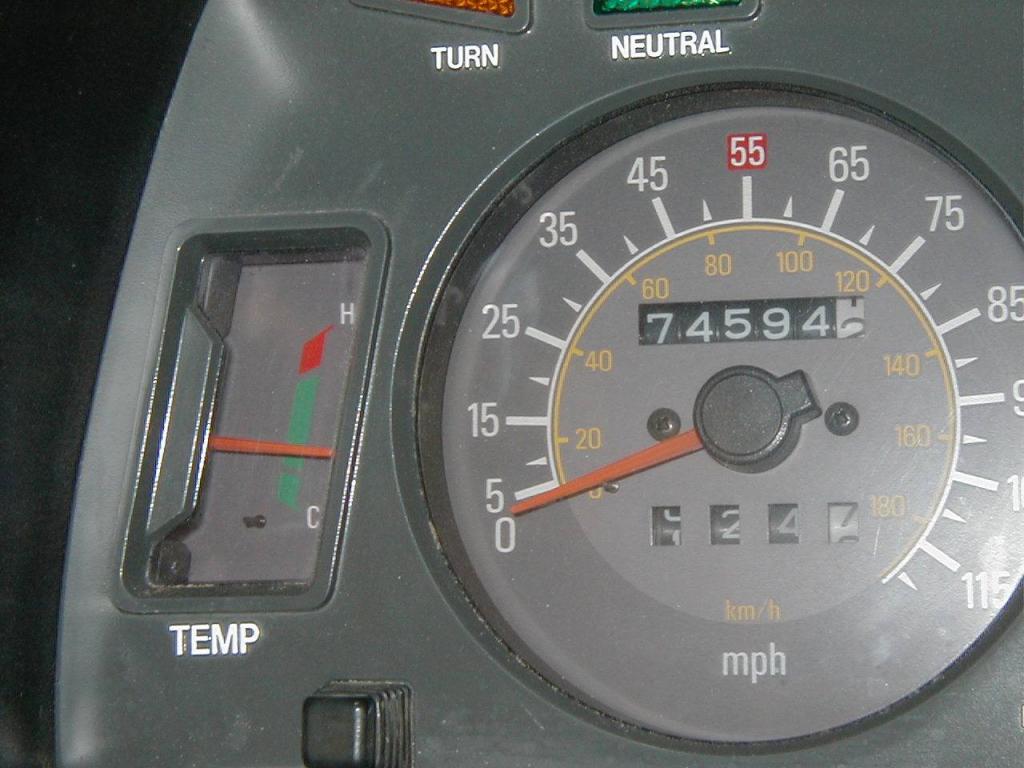
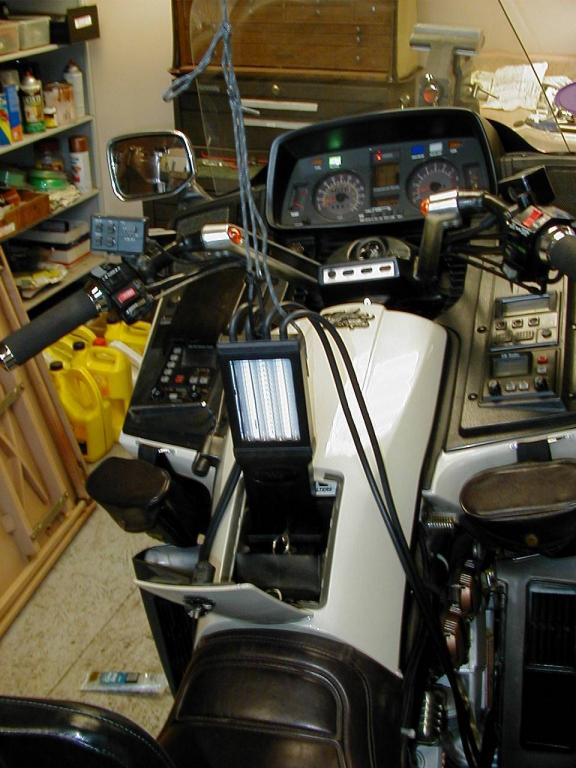
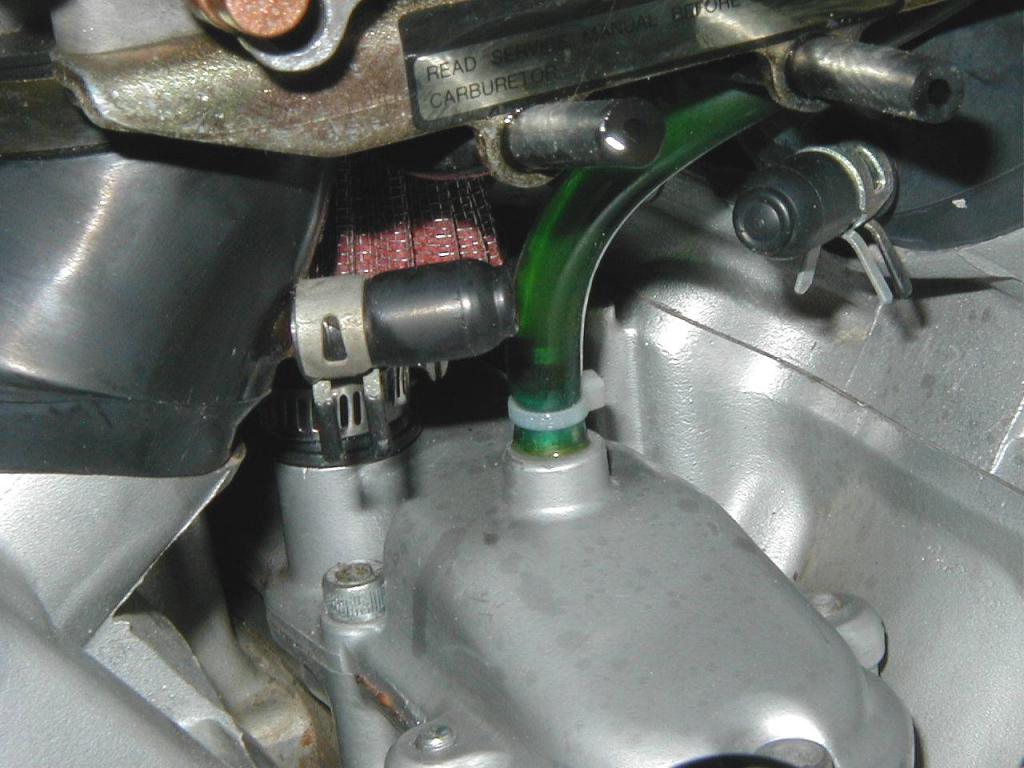
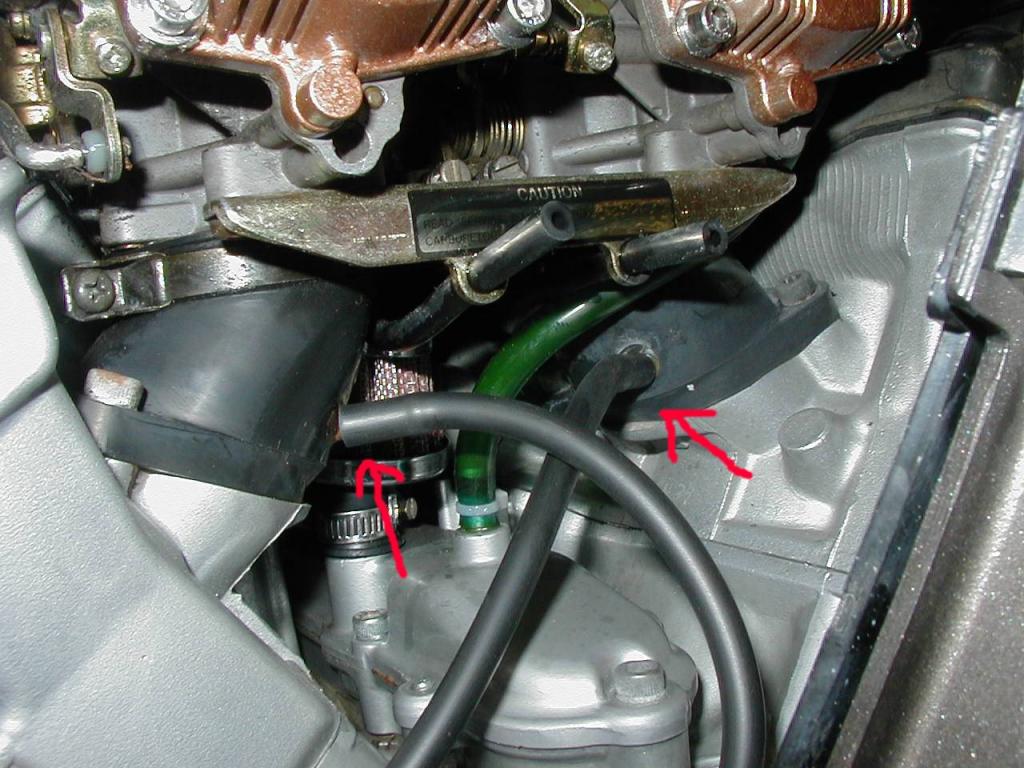
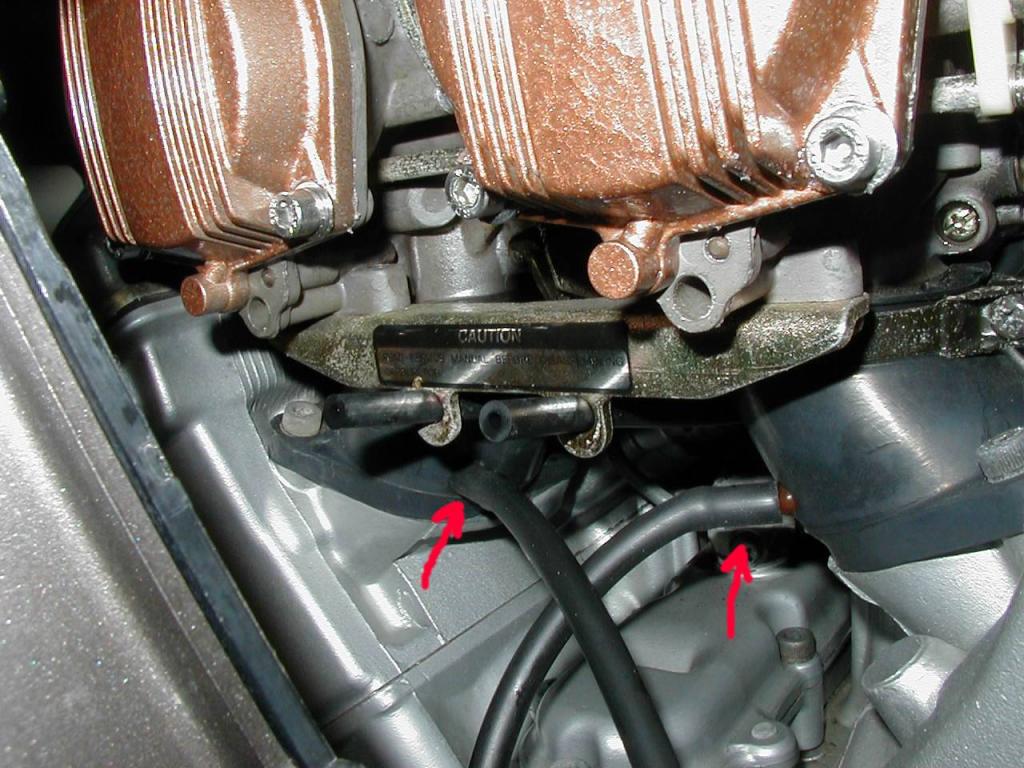
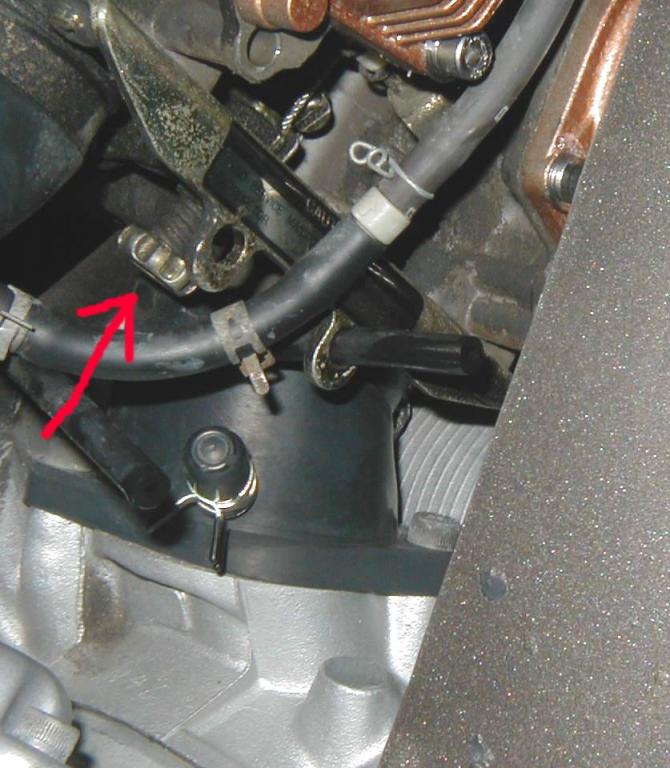
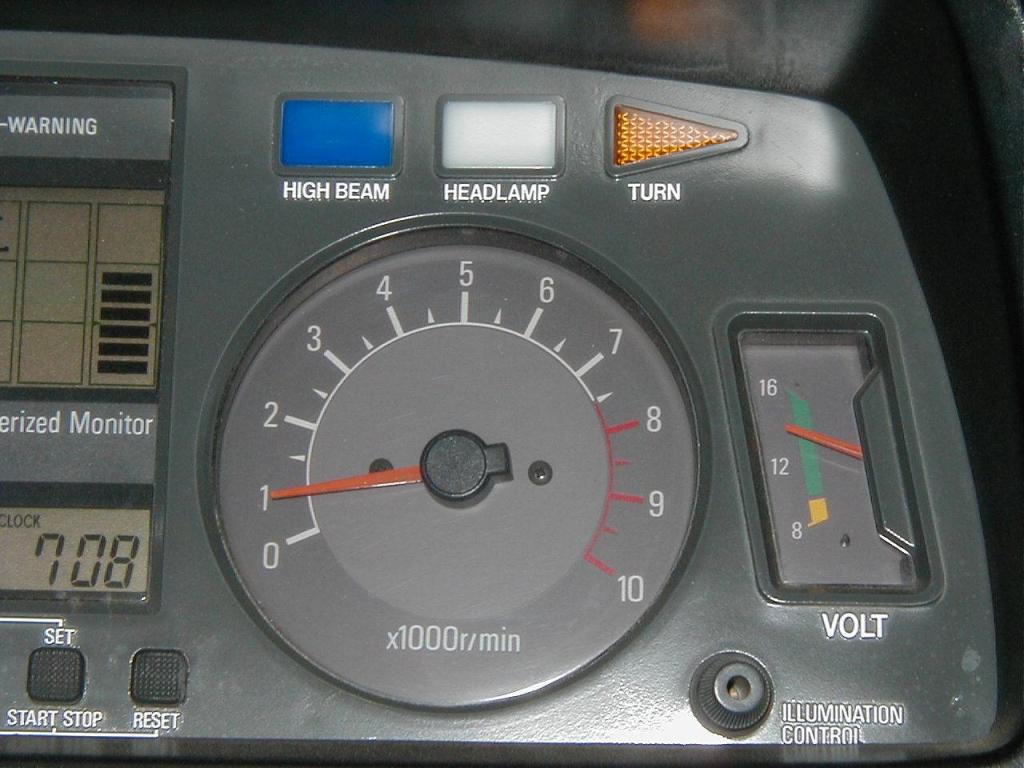
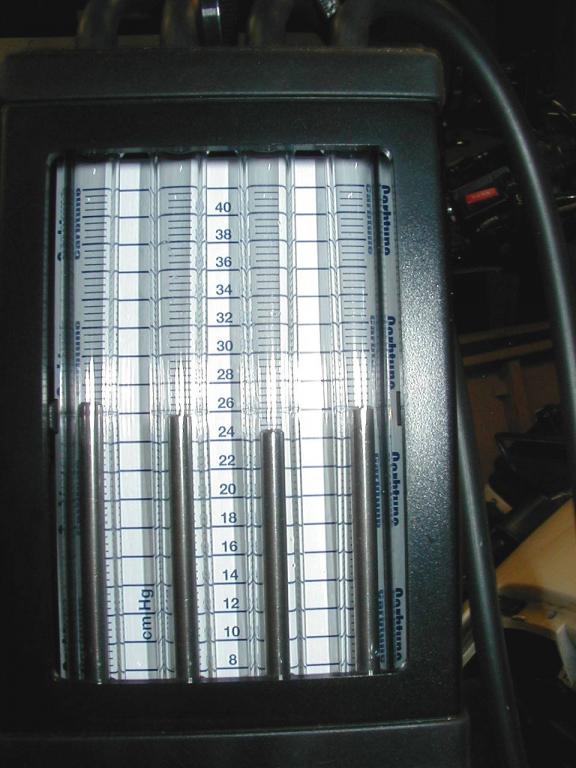
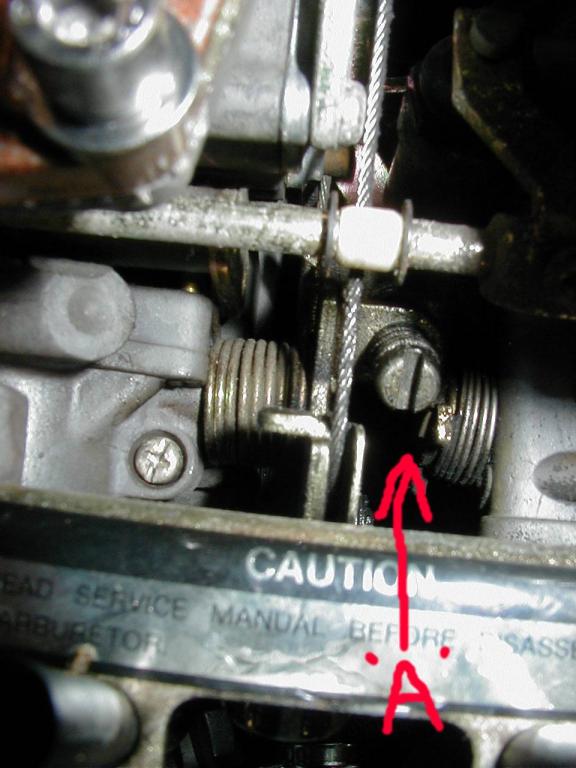
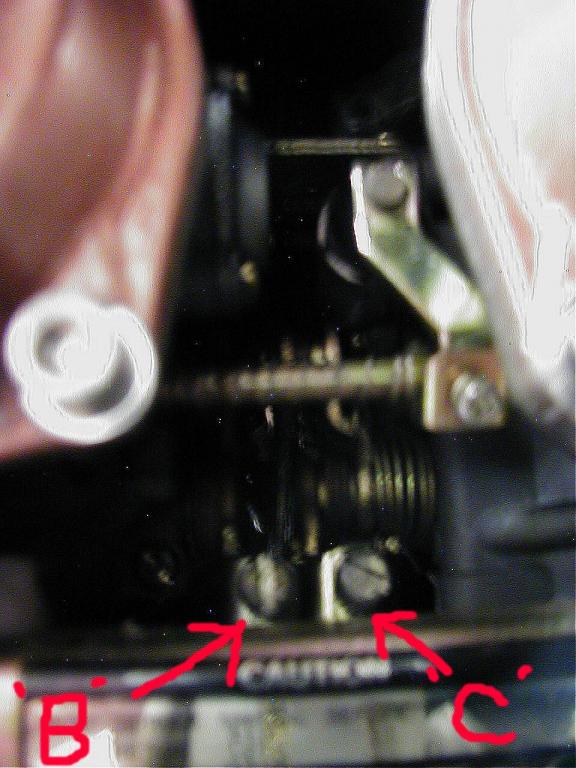
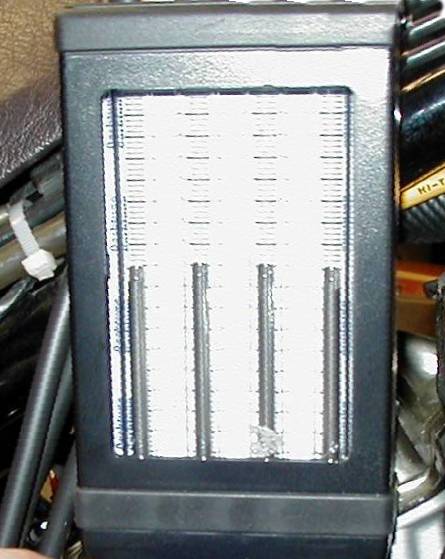
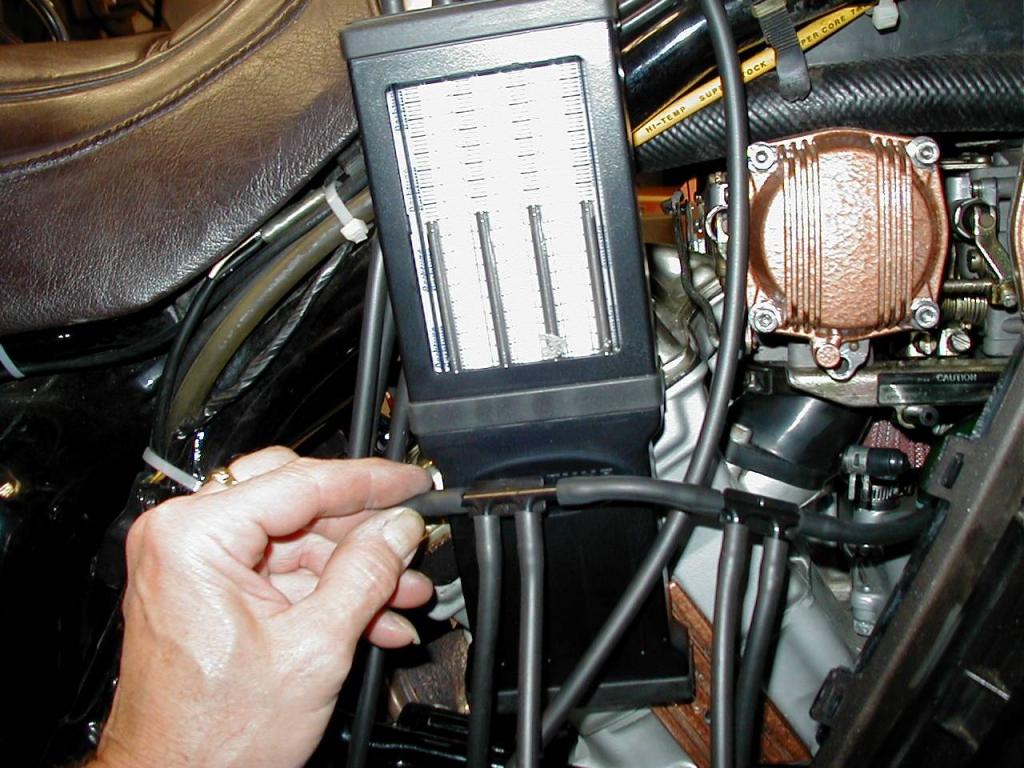
There have been so many people asking about Syncing. the Carbs on their First Gens. that I thought I would take a few pics of the way I do it so that other members would have a general Idea how to go about it. (Disclaimer: My way is not the "do all, be all", just the way I do it. Take what you need and leave the rest.) I start by removing the screw in the false tank cover and unhooking the front of the cover, It does not need to come off. I then remove both side covers. I then remove both of the Radiator side panels to expose the 2 screws that will allow the lower fairing legs to be pulled away from the Carb. Bodies. (NOTE: if your lower fairing legs are in bad shape, you may want to remove the lower cowling which will expose the screws that will allow you to completely remove the lower fairing legs, Mine are still pretty flexible so I don't take them completely off. (Do what you feel "warm and fuzzy" about.) With the plastic off, I start the bike and let it run up to "operating temperature". Pic #1 shows the temp. gage about 1/3 the way up. Depending how "hot blooded" you bike is, this may take a minute or two. While the bike is warming up. Pic #2 shows how I suspend my Carbtune from the ceiling in my shop with a long shoe string and center it right above the gas cap. This allows the Carbtune to remain vertical and also allows me to work both sides of the bike with out moving the Carbtune . At this time, I shut the bike off. Pic #3 shows the location of the Vacuum ports on the right side of the bike, I remove them and plug in the Carbtune on that side. Pic #4 shows the lines installed on the right side. I then move to the left side of the bike, Pic #5 shows the one Vacuum port Cap and the "Boost Sensor" Vacuum line that is connected to Cylinder #2. (NOTE: These pics were taken of an 1987 VR MKII, I don't know if the MKI is the same because I don't own one!) I remove the Vacuum port cap from the #1 cylinder and the Boost Sensor line from the #2 cylinder and Pic #6 shows the two lines from the Carbtune connected. I am now ready to restart the bike. Pic #7 shows how I position a fan at the front of the bike to keep the engine temp. from going too high. I like to take my time when I'm adjusting the Carbs. on a bike and this gives me the extra time. With the bike running and at temp. Pic #8 shows the location of the Idle adjustment screw. (NOTE: I moved the #2 cylinder Carb. Bowl Drain Tube out of the way for the pic. This screw is hard to find unless you are squatting down... and use a flashlight!) Pic #9 shows the Tachometer at 1000 RPMS (By the book 950-1050 RPMS) Pic #10 shows the Carbs. are in fact out of adjustment. I have the left two channels of the Carbtune connected to the left side of the bike, (cylinders #1 and #2.) and the right two channels of the Carbtune connected to the right side of the bike, (Cylinders #3 and #4). Starting on the left side of the bike Pic #11 shows the location of Carb. Sync. screw "A". (NOTE: This is another screw that is hard to see at first, and it is at a downward angle so it will be hard to get a screwdriver on it properly, be patient!) The object here is to rotate "Screw A" until you get the left two channels balanced. Make an adjustment, then "Blip" the throttle and let the bike return to Idle. If needed, adjust again. With the left bank of Carbs. adjusted, I move to the right side of the bike for the rest of the adjustments. Pic #12 shows the location of the "B" and "C" screws. Screw "B" is used to adjust the right two channels of the Carbtune, and Screw "C" is used to adjust the left bank of two Carbs. (Cylinders #1 and #2) to the right bank of Carbs. (Cylinders #3 and #4) Using screw "B" I adjust the right two channels, "blip" the throttle and readjust if necessary. Then I use screw "C" to adjust the left bank to the right, "Blip" the throttle and readjust. Pic #13 shows all four Carbs. on the Carbtune adjusted pretty darn close. Basically, you are done at this point. I wanted to add a few personal suggestions that I use to "enhance" the Carb. Sync. experience to make the bike run even better for me. After I am done with the Carb. Sync. at Idle, I Rev the bike to the 1800 to 2000 RPM range and hold it there, if all four of the Carbs. aren't holding the same vacuum at 2000 RPMS I make slight adjustments (split the difference) between Idle and 2000 RPMS. The reason I do this is because when I am stopped, and start to take off, I increase the RPMS of the bike into the 1800 to 2000 RPMS range as I am slipping the clutch to engagement. I don't want one or more Cylinders "cutting out" or "cutting on" as I am trying to look cool pulling away from a light, especially with Jean on the back! The next issue I would like to address is the "Reliability" of the Carbtune Manometer. Here is a list of Items I purchased to build a simple "Manometer Tester" Manifold. Pic #14 shows the "Manifold". and Pic #15 shows how I test my Carbtune BEFORE I use it. I got these Items from NAPA Auto Supply: Part# 2-616 (2 needed) Vacuum Connector $1.49 each $2.98 Part# H-459 (1 foot needed) 5/32 Vacuum Tubing $.99 1 qty. 1/4-20 screw Free from toolbox 6% Tax (Pa.) $.24 -------- $4.21 Total I hooked all 4 Carbtune lines to the manifold and hooked the Manifold line to one of the carbs. on my 87'VR. My Carbtune checked out OK. If you have any questions, PLEASE feel free to ask. Earl

-
.......... anyone have a stock 2nd Generation RSV windshield laying around that they want to get rid of?? A friend of mine who rides a Kawasaki Nomad with an aftermarket "BatWing" style fairing is looking to acquire one for modification and installation on his bike. ken.jo@shaw.ca
-
Hello All, I got all of the parts painted, not a pro, but they look pretty good. I put the trunk and the bags on today, worked pretty well. I am kinda dreading putting the fairing halves on, alot of the tabs are gone, and I am going to have to make do with the pieces I have, also the fairing lowers have alot of the tabs gone. Any suggestions or tricks to making the pieces stay on and look good? I will post pics when I get it done. D
-
I just got my bike all back together after I had it all torn down for paint. That means total disassembly of the fairing as well. While it was apart I upgraded the stator and gutted the cassette player to make a storage compartment. All went well or so I thought. I installed the battery and as soon as I connected the negative cable the light on the radio went on but showed no info on the face. It would not go back off until I disconnected the battery. I havent taken the fairing back off yet as I had a few other issues to tend to first but I want to know if this has happened to anyone else and Ideas of what to look for. I dont have the player anymore so putting it back in is not an option.
-
I saw a very cool trunk fairing lightbar the other day. Wondered if anyone has any leads on who makes or sells them. I've attached a pic. Thanks.
-
Well finally got the Batwing fairing installed on the V Star, it only took a few hours to do, but it took, a door fabricator, a substitute school teacher, a Fed Ex driver and a rocket scientist.......so wasnt to tough............and we also rewired this weird looking trailer so the rocket scientist could get it home from here. New pics added, removed the fairing to adjust the brackets and paint, fairing is now reinstalled with everything,w/s, lowers, and fork lowers...........Its finished.........:dancefool: I guess I can call it Midnite now................
-
Hey good people, I just picked up my '09 Venture last Sunday and due to a hand injury a month ago, I'm unable to ride my new scoot for at least another 2 weeks or more. So in the meantime, since I bought myself a truck load of chrome, I have plenty of time to accessorize and customize my bike to pass time till I actually do get to ride. I've been reading past posts in regards to what to do under the fairing after you've split it but I can't recall where to find them again so through this thread, I'd appreciate your input on things to do once you've pulled the fairing apart by helping me put together a 1-2-3 list of the things required. I'd really like to do this as a one time thing unless something drastic happens later. I have a few accessories that require pulling the fairing so while I'm under there, I'd like to be able to get all the jobs done in one shot. (I recall things like adding dialectric grease to electric connectors, rerouting a jack input for the MP3, adding a second accessory plug etc.) So with your help, we can compile a nice list that others can utilize too. I'd really appreciate your help. Thanks in advance....... Bluez
-
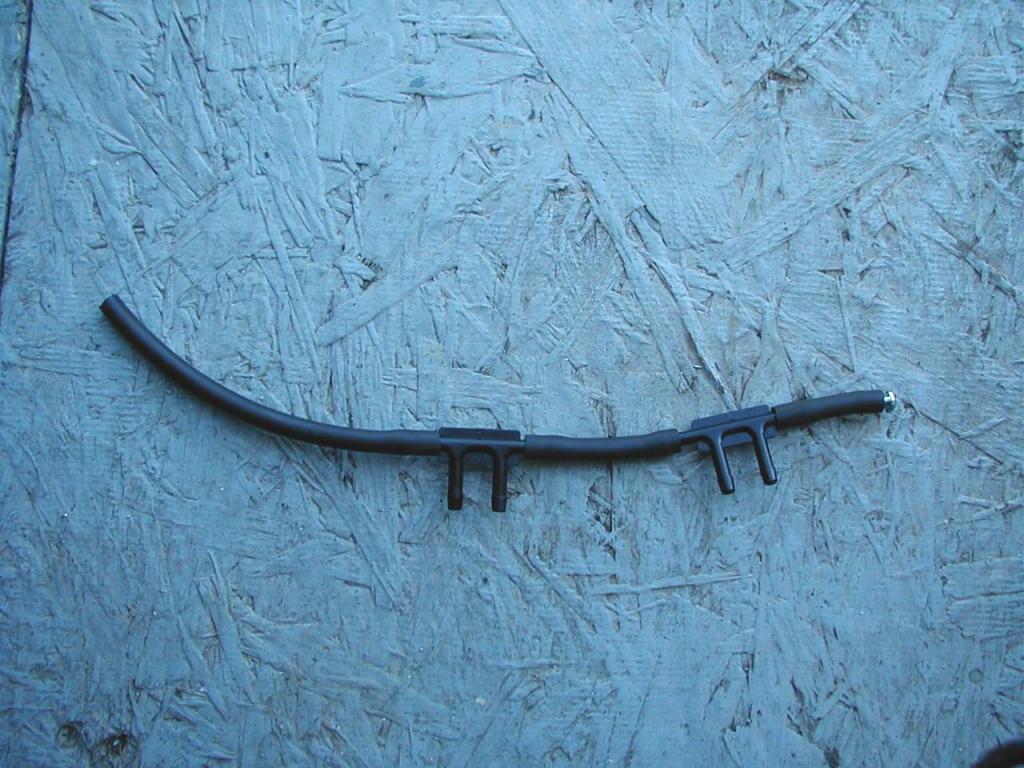
 Well, finished up a great deal of carb cleaning today, and wanted to get everything installed in order to keep the dirt out. Getting the carbs back in the bike was much easier than removing them in the first place, with two notable issues... 1) I broke the fitting on the number one carb that attaches from the bottom inside front to a hose that runs out the side to the stick out of the piece with the service manual warning. I need to dig through the service manual to find out exactly what that hose does in order to determine how stressed out I should be about it. Is that fitting replaceable? 2) I was able to reconnect the choke cable and the throttle cable that is pulled when twisting the handgrip to accelerate, but cannot for the life of me figure out how to reconnect the other one. It's smack dab between the carbs and I just can't see or reach well enough to reconnect it. Is there a trick to hooking that one back up? I went ahead and put on the air box to keep dirt out in the meantime. While I had everything mostly hooked up, I cycled the key several times and cranked it over to see if it would run. Fired up with only a few cranks but wants to idle at 4k. I'm hoping the Idle is running so high due to the other cable being disconnected. Seems to be running much smoother and needed no choke to start for a change. I will need to replace 2 diaphrams (1 pinhole in each on the right side and #3 wasn't seated correctly by the PO so about a quarter of the edge is just smooshed. Filled up the tank with some heet to absorb what water was in the tank. Will continue that for the next few tanks then change the fuel filter. Will also start a "seafoam regimen". Next big job is tires. I'm debating wether to pull the wheels and take them up to be changed which will keep me off the bike till probably next week or to just drive the bike up and have them do it all, which will get me on the road as soon as I get the carbs sorted... hopefully tomorrow. Guess I should call and get some estimates. Next big project... the broken plastic. I was able to glue one lower side fairing back together... ugly but smooth and strong. Good excuse for custom paint. I'll have to fiberglass/rebuild the front 2 inches of the left side. I thought I had lost the front "crossmember" that holds the two peices together, but found it in a box in the barn today.. woohoo! The upper fairing has cracks around most of the bolt holes and the "glove box" doors are all looking pretty sad. (my bike doesn't have radio, cruise, cb, class, or any of the other cool guy stuff) I figure I need to go over and "glue/fiberglass" the cracks in the upper fairing and I might as well do some customizing there too. I'm thinking about filling out/rounding off the inset section below the turnsignals. that will allow me to increase the cargo space in the fairing quite a bit and I may inset some driving lights into the front of it. I'll probably scrap the "doors" and install some gadgets in the panels. I am certainly open to any suggestions and welcome any advice. I appreciate the help, once again. Thanks, Mark
 -
 Though I have split the front fairing many times, I cannot remember whether there would be enough room in there to install a Stebel horn; could anyone enlighten me whether this would be possible? Also is the second horn inside the fairing? If yes that would be great. That is because I do not really think the Stebel horn belongs/fits in place of the stock horn on the right side. The Stebel unit is too large to fit, with real close proximity to hot exhaust pipes, especially the electrical wire connectors...... I installed a Stebel under the seat of my 08 Triumph Tiger and what a blast:yikes: !!!!!. This horn rocks:p. My next question has to do with GPS. I have found a Garmin 2720 for $100, so I bought it. The text-to-speech will got thru the RSV audio system thru the AUX input which is split to presently allow Sirius radio and a small MP3, which I do not play at the same time:smilies6:. If I have the GPS text-to-speech connected and the GPS on, will the text-to-speech still be audible while I have the Sirius playing into the AUX input also ? Could having both plugged in and on (Sirius + GPS voice) induce any damage to the audio system such as overload and such ? If having both plugged into AUX and turned on for music and directions is not recommended, I guess I would have to have the GPS connected to a seperate mono (one ear) earplug/helmet mini speaker. Many Thanks for any info/experience with these very important matters...... Cheerio
 -
50,000 miles Royale Purple/Red left fairing is busted up Seems like a fair starting price to me. http://www.usedmotorbikeshop.com/webtemplate.aspx?iid=673705
-
Does anybody know where I can found info on Arcady Fairing. I Know they do a firing, but couldn't find( Google) any web site, or info about them. Looking for new project
-
 I have a Bad Boy horn (plain jane). Has anyone installed one (or the Stebel Nautilis) in the Lower front fairing? I was thinking of replacing the stock horn on the lower left. I had a quick look today and it looks tight. Bike is still in the shed. Tons of snow between shed and driveway. Thanks, John
 -
Getting ready to install my new left side lower fairing. The original cracked right where the center screw tab is. Now I notice that there is quite a bit of stress from the screws not lining up properly. I have tweeked the brackets a little and that seems to help. The crash/tipover bars are not bent. I'm thinking of omitting the center screw altogether. Has anyone else had this problem?
-
Upgraded to TWO badboy air horns. I was ready for it and even I jumped when I hit the thing. I think I'll be scaring cagers into thinking they just cut off a semi truck instead of a motorcycle. I got rid of the fairing air ducting (it's useless anyways, I could not feel air from those vents even at 70 and an un-gloved hand in front of the vent.) and installed them in the space with their horns pointing down. you really have to take off the front fairing to get them in there though. but it's worth it. http://us.st12.yimg.com/us.st.yimg.com/I/rodi_2044_487357928
-
Somebody "pre-crash" posted a fix for pins broken off of fairing. I've searched, cant find it, hope its not lost. If memory serves it was a metal grease nipple gizmo........yikes......help..:canada:
-
 I am looking to replace the bags on my 06 RSTD with some custom stretched ones, but I'm having a little trouble finding some. They all seem to be made to fit harleys. Also, I would like to find a fairing that I could detach like the windshield. Any suggestions would be greatly appreciated.
 -
Learned 2 things yesterday. 1) the tilt trailer I bought was not a good idea. Ramps are better. 2) RSV's are really heavy when they have your left leg trapped between it and your new tilt trailer. Now for the real reason for the post: The only thing damaged on the bike during my little mishap was a broken left side lower fairing. I need one and would rather get it from someone here than ebay, craigslist, etc. I would even make a "fairing donation" to Freebird over and above what I pay for the part to help defray cost of running this site. So, if anyone has one laying around, please pm me. I've only had her since Thanksgiving and seeing it like this is really bumming me out. I ride a 00 RSV MM. I would prefer to get one from a millenium but it doesn't have to be.
-
Do you have to split the fairing to install the headlight Visor?
-
I have looked and haveny seen any threads on this, My 99 rsv low feul light does not come on. Is there a fuse or is the bulb blowin? The light does not come on when i turn on the key like the others do. That brings me to another question... Where is the fuses? I hope there not in the fairing. It bothers me that its not working.
-
I don't know you and you don't know me....but, I just HAD to say thanks. Today I installed a headlight modulator and ran the wire for the new passing lamps I'll be installing (when they arrive:bang head:). Anyway.....The tech articles on splitting the fairing & gas tank removal were just awesome. Thanks again and hopefully one day our roads will cross!!
-

front fairing parts (looking for)
Guest posted a topic in Venture and Venture Royale Tech Talk ('83 - '93)
i am currently looking for cheap parts for my first gen venture (especially) front fairing if anyone has any gimmie a holler i do not have much money but i am willing to trade something if i do not have the money (if interested, of course) labor, guns, paint work, graphics, airbrush, etc. update 1-4-09 recently aqired a vetter fairing from my neighbor, gonna try to make it fit, if it doesn't work i'll be back here looking thanks again -
Hello all, Sorry it's been awhile since I've checked in. Between the Weather out here [WA] and the Holidays in general...well, I've been just down right busy. anyway, here's my winter project for Trigger. I was able to pick up the Harley batwing fairing off of ebay. it did come with some nice mounts, but unfortunately and evidently, the Heritage and the RS forks are not quite set up the same...so I went about creating my own. I started off by making a cardboard template, which i then transfered to wood. This worked out pretty good actually, the 1/4" plywood is soft enough and easy enough to work with, yet strong enough to hold the fairing. Once i got the wood templates aligned to my liking, i then used them, to create the soon to be perminate mounts out of aluminum angle iron. The harder part is going to be in the finializing of the lower fairing mounts. I was able to bend up a couple of pieces of scrap aluminum flat bar...but it's just not all that pretty. Which brings me to the latter steps of "paint". All black or two tone to match Trigger's current color scheme. As always any thought and suggests would be greatly appreciated. OH...one more thing. [As i climb onto my soap box] This is absolutely, the best place for "free" help and information in regards to our two wheeled loved ones. Please consider making a small donation to this site. I know it's appreciated by those that run it and those of us that use it. Thx Ron. and now for the pix.... http://home.centurytel.net/malizia/RS/BatWingPics/20081121-001sm.jpghttp://home.centurytel.net/malizia/RS/BatWingPics/20081121-002sm.jpg http://home.centurytel.net/malizia/RS/BatWingPics/20081121-013sm.jpg http://home.centurytel.net/malizia/RS/BatWingPics/20081121-020sm.jpg http://home.centurytel.net/malizia/RS/BatWingPics/20081121-022sm.jpg http://home.centurytel.net/malizia/RS/BatWingPics/20081130-Front.jpg http://home.centurytel.net/malizia/RS/BatWingPics/20081130-Mount.jpg http://home.centurytel.net/malizia/RS/BatWingPics/20081204-Left.jpg
-
Road Glide Fairing ---- Please don't shoot!!!
Guest posted a topic in Royal Star and Royal Star Tour Deluxe Tech Talk
Ok.. I am sure I might get slayed for this.. But here goes anyhoo... I have a 06 RSTD Midnight. I put the Hoppe Batwing Faring on it and I enjoy it quite a bit! Having music on a bike is something I will never be without again! Now for the slaying.. Has anyone ever put a road glide fairing on the Royal star? I did a little MS paint rendition and think it would look super cool... Seems to fit the thinkness of the bike quite well to me.. I have done some digging on the wasternet.. and have come up empty handed.. Any feedback or direction is appreciated!!!


.thumb.jpg.ce61bc94739efc1059157f86c7216f78.jpg)
