Search the Community
Showing results for tags 'diaphragms'.
-
 I did my diaphragms today- 3 were holy! Like holy crap, batman! After my second tank of gas netted me only 30mpg, I got busy reading. I jumped in and removed my diaphragms today. The first had no holes, and I was wondering if I had needed to buy the kit as recommended from Sirius Consolidated Inc. as advised by you guys here on 1st gen. posts. But the second, third and fourth cylinders all had multiple breaches. My slider jets did not have the white washer, but had multiple places on the body where you could move the cir-clip, and thus the mixture, up or down. As one post by member Bobcat mentioned his BMW had this feature, and you can lean it out by moving it up a notch. I did this to all the sliders, and I have not road tested it yet but it runs fine. I'm wondering if someone put a set of old carbs on my 1987? I look forward to adding a crankcase breather (tips , anyone?) like i read about here, and checking my mileage. I have to say thanks to all that helped- especially "5bikes". I would not have had the courage to break into the carbs without the input and guidance of this group.
 -
 Like several on here lately, I replaced my diaphragms and even though the bike ran stronger under wide open throttle, my low rpm torque seemed to go down some and my gas mileage seemed to drop a little also. I was getting around 38 to 41 with the old diaphragms and the next two fillups after the new diaphragms were about 37-38 and that was 1-up. Yesterday I replaced the .123 thick washer on the needle with three #4 washers that came to about .093 and made a 250 mile ride today, 2-up. Before at about 140-150 miles, the red light was blinking on fuel. Today at 150 miles I still had two bars left. I should have filled up at that point, but I then did a twelve mile pull up the mountain from Morganton, NC to the Blue Ridge Parkway and stopped and filled it up. At the top of the mountain I had 162 miles on it and had just dropped to one bar. When I filled up and put all I could get in it, it only took 3.6 gallons, so that works out to 45 miles per gallon. And, not only did my MPG's go up over ten percent, but now I feel I have the low rpm torque back. So, if you have not considered making the change on the needle valve adjustment, I am strongly suggesting that you do it. It only took me a few minutes to do it, but I don't run the lower fairings anymore and all I had to take off is my bikini side panels. Even taking all the lower fairings off, it is not a big deal and well worth the effort. RandyA
 -
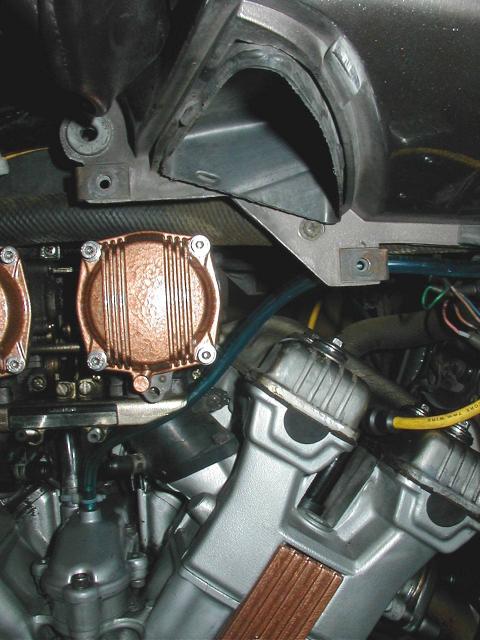
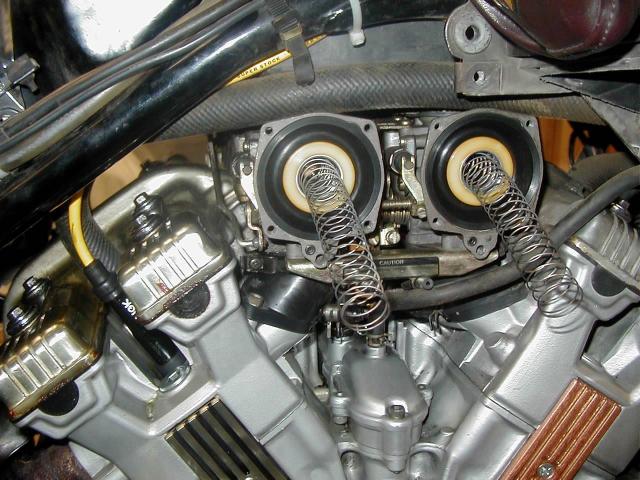
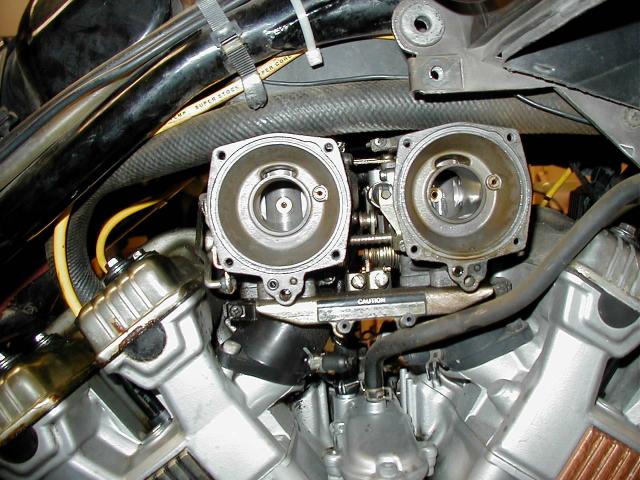
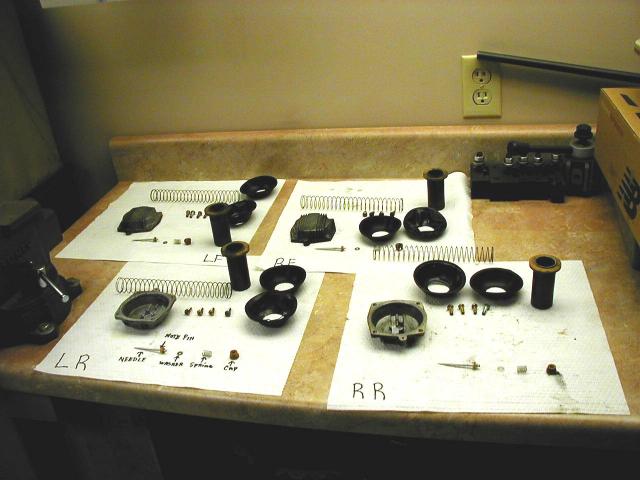
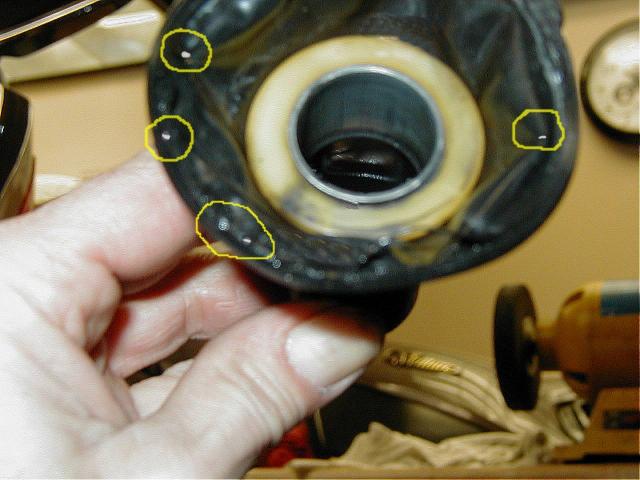
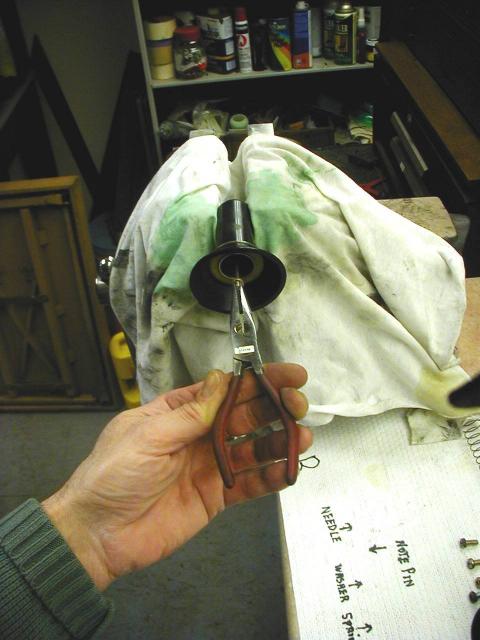
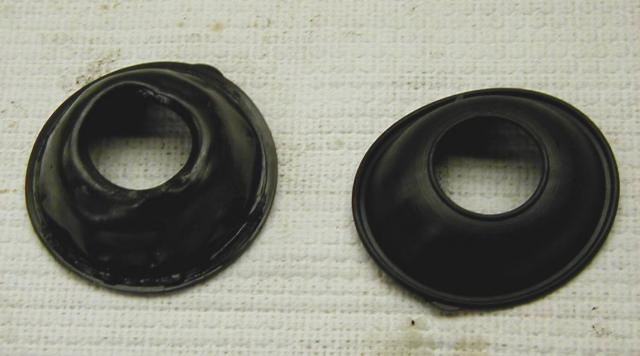
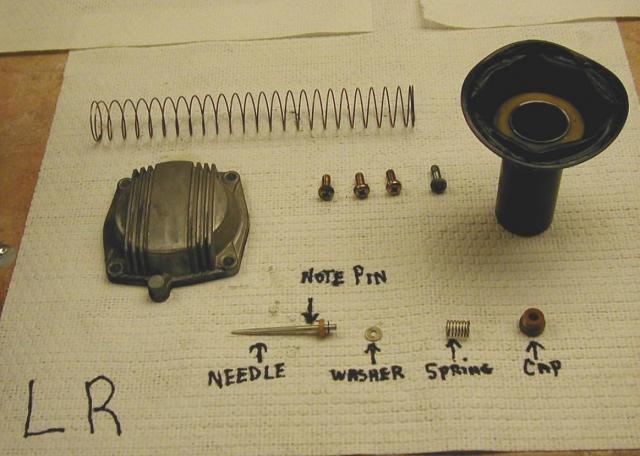
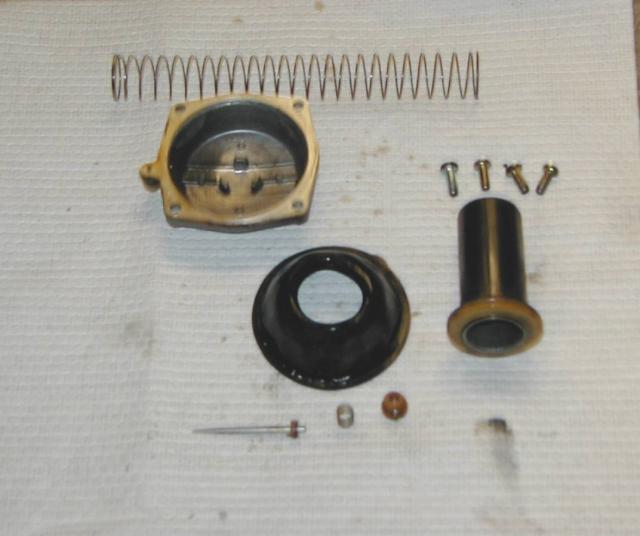
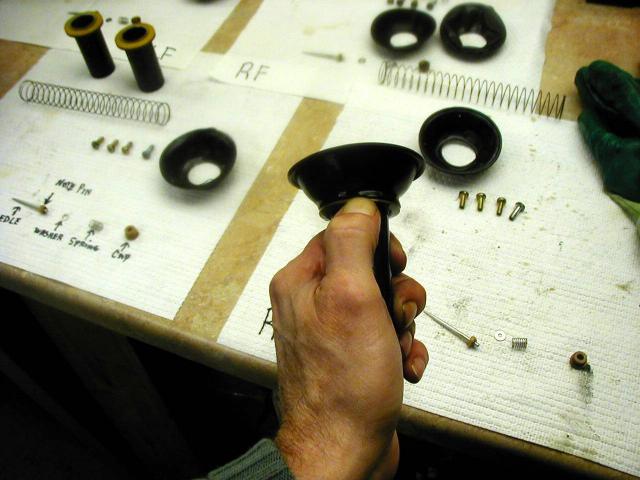
 Just to add to the knowledge base here on the subject of carb diaphragms -- 1. I was able to get the original screws off the side carb cover. I sprayed each screw with PB Blaster. This was based on information that these screws get frozen at the juncture of the head and carb cover plate (and the threads inside the carb body are fine). I had to use a impact driver on all and I also used a T-25 Torx security bit to get the "special" screw off. All screws came off in one piece and were later reinstalled. 2. After removing each cover, each (and I mean all four of mine) carb slide was in pieces. If you look at the first picture, all the pieces shown were in this disassembled state when the cover came off. The center metal keeper was loose and the old diaphragm was off the slide, Somewhere mentioned that parts on the carb slide "come apart" (I believe it was Condor who said he had experienced this a few times). I know the previous owner of this one owner bike, and it never had carb work done since new. It must be the nature of the beast that these slides parts came apart. 3. For the first two carbs, I followed the recommended procedure to disassemble everything including the carb needle/holder assembly. I found that reinserting the plastic screw that holds the small spring and carb needle to be a slightly tricky task. Since I wasn't replacing the white spacer (as some have for "improved" fuel mileage), I omitted this step for Carb 3 and 4. This omission saves considerable time. (5-10 minutes each) 4. I cleaned all the parts with carb cleaner and installed the parts together. I used the SD-1 diaphragms from Sirus. In photo 2, you can see the white plastic washer on the keeper part. (You don't need a screw driver like in the photo, it just made taking the photo easier). 5. The next part installed was the diaphragm itself, there is no need to stretch it over the slide in this assembly scenario. The gray washer goes on next and the groove side goes against the diaphragm. See photo 3. 6. Slide the reassembled keeper part into the black plastic slide assembly. See photo 4. 7. Lastly, there have been many questions about the orientation slide to the tabbed portion of the diaphragm. If you look into the slide, there appears to be a vent hole or something at the bottom. In my four, one was at 1 o' clock (or pointing at the tab portion in the upper right corner), one was at 4 o'clock, one was at 6 o' clock, and the last was 9 o'clock. As you push the keepers into the slides in step #6 above, you can rotate the diaphragm to get it into the position you want. As far as I can tell, there is no standard position. Does anyone know the answer? So the conclusion is, if your slide/diaphragm unit is "split, this is the way to assemble it. This may end up being the preferred way to install new diaphragms. If the keeper can be removed from your slides -- it allows for a thorough cleaning of pieces and avoids the possibility of ripping the diaphragm when you slip them into place (and use the fingernail method like skydoc17 does). This is probably more critical for people who reuse and recoat old diaphragms where they could easily be damaged by stretching. There is no need to take the carb needle out if you are just replacing the diaphragms. Seriously! The SD-1 diaphragms fit well. We will see if they stand up to the test of time. Incidentially, my old diaphragms showed wear (and fabric) along the outer edges but I couldn't spot any pin hole leaks elsewhere.
 -
When people have talked about the low end power on these 1200 motors, I felt like mine seemed to have more power (torque) than most. Mine at 25mph in 5th gear on flat ground would pull surprisingly strong compared to what other described about having to keep their bike above 3,000 rpm's. I also felt like at about 6,500 rpm's that the power was starting to taper off in that it was not pulling as hard. I know this bike pretty well as I have put 100,000 miles on it since I have had it for 13 years. I have patched the diaphragms a couple of times and it did seem to make it run a little better. With the new diaphragms, it is just opposite. Now, it feels a bit less torquey at low rpm's, but as I go over 3,000 rpm's in 1st gear at wide open throttle it now is almost scarey how quick it will pull to 8,000 rpm's. It now seems like just a few seconds in 1st and 2nd to 70 mph or more. I am wondering if I will get better gas mileage than before as I was getting from about 38 to 43, according to the road and my speeds. Now, if I am going to get anywhere near that good I am going to have to crank her down some as I am now catching myself looking for a place to crank it on. It's almost addictive how much pull it has as it is winding up and at 8,000 rpm's it is still pulling hard. I was just wondering if anyone has experienced this change with new diaphragms? RandyA
-
 is anyone parting out a bike or know where I can get slide diaphragms for cheaper than $65.00 each?
 -
 I would like to hear some opinions on the life expectancy of 1st Gen carb diaphragms... Last week I received a set of four new ones from Sirius Consolidated in Kitchener. They appear to be really nice quality, probably on par with the stuff Yamaha sells. I had some problems getting the carbs synched right last time I tried, fairly consistent in idle, huge difference at 2000 and 3000 rpm's. Ordered new diaphragms just to have them on hand in case a problem arose. Anyway, the diaphragms were replaced about 18k miles ago when a dealer in San Bernardino county rebuilt the carburetors. I have the receipt for almost $900 in parts and labor from the PO. Imagine my surprise when I removed the covers, all four diaphragms have significant holes in them, same amount and pattern in all four. So how long are these things supposed to last??? The bike runs much better now, lot more top end power, noticed that my trusty old Mercury MotionPro must have been damaged last weekend and ended up ordering a Morgan Carbtune... Klaus
 -
 This is my day to work on this bike. It is new to me, an 86 with 20,000 miles. When I picked it up, it wouldn't idle without choke, but ran pretty good on the road without choke. I just replaced the 4 diaphrams and did the 2 ss washer mod on the needles. 1 of the diaphragms was completely seperated from the slide and all had a few holes. Now the bike will not run without choke and if I rev it it wants to die. Will not stay running without choke and backfires a little while running. I have to adjust the idle with the choke. Seems like its running too lean. Trying to synch the carbs but can't get it to go without the choke. The indicators on the carbtune are moving but don't seem to be too high up on the gauge. Any suggestions would be greatly appreciated. Thanks Kevin
 -
 I bought some ebay diaphragms and have them on the bike. Seems like they went on fine but I'm havin a problem with about 2 carbs where I pop the covers and the diaphragms is no longer attached to the slider. Any ideas? Did I miss something?
 -
I just saw what the guy on ebay sold the last set of his diaphragms ( you know the ones he can only get one set at a time) for $147.00 . all i can say is someone wanted them pretty bad to pay that price when you can get them for $89.00 from sci at reg. price. i will wait until there back in stock and get mine at the venturerider price . I just can't belive people don't know that they are paying two to three times what it cost new.
-
Sorry, since I don't own a 2nd gen I really don't know that much about the specs on them.....do they use the same size diaphragms as the 1st gens? I'm asking because I'm negotiating with a local supplier for diaphragms and we had posted a poll in the 1st gen. tech section to see who would be interested in a group purchase and we didn't get much response and was wondering if maybe we inadvertently overlooked the 2nd gens and needed to broaden our poll. The poll indicated an order of approx. 67 sets of diaphragms.....I would have thought ( of course if the price was right ) that we would have been well over the 200 mark considering the size of the club.
-
I've been looking for carb diaphragms for a while now and thought I'd post here to let everyone know the best price I've been able to find. Part # 1FK-14940-09-00 is $70.00 plus shipping. Many of their diaphragms are the same price. CruisersPlus.com has quite a selection of diaphragms as well as other parts. I haven't ordered anything from them yet, though. If anyone has any info on them, good or bad, I'd like to hear it. I'm about ready to order now.
-
Not being the kinda' guy that likes to do things the easy way,But always looking to save a few bucks I purchased a set of Carb. Diaphragms off of Ebay a while back. ($86.00 with shipping) I thought I would give you a run down on how that went. After removing the False Tank cover and both side covers as well as the lower fairing legs on both sides I was able to get to all 4 Carbs. easily. To remove the Carb. covers I used 3 tools, a 1/4 inch drive ratchet with a special Torx bit on it for the 4 odd screws, an impact driver with a Phillips bit in it and finally a pair of Vise Grips for 2 of those Phillips head screws that just wouldn't come out. I took out the Torx head screws first on all 4 carbs. because when you remove the last Phillips head screw, you better have your catcher's mit on, that Carb. cover is coming off...FAST! I had set up 4 shop towels on my bench and kept all of the Carb. parts separated. I held each slider assembly up to a good light to inspect them and sure enough all 4 diaphragms had holes in them. I removed the old Carb. diaphragms by gripping the slider and "rolling" the old diaphragm out from between the two flanges on the slider. Two of the old diaphragms came off in pretty bad shape. I then cleaned all of the reusable parts with Carb. cleaner , but I must say that overall everything looked pretty clean. All 4 of the sliders were nice and smooth as were the Carb. bodies on the engine. I used a clean cloth and Carb. cleaner to clean out the Carb. body bores. (I don't use paper towels for this as I would not want a shard of paper ending up in the intake or the Carb. body) With everything clean I moved on to the reassembly. The Ebay diaphragms were not made of the same material as the stock Yamaha ones, but were very pliable, and had the tab for alignment in the Carb. body. After lubing the diaphragm with aerosol spray silicone I inserted the slider into the bore of the diaphragm. When I got to the flange, I stretched the diaphragm bore over the bottom flange. Now the spacing on the two flanges of the slider seemed a bit "slim" and I panicked for a moment but realized that by using my thumb nail I could wedge the diaphragm bore between the two flanges with no problem. When all was said and done you couldn't tell that the diaphragms and the sliders were not mated at the factory. I had the slider needles out for another project I will discuss later and at this point I reinstalled them. I put the slider assemblies back in the Carb. bodies aligning the tabs, put the caps on with the Stainless Steel Allen Head Cap Screw set I have listed in the classifieds and reinstalled all of the body parts and that as they say was that! Oh yea, I accidentally spilled some paint on the Carb. caps...Oops! I have attached some pics below and am willing to chat with anyone that is interested in this rebuild. Feel free to PM me. Sorry this got a bit "windy" Earl

-
does anyone know the part number for a first gen carb diaphragm? are they the same for a second gen? just jt
-
as everyone knows, these mkII's won't run worth a tinker's dam, without the air filter in place. mine will run JUST long enough , without the "enrichment lever at about 1/2, to see that the #4 diaphragm doesn't move when you turn the throttle.then it dies. need troubleshooting help on this one. i had the diaphragms all out a few months ago, and did the "liquid tape " repair on a few small cracks and pinholes. question is WHY is #4 the only one that doesn't dance? it isn't "frozen up", as i can move it manually. any help would be greatly appreciated. just jt:confused07:
-
Hi all, There is a guy on ebay selling a set of first gen. VR carb. diaphragms new with a starting bid of $49.99. He even shows pics of the install right on the bid page. Could these be for real? http://cgi.ebay.com/ebaymotors/ws/eBayISAPI.dll?ViewItem&item=280250975829&fromMakeTrack=true&ssPageName=VIP:Watchlink:middle:us Item number: 280250975829 Has anyone ever used aftermarket carb. diaphragms for their first gen. with any luck? Comments would be greatly appreciated! Earl and Jean
-
How does an first gen act when there is a hole in the carb diaphragms? Would that cause it to run lean?
-
Back in December I gave myself an early Christmas Present and found a set of new diaphragms for my 89vr on E-bay for a very affordable $41.00 needless to say I was all over them like oil drips under a Harley! Tonight I finally got out to the garage and replaced the diaphragms, much easier than I anticipated and I also found that the front left plug boot was very very loose, probably a 3/4" gap between electrode and plug tip. Well since I bought the 89 1 1/2 years ago it has been pretty doggy in the acceleration dept. However tonight when I took the old girl out with her new diaphragms..... WOW!!! now this rides like a 1300cc bike, I get full extension out of the front forks under acceleration, throttle response is a 100% better, cant wait till I put new plugs in her and resink the carbs. Just a note for those who use liquid electrical tape to patch their diaphragms be very careful when I pulled the old diaphragms out which I had used the liquid tape on, I found that it had flaked badly and the air bleed holes were covered. Now that the bike seems to be running better can't wait for the meet and eat later on this month.
-
 What happens when the diaphragms go ont the 1300 motor? Does it limit the amount of fuel that can be delivered to the cylinders? If so that may account for my very low top speetd. Is it difficult to access the diaphragms to check or replace them?
 -

now i am totally confused
hipshot posted a topic in Venture and Venture Royale Tech Talk ('83 - '93)
i have read ,in different threads and posts, that the carb. diaphragms,DO have a direct bearing on "engine idle." i have also read, here, that the diaphragms have NO effect on idling. so which is correct? also , today, i read a thread or two that mentioned "enrichment diaphragms"! first time i've ever heard of them. where are they located, and do THEY have any influence over "smooth idling".? just jt -
 I've been chasing poor mileage on my 87 for the year I've owned it. GeorgeS has written more than once that holes in the slide diaphragms will cause poor mileage and are common at this age. I finally pulled one this morning and guess what - it's bad! (Almost looked as if they had never been removed before.) Several obvious cracks, light shines right through them. The slide itself, needle, and jet looked OK. They are SOOOO easy to pull on this bike that there was really no excuse to wait so long. What's weird is that the bike runs fine - no stumbles or hesitations, revs right up to redline, plugs are the appropriate color. Is this common, that they don't affect driveability, but hit the gas mileage? It seems like this problem would cause a lean condition, which isn't good for the engine but in some cases can actually HELP mileage... QUESTION: Are the coasting enrichener diaphragms also commonly disintegrated? One guy had that problem here recently - anyone else? What kind of problems will that cause? They are harder to get to...ughhh. COMMENT: Some have written, indeed I have done so myself, something like, "I watched the slides with air filter removed and engine running, and they all seem to be doing the same dance, so they are probably OK." I can tell you, this is NOT a valid test! In fact, just this morning, I repeated this "test" with a now-known bad diaphragm, and they still appear to dance the same. Maybe they are all cracked exactly the same. Jeremy
 -
For those of you that just can not seem to let go of a couple of hundred bucks to replace your diaphragms, even though you know they need it, there is an alternative. Over the years I have tried several things to fix the existing pin holes to get me through one more season of riding. I have tried Yamabond, Seals All, silicon and maybe even something else. Last year I bought a set of carbs off ebay and even though the diaphragms did have some pins holes in them, they had been unmolested. I had heard from someone on here about a product called Liquid Tape. Well, as an update of about a year later, I want to say that it works very well. I took my carbs apart and in particular looked at the diaphragms that I patched last year and they looked very good. There was only one small hole that I needed to repair and either it was new, or I missed it last year. The great thing was the Liquid tape was still sticking real good and was still very pliable, much more than a little bit of Yamabond. I believe the trick to it is to make sure you get the hole area prepared before putting the Liquid Tape on. What I do is spray the area with brake cleaner and then clean it good with alcohol. After blowing it off a bit with compressed air, I will smear a little Liquid Tape over the area where the hole is. Then I will let it dry over night before I put it back together. I have seen Liquid Tape available at several places, but I originally bought mine at a NAPA store. It is made to be put over wires or connections to seal them. It also must have some pretty good resistance to gasoline. For those of you that want to get a little more life from your diaphragms and make your bike run better and get better gas mileage, this will sure help. RandyA