Search the Community
Showing results for tags 'adapter'.
-
I changed the rear tire on my RSV and it was a pain to get lift it? I saw this adapter on ebay anyone out there have it? Or a blueprint to make one like it? Or maybe one they want to sell? http://cgi.ebay.com/ebaymotors/LOOK-YAMAHA-ALL-VENTURE-ROYALSTAR-JACK-LIFT-ADAPTER-/250880210107?pt=Motorcycles_Parts_Accessories&hash=item3a69a034bb
-
Anyone make one? What I would like to do is plug in an adapter to my 5 pin "pentagon" shaped pigtail for my headset and then plug in a 1/8 inch male stereo jack. This way I could use the speakers in my Arai full face helmet on any bike... any thoughts? When I ride the 650 Vstar I use the same helmet and I'm having clearance issues if I use ear buds
-
Carbon One your lift adpter works great. I tried it out today. That not me in the picture. It's a neighbor.
-
I have read enough about Raising my 2005 RS Tour dlx. to make me dangerous. It appears to me a Bike Jack (ala sears) will hit the pipes before frame. I am thinking a centerstand is right for me. I have had several bikes with them and LIKED It. I am not someone who can cough up $300.00 for one. What year Centerstand from an older bike do I need AND Is someone currently making the adapter parts???I do my own work and am somewhat Mech. inclined but dont really want to fab my own adapter bracket as I am not a Machine shop kinda guy. I Think this bike is Amazing for its weight. Lag in cruise control kicking in normal? Speedo moves up a little notchy, normal? bike has 14,000 miles and is a 2005 model would you Flush the brakes and clutch (hyd.)? Tune it (plugs) Change Thermostat? Many Thanks in Advance bf
-
Has anyone been able to put some kind of adapter on the front forks so that both sides can be filled from one point? I found a link here some time ago but the adapter kit was no longer available so I've decided to try and do something myslef but thought I'd come to the experts first. Thanks KB
-
I am looking for a set of adapter plates for HD mufflers. I have tried emailing the address on the ad on the site with no response. Does anyone know if he is still selling these brackets and if not where else I could get some?
-
 I have a 1993 VR. I just installed a cigarette lighter for charging my cell phone. I tested the cigarette lighter with the lighter, no issues, in 20 seconds it was hot and popped out (as expected). I plugged in my cell phone car charger adapter and in a couple of seconds I heard a loud pop and smoke coming from my adapter. I hooked red (center wire) to positive terminal and black wire to negative terminal. What did I do wrong? Thank you.
 -
I added a y adapter to my AUX input as suggested here so that my garmin could be plugged in. I thought I would still be able to listen to my iPod through the AUX input by the cassette deck. Unfortunately, now when I plug my iPod in (even when the gps is off). The audio is extremely weak. I discovered by accident that if I touch the back off the iPod to the fuel filler cap that the audio is normal!! I need to take it all apart again. Perhaps my plug became disconnected while I taped it. It's weird though because I certainly tested it??? The grounding thing is really strange too... The gps audio is fine...
-
A few out of the dozens of water temp gauge installations have reported leakage at the adapter. I think we have found a cure. I sell the adapters with a 18mm crush washer. The problem occurs where the inside diameter of the washer meets the outside diameter of the adapter. There is a recess machined into the adapter which allows the washer to slide over to one side which will not seal. http://i672.photobucket.com/albums/vv87/dawarren77377/Bike%20shots/waterseal3.jpg?t=1263574491 To solve this issue place a 1/2" ID X 3/32" thick o'ring between the adapter and the crush washer. Make sure the tabs on the washer face away from the o'ring. With the o'ring in place against the washer, the tabs should still engage the threads. http://i672.photobucket.com/albums/vv87/dawarren77377/Bike%20shots/waterseal4.jpg?t=1263574679 http://i672.photobucket.com/albums/vv87/dawarren77377/Bike%20shots/waterseal5.jpg?t=1263574858 http://i672.photobucket.com/albums/vv87/dawarren77377/Bike%20shots/waterseal6.jpg?t=1263574887 The o'ring alone would work if the adapter had a groove machined in it to prevent the o'ring from squishing out (like the water jacket plug removed from the cylinder head). The washer holds the o'ring in place and the o'ring holds the washer centered. http://i672.photobucket.com/albums/vv87/dawarren77377/Bike%20shots/waterseal7.jpg?t=1263574917 The o'ring is available at most hardware/home improvement stores. The one I bought was a #35 o'ring, however all o'ring manufacturers may not use the same number. If anyone who has bought a kit from me needs either the crush washer or the o'ring, let me know. Also, I have received a request to announce what tools I use to remove the water jacket plug and install the adapter. Most use a standard 10mm "L" or Allen style wrench for removal. A 10mm hex bit/adapter to 3/8" drive works well for plug removal. You can put a breaker bar on the hex tool for leverage. I sawed one inch off of a 10mm "L" wrench which I can use a 10mm box wrench or a socket and ratchet. It is important to use a hex that is in good shape. If a rounded hex tool is used and the plugs is damaged, you have problems. I use a 7/8" or 22mm socket with ratchet to install the adapter. If I have a leak or need to tweak the adapter after it is installed, I use a tubing wrench. You don't have to buy an expensive tubing wrench. I bought a $3.00 combination wrench at a pawn shop and ground a 1/4" slot in the box end. This slides over the thermocouple tube easily. I also use a 5/8" (16mm) tubing wrench for the thermocouple nut. Cheers, Ponch
-
 Last night I installed a pair of Powerlets on to Roxie. I liked what I saw in this thread, and decided to do it myself. I'd been biding my time, but then I saw an article on a DIY Powerlet to USB Adapter. I wanted the USB adapter to recharge phones, headsets, etc. And with a camping trip coming up, with the need to inflate air mattresses, now was the time! I dealed primarily with BurnsMoto. Stephen Burns has been a joy to deal with. He responded to my questions quickly, and shipped about 5 minutes after I ordered. I ordered on a Friday, and had everything to me by Monday AM. He was missing the Low Profile Adapters, so he went through Powerlet. They screwed up and sent the stuff to him, and he resent it to me. I bought the Powerlet to USB adapter elsewhere, but BurnsMoto now carries it. It is in fact made by NAPA, so it could be widely available. Anyways, here's what I bought.... The Powerlet Low Profile Adapter with a 24" lead (x 2), P/N PKT-046-24. http://farm5.static.flickr.com/4009/4618825544_4868782079.jpg The Powerlet right-angle adapter P/N PPL-004 and the NAPA USB All Weather Power Outlet P/N 782-6003 http://farm4.static.flickr.com/3388/4618824062_5867e11a69.jpg The Powerlet to Cigarette Adapter P/N PAC-012 Like it or not, most doo-dads want cigarette plugs rather than Powerlets. http://farm5.static.flickr.com/4001/4618825306_638d2bb2a4.jpg The Install Here is the side cover, basically a plastic filler plate from her left side. The holes are where the passenger floorboard mounts, the small inset is for the screw that holds this piece on, and there are two "bosses" that plug into rubber boots for positioning. I had to drill two holes for the Powerlet. http://farm5.static.flickr.com/4034/4622257362_06a2dbbfab.jpg Using the step drill, I bored two holes for the low profile Powerlet outlet. The instructions said to use an 11/16" hole saw, but I actually used a step bit. I am glad, because the holes are two steps bigger than 11/16"! http://farm4.static.flickr.com/3402/4622258072_ca2a109969.jpg Here is the Powerlet half way through, showing the rubber gasket. http://farm5.static.flickr.com/4019/4622258508_7f1a08fa5d.jpg The Powerlet seated on the rubber gasket. http://farm4.static.flickr.com/3319/4621652251_7e194a45ae.jpg On the backside, an aluminum washer is installed, then a brass jam nut is used to tighten it down. http://farm2.static.flickr.com/1153/4621652551_7bfda7cecb.jpg One of the Powerlets installed. http://farm4.static.flickr.com/3406/4622259406_0c24fb31d8.jpg The backside, showing both Powerlets. http://farm4.static.flickr.com/3355/4621653059_06024aac0d.jpg The Powerlets are covered with right angled rubber boots on the backside. What a PITA these things are! http://farm2.static.flickr.com/1163/4622259876_772c54a635.jpg The final off-bike step is to add the white "T" connector. This connects the battery harness to the powerlet. You can see the harness below. http://farm5.static.flickr.com/4058/4622260160_0300f8343d.jpg (Harness) http://farm5.static.flickr.com/4009/4618825544_4868782079_m.jpg You can see the cavity that the plastic cover goes over in the right middle, right in front of the drive shaft. Confession time: I misjudged where to drill the holes in the cover. The rear Powerlet conflicts with the large bolt at the back of the cavity. Not much, maybe 1/8". But it is enough to make me want to buy a replacement cover and do it over. Maybe put one outlet on the left side, and another on the right. *sigh* http://farm5.static.flickr.com/4019/4622262028_c6183f79dd.jpg Here it is installed. Note the power leads coming out at the top. http://farm2.static.flickr.com/1176/4622262274_d5d7584030.jpg This is how it opens. http://farm4.static.flickr.com/3386/4622262494_c41d9999ea.jpg Now the right side fuse cover and the passenger floorboards are re-installed. When the floorboards are up, you can hardly see the Powerlets. Note too the coil of wires up top. I lacked a spade connector, so I used the harness as supplied. As a result, there is a vast amount of excess wire at the top, under the seat. I need to fix that soon. http://farm2.static.flickr.com/1155/4621656099_6302ff4d8f.jpg Job done! Now I can power my auxilliary electronics, like my phone/MP3 player, or an air mattress when I go camping. I can also use it to attach a trickle-charger to keep Roxie's battery charged. I added a pair because I am planning to buy electric clothes, and they'll plug in here. http://farm5.static.flickr.com/4037/4621656431_334326c902.jpg This was a pretty easy job, aside from the mis-measurement. Having an outlet or two designed for powersports will be a real benefit!
 -
Maybe someone can tell me if the Carbon One adapter will work with this floor jack. If so the price is right. http://www.kragen.com/ProductDetail.aspx?MfrCode=PBI&MfrPartNumber=640753
-

lift adapter 96 classic
casabroker posted a topic in Royal Star and Royal Star Tour Deluxe Tech Talk
Does the Carbon One work on this year. I looked at a pic of one. I think my bike is different it has the mono shock which I think gets in the way. Any help here? Has someone came across this before. there seems no sold place to put the lift. Thanks, Kregg -
i have a motorcycle lift from craftsman, besides buying an adapter is there a easy way to lift bike safely?
-
I got 2 led 1157 bulds for my scoot and decided they are better then i expected.I am going to hold off on the turn lights because the load change on the flasher. I did see you can buy the adapter to get more load but not sure where to put it. Also not sure if i need 1 or 2 load adapters. Any idea thanks Doug that is suppose to be light not tight
-
Sweet, after a year of loose light bar issues and frustrations with vibes, cut wires and what ever else, the job is done and doods, if *I* can do it, anyone else can lol.. if your bolt hole threads in the lower triple tree clamp are munged or stripped, this is the fix for you.. Or even if you're sick and tired of not ever being able to get them frikken bolts in proper, this would be a good fix as well.. I have tried to find the link or threads of this aluminium block adapter that mounts your highway light bar ahead of your fairing so that you'll never ever have to remove your light bar to take off the front fairing.. if someone can find it, please advise.. this is an awesome adapter. I had never been before able to make it work for various reasons and now I know why.. nothing wrong with the adapter, it's AWESOME but my bike, for what ever reason, always rejected the adapter or proper installation of the light bar.. Me being the 3rd owner of this magnificent bike, I'm finding a lot of previously buckshee maintenance done to the bike causing me problems.. Now that I have my heated garage for the winter, boom, time to fix it all up proper.. and the light bar is my first victim.. mou'aha.. The main ingredient was to use a 2 inch 7/16th bolt with washer and lock nut (nylon insert) or what ever you feel safe with.. As you'll notice, in the photo, I had to nibble away at the shroud with a dremel tool to make tool alignment easier. These are the bolts passing through the triple tree clamp.. The bolts mounting the light bar are now Loktite and have a lock washer as well.. (if I ever have to remove this again for what ever reason, I'll have found proper sized washed to put under the bolt heads in the recess, but couldn't find them around here).. http://www.myvstar.ca/venture06/mount001.jpg The shot below is taken from the floor looking up in front of the radiator. The brake line splitter is removed as is the half moon mud flap (2 bolts each). You'll want to remove these for easier and better access to the nuts. As you can see, the threaded portion of the triple tree clamp where your highway lamp attachment bolts bolt into isn't all that thick after all.. so the 2 inch bolt used here leaves enough thread showing for safety (min 3 threads etc).. When you're torquing down the bolts, you'll want to be very careful and ensure your wiring isn't being pinched or caught in behind the adapter block.. I have mine laying across the top and out to the left side (kick stand side) of the block. http://www.myvstar.ca/venture06/mount002.jpg Photo below shows why I thought it best to nibble away at the shroud for better access to the bolt head. I used a thin walled 7/16 deep socket to turn the bolt head to get the nut started. However, when the nut tightens up against the washer, its best to turn the nut, and not the bolt to avoid damaging the adapter.. There is sufficient 'bolt head size' to take up the hole without a washer.. but if you're able to fit a washer down that recessed hole, the better. http://www.myvstar.ca/venture06/mount003.jpg Below is the hardware I used.. go for high tensile steel if you're going to torque onto these puppies.. http://www.myvstar.ca/venture06/bolt.jpg Below is where a lot of my problems with wiring happened, the wiring would basically drop down into the fork stops and be guillotined causing shorts, failures and freaking annoyances like you wouldn't believe.. I had used a zip tie to hold this bundle up and away from the fork stops but they eventually fell into them again something got nicked.. Now that the bike is sitting high and pretty on the jack adapter, I'll be able to do properly tuck these bad boys away for good.. http://www.myvstar.ca/venture06/wires-cut.jpg So there ya go.. the hardest part of all this was finding out what proper sized bolt I should be using.. originally I had started with a 2.5 inch bolt but the shank was too long so the 2 inch bolt was perfect.. It will be a while before I can test ride this set up properly but I think this is the permanent fix for my bike.. no more BS with munged threads etc.. never more having to drop the light bar to remove the fairing.. Ahhh nice.. If you have any questions or comments, please feel free..
-
Can you raise your bike, using the carbon one adapter and if so does it balance OK?
-
Saw this on E-Bay. Now if they would make one for the 1st Gen. http://cgi.ebay.com/ebaymotors/YAMAHA-VENTURE-ROYAL-STAR-EXHAUST-MUFFLER-ADAPTER-KIT_W0QQitemZ250509425487QQcmdZViewItemQQptZMotorcycles_Parts_Accessories?hash=item3a53867b4f&_trksid=p4506.c0.m245
-
OK, I always seem to do things bassackwards. A couple of weeks before the '99 Venture grabbed me by the throat and said BRING ME HOME, I bought a MotoCom RiderLink system for the RSTC. Now that I have the Venture, I'd like to adapt the RiderLink head sets to the Venture. It first looked like all I needed was a PC keyboard adapter to go from the RiderLink PS2 plug to the Venture 5 pin DIN plug. Well being the pack rat that I am I had the PC adapter. Well I guess the pin-outs are different. I hooked it up but get no sound out. Anyone have any suggestions? Walter
-
I can not believe you must rewire the whole system to replace your antennas someone should make an adapter to use the existing mount they could sell alot of them anyone interested?
-
I had to modify my Zumo 550 car adapter for my wife's car for her trip a couple months ago. (to fit in her flower holder in her bug) What I was wanting to know is there anybody out there that will never use there Zumo 550 Car adapter and would want to sell it? Needing a none modified one for my truck. If so give me a shout! Thanks, Jeff
-
Just installed the Chatterbox Xbi-2 headsets on both of our helmets. Anxious to try them out as soon as Ronda gets off of work. No more cords. I've tried it out with my cell phone and works great, now as soon as the bluetooth adapter is charged, I'll try it with an I-pod.
-
Now I know there is a whole section on connecting up a Tach but bear with me. I purchased a Sun Super Tach II (2 1/8 diameter for $15.00) and want to use it on my 2006 RSV. Now my question is this, I believe the Tach as it is will not work correctly on the bike as it will only read from the 1 coil it is connected to there by when it says 1,000 RPM the motor is really doing 4,000 RPM. What I need to know is the RSV considered a single fire setup because of the 4 individual coils? Now I found this info on building an adapter for mutli coil setup (picture attached). I priced out the diodes and they are around .02 cents each (in a lot of 100) and the resistors I figure can't be much more and a small box to put them in less then $5.00. My question here is will this work on the bike as a single fire adapter if there are 4 setups made and each connected as shown in the picture to the coils with the Tach set to the 4 cylinders setting. I have water proofed the Tach to the point of it floats but would be better off saying it's more water resistant not water proof. When I get this done I'll upload a PDF on how I made the Tach water resistant (a few O rings), fixed the mounting, and got it all to work.
-
Anybody had any luck making an adapter 2 use a cell phone style headset with the existing 5 pin intercom? What i would really like to do is add a headphone bluetooth adapter to the driver and passenger connection and be able to use or cell headsets.
-
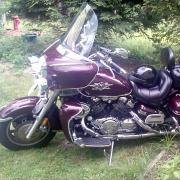
 Larry, just wanted to show off your product for everyone to see "In Action" Worked great, very pleased. Well made, I can't say enough good things about it. Any of you guys thinking about this piece of equipment, you should go ahead and pull the trigger. The 2nd Gen on a lift is a scarey, wobbly experience. Put that big heavy thing on this adapter and she's rock solid.
 -
Hey all, Just ordered a Carbon_one free standing lift adapter and was intrested in knowing which Sears jack best works with the adapter. I had the red lift several years ago and it seemd to work well for the short time I had it. Have been reading the reviews lately on Sears web site and the red lift dosen't seem to be very popular in ratings. Just wanted to know how others feel about this and out of the two is the red or yellow lift better with Carbon_one lift adapter and supporting our heavy bikes? Thanks, Dennis


.thumb.jpg.176b2ebbe9863175975d94710375c414.jpg)