Search the Community
Showing results for tags 'spring'.
-
Anybody going to Spring Fling in Pigeon Forge this weekend? I'm thinking about having my bike pin striped. I have the 2007 Raven or blue/black RSV. Any suggestions on what colors for the pin stripes. I'm thinking about light blue/gold/red???? Eddie:confused24:
-
Some memories of vogel 07. Heineken Spring Water a dry county favorite.:rotf:
-
SPRING FINALLY MADE IT TO NEW YORK.....GOT A SHORT 50 MILE RIDE IN AFTER WORK TODAY.... THATS RIGHT HAPPY DANCE...NOT TO BE CONFUSED WITH THAT OTHER DANCE YOU DO AFTER A LONG RIDE...:moped:
-
It's official spring is here. I have just received my annual 1-2 punch from mother nature. Allergies have me down for the weekend but it happens every year. After this is over in a few days I can think about getting the scoots out. I go through this every spring and fall.Guess I got to take sick leave for something.:sick: Forecast better days ahead.:cool10:
-
Spring has sprung, the grass has riz. I wonder where all the VentureRiders iz? O.K. everybody....the weather is finally turning, spring is well.......here...or just around the corner.....time to make your plans to attend the 2008 VentureRider International Rally......book that campsite or motel room.....here is the link to all the information you need....http://www.venturerider.org/irally/ There will be camaraderie.....story telling...probably some stretching of the truth...maybe some outright lies...there will be meals to share, rides with friends through some of Ontario's best scenery....evenings around the campfire.....maybe a few lessons in how to speak Canadian..... Sign up now!
-
For trike riders or anyone else interested my trike is on the cover for the spring 08 issue. Jerry M
-

Carb Diaphram Replacement
Marcarl posted a topic in Venture and Venture Royale Tech Talk ('83 - '93)
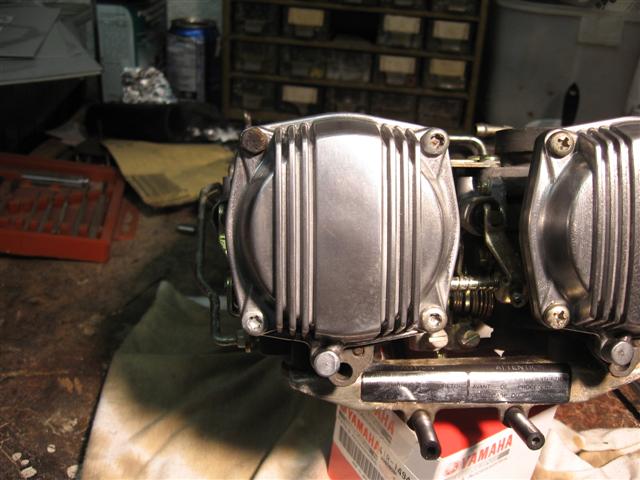
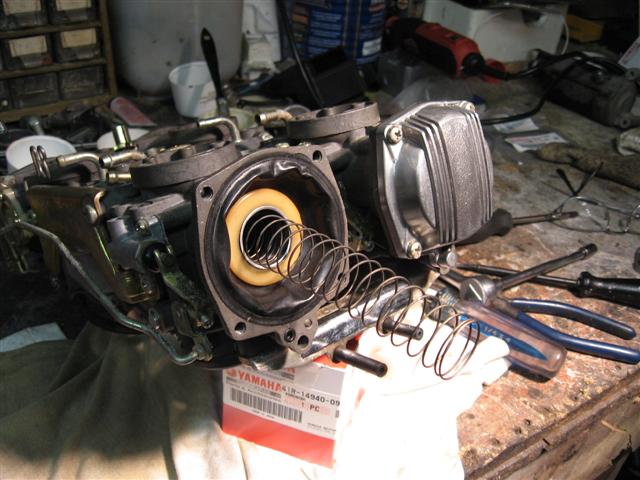
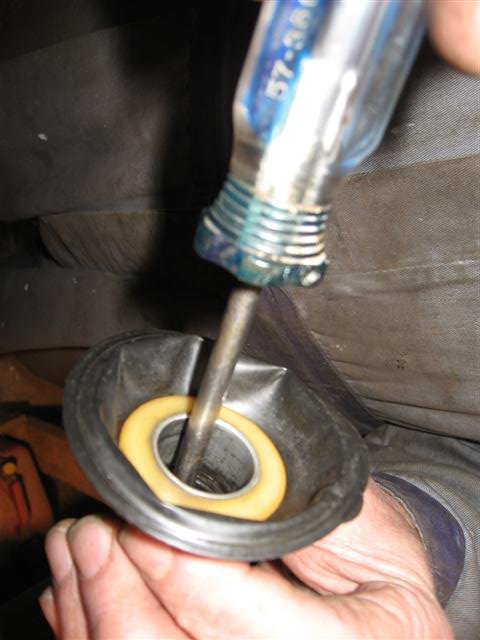
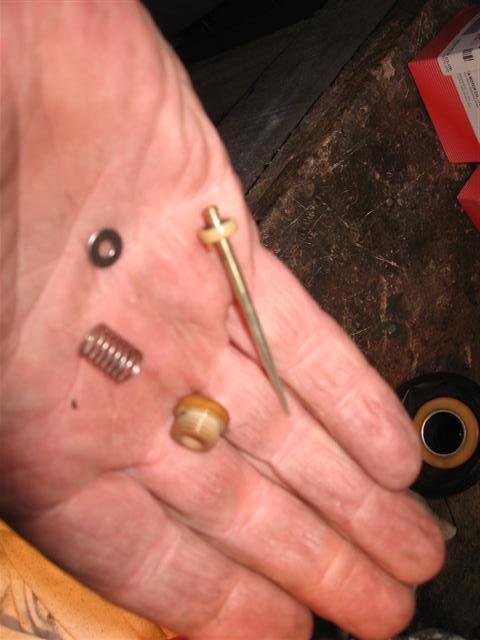
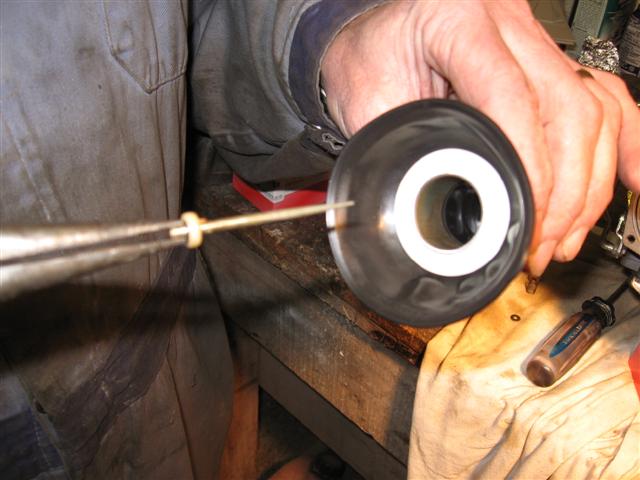
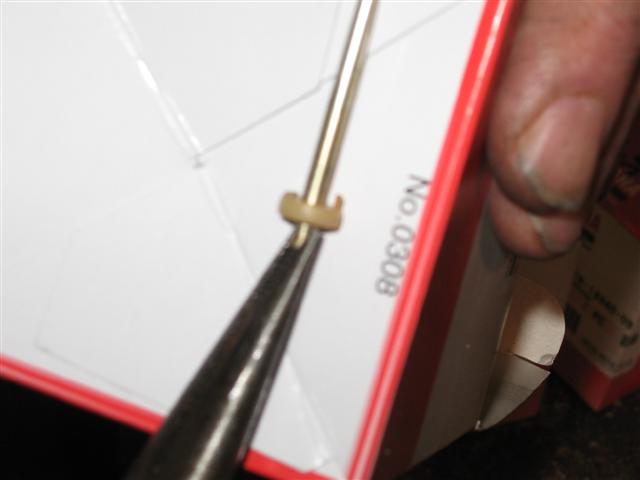
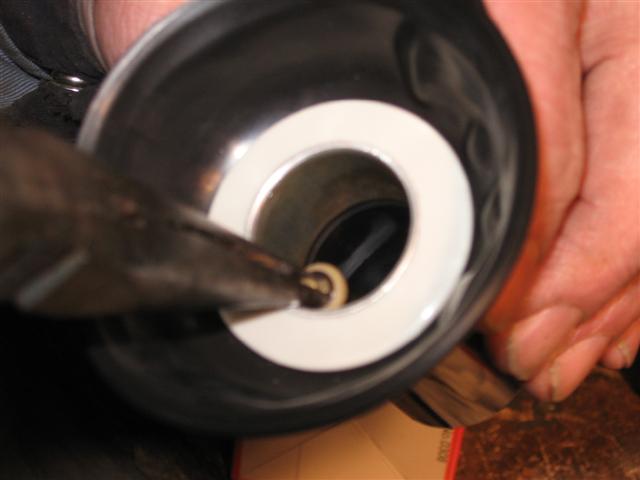
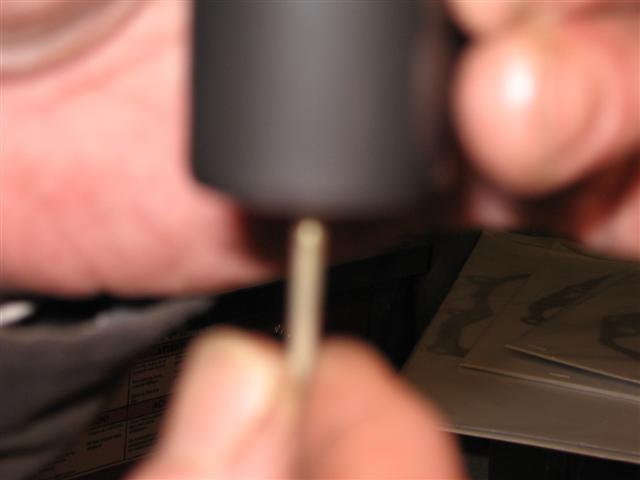
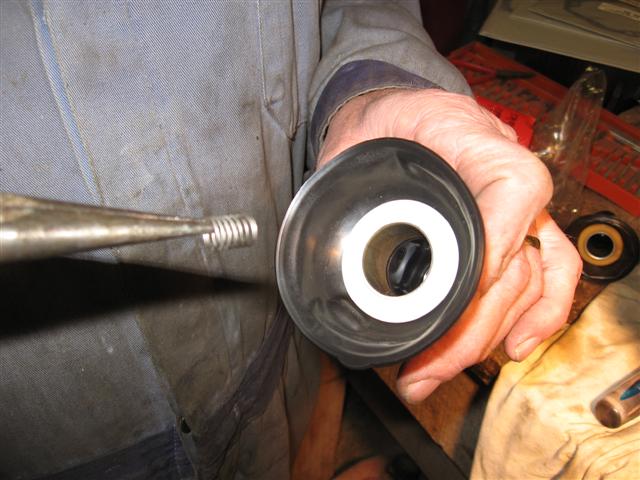
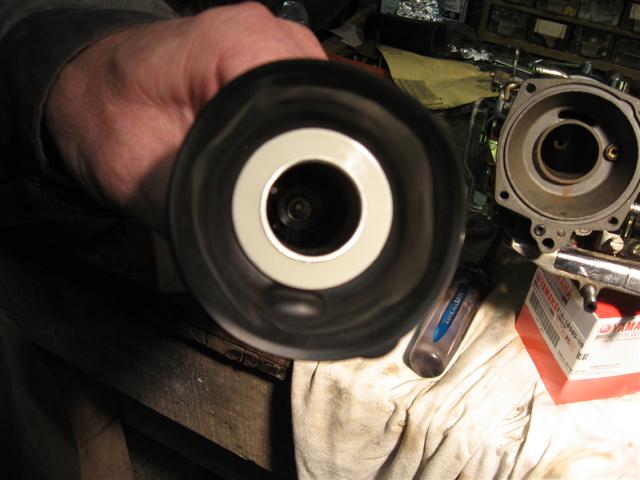
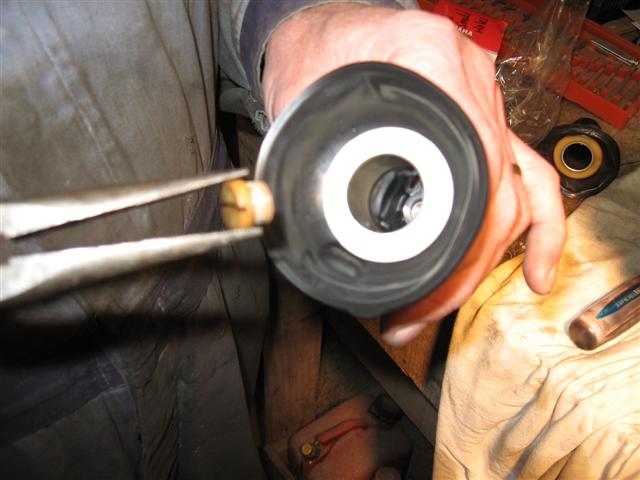
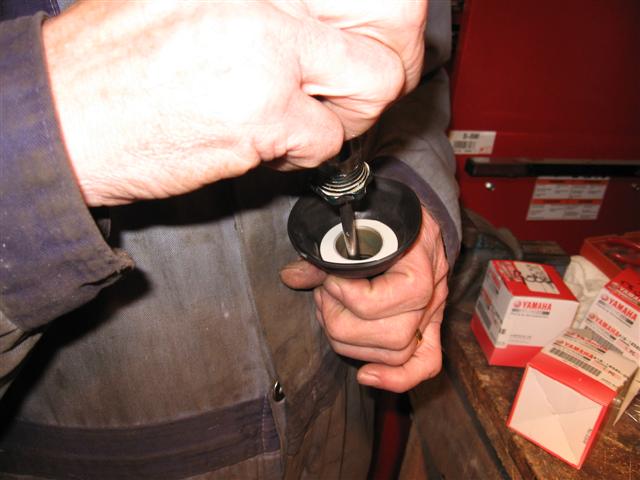
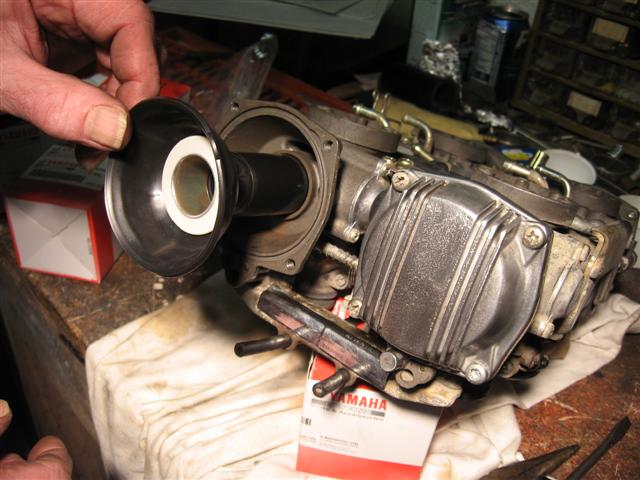
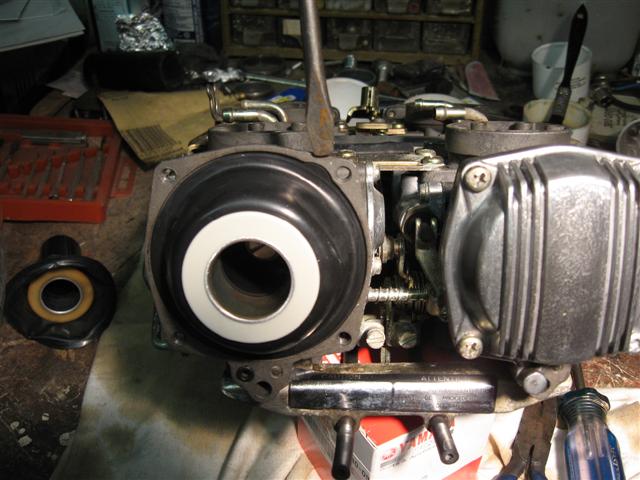
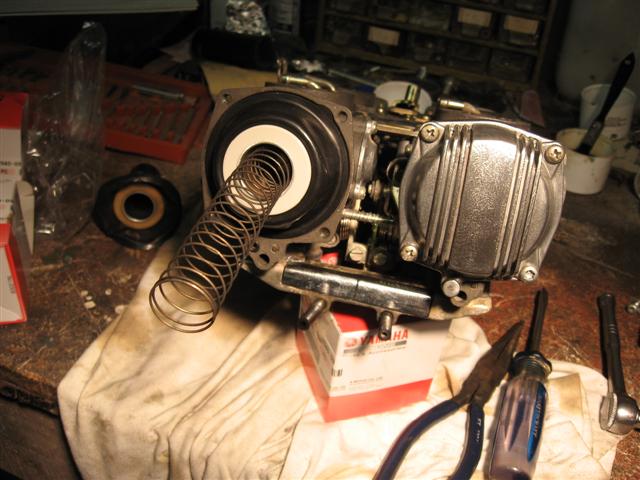
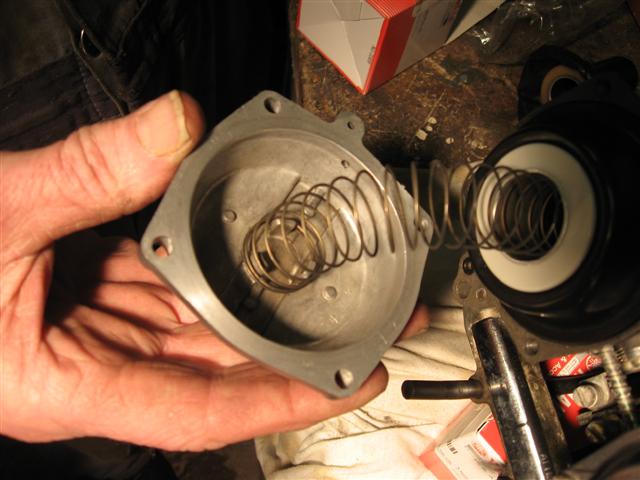
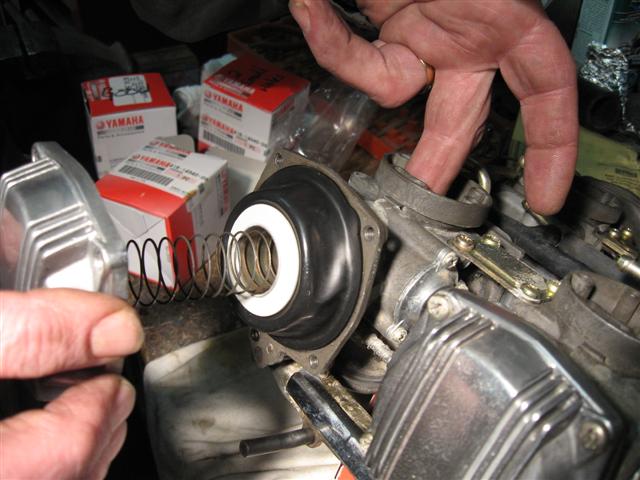
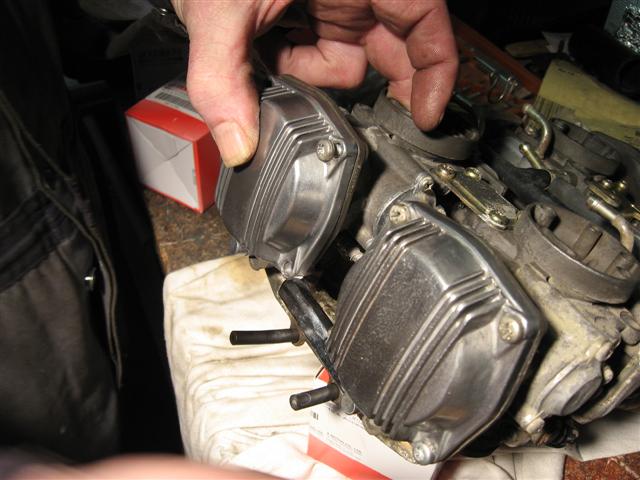
There's been some questions in the past as to how to replace the carb diaphrams, so when I did mine last night, I took some pictures, everybody always like pictures, RIGHT? Well here goes the write up: 1) Remove the false tank cover, side covers, side rad covers and loosen the lower faring. Remove the air box lid and the air filter. This would also be a good time to clean the air filter and the air box. You need to do this so you can reach into the carbs later. 2) Identify the part, the diaphragm cover, which has 4 torx screws, the one having a pin in the middle. This was done to make it hard, otherwise everything would be easy and any mechanic could do it. I didn't have one to show you, so you'll have to take my word for it. It can easily be snapped out by using a needle nose pliers or if it's stubborn a small punch. Just work it back and forth once or twice and it will come clean out. 3) Remove all the screws and the cover will pop out by it self, seeing as there is a spring behind it. Save the spring, it will come in handie when you put things back together. 4) Now that you have this area open, it's a good time to use some Carb Cleaner to clean the area, and all the little ports you can see. Finish by blowing out with air. At the bottom you'll see a little built out area that has a rubber ring in it. Be sure to save this ring as well, otherwise it's sure to get itself lost and then you'll have to wait longer for more parts. 5) Inside the diaphram body you'll find a plastic screw, turn it out by turning counter clockwise, that's the opposite way the hands on a clock turn. Under that screw will be another spring, not at all the same as the first spring, but a spring none the less. Keep it handy as well. Under the spring will be the needle assembly. This consists of the needle itself, a 'C' ring and a small washer. Best not to loose these either. They all need to go back in order in the new diaphram. 6) You are now ready to begin the installation of the new diaphram. Make sure that the little washer is mounted on the short side of the needle (#3) and then with a needle nose pliers insert the needle into the new diaphram (#1). Now comes the part where you pay attention. On the collar of the the needle you see a little plastic pin,(#2) this needs to seat in the hole provided for it in the base of the diaphram. Once the needle is inserted into it's rightful location you can very slightly push it back and then by turning it you'll have it find the hole (#5). Now you cannot turn the diaphram over again until the plastic screw is in place, but first you need to put the little spring back in on top of the needle (#6). Then with a needle nose pliers you drop the plastic screw down into the diaphram and with flat screwdriver wiggle it until it jumps into it regular spot, at which time you can gently attempt to turn it into the threads. Sometimes this goes easy, sometimes it takes a bit more time, but don't give up, it will happen. 7) Once you have the diaphram together you can slide it back into the carb. You'll find a tab on the outer edge of the diaphram and that seats into the cutout for in the carb. This is also a good time to remember to put the rubber O ring back in place at the lower end of the carb. To make things easy, fold the diaphram to-wards the carb and seat it in the grove provided for it. Next insert the long spring, that pushed the cover off in the first place, into the diaphram, but do not let it seat the plastic slide into the carb as this will cause it to unseat the rubber from the carb. Now seat the spring in it's approved place on the cover. Do not push it together just yet. 8) Now as you can see, I did mine while the carbs were off the bike, that was because the motor was already out and second gear was under construction. You really don't have to wait until second gear goes or you have to take the engine out for some other reason. This can all be done very nicely right on the bike. So now comes the final process: before you push the cover back into place, put your finger or have someone else place their finger, or use a piece of plastic or steel, (I wouldn't suggest wood as you may get dirt into the carb) into the throat of the carb to prevent the diaphram from sliding in. This will keep the bead seated in it's proper spot. Once the cover is in place and two screws have been inserted and tightened you can withdraw your 'finger' from inside the carb. Now, wasn't that easy????? -
Just wonderin' . . . [ATTACH]16337[/ATTACH] . . . where's Spring?
-
Thank you all for your help and hints on bike maintenance, I have driven bikes since I was 16 yrs old and always did my own maintenance, with my father's help, when I was only knee-high. WHEN I bought the VR88 about 16 months ago, it looked so big and intimidating to do any work on it, I almost considered giving to the local shop for a complete fluid change out, brakes, etc......... but once you get all that "plastic" off, it's just like any bike.................it is ugly though with no fairings. 80 some hours later it is back together....... the deep cleaning of all the parts that were inaccessable before took the longest.......now ready for some freaking SPRING weather........ and planning a summer run from Ont canada to the east coast of canada, and down through the eastern states and back into Canada..... may see you on the road then..........and if you need help when in my area..... I feel a lot more confident, in helping doing the repairs if needed.... cheers JOHN:cool10:
-

Odd starter clutch failure
mbrood posted a topic in Venture and Venture Royale Tech Talk ('83 - '93)
Well, I tore into the starter clutch. It would "bang and grind" every once in a while and since it's a good time of year, I figured what the heck. Once I got it off, I looked down at the pillow, laid there to 'catch" the flying rotor (thanks guys.. that's a marvelous money saving trick!) and I saw three dowels, two spings and two spring cups... TWO??? The bronze (or???) housing that the springs and dowels fit into had ONE spring cup still in it... slightly recessed... so IT was NOT doing it's job. So I tried to tease it out by gently pushing it in (VERY slight movement)... after an hour I was able to get it flush with the edge. After another hour I was able to get it to wiggle out about 1/3rd. I finally got it out and saw that the sides looked ok... (IT'S on the left). http://www.bergall.org/temp/venture/starter/starter%20clutch2.jpg So I blew out the recessed hole it sat in with WD40 and tried slipping in one of the other spring and cups and it slid in and bounced up and down just fine. I started really looking at the three spring cups. ONE had the open end just pristine but TWO had edge damage and the one that had hung up actually had a nick (or future chip?) that was hanging out... the outer diameter of the three is .248 and the open end at the nick spot was .252! Must have been just enough to snag and disable a third of the clutch! (The "offending" cup is still on the right.) http://www.bergall.org/temp/venture/starter/starter%20clutch3.jpg The parts fiche shows an odd part in the bottom of that recess, no part number though. SOMETHING is causing the edge to chip and this just is NOT a good thing. Either the spring cup has too much slop in the hole (sure doesn't feel like it or that .004 "nick" would still fit?)) or the cups are bottoming into something and chipping. Nonetheless, it's enough that it caused the cup to seize. The idle gear #2, that has the race attached that the dowels drive against, had a distinctive "dance mark" pattern where the dowels had driven in so that's an easy solution to repair... http://www.bergall.org/temp/venture/starter/starter%20clutch1.jpg I figure, once the bike starts, centrifugal force throws the dowels back against the springs and the cups are driven deep into the hole and maybe THAT is what leads to the chipping...? Any ideas? The bike only has about 46,000 miles. Here's a breakdown of needed parts from two web sites and my local Yamaha shop... and the shop wonders why I won't buy from them??? Flatout Zanotti North County Yamaha Bolt (3 needed) 91316-08014-00 .99 .80 2.48 Gear Idler #2 26H-15517-00-00 29.86 28.64 46.67 Whole Starter Clutch 11H-15580-00-00 74.54 73.68 109.24 Dowle Pin (3) 93615-12088-00 1.64 1.57 2.55 Spring Cap (3) 341-15583-05-00 4.76 4.57 7.44 Spring (3) 90501-04623-00 1.59 1.52 2.46 Left engine case gasket 3JP-15451-00-00 5.10 4.89 7.97 Rear case gasket 3JP-15461-00-00 1.80 1.73 2.97 -
Heard a Gang of Hardleys going up the road today. Spring can't be far away. 60's and sunshine. How come the sun only shines on days I have to work???Warmer temps coming...
-
Sometiome this spring the State Dept. will be issuing a passport card that can be used for land and sea travel when intering back into the US. I though for those going to VR II it might be something to think about getting. It might be easier to pull out a card than rummage around for a book. They haven't set an exact date yet as to when they'll be producing the plastic card, just that it'll be spring 2008, and you might want to wait until they actually do as you have to submit your current passport along with the app, and I wouldn't want to be without something. I called to get varification and you will get both a card and a new book. The cost is $20 bucks..... Here's the site to download and print up the app.
-
Just saw that we are getting 6" more snow tomorrow. This site helps take my mind off winter. Don't worry not to much Norwegian just great riding. http://www.roadmc.com/default.asp?pub=0⊂=6 Come on spring!
-
OK, here is one for ya. I took the mixture jet out of the carb and all be damm if I can't remember witch way they go back in. Is it spring, washer, o-ring, or spring o-ring, washer. Any help would be greatly helpful...
-
There's been some questions in the past as to how to replace the carb diaphrams, so when I did mine last night, I took some pictures, everybody always like pictures, RIGHT? Well here goes the write up: 1) Remove the false tank cover, side covers, side rad covers and loosen the lower faring. Remove the air box lid and the air filter. This would also be a good time to clean the air filter and the air box. You need to do this so you can reach into the carbs later. 2) Identify the part, the diaphragm cover, which has 4 torx screws, the one having a pin in the middle. This was done to make it hard, otherwise everything would be easy and any mechanic could do it. I didn't have one to show you, so you'll have to take my word for it. It can easily be snapped out by using a needle nose pliers or if it's stubborn a small punch. Just work it back and forth once or twice and it will come clean out. 3) Remove all the screws and the cover will pop out by it self, seeing as there is a spring behind it. Save the spring, it will come in handie when you put things back together. 4) Now that you have this area open, it's a good time to use some Carb Cleaner to clean the area, and all the little ports you can see. Finish by blowing out with air. At the bottom you'll see a little built out area that has a rubber ring in it. Be sure to save this ring as well, otherwise it's sure to get itself lost and then you'll have to wait longer for more parts. 5) Inside the diaphram body you'll find a plastic screw, turn it out by turning counter clockwise, that's the opposite way the hands on a clock turn. Under that screw will be another spring, not at all the same as the first spring, but a spring none the less. Keep it handy as well. Under the spring will be the needle assembly. This consists of the needle itself, a 'C' ring and a small washer. Best not to loose these either. They all need to go back in order in the new diaphram. 6) You are now ready to begin the installation of the new diaphram. Make sure that the little washer is mounted on the short side of the needle (#3) and then with a needle nose pliers insert the needle into the new diaphram (#1). Now comes the part where you pay attention. On the collar of the the needle you see a little plastic pin,(#2) this needs to seat in the hole provided for it in the base of the diaphram. Once the needle is inserted into it's rightful location you can very slightly push it back and then by turning it you'll have it find the hole (#5). Now you cannot turn the diaphram over again until the plastic screw is in place, but first you need to put the little spring back in on top of the needle (#6). Then with a needle nose pliers you drop the plastic screw down into the diaphram and with flat screwdriver wiggle it until it jumps into it regular spot, at which time you can gently attempt to turn it into the threads. Sometimes this goes easy, sometimes it takes a bit more time, but don't give up, it will happen. 7) Once you have the diaphram together you can slide it back into the carb. You'll find a tab on the outer edge of the diaphram and that seats into the cutout for in the carb. This is also a good time to remember to put the rubber O ring back in place at the lower end of the carb. To make things easy, fold the diaphram to-wards the carb and seat it in the grove provided for it. Next insert the long spring, that pushed the cover off in the first place, into the diaphram, but do not let it seat the plastic slide into the carb as this will cause it to unseat the rubber from the carb. Now seat the spring in it's approved place on the cover. Do not push it together just yet. 8) Now as you can see, I did mine while the carbs were off the bike, that was because the motor was already out and second gear was under construction. You really don't have to wait until second gear goes or you have to take the engine out for some other reason. This can all be done very nicely right on the bike. So now comes the final process: before you push the cover back into place, put your finger or have someone else place their finger, or use a piece of plastic or steel, (I wouldn't suggest wood as you may get dirt into the carb) into the throat of the carb to prevent the diaphram from sliding in. This will keep the bead seated in it's proper spot. Once the cover is in place and two screws have been inserted and tightened you can withdraw your 'finger' from inside the carb. Now, wasn't that easy?????

-
I hope everyone has plans to celebrate the First Day of Spring Training! Take me out to the ball game...
-
This 86 has 97K on it but runs fair. It needs lots of tlc,steering head bearings,new rear tire, seat repair,etc. It pulls strong into the triple digits no slippage of clutch and brakes are good.All or part of it have to go.In the next 30 days I'm going to decide what to do with it. 1. sell it outright 2. part it out 3. partial part it out. lighten it up significantly and see what a rat venture looks like.I have a 89 engine with only 15k on it. I could install it just to see how it runs. This 86 still sounds good with 97K. 4. Buy some duct tape and run it. I bought this one last spring to part out. My brother wanted to try it out so he licensed it and rode it some last summer. He decided he was to short for it and has a problem with crossing my creek.Not many know how to surf on a first gen. Any ideas on what to do with it? No input from REDNECK either.:rotf:
-
It seems that the rodents can't align ... Wiarton Willie (Ontario) and Shubenacadie Sam (Nova Scotia) both didn't see their shadow, and therefore are predicting an early spring. However, Punxsutawney Phil (Pennsylvannia) did proclaim "a bright sky I see and a shadow beside me, six more weeks of winter I see.' I think someone should go "Phil-hunting" ... Cheers, Lou
-
I have been looking at ads and info on the net about battery desulfators. Given the long rest periods over our Canadian winters, I have had the experience of replacing batteries come spring and thereafter. Anybody have experience with these? They look like a great deal to me! Harvey
-
I was cleaning up a bit under/around the 2000 MM Limited and found this spring in that pile of dust. I'm pretty sure it's off my RSV but for the life of me I don't know where... Anyone had an idea??? I looked at the two springs on the carbs -- they are there..... :confused07: http://img.photobucket.com/albums/v208/01REDWING/extraspring.jpg?t=1200863181 This picture is pretty close to the actual size of the spring. Coil is about an inch long and the over all length just over two inches... :rolleyes: Thanks for helping!!!!
-
Hey Cats... yeah that's right. Eat your hearts out. Trigger and I logged a whole 24 miles today. How long till spring? Big Smiles All!
-
Hey spring has got to be coming soon. Check out what's grown and already bloomed in my yard. Margaret
-
News on a GPS site mentioned that Garmin will put v.9 maps on units in spring. Those folks with current units (v.8) will get a Happy New Year from Garmin as they will upgrade yours for approx. $125.00 Some of you that won't be needing one (for bike) till spring might want to wait.
-
Hey all, I may be able to pick up an old 1100 Virago with starter and carb issues. Has new rear shocks, battery and solenoid. I am looking at it as a winter project and will sell it come spring. What sort of problems do these bikes have besides starter issues? Any comments or advice is welcome. Rick
-
Just did the first oil change on a 87 Venture Royale that I bought this summer. I put the new filter on and in the process of cleaning up the oil drain pan afterward, found a compression spring on the bottom. Duh! No mention of the spring in the user manual or the service manual but I did find it in the parts manual that is posted elsewhere on this site. The oil filter cover is tight and doesn't leak after starting and runup, so my question is will the absence of the spring in the filter cover impede the flow of the oil through the bypasss valve assembly? Being somewhat lazy, if I don't have to drain the oil and start all over, I'm just as inclined to wait until the next oil change. Any thoughts? Thanks Ron